

COVID-19 has put remote working on a totally new level for everyone, as well as for AWS engineers. In fact, it has made working from home a trend. We surely knew that this would come, but no one expected that it would come so fast and abruptly just as it did. Working from home has its own perks, as well as negative aspects. Among many other things, working from home requires a stable and safe Internet connection as all businesses are working with sensitive information. VPN is nothing new to us, and almost all of the companies are using VPN to access their internal systems when working remotely.
The following blog post addresses creating AWS Managed Microsoft AD into private subnets in VPC and configuring AWS ClientVPN in order to authenticate and connect to private VPC. Creation of VPN, AWS Managed Microsoft AD, and AWS ClientVPN configuration is a script in the CloudFormation template. In order to run the script, we need to set up several prerequisites. Let’s begin.
Create Server and Client Certificates
AWS Client VPN allows a VPN connection from a device running VPN client software to the Client VPN endpoint created in your VPC. AWS ClientVPN offers two types of client authentication: Active Directory authentication and mutual authentication. With mutual authentication, ClientVPN uses certificates to perform authentication between the client and the server. Certificates are a digital form of identification issued by a certificate authority (CA). I’ve used EasyRSA in order to generate the certificates.
The server uses client certificates to authenticate clients when they attempt to connect to the ClientVPN endpoint. The server and client certificates must be uploaded to AWS Certificate Manager (ACM). From there you’ll get the ARN of the certificates.
A Client VPN endpoint supports 1024-bit and 2048-bit RSA key sizes only.
Here you can find easy-rsa steps to generate the server and client certificates and key: https://docs.aws.amazon.com/vpn/latest/clientvpn-admin/authentication-authorization.html
You can upload the certificates using the commands described in the link or upload them manually from the AWS Certificate Manager console. If you use easyRSA, you need to fill out as follows (example for client certificate):
- Certificate body: PEM data from client.crt file
- Certificate private key: PEM data from client.key file
- Certificate chain: PEM data from ca.crt file
In the ClientVPN Documentation, it is suggested to create a client-side key for every user, making it easy to revoke their access when they leave the organization. You generate a client certificate using the following command:
./easyrsa build-client-full client1.domain.tld nopass
One possible naming convention for this one is firstname.lastname.<your_domain>.
After you generate the server certificate and all client certificates (in our case one client certificate), you can upload it in the AWS Certificate Manager. Consider using scripting in order to upload all client certificates.
In Amazon Certificate Manager certificates should look like this:
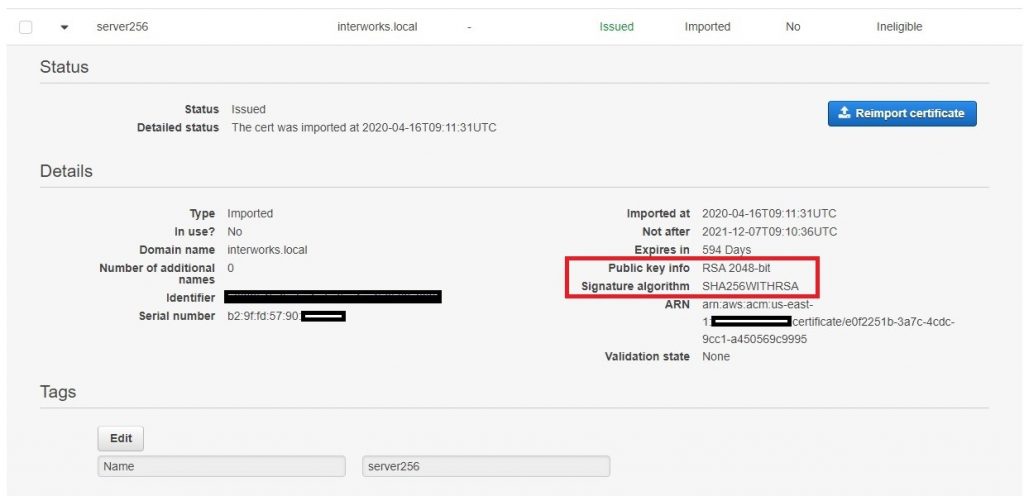
Pay attention to the Public info key and Signature Algorithm. As mentioned, the Client VPN endpoint supports 1024-bit and 2048-bit RSA key sizes only. By default, easyRSA uses the SHA256 algorithm for encryption.
If you are using OpenSSL, be sure that you use 1024 or 2048 for the RSA key size value and use the -nodes option, AWS Certificate Manager does not work with password-protected private keys. Also, fill out CSR information about Common Name (e.g. server FQDN or YOUR name) []. ClientVPN needs a domain name specified. Even though I generated the same certificate from OpenSSL, it did not work for me with ClientVPN. So, I proceeded with EasyRSA-generated certificates.
Create Amazon Managed Microsoft AD and AWS ClientVPN
You can create AWS Managed Microsoft AD and ClientVPN services manually, but I wanted to save time for the Admin guys who are going to use this solution, so I script it out in the CloudFormation template. This template expects several input parameters such as AD short name, domain, Certificate ARNs, etc. Here is some code snipped from the template:
AWS Managed Microsoft AD:
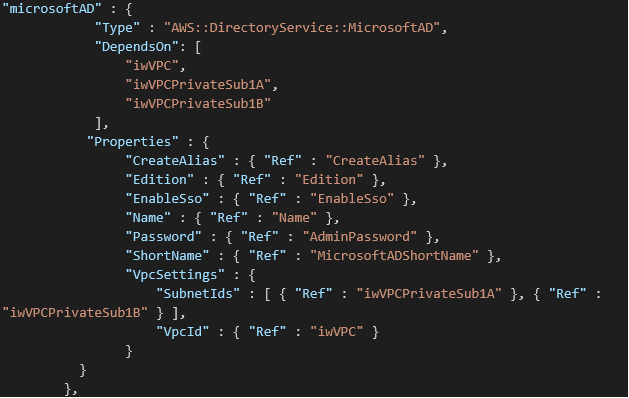
Managed Microsoft AD requires two subnets. When you create the AD, you need to enter the Admin pass, which can be changed later – after the AD is created. This is the first, Admin user, in your AD. The Name of the AD is a fully qualified domain name for the AWS Managed Microsoft AD directory, such as interworks.local. This name will resolve inside your VPC only. It does not need to be publicly resolvable. The Short name is NetBIOS name for your domain, such as CORP. If you don’t specify a NetBIOS name, it will default to the first part of your directory DNS. For example, interworks for the directory DNS interworks.local.
AWS ClientVPN:
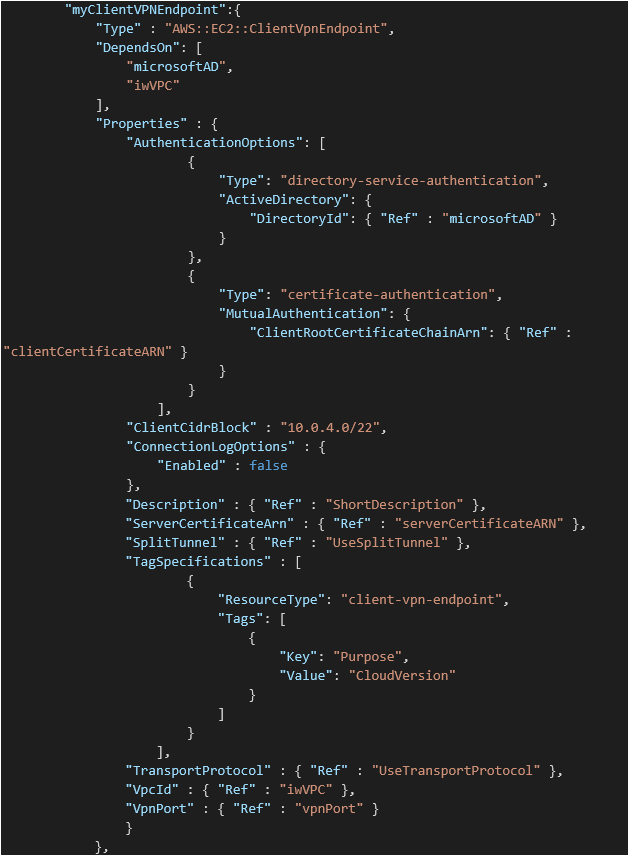
ClientVPN uses two Authentication options: AD and certificate authentication. In this case, I use the client certificate ARN. Note: the ClientVPN CIDR block must be different from the VPC CIDR the endpoint is connected to.
There are two remaining steps to be completed: associating the VPN endpoint with a subnet and authorizing ingress. In the first one, you associate a VPN endpoint with one or more subnets from your VPN. Here is the code snipped for that step:
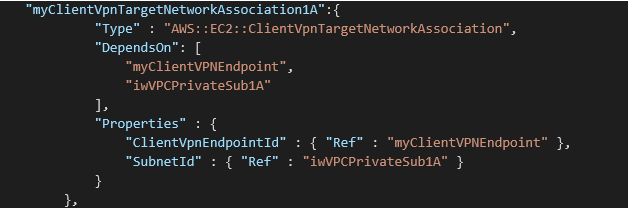
You can repeat the same code snippet for all subnets that you want to associate.
The second step is authorizing ingress. The destination network is the CIDR range for the VPC. You can choose to allow everyone access, which is necessary if using mutual authentication, or restrict to specific Active Directory groups if using Active Directory authentication. At this stage of solution creation, you do not have active AD configured with Users and Groups, so you do not have the required SID information in order to restrict access per user. So, at this step, we will allow access to everyone. Here is the code snippet:
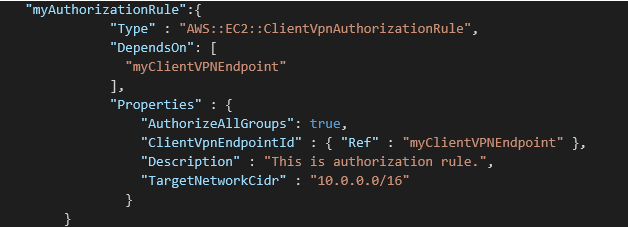
When we are up and running the configured AD, we can come back and restrict access to specific AD groups or users.
Managed Microsoft AD usually takes 20-25 minutes to get Active and rule Association in ClientVPN takes around 5 minutes to be ready. So, after 30 minutes you are good to go with the next step.
Try the VPN connection
Active AWS Managed Microsoft AD is running in a private subnet. In order to configure AD, we need to join the EC2 instance to the AD domain. This EC2 instance will also run in a private subnet. In order to RDP to the instance, we need to try out our VPN connection.
Once the Client VPN endpoint is configured, the OpenVPN client configuration can be downloaded through the AWS Management Console. Note: The downloaded Client VPN configuration is incomplete and will not work “out of the box”. The downloaded configuration file is missing specific directives to negotiate a successful connection, and it requires info about the certificates and keys. It does not include the information needed to provide the mutual authentication components, specifically the key and certificate to provide to the server. Therefore, we need to add the following elements at the end of VPN endpoint configuration file:
key PATH TO KEYFILE
cert PATH CERTFILE
Also, prepend a random string to the Client VPN endpoint DNS name. Locate the line that specifies the Client VPN endpoint DNS name, and prepend a random string to it so that the format is random_string.displayed_DNS_name.
For more details, review the official AWS documentation: https://docs.aws.amazon.com/vpn/latest/clientvpn-admin/cvpn-getting-started.html#cvpn-getting-started-config
Now, the config file is prepared. Import it in your VPN client tool – I use OpenVPN – and try to connect it. You should be prompted to enter credentials – enter Admin, the ones that you’ve created in AD configuration. If everything is correct, you should be connected.
RDP to the instance, add the instance to the domain, and install AD tools
Now, that you have access to the private subnets of VPC through your VPN connection, you can create and access EC2 instances.
We will join an EC2 instance in our directory domain. You can use two ways: automatically using AWS Systems Manager as described here Seamlessly Joining a Windows Instance to an AWS Directory Service Domain or manually following these steps:
- Lunch EC2 instance. I’ve launched EC2 Microsoft Windows Server 2019 and added a security group that allows RDP connection. Connect it to the instance using any Remote Desktop Protocol client.
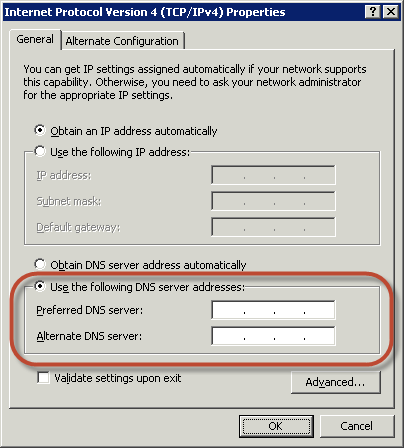
- Open the TCP/IPv4 Properties dialog box on the instance.
– Open the context menu (right-click) for any enabled network connection and then choose Properties.
– In the connection properties dialog box, open (double-click) Internet Protocol Version. - Select Use the following DNS server addresses, change the Preferred DNS server and Alternate DNS server addresses to the IP addresses of the AWS Directory Service-provided DNS servers, and choose OK. You can find this info in your AWS Managed Microsoft AD properties view.
- Open the System Properties dialog box for the instance, select the Computer Name tab, and choose Change.
– In the Member field, select Domain, enter the fully qualified name of your AWS Directory Service directory, and choose OK. In our case, it is interworking.local.
– When prompted for the name and password of the domain administrator, enter the username and password of an account that has domain join privileges. That is the same user that you use to establish a VPN connection. - After you receive the message welcoming you to the domain, restart the instance the changes to take effect.
- Next, log into your instance using AD Admin credentials. Note: do not use your EC2 credential, but AD Admin credentials.
Now, your EC2 instance is joined with your AD. Next, let’s install AD tools on EC2 and create users/groups.
I’ve chosen Windows Server 2019, so here are the steps to install the Active Directory administration tools on Windows Server 2019:
- Open Server Manager from the Start screen by choosing Server Manager.
- In the Server Manager Dashboard, choose Add roles and features.
- In the Add Roles and Features Wizard choose Installation Type, select Role-based or feature-based installation, and choose Next.
- Under Server Selection, make sure the local server is selected, and choose Features in the left navigation pane.
- In the Features tree, open Remote Server Administration Tools, Role Administration Tools, select AD DS and AD LDS Tools, scroll down and select DNS Server Tools, and then choose Next.
- Review the information and choose Install. When the feature installation is finished, the Active Directory tools are available on the Start screen in the Administrative Tools folder.
Go on and create two users and one group in AD. Make one of the users to be a member of the group.
Update Authorization rule for AD group
After you create the group you can add that group into the Authorization rule section of AWS ClientVPN. You can find your Group SID using AD-PowerShell command:
Get-ADGroup -Filter {Name -like “pa*”} | Select Name,SID | Format-Table -Auto
For example, my group is called ‘AWS VPN users’ and the command would be:
Get-ADGroup -Filter {Name -like “AWS*”} | Select Name,SID | Format-Table -Auto
Copy the SID and add it to the Rule table. Now, make the test.
First, establish a VPN connection with the user that is part of the AD group – enter the user’s credentials instead of the admin ones. You should be able to RDP to the EC2 instance.
Now, establish a VPN connection with the user that is not part of the AD group. You should not be able to RDP to the EC2 instance.
Conclusion
Using this approach our company made a quick change on the day when all employees started working from home due to the COVID-19 pandemic. The AWS Client VPN is a great solution for connectivity to the AWS network for companies operating with a large number of remote users. We can access resources in AWS or on-premises from any location using OpenVPN based clients, still using the AD capabilities.
- Business Continuity Plan, Ensuring Continuous Delivery of Service and Achieving Optimal Security During Work from Home
- Case Study
References:
- https://docs.aws.amazon.com/directoryservice/latest/admin-guide/join_windows_instance.htmlhttps://docs.aws.amazon.com/directoryservice/latest/admin-guide/ms_ad_manage_users_groups.html