
Introduction
Hello, friends. Today’s article is about how we set up Continuous Integration and Continuous Deployment (Gitlab CI/CD) in our project. Every database operations engineer in our team is preparing an App for donations (BidiCovek) as part of our IW-Open-Source Project. Currently, we are in a phase where we like to cover the DevOps part by using our GitLab and assigned Gitlab Virtual Machine (VM).
A few words about the architecture
Our project contains three parts:
- WordPress (as a headless CMS by using the WordPress API with several plugins)
- NextJS (Mostly to cover the FE part of the app and to cover images optimizations by default, SSR, SEO, etc.)
- NodeJS (an API that behaves like a proxy between the WordPress API and NextJS + additional endpoints for the FE and payment integration for donations-Braintree)
And in this, we will cover the NextJS and the NodeJS API with CI/CD Gitlab.
**Note: it’s not a good practice for production solutions to have everything on the same Gitlab VM (there might be potential issues with memory or problems with scaling) but for a testing environment as in our case it is fine. Your introduction shouldn’t be really long.
Technology defaults on VM
By installing WordPress, we manually have all that we need in the VM such as PHP, MySQL, Apache Server, and Linux VM. In short, this is the popular LAMP stack of technology, therefore, we must install NodeJS v16 and PM2 (live process manager for NodeJS) so we can cover the FE and BE parts. NodeJS will run as a background service and for our backend, we can reuse MySQL to store data from the NodeJS API.
**Note: Apache Server will be reused as a Reverse Proxy to handle the incoming requests and to serve the calls to the pm2 NodeJS running services. (We can tell the Gitlab runner ports firewall to open ports only for apache and everything will be handled from there).
Defaults GitLab runner
To automate the process and tell GitLab to run tests for the apps or make a deployment we need a runner. There are two possibilities for runners:
- Shared runners (Useful for jobs that have similar requirements, between multiple projects)
- Gitlab CI/CD Self-hosted runners (Runner mostly for a specific project, and we will use self-hosted runner for our project)
The process of installation is straightforward:
On GitLab go to Settings > CI/CD > Runners section and on self-hosted runners pick the machine.
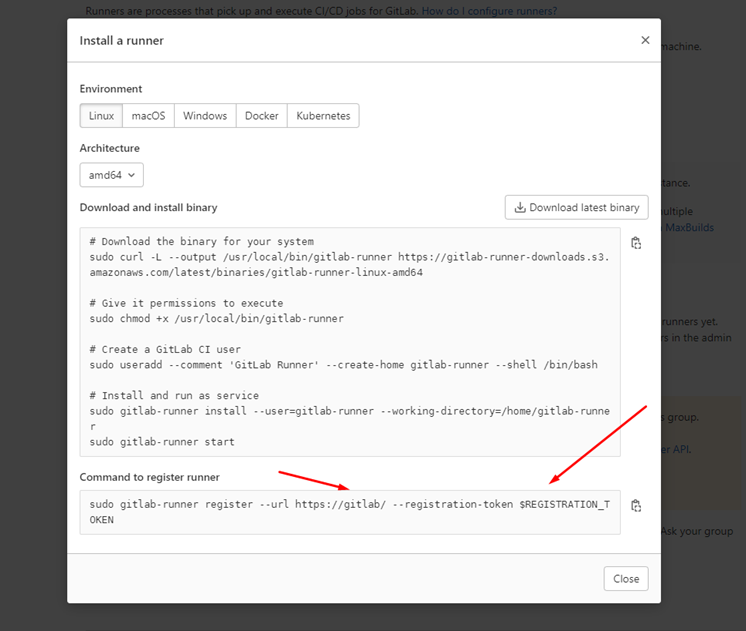
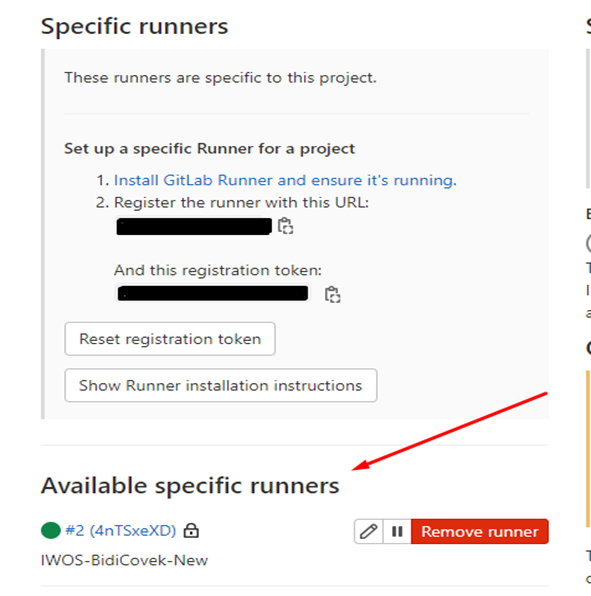
Before trying to register a runner, you will need to set a URL and REGISTRATION_TOKEN that GitLab will generate for you. If you can see the runner like on the screenshot you’re on a good way.
**Note: Sometimes not all scenarios work as expected and an error may occur when we try to register the Gitlab runner VM. In our case, the problem was related to the authority on the GitLab certificate.

The solution is to take the certificate like:
echo | openssl s_client -CAfile /etc/gitlab-runner/certs/gitlab.local.crt -connect gitlab:443and place it in /etc/gitlab-runner/certs/gitlab.local.crt
Then, you can register the Gitlab local runner by providing the command
sudo gitlab-runner register --tls-ca-file /etc/gitlab-runner/certs/gitlab.local.crtAfter you press enter you will be asked to enter the URL and the REGISTRATION_TOKEN from GitLab.
There will be an additional step where you need to select an executor. So, now…what is an executor?
With the executor, you’re telling the runner how to execute the jobs in the Gitlab CI CD pipeline. The common ways are by using docker or ssh. And for our test environment, we will use the ssh executor.
**Note: If you like to go with docker you will need to enable virtualization in virtualization for your VM otherwise the scenario will not work.
Adding Gitlab-ci.yml to your ci project
By placing the GitLab ci on the root of your repo on a specific branch (for e.g. develop), the runner will be triggered to execute the jobs from the pipeline for that branch. In our scenario, we cover 4 stages
- test (for running the tests)
- migrations (rerun migrations and default seeds)
- Gitlab deploy (Gitlab deploy to server the apps and rerun pm2 service)
- final (final checks and make sure to save the config when the server is restarted)
Here is an example of the file:
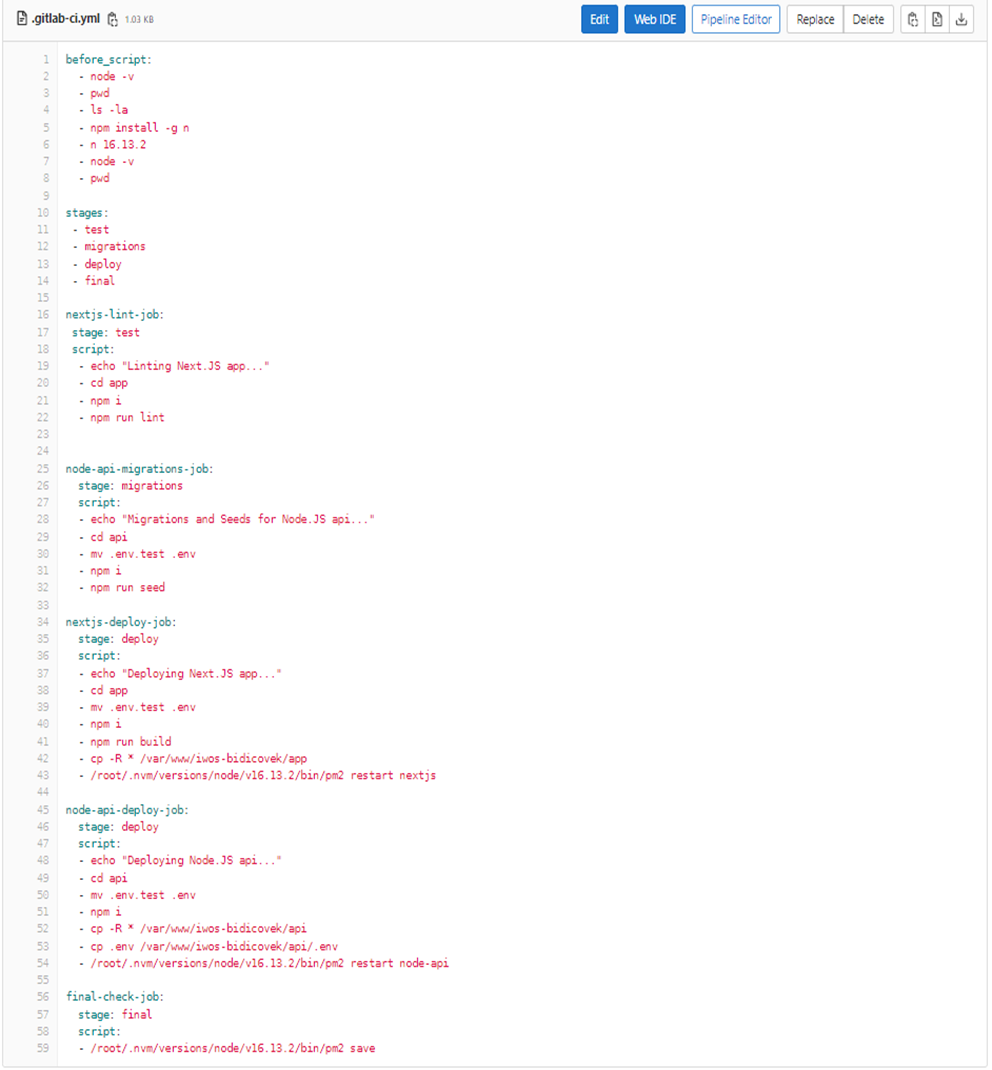
**This file can be created/edited directly in the navbar in the section Gitlab CICD > Editor.
Final outcome
It is just awesome. Full-covered automation process for running tests, migrations, and auto-deployment. Definitely must try. And here are the results.
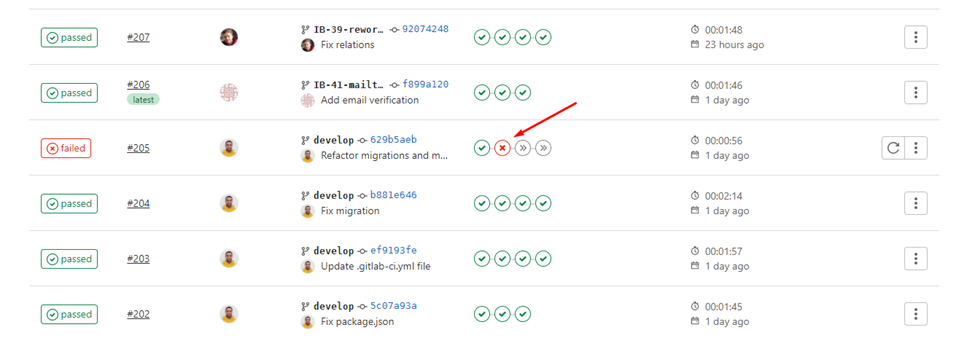
**Note: It’s important to mention that defining the stages must be in order. For example, the Gitlab runner ssh executor example is executing the test stage. So, if the stage fails the next job will not be executed and the pipeline will fail.
If you have any questions or you need help with setting Gitlab CI CD on your project by using GitLab you’re free to reach us any time.
Enjoy the CI CD with Gitlab and VM, and have a lovely day.