
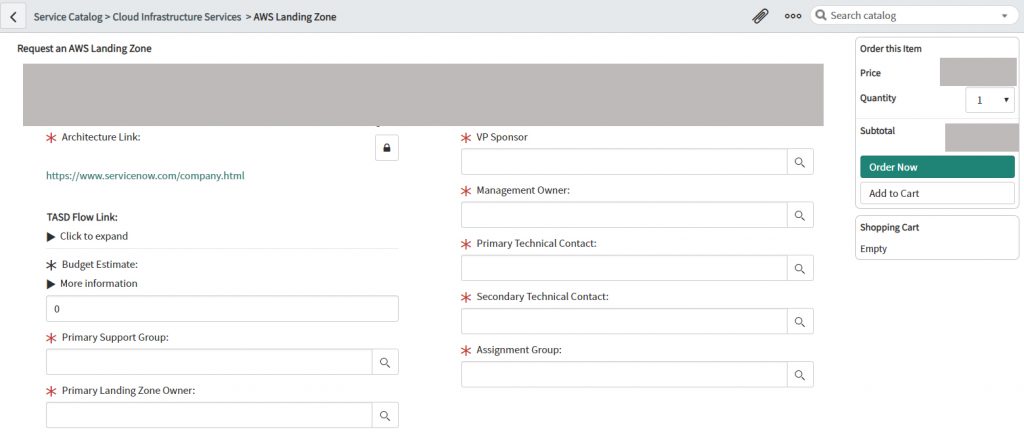
Whether you are a senior Java developer, or any type of software engineer, it’s important to continuously thrive to become better. Therefore, in this article, we will explain how to create a ServiceNow variable type into the catalog item to be an input field for the URL with the possibility to lock and unlock the field. The expected behavior is for the link to be clickable when the field is locked. The ability to lock and unlock the field should be possible only in the catalog item form. When the RITM (Request and Requested Item) is created and variables are shown in the RITM’s form the link should be clickable and the possibility to unlock it, should not be available.
Maintain Item
Maintain items is an application module that lists a few types of request items like catalog item, record producer or ServiceNow record producer variables script, standard change templates, software catalog, hardware catalog, etc. All of these are extended from the base Catalog Item (sc_cat_item) table and used to request fulfillment from your service catalog.
Request and Requested Item (RITM)
When a user orders from the catalog, they add all the items to their cart. Let’s say they are ordering a phone, a PC, and a monitor at the same time. These items are added to the cart. They submit this request containing these three items and a request is generated.
The request is the top-level record for this order, it is the container the requested items are included under. The items ordered are the requested items.
The ServiceNow catalog task variables, actually, the catalog tasks are under each requested item and are assigned to fulfillers to complete any work needed to get the requestor the items they have requested.
Making the field
First of all, we need to create a variable type ServiceNow URL into the maintain item.
- The next step is to create a UI Macro to add the functionality that we want to the ServiceNow URL variable. The UI Macro would be based on Prototype JS.
- When the UI Macro is created, it should be added as a variable of type Macro into the maintain item, becoming a ServiceNow Macro variable.
- A prototype is an object that is associated with every function and object by default in JavaScript, where the function’s prototype property is accessible and modifiable and the object’s prototype property (aka attribute) is not visible.
- First, we will import a link for the style and use the classes font-awesome.min.js, and a script for manipulating the functionality of the field prototype.min.js.
<link href=”https://maxcdn.bootstrapcdn.com/font-awesome/4.7.0/css/font-awesome.min.css”
rel=”stylesheet”
integrity=”sha384-wvfXpqpZZVQGK6TAh5PVlGOfQNHSoD2xbE+QkPxCAFlNEevoEH3Sl0sibVcOQVnN”
crossorigin=”anonymous”></link>
<script
type=”text/javascript” src = “https://cdnjs.cloudflare.com/ajax/libs/prototype/1.7.3/prototype.min.js”></script>
- Now we need to override some of the classes for our own purposes. This is shown in the picture below.
<style>
.marginbottomBottom {
margin-bottom: 5px;
}
.hideElement{
display: none;
}
.fa-unlock {
display: inline-block;
position: absolute;
top: -71px;
right: -5px;
background-color: #ffffff !important;
z-index: 1000;
}
.fa-lock {
position: absolute;
top: -50px;
right: -5px;
background-color: #ffffff !important;
z-index: 1000;
}
</style>
- Next, we will create the body:
* A button is created with the following properties:
– ID
– Style
– Class
– Function (this function will be created in the script tag)
<body>
<button id=”btncustom” style=”display:inline-block;” class=”fa fa-unlock” onclick = “addClass();”>
</button>
<a id=”d” style=”display:inline-block;width:100%;word-break: break-all;vertical-align: middle; margin: -10px 0px 10px;” href=””></a>
</body>
- A hyperlink is created with the following properties:
– ID
– Style
– href
- The next phase is the creation of the Script which will allow all the functionalities.
– First, we will create the variables for easier and more readable coding.
divSection = $$(‘.col-xs-12.form-field.input_controls’)[0];
inputDynamicID = divSection.select(‘input’)[1].id;
link = $(‘d’);
button = $(“btncustom”);
link.hide();
control = $(inputDynamicID);
A class is added to the URL Field
divSection.select(‘input’)[1].addClassName(“marginbottomBottom”);
});
Now, we need to create the addClass function which was added like an attribute in the button.
function addClass() {
res = $(inputDynamicID).getValue();
link.addClassName(“title”);
link.writeAttribute(“href”, res).update(res);
if( control.visible() ) {
divSection.hide();
control.hide();
link.show();
button.removeClassName(“fa
fa-unlock”).addClassName(“fa fa-lock”);
}else {
divSection.show();
control.update(res);
control.show();
control.show().update(res);
link.hide();
button.removeClassName(“fa
fa-lock”).addClassName(“fa fa-unlock”);
}
}
When a user presses the button next to the input field, this function will be called. The function will hide the input field and show the hyperlink and will do the opposite when the input field is hidden. In addition, this function updates the hyperlink with the text inserted into the input ServiceNow URL field. Also, this function will change the classes of the button:
fa fa-lock
fa fa-unlock


This is the effect of this part of the script:


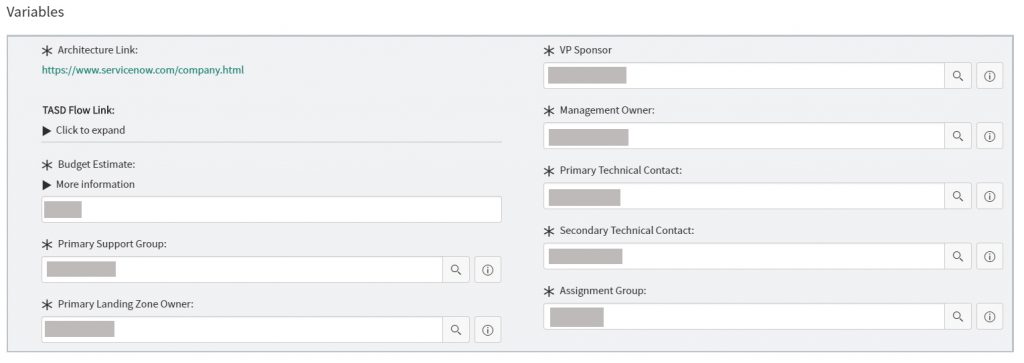
The last phase of the script is to disallow the unlocking of the link on the RITM’s form. The following code should be used to do that:
if($(‘sc_req_item.number’) !== null) {
afetrOreder = $$(‘.col-xs-12.form-field.input_controls’)[0];
afetrOrederInputID = afetrOreder.select(‘input’)[1].id;
afetrOrederValue = $(afetrOreder.select(‘input’)[1]).getValue();
afetrOreder.insert( “afetrOrederValue” );
afetrOrederA = $(afetrOreder.select(‘a’)[0]).writeAttribute(“href”, afetrOrederValue).update(afetrOrederValue);
console.log(‘afetrOrederInputID’, afetrOrederInputID);
afetrOreder.select(‘input’)[1].addClassName(“hideElement”);
}
This is the effect of the last part of the script:
Benefits and results
- The user is able to click the variable link and navigate to the specific location
- Time is reduced and there is no need to copy and paste the link
- With locking the field the chances for breaking the link is reduced to a minimum.
So, if you want to read more about ServiceNow-related links or anything else development-wise, feel free to check any of our other blog posts.