

When browsing the Internet on a certain topic, a lot of articles appear. We tend to open those that seem to have the highest rating as being useful, as we deem that when many people rate it as useful, it certainly easy. Having this information in front of our eyes decreases the time needed to find the information that we need. But, have you ever thought about how you can create those widgets?
In this article, we will do exactly that – explain how to create widgets for ITIL users. Also, we will explain how to implement the widgets into a form. Here we will create widgets that should rate knowledge articles and also for marking the article as helpful or not. After the article is rated or if it is marked as helpful or not, a knowledge feedback record should be created (related to the current knowledge article). For this purpose, we will use JavaScript, CSS, and Jelly. To create these widgets, we need to create UI Macros for the functionality of the widget, Formatters for wrapping the widgets, and once created to show them into the form and Style Sheet for the Style of the widgets.

ITIL View
The IT Infrastructure Library (ITIL) is an integrated, process-based framework for managing IT services. It provides guidance for creating and operating a Service Desk that provides efficient communication between the user community and the IT provider. Originally initiated to improve IT service management for the UK central government, it has become a standard for many organizations; public or private sector, large or small, centralized, or distributed. (Reference: https://support.purdue.edu/help/FootPrintsHelp/content/it_infrastructure_library.htm )
UI Macros (Reference: https://docs.servicenow.com/bundle/orlando-application-development/page/script/server-scripting/concept/c_UIMacros.html )
UI macros are discrete scripted components administrators can add to the user interface.
UI macros are typically controls that provide inputs or information not provided by existing field types. By default, the system provides UI macros for a variety of user interface elements such as:
- All formatters
- The Service Catalog cart
- The action icons next to the fields
- The action icons on forms and lists
- The widgets of a content management system
- The Orchestration activity designer
Administrators can create their own UI macros to provide custom controls or interfaces. Creating UI macros requires knowledge of Jelly script. Review the existing UI macros for examples and suggested approaches. Those who want to build custom interfaces with JavaScript technologies should consider Service Portal as an alternative.
Formatters (Reference: https://docs.servicenow.com/bundle/orlando-platform-administration/page/administer/form-administration/concept/c_Formatters.html )
A formatter is a form element used to display information that is not a field in the record. Add formatters to a form by configuring the form.
Style Sheets (Reference: https://docs.servicenow.com/bundle/london-servicenow-platform/page/administer/content-management/concept/c_StyleSheets.html )
Styles sheets are standard Cascading Style Sheets (CSS) that define the look and feel of all elements within the interface.
Cascading Style Sheets (CSS) can either be internal (stored in the database) or external (hosted on the server), based on organizational needs. To define an internal style sheet, use standard CSS in the style field. Using external CSS allows the Content Management System to use the same CSS as a corporate website or other online resource.
Use an external style sheet by defining a URL that points to the .cssx file. If you upload a .cssx file to the platform, you can reference the .cssx file using a URL.
Content pages do not reference style sheets directly. To invoke a style sheet, you assign the style sheet to a Theme using the related list on the Theme form.
How we solved it?
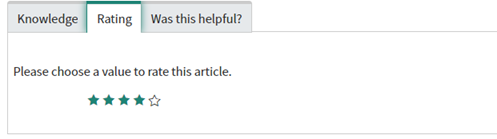
1. Creating the UI Macro for Rating an article
Because we have this kind of functionality on the kb_view UI Page defined within UI Macro (kb_view_title_ratings) on the instance we will take the code and make some changes to it. In our new UI Macro first, we need to change the syntax for getting the current sys_id of the article in two places in the UI Macro.
- The first place is in the phase 2 JavaScript (g2) tag shown in the picture below.
<j2:if test=”$[show_kb_star_rating]”>
<g2:evaluate var=”jvar_num_ratings”>
var count = new
GlideAggregate(‘kb_feedback’);
count.addQuery(‘article’,
‘$[current.sys_id]’);
count.addQuery(‘rating’,’!=’,”);
count.addAggregate(‘COUNT’);
count.query();
var ratings = 0;
if (count.next()) {
ratings = count.getAggregate(‘COUNT’);
}
ratings;
</g2:evaluate>
</j2:if>
- The second place where we need to change the syntax is in the script tag which is under the Phase 2 Jelly tag condition where it is checked if the property show_kb_rating_options is set to true.
<j2:if test=”$[show_kb_rating_options]”>
<script>
function test(){
alert(“sdsdd”);
}
function KbStarRatingClass() {
var currentId = ‘$[current.sys_id]’;
var currentRating = 0;
- The third place where we need to make a change is at the beginning of the UI Macro where we need to add a link tag for the created style sheet. In the next section, we will explain how to create it. Because the Style Sheet is locally in the instance we can access it by taking the sys_id of the created Style Sheet and adding it in the link into the href attribute.
<?xml version=”1.0″ encoding=”utf-8″ ?>
<j:jelly trim=”false” xmlns:j=”jelly:core” xmlns:g=”glide”
xmlns:j2=”null” xmlns:g2=”null”>
<link href=”4ecefb19db29c850c4ec38ff9d96196d.cssdbx” type=”text/css” rel=”stylesheet”/>
You can check the full code at the end of the article.
2. Creating the UI Macro for Helpful Article
We will do the same steps as we made for the previous UI Macro.
We need to change the syntax for getting the current sys_id of the article.
<g:evaluate var=”jvar_failure_message” expression=”gs.getMessage(‘Useful rating not submitted’)” />
<j2:if test=”$[show_kb_rating_options]”>
<script>
function KbArticleRatingClass() {
var THANK_YOU = “${gs.getMessage(‘Thank you’)}”;
var currentId = ‘$[current.sys_id]’;
You can check the full code at the end of the article.
Creating the Style Sheet
1. Rating an article and Helpful article
The CCS code that we need for this Style Sheet can be taken from the existing Knowledge Common Styles Style Sheet. For these widgets, we need to take only the classes that are part of the rating widget and helpful widget.
.kb_yn_rating_box {
margin-right: 15px;
}
.kb-vote-label {
color: #666666;
margin-right: 10px;
}
.kb-user-feedback {
width: 250px;
color: #666666;
padding: 20px;
}
.kb-star-rating > label.kb-active-star:before,
.kb-star-rating > label.kb-active-star-self:before {
content: attr(data-content);
color: #1f8476;
}
.kb-star-rating > label.kb-hover-star:before {
content: attr(data-content);
color: #1f8476;
text-shadow: 1px 0 0 #1f8476, -1px 0 0 #1f8476, 0 -1px 0 #1f8476, 0 1px 0 #1f8476;
}
.kb-star-rating > .icon-star-empty {
font-size: 12px;
}
.kb-star-image .icon-star-empty,
.msie7 .icon-star-empty,
.msie8 .icon-star-empty {
width: 16px;
height: 16px;
background: url(images/icons/star_empty.pngx) no-repeat;
}
.msie7 .kb-active-star, .msie7 .kb-hover-star,
.msie8 .kb-active-star, .msie8 .kb-hover-star,
.kb-star-image .kb-active-star,
.kb-star-image .kb-hover-star {
background: url(images/icons/star_full.pngx) no-repeat;
}
You can check the full code at the end of the article.
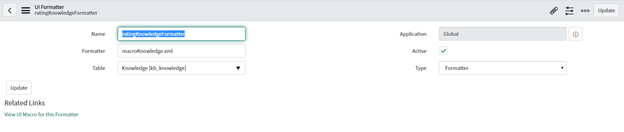
2. Implementing the UI Macros into the form
The last step is to show the UI Macros in the desired form. This is possible with creating Formatters which will wrap the UI Macros. In the field Formatter we should enter the name of the UI Macro with .xml extension.
Now we are able to show the widget in the form. We will navigate to the knowledge form (default view) and will open the form designer. A new section should be created where the formatter will be added.

The same steps should be also made for the Helpful Widget.
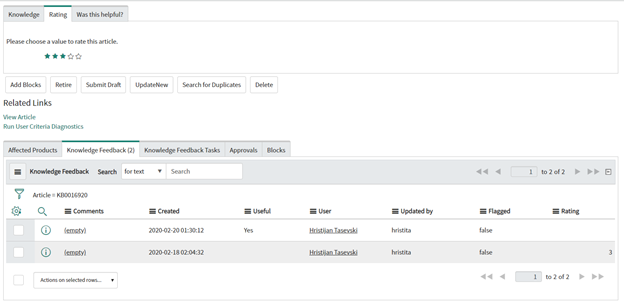
In the picture above, we can see that both widgets are creating new Knowledge Feedback records. One of them is created based on rating the article in this case with 3, and the other record is created based on the Helpful Widget, in this case, is the vote Yes.
Benefits and Results
- The user time is greatly reduced
- No need to rate the article from the portal or from the UI Page
- No need to mark the as Helpful or not article from the portal or from the UI Page
- No need to open the portal or the UI Page to create a feedback task
- Visualization is much better
Conclusion
This functionality was of huge importance for knowledge management, knowledge members and other users will be able to create actionable knowledge feedback directly from the knowledge form. And if you want to perform your Senior Jedi qualities at the highest level, we are the perfect place to do so!