
Contact centers, in many cases, are the first point of contact for many organizations. Customer service organization aims to deliver an exceptional level of services to all customers supporting them 24/7. At the low end, call centers simply route incoming calls to any available agent. More sophisticated systems support more sophisticated routing and interaction, including the ability to create customized call trees and other Integrated Voice Response (IVR) systems. Traditionally, IVR systems have been difficult to install and expensive to license, with capacity-based pricing the norm. Many years ago, Amazon retail was facing the same problem, so they built up a solution today known as Amazon Connect.
Amazon Connect is a contact center that would give personal, dynamic, and natural experiences to your customers. It is an omnichannel cloud contact center that provides a seamless experience across voice and chat for your customers and agents.
In this blog post, we are going to show how to create one Amazon Connect contact center in minutes and then design a contact flow (similar to IVRs).
Setting Up Amazon Instance
The first thing that you should do is create an Amazon Connect instance. You can find a detailed step-by-step explanation in the official AWS documentation:
https://docs.aws.amazon.com/connect/latest/adminguide/amazon-connect-instances.html
Following the wizard for instance configuration, you can set up your call center phone(s) number. I’ve chosen the Toll-Free number option.
Once you have set this up, you are ready to take your first call. I call the number on my Viber Out (it is free due to a Toll-free number although my location is North Macedonia, Europe) and go through the default options. I choose to speak to an agent, and the softphone offers to let me (playing the role of the agent) take the call:
Contact flow
Explore the dashboard. In the dashboard, you can find out that the number associated with your call center is related to a contact flow. A contact flow defines the customer experience after they make contact. This is the custom flow that we are going to create:
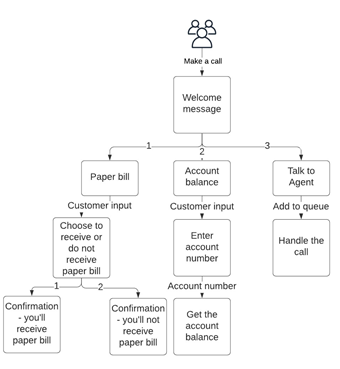
When a customer calls our call center, we will play a welcome message with 3 options:
- If the customer wants to make changes in receiving a paper bill
- If the customer wants to check account balance
- If the customer wants to talk to an agent
We will start from the bottom to build this solution. First, we are going to create a Lambda function that will handle the status of the paper bill, then we are going to create one Lex bot and connect one of the intents to our Lambda function. Lastly, we are going to register and use the Lex bot in our custom Contact flow.
Lambda function
I’m going to create a Node.js 12.x Lambda function with the following sample code:
exports.handler = async (event) => {
var paperBill = event.currentIntent.slots.receivePaperBill;
var responseOption = “Something went wrong”;
if(paperBill == ‘One’)
{
responseOption = “You will receive your paper bills in future.”; }
else
{
responseOption = “You will not receive any paper bills in future.”; }
let lambda_response = {
“sessionAttributes”: {
“paperBill”: event.currentIntent.slots.receivePaperBill
},
“dialogAction”: {
“type”: “Close”,
“fulfillmentState”: “Fulfilled”,
“message”: {
“contentType”: “PlainText”,
“content”: responseOption
},
}
}
return lambda_response;
};
Lambda_response has the proper format that Lex can interpret. You can test your Lambda function using the following test event (Lex will send the same structured event to the Lambda function in an integrated scenario):
{
“messageVersion”: “1.0”,
“invocationSource”: “DialogCodeHook”,
“userId”: “259-45236-458563-4521”,
“sessionAttributes”: {},
“bot”: {
“name”: “CC_WelcomeOptions”,
“alias”: “$LATEST”,
“version”: “$LATEST”
},
“outputDialogMode”: “Text”,
“currentIntent”: {
“name”: “PaperBill”,
“slots”: {
“receivePaperBill”: “One”
},
“confirmationStatus”: “None”
}
}
As a response, you should see the following message:
{
“sessionAttributes”: {
“paperBill”: “One”
},
“dialogAction”: {
“type”: “Close”,
“fulfillmentState”: “Fulfilled”,
“message”: {
“contentType”: “PlainText”,
“content”: “You will receive your paper bills in future.”
}
}
}
If everything is working on the Lambda site, you are ready to set up the Lex bot.
Amazon Lex
Amazon Lex is a service for building conversational interfaces into any application using voice and text. Amazon Lex provides the advanced deep learning functionalities of automatic speech recognition (ASR) for converting speech to text, and natural language understanding (NLU) to recognize the intent of the text, to enable you to build applications with highly engaging user experiences and lifelike conversational interactions. You can find more info about Lex here: https://aws.amazon.com/lex/
Here is the bot blueprint that we are going to create:
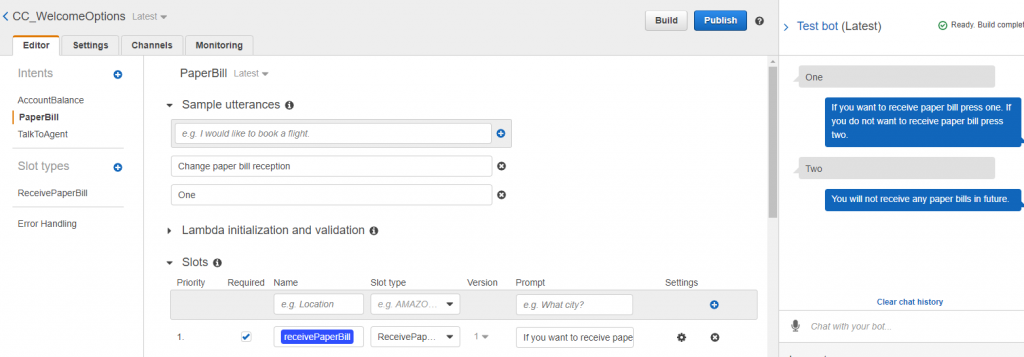
Slot type:
- ReceivePaperBill
- One – yes, continue sending a paper bill
- Two – no, stop sending a paper bill
Intent1: PaperBill
- Utterances
- One
- Change paper bill reception
- Slots
– receivePaperBill of custom type ReceivePaperBill and the prompt text “If you want to receive paper bill press one. If you do not want to receive a paper bill press two.”
NOTE: The name of the slot must be the same name that you’ve already used in Lambda function code event.currentIntent.slots.receivePaperBill - Under the Fulfillment section select AWS Lambda function and choose your Lambda function from the dropdown menu. You’re done with the first intent.
Intent2: AccountBalance
- Utterances
- Two
- Check my account balance
- Slots
– AccountNumber of build-in type AMAZON.NUMBER and the prompt text “Using your touch-tone keypad, please enter your account number” - Under the Response section add the message “The balance for your account is $2,586.34.”
Of course, you can connect to the Lambda function that will read the balance from the database, following the scenario for the intent PaperBill.
Intent3: TalkToAgent
- Utterances
- Three
- Speak to an agent
- Under the response section add the message “An agent will be with you shortly.”
Now you are ready to Build and test your Lex bot. In the Test bot section insert one utterance and you should be prompted with the text for the related utterance. You can Publish your Lex bot.
Amazon Connect – Contact flow
Go back to your Amazon Connect in the AWS console and select the active instance that you’ve created. Under Contact flows from the menu, register your Lex bot in the section Amazon Lex.
Now, navigate to the Administration panel of your Amazon Connect. This panel is available in your browser and accessible on the link that you’ve created in the Amazon Connect configuration step. You can find it under the Overview section of the menu.
Log in as Administrator – the user that you’ve already created. From the dashboard navigate to Create contact flows.

Amazon Connect lets you set up a cloud-based contact center in minutes. You create your contact center, design your contact flows (similar to IVRs), and on-board your agents using a modern interface that is entirely web-based.
Instead of requiring help from IT teams and specialized consultants, Amazon Connect is simple enough to be configured and run directly by business decision-makers. There’s no hardware to deploy and no per-agent licenses. Instead, you pay based on the number of customer minutes and the amount of phone time that you consume. This scalable, pay-as-you-go model means that you can use Amazon Connect in situations where your call volume is unpredictable, spiky, or both.
From the Interaction section pull Get customer input. Select it to open configuration options:
In this field, we will enter the Welcome message that will be read to every customer when a call is made.
Example:
“Welcome to Interworks call center. To change the reception of paper bills, press or say 1. To check your account balance, press or say 2. To speak to an agent, press or say 3.”
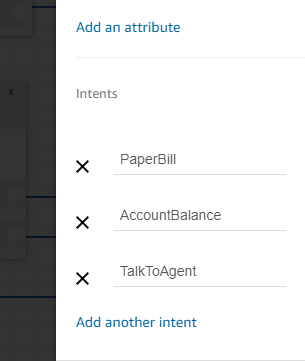
Scroll down the configuration window where we can add Lex info – Select the Amazon Lex tab and select Lex bot from the dropdown menu. Next, define the intents:
Click Save and return to the flow.
Pull the Play prompt, change the text to “Thank you for calling.” and connect PaperBill and AccountBalance intents to this prompt. From the Terminate/Transfer section, pull the Disconnect/Hang-up prompt and link the Play prompt to this one. How does this cover our flow? The customer will call the center and select AccountBalance. Then Lex will continue the flow for the customer. After Lex is done, the customer is returned to Contact flow where we say “Thank you for calling” and finish the call. The same goes for PaperBill. The customer is handled by Lex bot and Lambda function. After the Customer finishes the communication with Lex, he is returned to Contact flow where we hang up the call.
Another flow is when the customer wants to speak to the agent. The Contact flow first pushes the customer’s call to the queue to be accepted by a free agent. This flow is covered with Set working queue and Transfer to queue. In case of error or time out, contact flow plays the message “Sorry, no agents are available at the moment.” And hangs up the call.
Click Save and Publish the Contact flow. Make sure that all options from the prompts are connected.
The last step is to connect our new Contact flow to the phone number. Navigate to Phone numbers from the Dashboard:
Select your phone number and from the drop-down menu, select your Contact flow:
Now, make a call and try out all options available from your contact center.
Conclusion
Amazon Connect is a really powerful service. This is only a slice of the capabilities and options that can be explored.
The pricing is on a pay-as-you-go basis. You pay for each contact center and each active phone call (inbound or outbound) on a per-minute basis. As part of the AWS Free Tier, you get 90 minutes of contact center usage, two phone numbers (DID and toll-free), 30 minutes of inbound DID calls, 30 minutes of inbound toll-free calls, and 30 minutes of outbound calls, all per month, for an entire year. Enjoy playing around with this powerful service.
If you want to read a real case scenario of Amazon Connect, check our case study:
Or contact us to discuss the possibilities of enhancing your call center.