

Introduction
Gravitee.io is an open-source, easy-to-use, cost-effective, and super-fast API management solution that helps secure, publish, and analyze who, when, and how your APIs have been accessed.
Amazon EKS on the other hand is a fully managed Kubernetes service that is used by many senior AWS engineers and famous companies, such as Intel, Snap, GoDaddy, etc., to run their applications due to the security, reliability, and scalability that it offers.
We have been learning and working with Gravitee, and we also have vast experience with cloud-ready solutions, which motivated us to create an article where we will explain how to get APIM 3.x running on AWS, using Gravitee’s Helm charts.
There is already an article about deploying Gravitee API Management 3.x on GKE – https://www.gravitee.io/article/gravitee-ioapim3-xongke , which was another motive to write this article that will cover another cloud provider. AWS sounded like a logical choice. Thus, in this post, we are going to explain briefly how to deploy Gravitee APIM 3.x on the Amazon Web Services platform, using Amazon Elastic Kubernetes Service (Amazon EKS) as a fully-managed Kubernetes service.
Prerequisites for EKS
Before creating the EKS Cluster, several prerequisites should be fulfilled. Those are as follows:
- Local installation of Kubernetes version 16+
- Helm version 3
- An AWS account
- AWS CLI v2 connected to the AWS account
- The eksctl command-line tool for managing EKS clusters.
You can find more info about installing the CLI and eksctl on the following link:
https://docs.aws.amazon.com/eks/latest/userguide/getting-started-eksctl.html
Generate SSH Key pair
Before we run the command to create the EKS cluster, we need to create a key pair that can be used later to SSH into the underlying nodes of the cluster. From the EC2 dashboard, we select Key Pairs and create a new key pair.
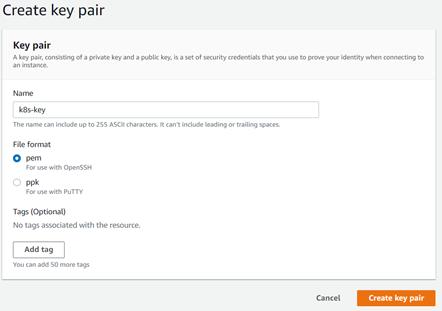
We save the key pair to our local machine. Out of this key, we need to create a public key that we will pass to the create command. To create this public key, we open a terminal in the folder where the key is located and run the following command:
ssh-keygen -y -f k8s-key.pem > public-k8s-key.pem
This will generate the public key and save it in the same directory. Now we are ready to create our cluster.
Creating our Cluster
Now that we have everything set up, we need to open a terminal window in the folder where our public key is and run the following command:
eksctl create cluster –name gravitee-eks –version 1.16 –region us-east-1 –nodegroup-name linux-nodes –managed –node-type m5.large –nodes 3 –nodes-min 1 –nodes-max 4 –ssh-access –ssh-public-key public-k8s-key.pem –profile <profile_name>
*Running m5.large instances is not included in AWS free tier. Check the pricing if you want to follow along. https://aws.amazon.com/ec2/pricing/on-demand/
Let’s go through the parameters in the command:
- name – The name of the cluster. We can omit this parameter and Kubernetes will automatically create a name for us.
- version – The version of Kubernetes for the cluster. As of the writing of this post, valid values are 1.14, 1.15, 1.16, and 1.17. The cluster version will default to 1.17 if not specified.
- region – The AWS region in which we will deploy the cluster.
- nodegroup-name – EKS will place the nodes that we create in a node group. We can create multiple node groups in one cluster.
- managed – A flag that tells EKS that we want our node group to be managed by EKS. This option was first available in Kubernetes 1.14 and it automates the provisioning and lifecycle management of nodes.
- node-type – We specify what type of EC2 instances we want to provision. Each node is actually an EC2 instance.
- nodes, nodes-min, nodes-max – Parameters to control the current, minimum, and maximum number of nodes in the cluster.
- ssh-access. Enable SSH access for the nodes in the cluster. We specify the key with the ssh-public-key parameter.
- profile – I use this parameter since I am not using the default profile in the AWS config file. If you have only one account set up and it’s using the default profile, you can skip this parameter.
Note: One common error that you may experience while using Amazon EKS is Insufficient capacity.
If you receive this error while attempting to create an Amazon EKS cluster, it means that you left the AWS process to decide which availability zone to use. The availability zone will be chosen randomly and if that availability zone does not exist in your region ex. us-east-1f, you will experience the following error:
Cannot create cluster ‘example-cluster’ because region-1d, the targeted Availability Zone, does not currently have sufficient capacity to support the cluster. Retry and choose from these Availability Zones: region-1a, region-1b, region-1c
Retry creating your cluster with subnets in your cluster VPC that are hosted in the Availability Zones returned by this error message.
AWS suggest overcoming this problem by adding additional flag-zones in the create cluster command with AZs listed in the error message:
eksctl create cluster –name gravitee-eks –version 1.16 –region us-east-1 –zones us-east-1a,us-east-1b,us-east-1c …
That’s it, you can continue with the configuration steps.
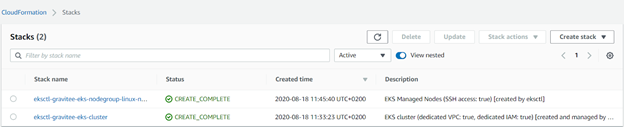
The create command will create two CloudFormation stacks: one for the networking and one that will contain the nodes. It should take around 10-15 minutes for the cluster to be created.
Once the cluster has been created, we can run the following command to confirm.
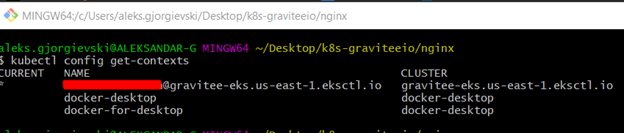
The context will be automatically switched to the new cluster. So now, we are ready to install Gravitee on our cluster.
Installing MongoDB
Before we install Gravitee, we want to make a couple of preparations.
First, we will create a separate namespace where we will create all resources for Gravitee.
kubectl create namespace graviteeio
Next, we will install MongoDB on Kubernetes as it will be required by Gravitee. For this, we will be using the official helm chart from the Bitnami repository.
We can pull the Bitnami repository with the following command:
helm search repo bitnami
We can pull the Bitnami repository with the following command:
helm repo add bitnami https://charts.bitnami.com/bitnami
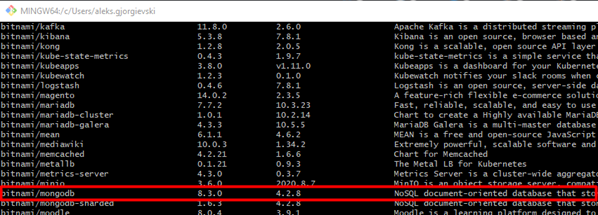
Once we pull the repository, we can inspect the charts that are available in this repository:
helm search repo bitnami
Finally, we can install MongoDB with the following command:
helm install mongo bitnami/mongodb –namespace graviteeio
This chart will create a new pod with MongoDB installed and will expose it via a service with the following format: [release name]-[chart name].[namespace].svc.cluster.local
In our case, the exposed service is mongo-mongodb.graviteeio.svc.cluster.local
We need to save the DNS name as it will be required by the Gravitee installation. Also, we need to save the password of the root MongoDB user. We can do that with the following commands:
export MONGODB_ROOT_PASSWORD=$(kubectl get secret –namespace graviteeio mongo-mongodb -o jsonpath=”{.data.mongodb-root-password}” | base64 –decode) echo $MONGODB_ROOT_PASSWORD
* The instructions to get the password will be provided when we first install MongoDB
Install Gravitee
Now that we have MongoDB installed, we can install Gravitee. Again, just like for MongoDB, we will need to pull the Helm chart repository for Gravitee:
helm repo add graviteeio https://helm.gravitee.io
Before we run the install command, we will create a config file where we will specify all options that we want to override from the default chart values. Let’s call it gravity-config.yml:
mongo:
   uri: mongodb+srv://root:passwordX@mongo-mongodb.graviteeio.svc.cluster.local/admin?retryWrites=true&connectTimeoutMS=30000&tls=false&ssl=false
 api:
   replicaCount: 1
 gateway:
   replicaCount: 1
 ui:
   replicaCount: 1
 elasticsearch:
   enabled: true
   cluster:
     env:
       MINIMUM_MASTER_NODES: "1"
   client:
     replicas: 1
   master:
     replicas: 1
   data:
     replicas: 1
 es:
   endpoints:
     - http://graviteeio-apim3-elasticsearch-client.graviteeio.svc.cluster.local:9200
   security:
     enabled: true
     username: username
     password: password
In the Mongo section, we give the URI to the MongoDB service that we have previously created. The format in which we specify the URI is:
mongodb+srv://[username]:[password]@[DNS]/admin?args
We need to use the /admin database to authenticate since our root user is stored in that database that MongoDB creates automatically. If we try to connect using another database, we might get an error while trying to connect.
Also, we are connecting to MongoDB without SSL. For this, we specify the following parameters in the connection string: tls=false & ssl=false. If we omit these parameters and try to connect without setting the proper SSL certificates, we will get an error.
Next, we have some configuration for the number of replicas of the resources that will be created. Since this is only for demonstration purposes, we set all replica counts to 1, in order not to consume too many resources on our Kubernetes cluster. Finally, we install the built-in ElasticSearch from the Gravitee helm chart and we set the endpoint.
The options that we defined in the config file are just a small subset of all the options that are available. If we want to see all possible options for the helm chart that we are installing, we can inspect them with the following command:
helm show values graviteeio/apim3
Once we save the config file, we can install Gravitee.
helm install graviteeio-apim3 –namespace graviteeio -f gravitee-config.yml graviteeio/apim3
It will take some time (around 5 minutes) for all the pods to be created. You can monitor the progress of the creation of the pods with the following command:
kubectl get pods –namespace graviteeio -w
The mongo pod at the bottom is the one we previously created, and the other 7 pods have been created by the Gravitee installation.
Expose Gravitee APIM
Now even though all pods are running, we can’t access our application since it’s only accessible from within the cluster. To access it, we will need to install an Nginx Ingress Controller that will expose the Gravitee application through a Load Balancer.
We can use the nginx-ingress chart from the stable helm repo.
helm repo add stable https://kubernetes-charts.storage.googleapis.com/
We will also create a small config file, with a couple of options for the Nginx controller.
controller:
defaultBackendService: graviteeio/graviteeio-apim3-portal
publishService:
enabled: true
rbac:
create: true
defaultBackend:
enabled: false
With this, we just disable the default backend that Nginx provides and pass in our gravitee portal service to act as the default backend. Now we can create the controller with the following command: (make sure you are in the same directory as your config for the nginx)
helm install nginx-ingress –namespace graviteeio -f nginx-config.yml stable/nginx-ingress
The Nginx ingress controller will take any ingress rules that are defined in our Kubernetes cluster and will manage the routing of the traffic. If we inspect what ingress rules were created by the Gravitee installation, we will see the following:
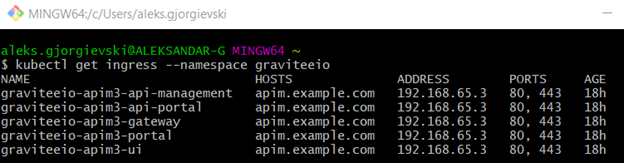
If we describe each of these rules, we will see that each of these services can be accessed on some /path on the apim.example.com host. Also, this host can be changed to whatever suits us on creation time, in the gravitee-config.yml.
If we check our services we can see that the Nginx controller is exposed to an external AWS Load Balancer:
Also, if we check the AWS console, we can see that the command used for the creation of the Nginx controller automatically created a Load Balancer.
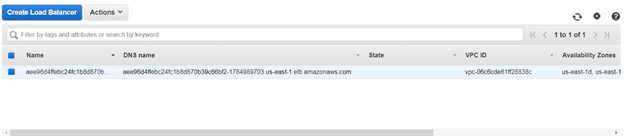
Since our Nginx ingress controller is exposed on the Load Balancer’s DNS, we need to redirect all traffic from apim.example.com to the Load Balancer or to be more precise to the IP addresses of the Load Balancer.
To find the IP addresses of the Load Balancer nodes, we need to check the ENI section on the EC2 dashboard.
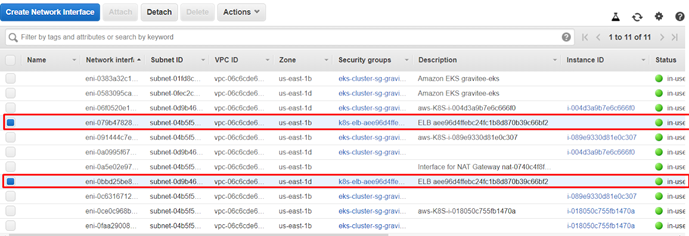
And finally, we need to add these IP addresses in our hosts’ files so we can access the Gravitee application from our browser. On Windows, this file is located at C:\Windows\System32\drivers\etc.
In that file, we add one line per IP address:

*The public IP addresses of the nodes of the Load Balancer can change over time. This means that at some point the application could become inaccessible and we would need to update our hosts’ file. A better approach would be to create a Route53 hosted zone with a custom domain and use the Load Balancer as an entry point to this zone. However, this is out of the scope of this blog.
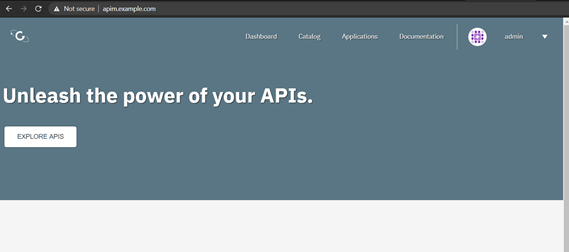
And we are done. Now we can access the Gravitee application via http://apim.example.com.
Cleaning up
If we decide we don’t want to use Gravitee anymore we need to delete the cluster so we don’t get charged by AWS. First, we need to remove any services that are externally exposed, as these services provide additional resources on AWS (Load Balancers most of the time). In our case, the nginx-ingress creates a Load Balancer so we need to remove it before we completely delete the cluster, so AWS can properly release all resources. We can remove the service with the following command:
kubectl delete service nginx-ingress-controller –namespace graviteeio
Or, we can completely remove the helm release of the nginx-ingress chart:
helm uninstall nginx-ingress –namespace graviteeio
After the service is gone, we can completely delete the cluster with the following command:
eksctl delete cluster –name gravitee-eks –region us-east-1
This will initiate a deletion of the 2 cloud formation stacks. Once they are deleted, check the AWS console for any remaining key pairs and volumes from the EC2 nodes.
Conclusion
We just showed a basic step-by-step use of Gravitee’s Helm Charts and the options that Amazon EKS provides, for easy and quick deployment of Gravitee on the AWS platform, so you can start experimenting.
Although we covered the setup basics and straightforward deployment path, we know that a real-life scenario would probably require additional planning and tweaking on how to plug an API management solution, such as Gravitee, into a Kubernetes ecosystem. Nevertheless, the Helm package management provided by Gravitee reduces the complexity of the deployment and improves productivity, letting you only take care of the cloud provider specifics underneath.
But, also expect some interesting details on our best practices for optimizing deployments and environments setup with Kubernetes within our next articles.
If you found this article useful, let us know.