
In this article, we are going to describe the integration between the Xray test management plugin for JIRA and the Robot test automation framework utilizing Jenkins. To help you as an integration developer, we will elaborate the configurations that need to be done, so that results from the automated execution of tests implemented in the Robot framework can be transferred back to Xray/JIRA where tests are documented. All these processes can be implemented with Jenkins job and accomplished without any manual intervention.https://www.linkedin.com/pulse/agile-architecting-practice-architecture-spike-erik-philippus/
Introduction
Xray is one of the most popular test management tools for the JIRA software. Xray supports the entire testing life cycle: test planning, test design, test execution, and test reporting. Xray supports both manual and automated tests, including full support for Cucumber tests. It has built-in support for multiple test automation platforms, like JUnit, TestNG, NUnit, and Robot framework, it also provides easy integration with CI platforms like Jenkins, Bamboo, or TeamCity. For more information on Xray please refer to its official documentation: https://confluence.xpand-it.com/display/XRAY/Xray+Documentation+Home
Robot framework is a well-known test automation framework based on a keyword-driven paradigm. The framework has a rich ecosystem around it consisting of various generic test libraries and tools. For more details on the Robot framework, please refer to its official website: http://robotframework.org/.
Jenkins is the most popular open-source Continuous Integration (CI) server which provides hundreds of plugins that enable integration with many different systems and/or frameworks, including Xray and Robot framework.
This article is organized into three main sections: the first organization of test cases in Xray on sample projects will be presented, then the necessary Jenkins configuration that provides execution of the Robot tests will be explained and finally the three different methods for importing results of Robot automated tests back in Xray/JIRA will be elaborated.
Sample JIRA project supported with Xray
Let’s assume that the system under test is the e-commerce site http://automationpractice.com and in Sprint 1 there are 5 user stories.
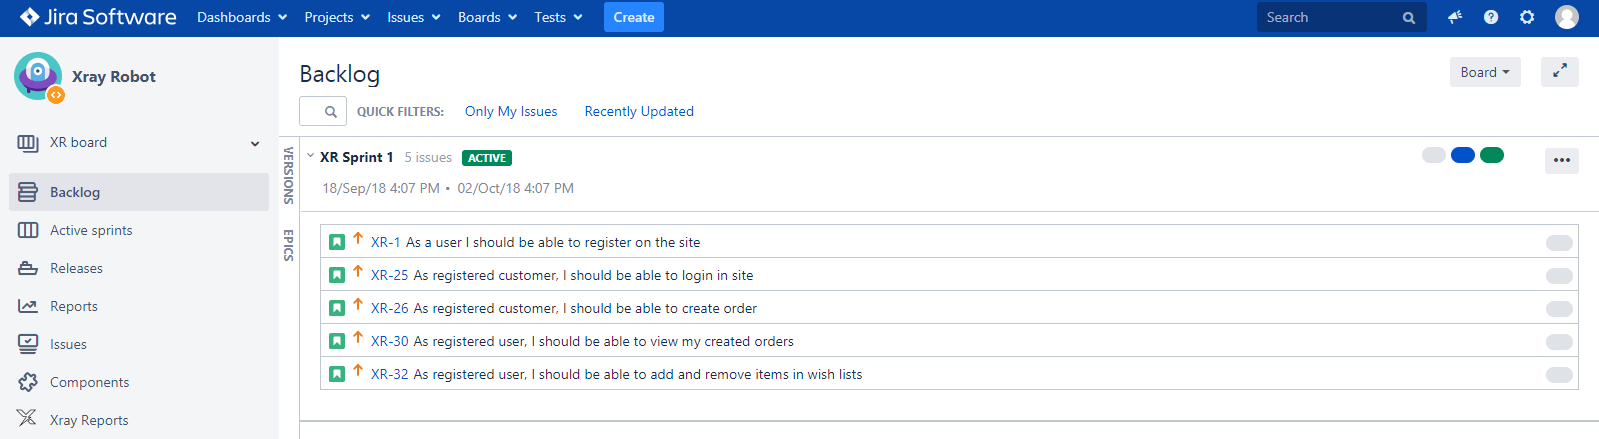
(Figure 1 – Sprint 1 user stories for the sample project)
For each user story Tests in Xray are created. For example, for user story XR-32 three test cases in Xray are created:
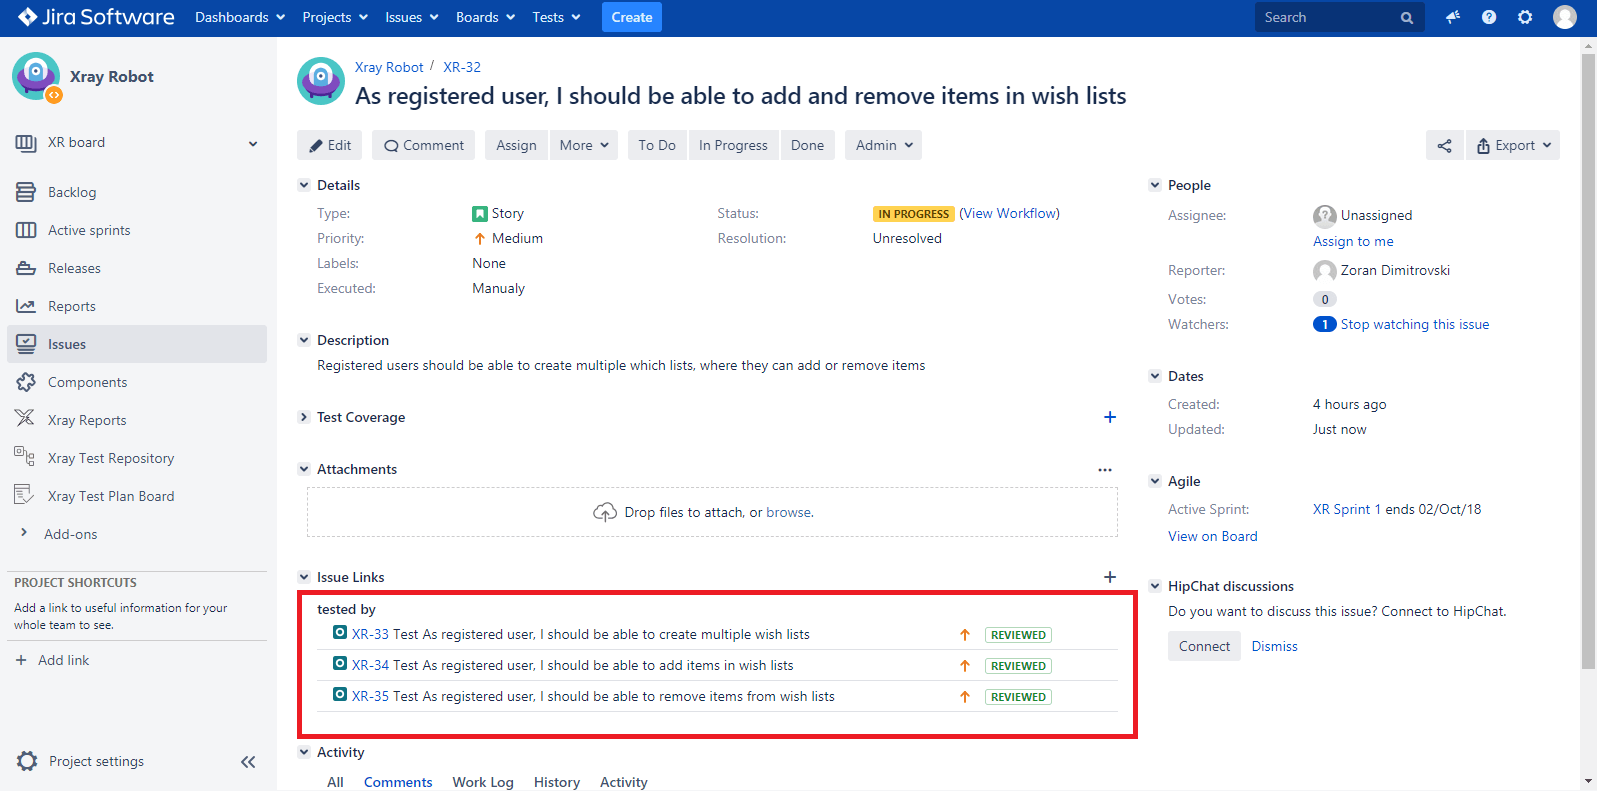
(Figure 2 – Xray Tests associated with one of the user stories of the sample project)
Test Plan is Xray provided custom JIRA issue type that ensures better visibility and management over the Tests and can be considered as a “container” of Tests related to a particular version of the system under test. Not going into details on how a Test Plan is created (for more details on creating a Test Plan using Xray, please refer to: https://confluence.xpand-it.com/display/XRAY/Test+Plan), let’s assume that a Test Plan is created with all the tests from user stories of Sprint1:
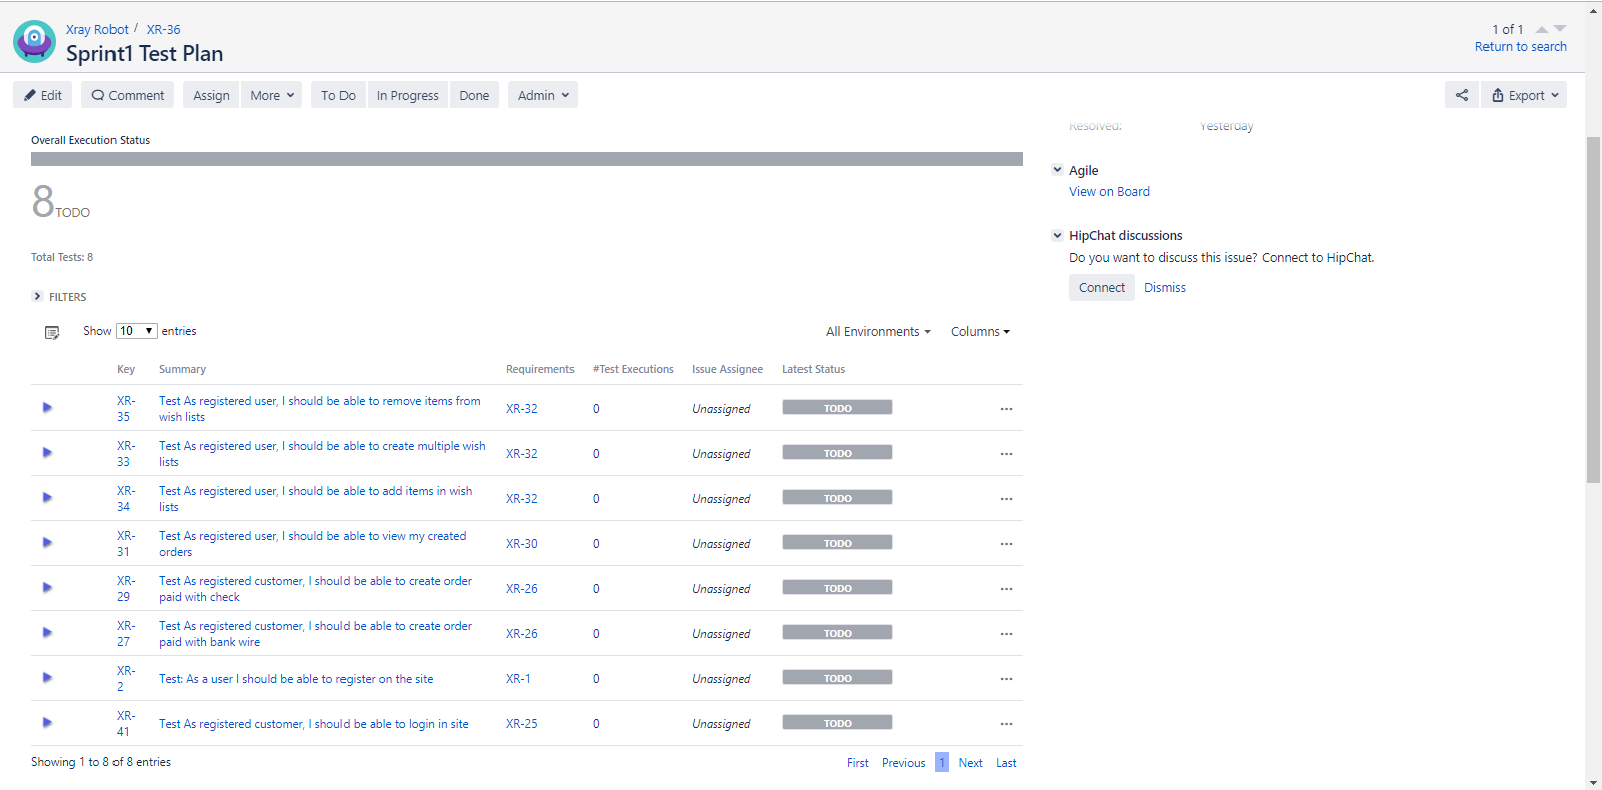
(Figure 3 – Sample Xray Test Plan)
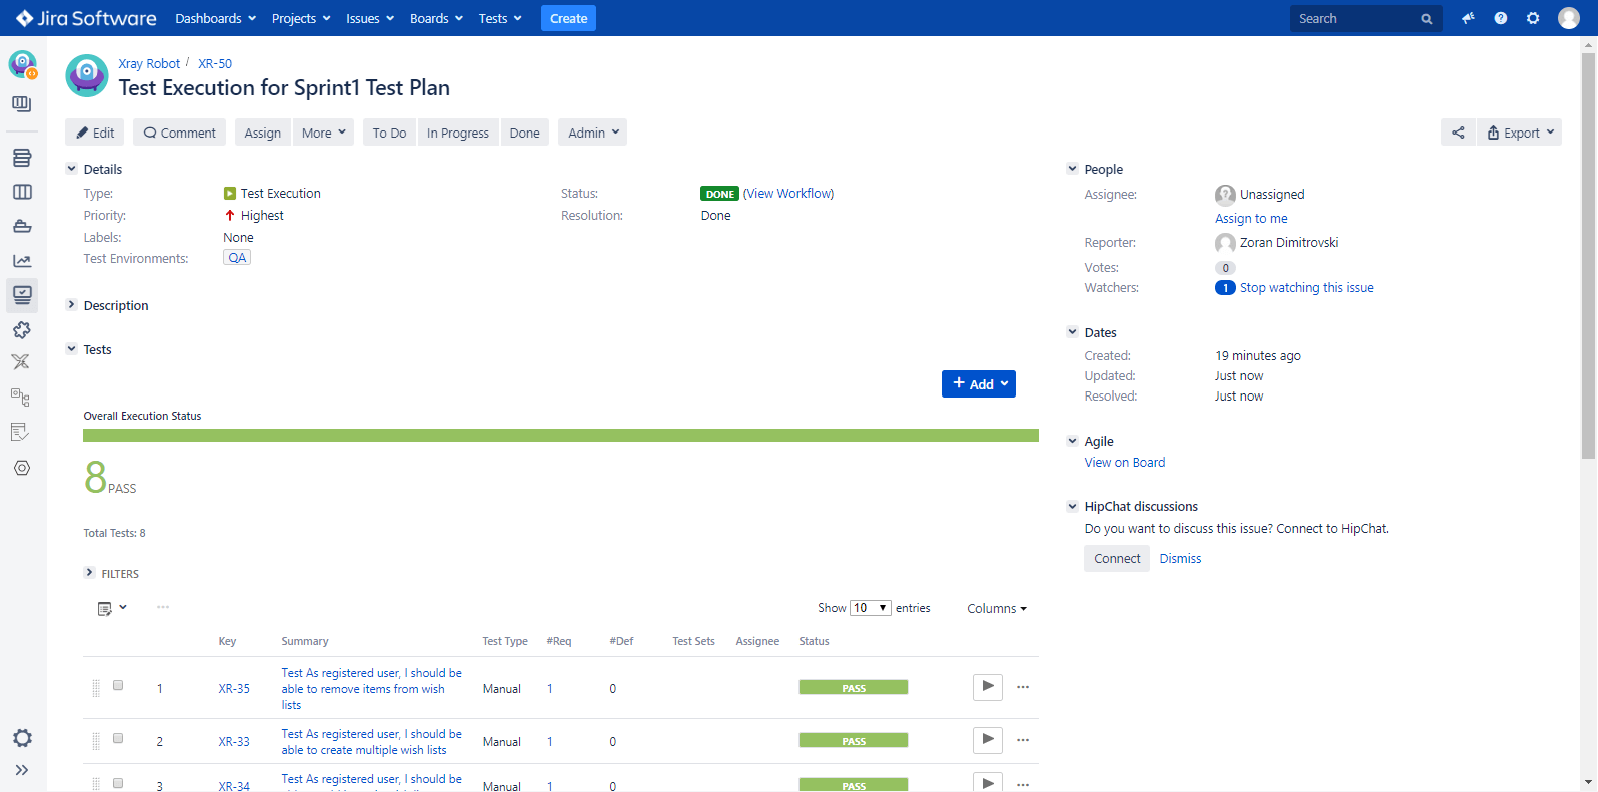
Test Execution is another Xray-provided custom issue type, which tracks multiple Test Runs, i.e. it is composed of multiple Test Runs. From the Test Plan, it’s possible to create one or more Test Executions for all or just a subset of the Tests contained within the Test Plan (e.g. only those Tests that are still failing). We are not going to go into details on how Test Execution is created (for more details on creating Test Execution using Xray, please refer to: https://confluence.xpand-it.com/display/XRAY/Test+Execution), for the sample project one Test Execution is created associated with Sprint 1 Test Plan.
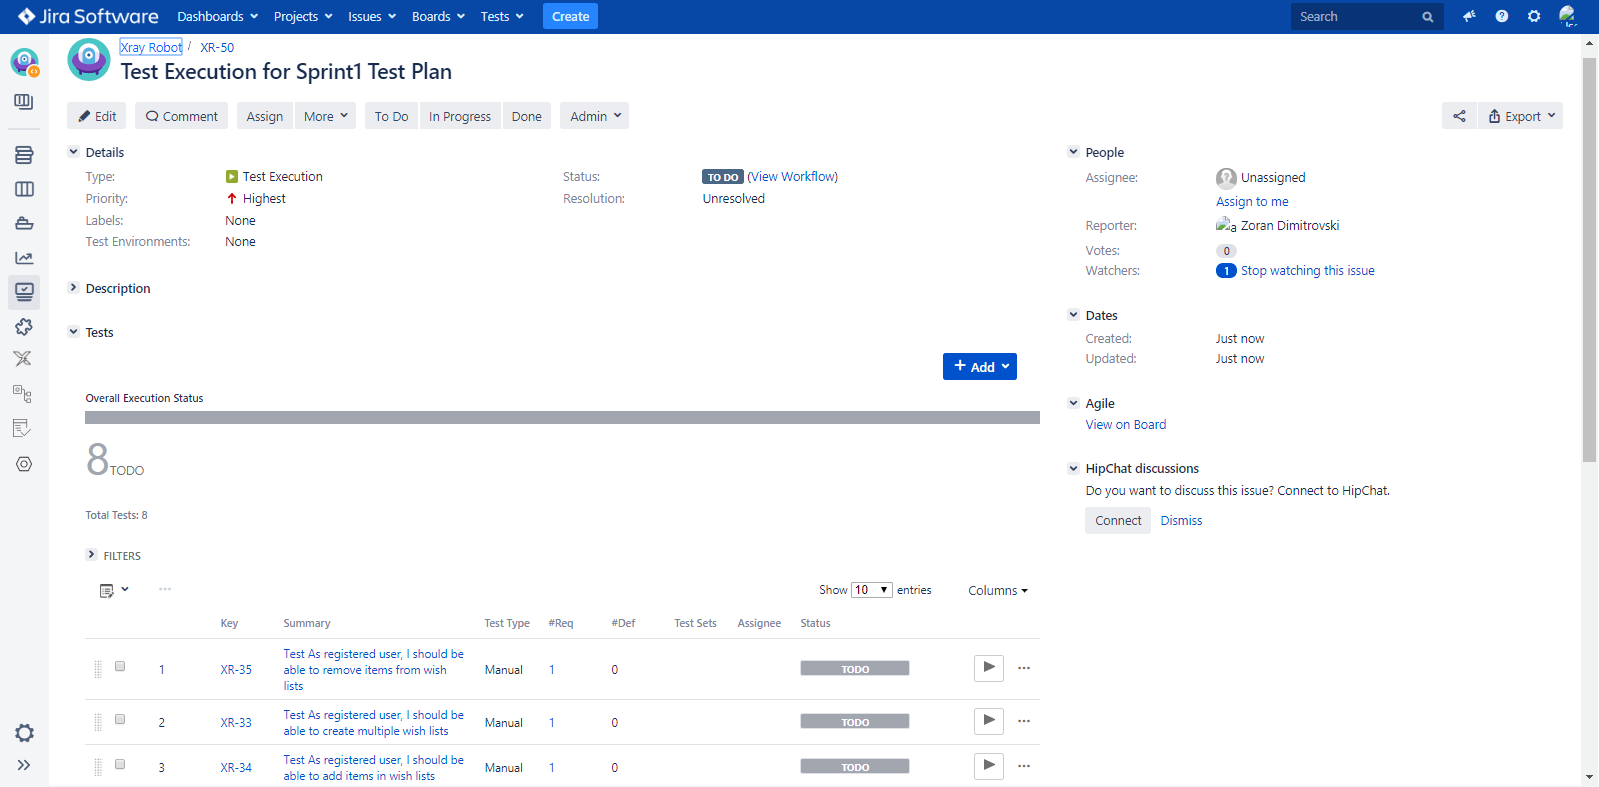
(Figure 4 – Sample Xray Test Execution)
Installing and configuring the Xray Jenkins plugin
Xray provides a plugin for Jenkins that enables importing results from automated test execution back in JIRA. Xray Jenkins plugin can be downloaded from: https://confluence.xpand-it.com/download/attachments/35356981/xray-for-jira-connector.hpi?version=1&modificationDate=1532097682950&api=v2
In order to install the Xray Jenkins plugin navigate to Manage Jenkins > Manage Plugins and select the Advanced tab. In the Upload Plugin section, click Upload and select the location where you have downloaded xray-for-jira-connector.hpi file.
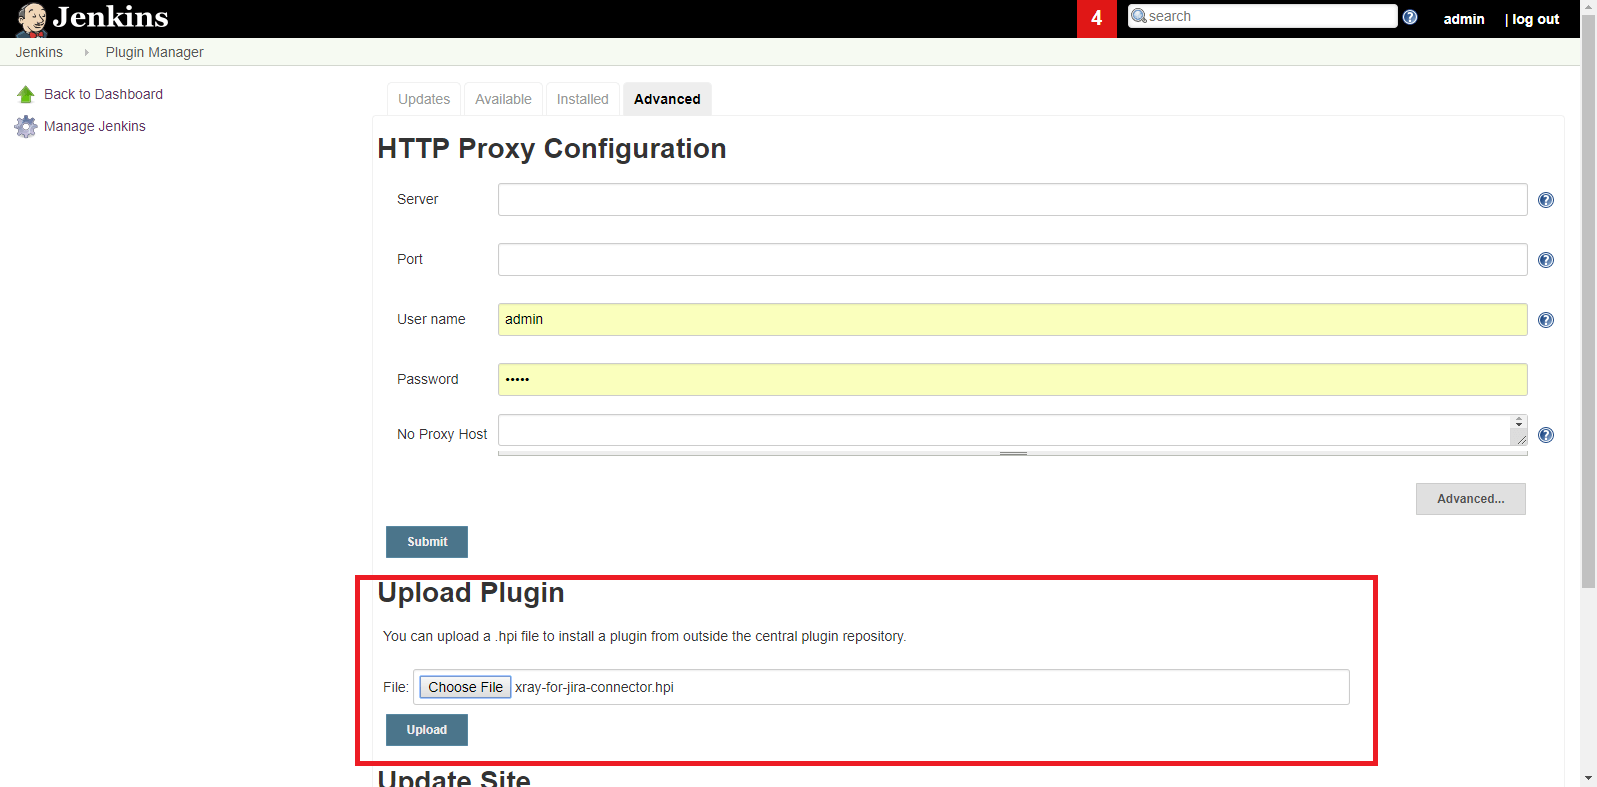
(Figure 5 – Installing Xray Jenkins plugin)
Further, you need to configure the Xray plug-in to communicate with JIRA. For that purpose, navigate to Manage Jenkins > Configure System > Xray for Jira configuration. Field Server Address is populated with the URL of the Jira Server where Xray is running, while Username and Password should be JIRA Administrator’s credentials:
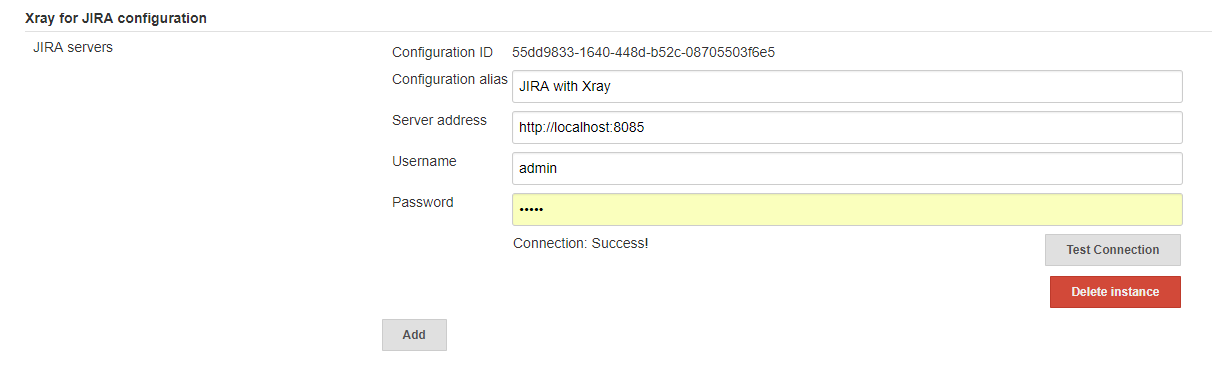
(Figure 6 – Configuring communication between Jenkins and JIRA where Xray is running)
Configuring Jenkins job for automated test execution and reporting back results to Xray-JIRA
The Jenkins job that will be created is a Freestyle project, named Xray Robot Integration Demo:
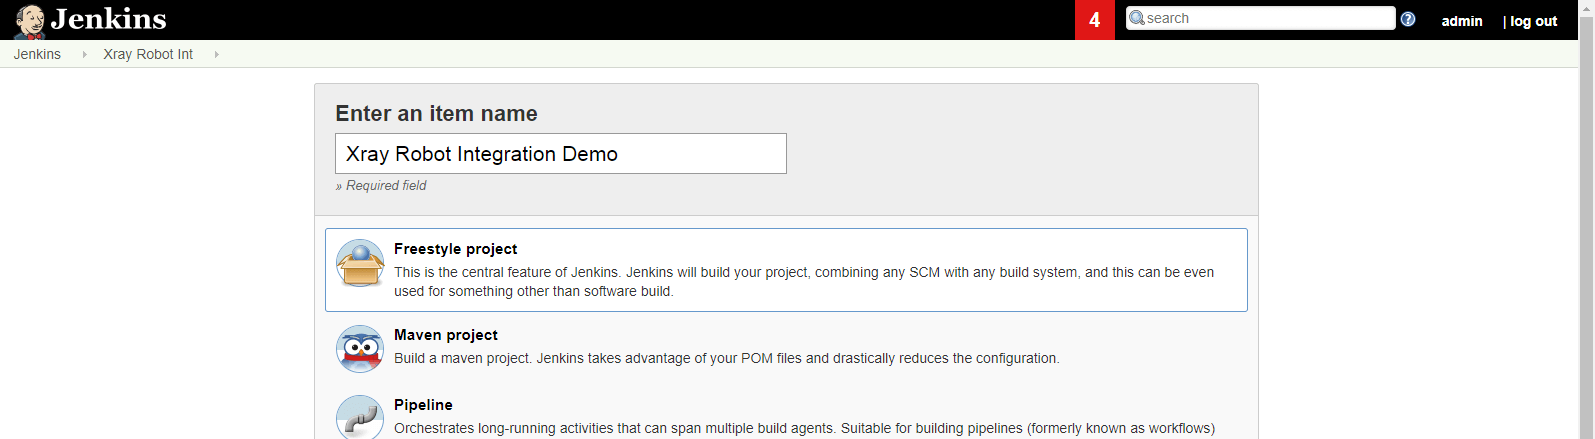
(Figure 7 – Creating Jenkins job)
For the purpose of this article, eight tests in the Robot framework for already defined Tests in Xray were developed. In this case, a custom workspace will be used and the specified directory is the location where Robot tests are placed.

(Figure 8 – Configuring Jenkins job – specifying workspace)
For executing automated tests Windows batch command can be used:
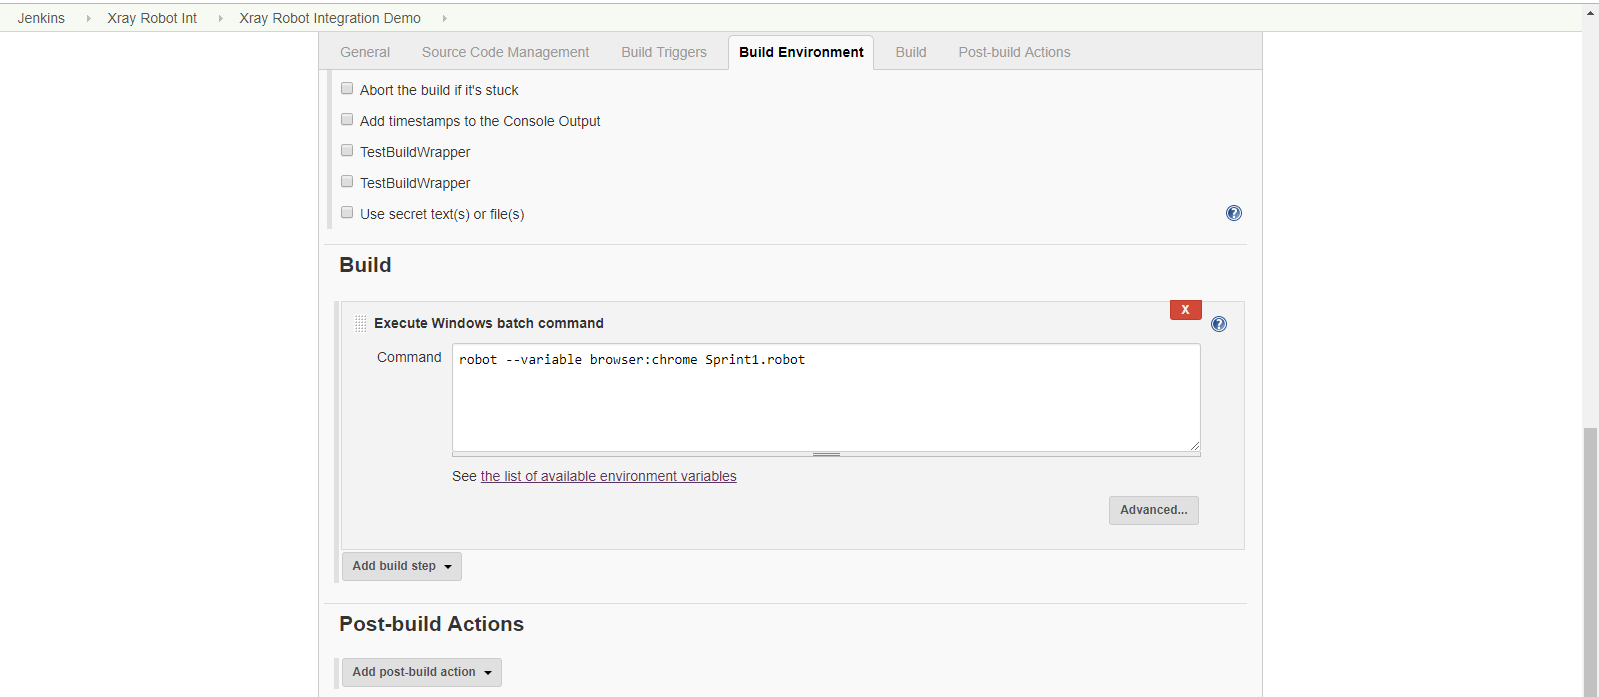
(Figure 9 – Configuring Jenkins job – Robot tests execution)
And finally, in order to transfer results from Robot tests execution to Xray, as “Xray: Results Import Task” that comes with the Xray Jenkins plugin, it needs to be defined as a Post-build action.
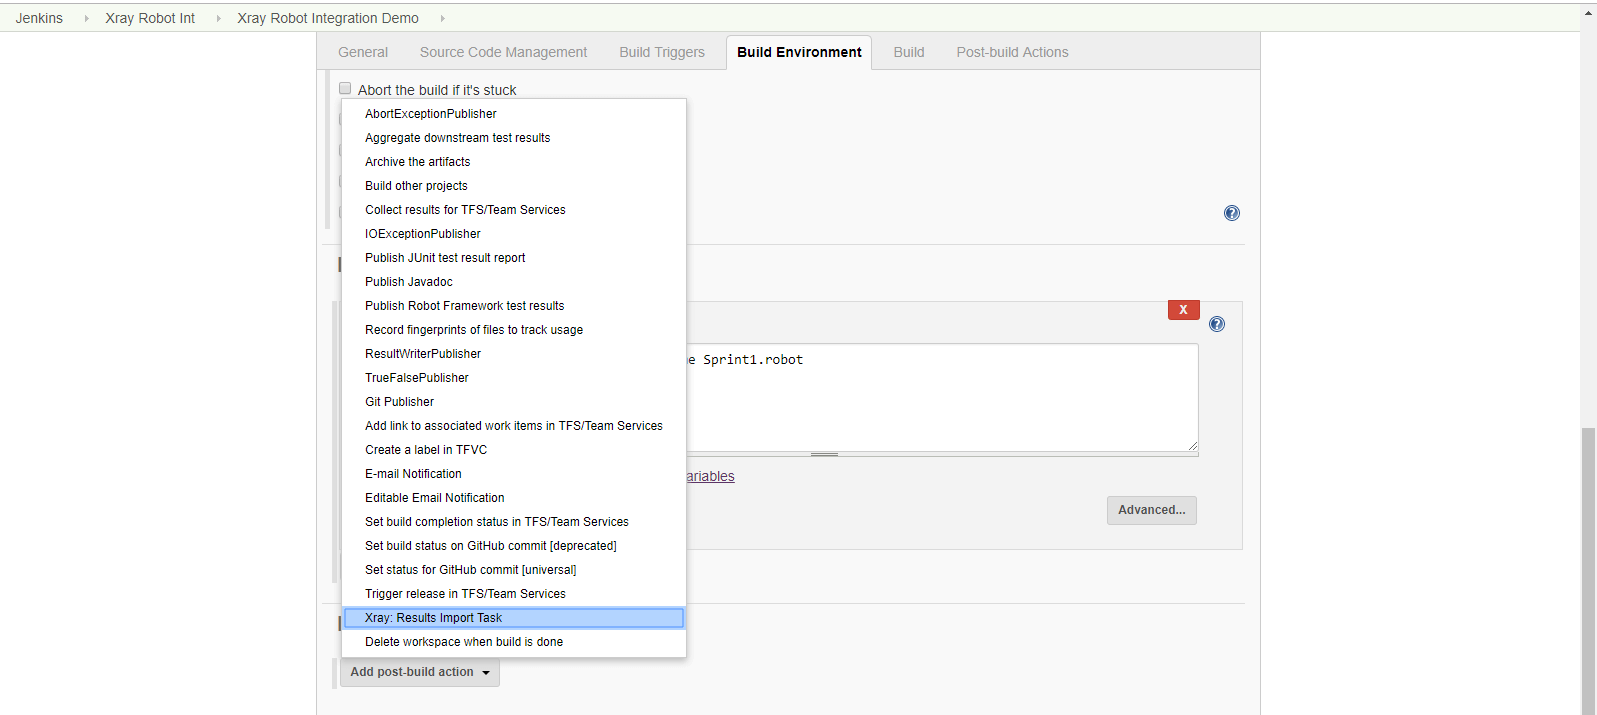
(Figure 10 – Configuring Jenkins job – Post-build action)
After creating the Xray: Results Import Task, in the field JIRA Instance you can choose to which JIRA the server results will be pushed. Xray plugin allows to configure multiple JIRA servers under the Xray for JIRA configuration in Jenkins configuration. In this case only one JIRA server is configured, and the displayed JIRA instance is defined as Configuration alias (please refer to Figure 6). Format drop-down, lists reports from different testing frameworks that can be imported in Xray.
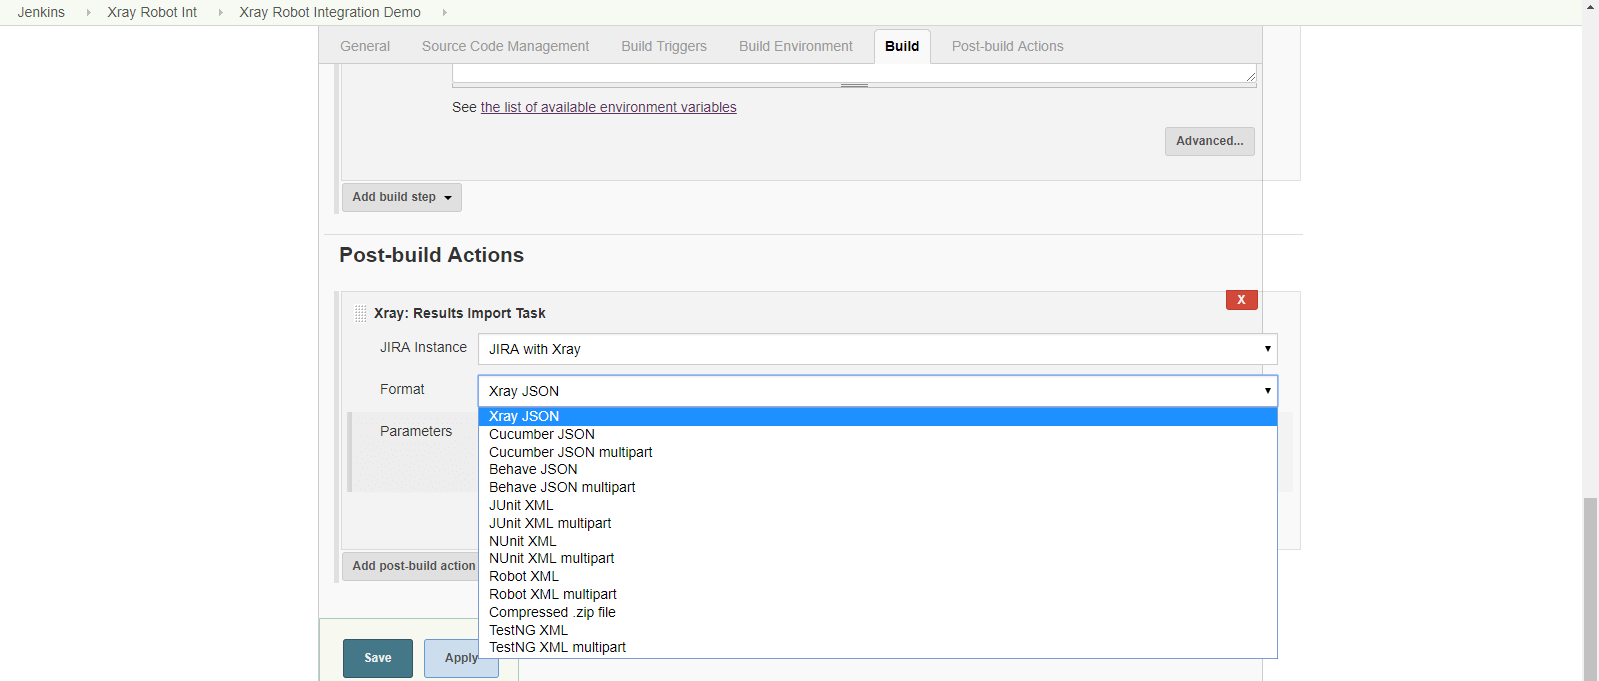
(Figure 11: Xray: Results Import Task)
In our case Robot XML format will be used, and import task needs to be configured with the following parameters:
- Import to Same Test Execution – When this option is checked, if you are importing multiple execution report files using a glob expression, the results will be imported to the same Test Execution
- Execution Report File (file path with file name) – location and name of the Robot Framework tests output file. Location should be specified as relative to the defined workspace
- Project Key – key of the JIRA project. This is a required parameter, if it is not specified, test results will not be imported to JIRA
- Test Execution Key – JIRA issue key of the Test Execution where results will be imported. If this parameter is not specified, then after importing results a new Test Execution will be created in JIRA
- Test Plan Key – JIRA issue key of the Test Plan. If this parameter is not specified, then the imported Test Execution will be not associated with any Test Plan
- Test Environments – list of Environments (separated by “,”) where tests are executed.
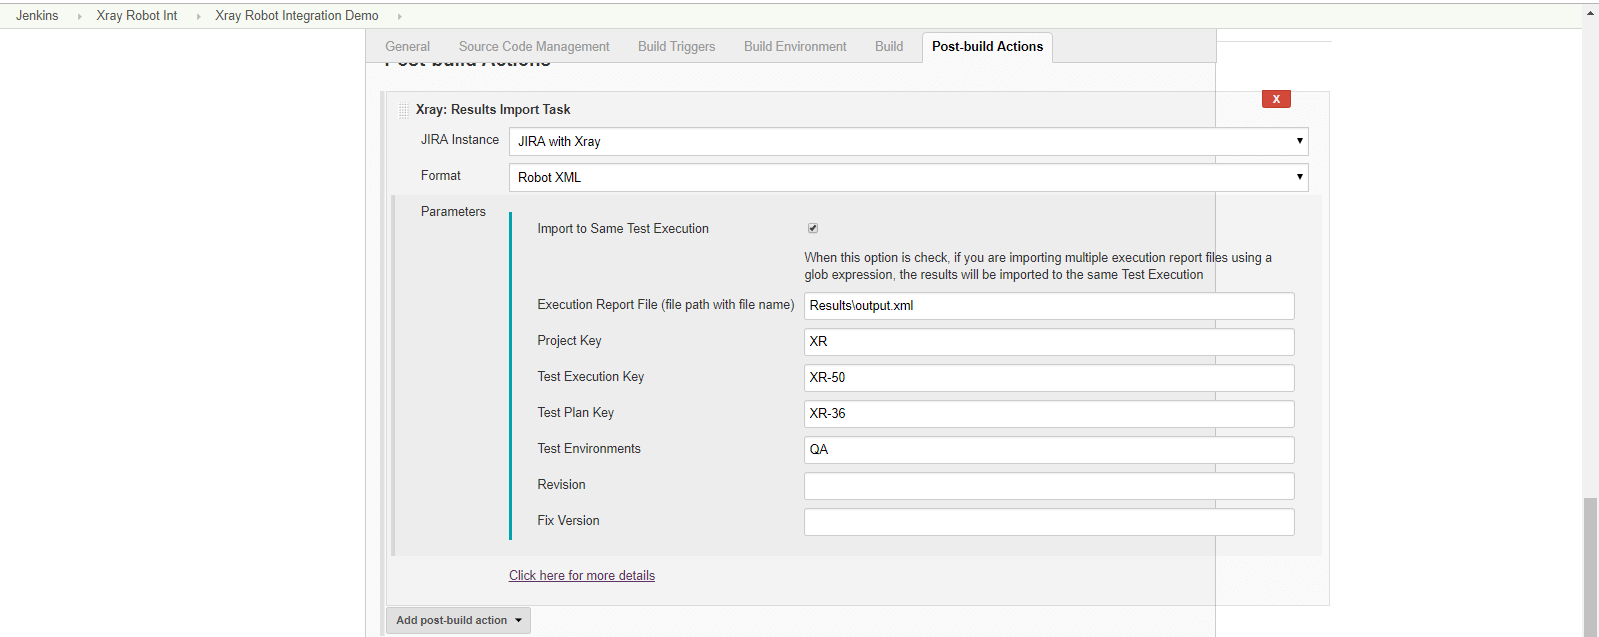
(Figure 12 – Xray: Results Import Task – configured for Robot framework)
On the other side, configuration needed for Robot tests in order to be associated with a particular Test in Xray/JIRA is very straightforward, i.e. tag should be added to Robot test case that match key of the Test in JIRA. For example, in the figure test case bellow “Create Account” is tagged with XR-2, while “Place Order paid with bank wire” is tagged with XR-27, where XR-2 and XR-27 are keys of already created Tests in Xray/JIRA.
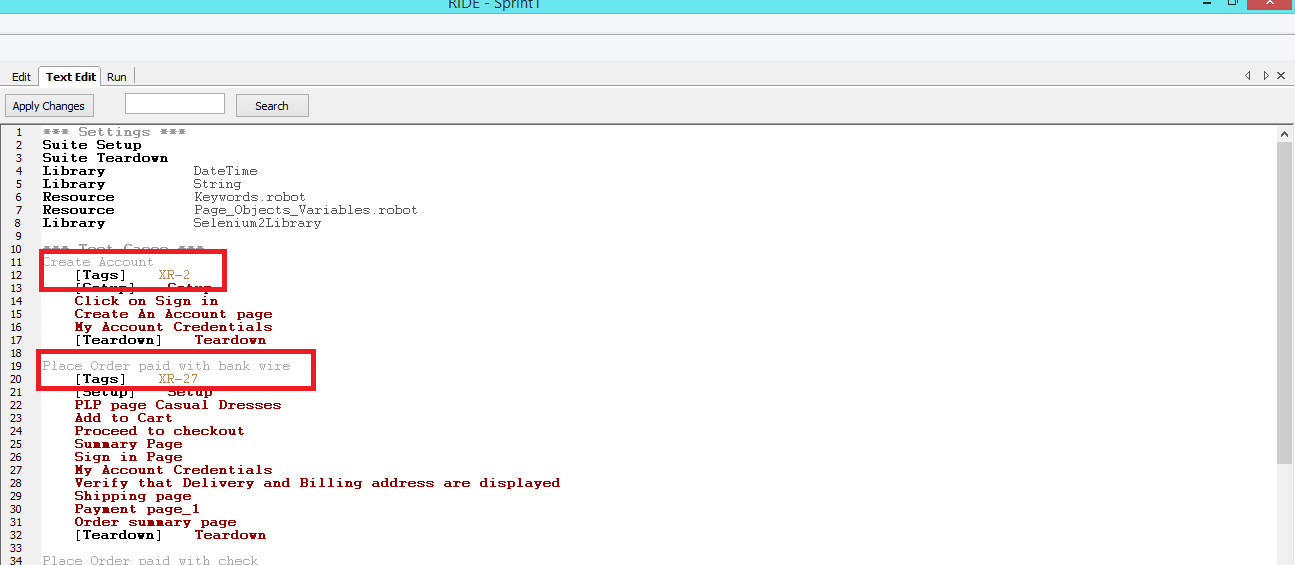
(Figure 13 – Associating Robot test cases with Test key in Xray/JIRA, using tags)
In the following text, three different ways of importing automated test results back in Xray/JIRA will be presented.
1. Running Jenkins job with defined Test Execution
Let’s examine how imported Robot test results, will look when in “Xray: Results Import Task”, the Test Execution Key is defined. In order to illustrate this let’s assume that before Robot tests run there is an already created Test Execution in JIRA X-50, and the import task is configured as in Figure 12.
After the Jenkins job has finished, and Robot results are imported in JIRA automatically Test status is updated in the corresponding (in this case XR-50) Test Execution. Also for Test Environment label is set to value “QA”, as defined in the import task.
(Figure 14 – Test Execution created before automated test run and after importing Robot test results)
2. Running Jenkins job without defined Test Execution
Another option is automated Robot tests to be run from Jenkins without creating Test Execution in JIRA before. For that purpose the field Test Execution Key in “Xray: Results Import Task” should be left blank.
After Jenkins job has finished, if we navigate in JIRA to the associated Test Plan, we can see that an additional Test Execution (XR-51) is automatically added:
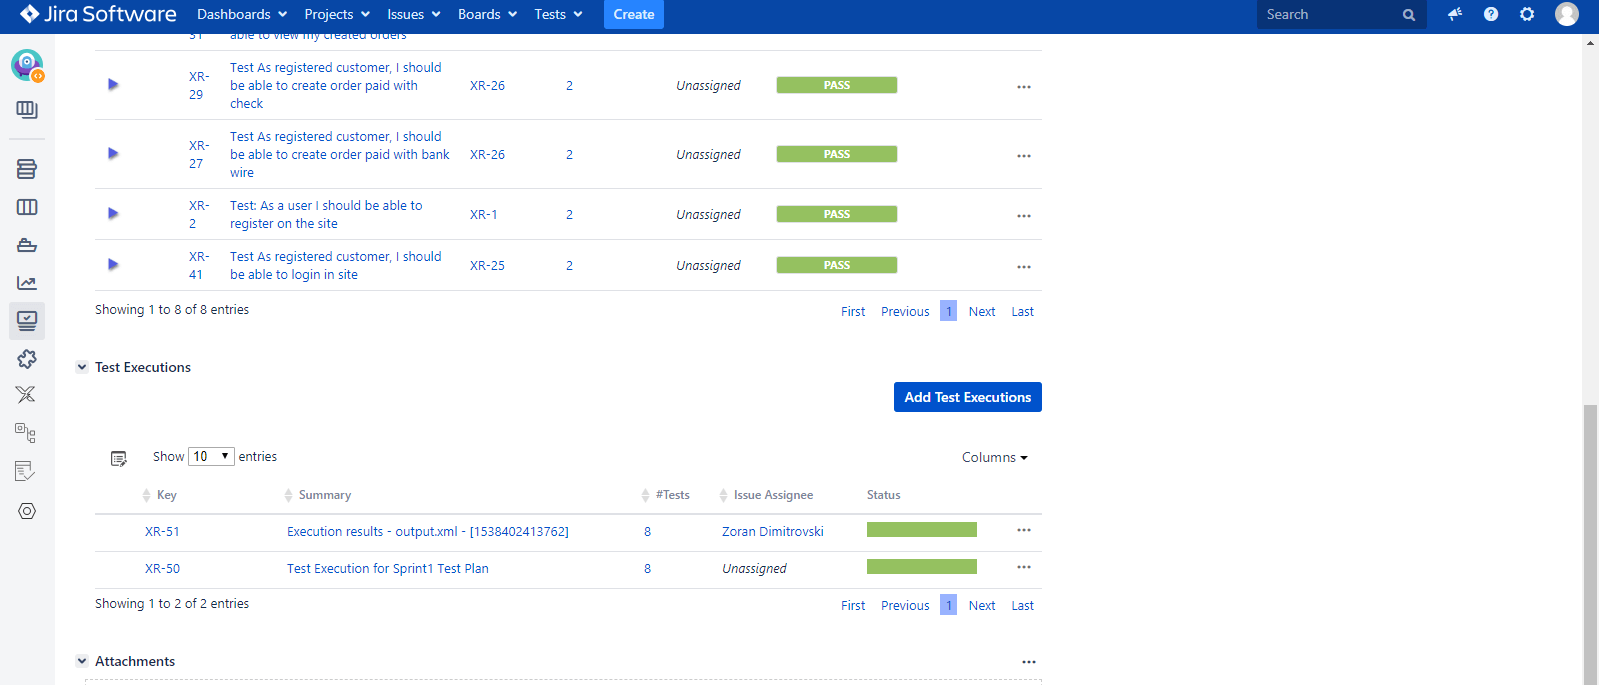
(Figure 15 – Test Plan with the associated two Test Executions)
3. Importing tests and results from automated Robot test run, when Tests are not defined in Xray
Interesting feature of Xray is that Tests can be created in JIRA, based only on importing tests results from Robot automated test run. Consider that our tests are created only in Robot and there are no corresponding Tests created in Xray/JIRA.
In order Robot test cases to be mapped to particular User Story in JIRA, Robot test cases should be tagged with User Story which those are testing. For example in the image bellow, Robot test case “Create Account” verifies User Story XR-1, while Robot tests “Place Order paid with bank wire” and “Place Order paid with check” verify User Story XR-26.
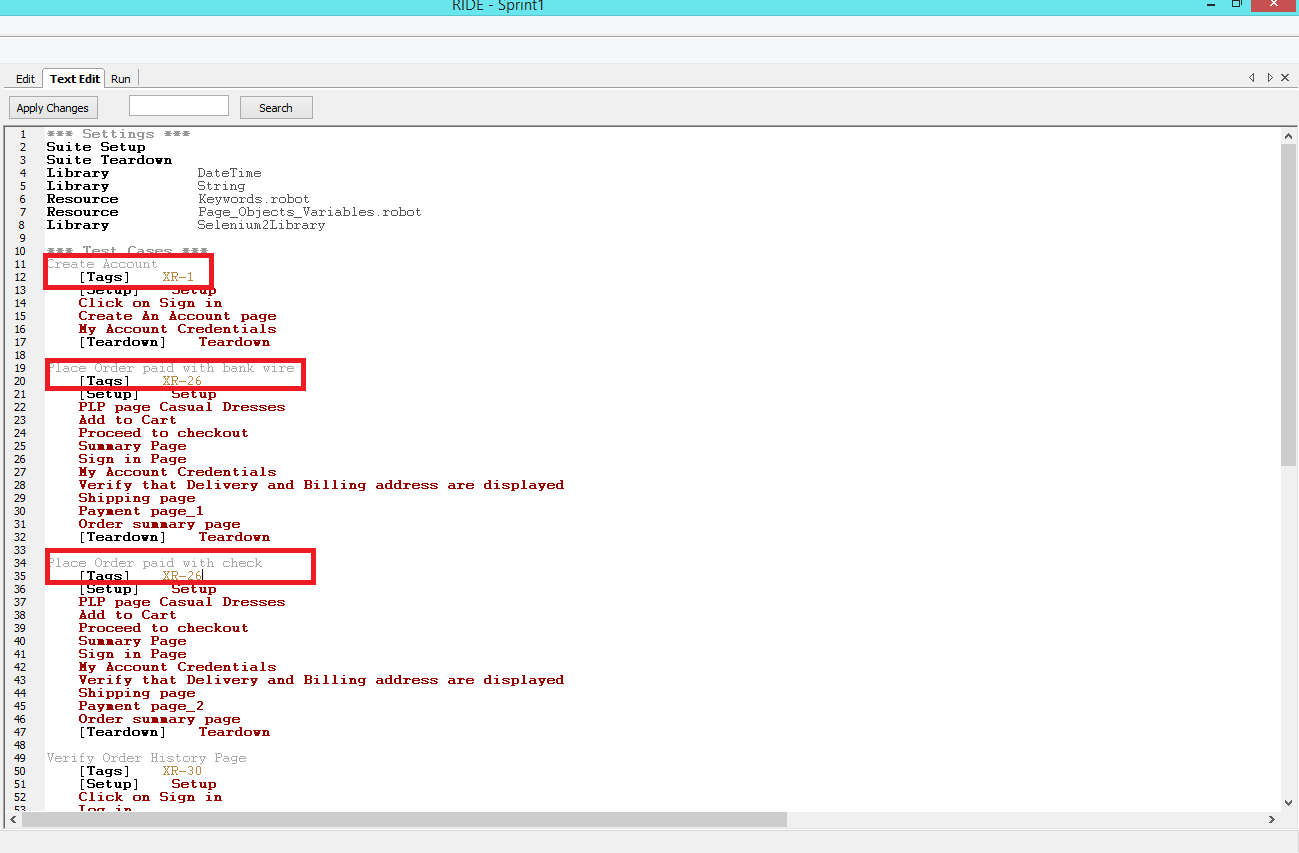
(Figure 16 – Associating Robot test cases with User Story key in JIRA, using tags)
In this case, “minimal” configuration for the import task in Post-build action in Jenkins job will be used, i.e.only JIRA project key and environment will be configured, which is optional.

(Figure 17 – Xray: Results import Task – minimal configuration when Tests are not created in Xray/JIRA before an automated test run)
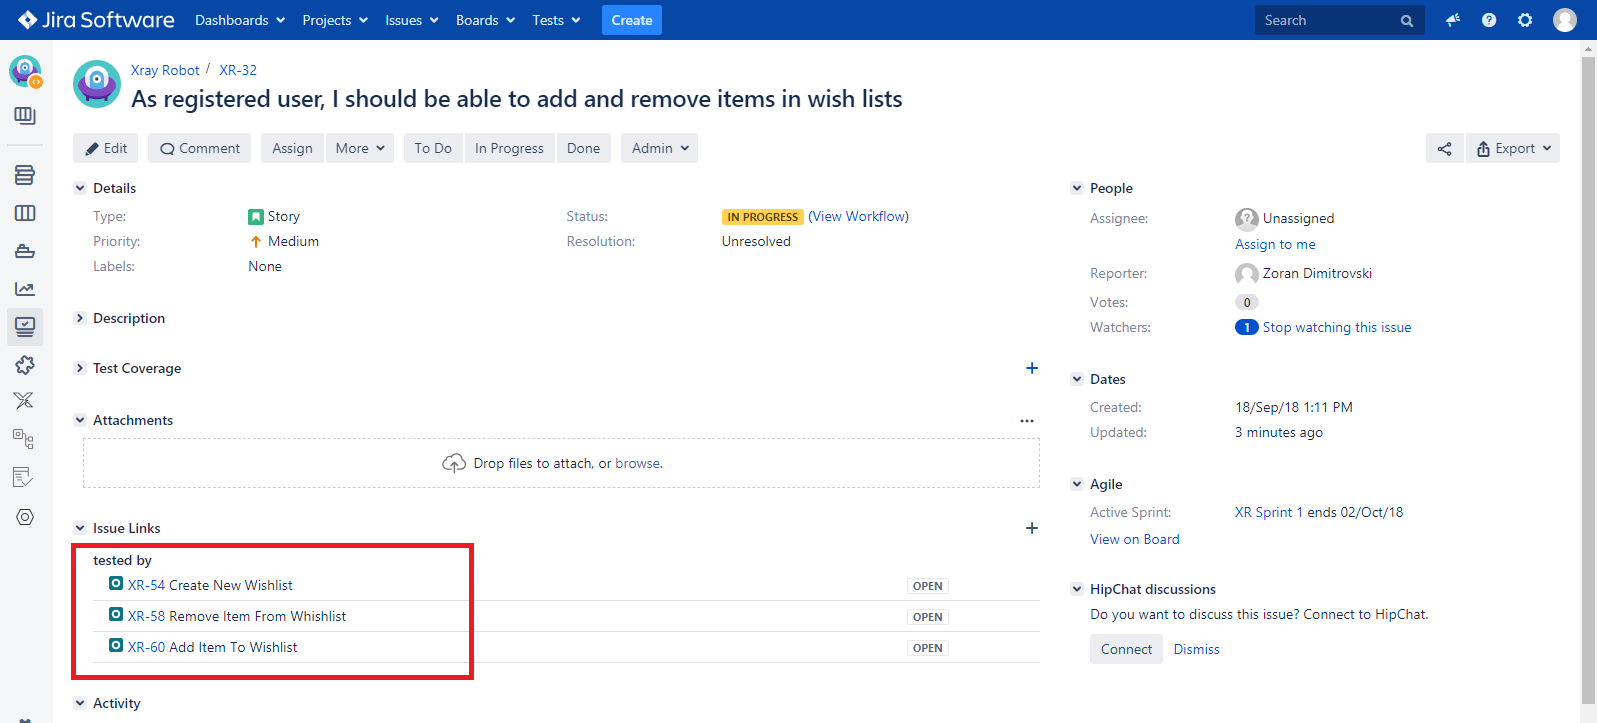
After tests are executed by Jenkins, new Tests are created, that are automatically associated with User Stories, based on the tags that were added in Robot test cases. For example, in a case of a user story XR-32, three Tests are automatically associated from executed Robot test cases.
Also, after tests run, new Test Execution is created with all executed Robot tests. (Please note, that Test Type in this case is “Generic”. Xray supports three different Test Types: “Generic” – supports automated agnostic test that is executed by an external tool, “Cucumber” – enables writing Tests in Gherkin language and “Manual” – enables writing tests in standard Step Description/Expected Result format for manual execution)
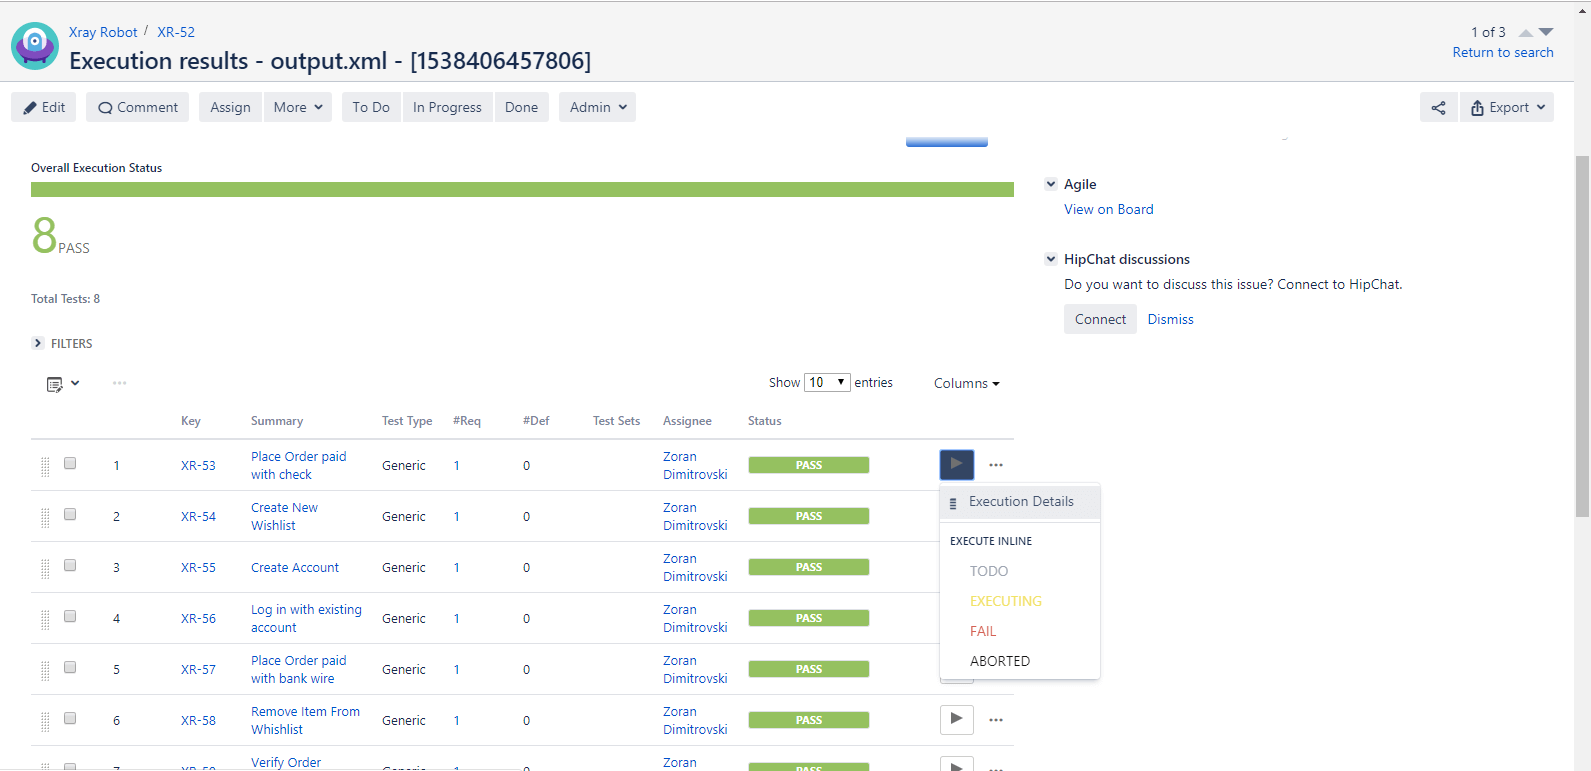
(Figure 19 – Created Test Execution after Robot tests run)
From Test Execution, it can be navigated to the Execution Details for each of the Tests. For example, if we navigate to Execution Details of the Test XR-53, we can see the test status of each of the keyword contained in executed Robot test.
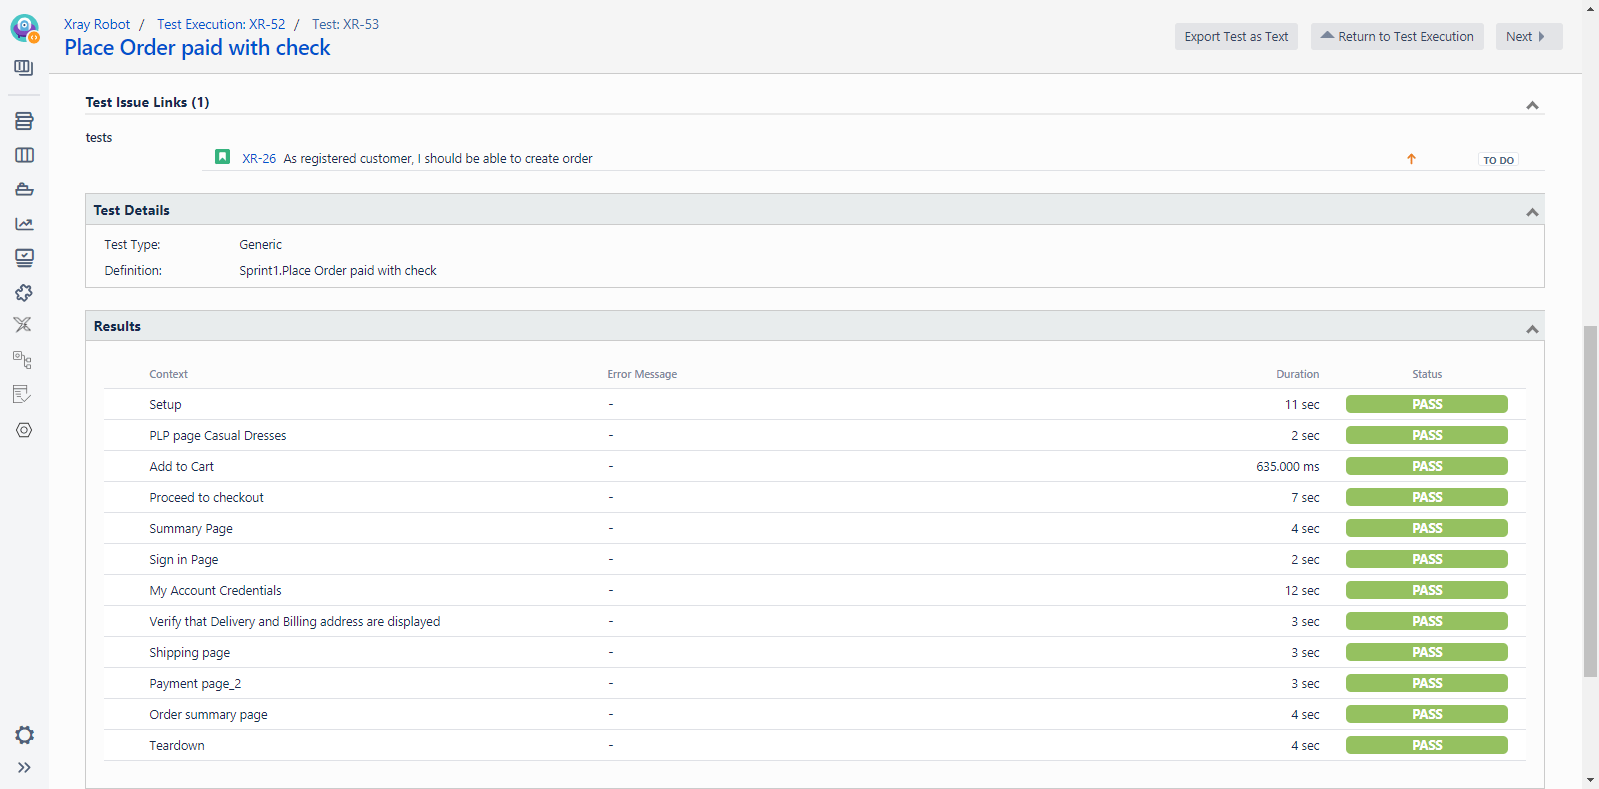
(Figure 20 – Execution details with keywords from the executed Robot test)
Comparing the above mentioned three methods for importing automated tests results, it looks that the most applicable is the method 2, because it automatically creates Test Execution in Xray/JIRA upon execution of the automated tests and associate results with corresponding Test Plan. On the other side, comparing method 2 with method 3, the drawback of method 3 is that it doesn’t create any Test Plan associated with the automated test run. The main advantage of method 3 – automatic creation of Tests in XRay/JIRA, in most situations will not be applicable, because most probably there will be already defined Tests for manual testing, before implementation and execution of automated tests.
Conclusion
Xray test management plugin for JIRA, provides all necessary artifacts for entire testing life-cycle in a case of manual testing, it provides strong support for automated testing with its support of importing results from different test automation frameworks, like Robot testing framework. This possibility, avoids the need of “manual” importing results from automated tests. All in all, Xray simplifies the entire test management, monitoring and reporting, because it provides one central point – JIRA where all relevant information of the testing for a particular project can be found.