
Starting from December 2018, Amazon Web Services (AWS) launched a widely-requested feature: WebSocket in Amazon API Gateway. With WebSocket available in AWS API Gateway, all senior AWS engineers are able to create client-driven, real-time applications which use a two-way/bidirectional communication (this means that a client can send messages to service and services can independently send messages to its clients). It is an advanced technology that makes it possible to open an interactive communication session between the user’s browser and a server.
WebSocket APIs are often used in real-time applications such as chat applications, collaboration platforms, multiplayer games, and financial trading platforms.
But before we dive into the how-to, there are some concepts that I want you to be aware of.
WebSocket API Gateway Concepts
Routes
- $default route – if the route selection expression cannot be evaluated against the message or if no matching route is found.
- $connect route – when a persistent connection between the client and a WebSocket API is being initiated.
- $disconnect route – when the client or the server disconnects from the API.
- $custom route – API Gateway calls a custom route, after the route selection expression is evaluated against the message, if a matching route is found the match determines which integration is invoked.
Route selection expression
A route selection expression is evaluated when the service is selecting the route to follow for an incoming message. The service will use the route whose routeKey exactly matches the evaluated value. If none match, and a route with the $default route key exists, that will be selected. If no routes match the evaluated value and there is no $default route, the service will return an error. For WebSocket-based APIs, the expression should be of the form $request.body.{path_to_body_element}.
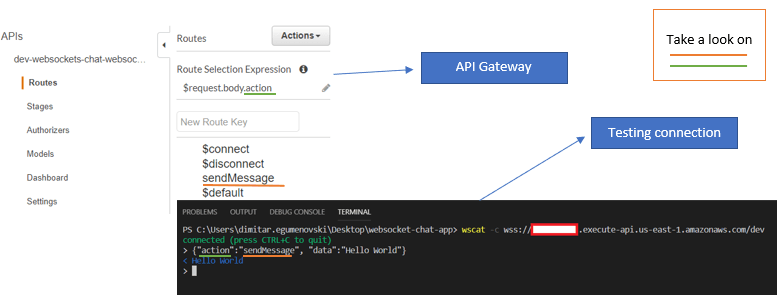
Web Sockets are always useful in web applications. One tutorial, that I find quite interesting, demonstrates Chat based on the API Gateway Web Sockets. You can find the link in the References section. The client sends a message and it is fan-out to the connected client.
In addition, I will initiate a push message from “external” logic, i.e. another Lambda function which will have a timed trigger. When you invoke that Lambda function, it will send a message to the specifically connected client (even if none of the connected clients has sent a message).
This means I will create a Lambda function which will send a message to the connected client, relation: server -> client.
How-to
This is an addition to the Chat application showed in the tutorial above.
- Create a Lambda function
(Go to AWS Lambda Console -> Click on “Create a function” -> Choose “Author from scratch” -> Give a name to your function -> Choose “Node.js 8.10” as a Runtime -> Before choosing “Use an existing role” let’s create a role…)
(Go to IAM Console -> Choose “Roles” from the left vertical menu -> Click on “Create role” -> Select “AWS service” from “Select type of trusted entity” -> Then choose “Lambda” as a service that will use this role -> Search for “APIGatewayAdminitrator” -> Choose “AmazonAPIGatewayAdministrator” -> optional: Insert Tags -> Give a name for the role -> Create role )
(Now when you have a role go to the Lambda function creation and choose your created role)
Copy and paste the code in your Lambda editor:
ar AWS = require('aws-sdk');
var dynamodb = new AWS.DynamoDB();
exports.handler = (event, context) => {

var paramsS = {

TableName: "chatIdTable",
ProjectionExpression: 'connectionId'

}

dynamodb.scan(paramsS, function(err, data) {
if (err) console.log(err, err.stack); // an error occurred
else console.log(data);
var i;
for (i = 0; i < data.Count; i++) {
console.log(data.Items[i].connectionId.S);
var params = {
ConnectionId: data.Items[i].connectionId.S,
Data: 'Hello from Lambda'
};

var apigatewaymanagementapi = new AWS.ApiGatewayManagementApi({
apiVersion: "2018-11-29",
endpoint: '<your endpoint>.execute-api.us-east-1.amazonaws.com/dev',
accessKeyId: <your access key>,
secretAccessKey: <your secret key>
});

apigatewaymanagementapi.postToConnection(params, function(err, data) {
if (err) console.log(err, err.stack); // an error occurred
else console.log(data); // successful response
});

}
});

}
Don’t forget to change: connectionID, endpoint, accessKeyId, and secretAccessKey with your values!
2. Create a timer trigger for your Lambda
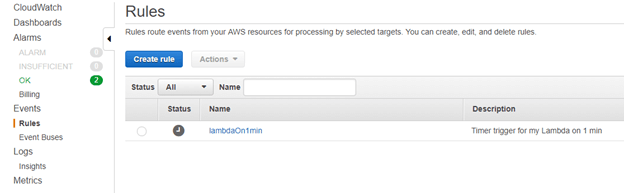
(Go to AWS CloudWatch console -> From the left vertical menu choose “Rules” -> Click on “Create rule” -> Choose “Schedule” from “Event Source” -> Type how much time you want in “Fixed rate of”-> Then click on “Add target” -> Add your Lambda function -> Configure details -> Give a name and description -> Create rule )
Conclusion
In this post, I explained a little bit about WebSocket API, including WebSocket in API Gateway. Additionally, below you can find the link with a full tutorial about using and creating a real chat application with WebSocket plus creating a PUSH notification with Lambda function that will send a message to connected clients.
References
https://docs.aws.amazon.com/apigateway/latest/developerguide/apigateway-websocket-api.html
https://docs.aws.amazon.com/AWSJavaScriptSDK/latest/AWS/ApiGatewayManagementApi.html
https://aws.amazon.com/blogs/compute/announcing-websocket-apis-in-amazon-api-gateway/
https://youtu.be/Quk_XHMvFJI – video demonstration from Foo Bar