When speaking of UI Automation, usually Selenium comes in the first place. But why is this framework so popular?
Selenium does browser automation by telling the browser to click some element, populate and submit a form, navigate to a page, or do any other form of user interaction. Basically, it simulates manual testing of E2E flows. Tests can be run repeatedly, which results in increased software quality and a reduction in overall software development costs. It has support for multiple web browsers as well as multiple platforms. Tests can be written in a number of popular programming languages, including C#, Java, PHP, Python, Ruby, Groovy, and Scala.
The Selenium suite consists of the following components: Selenium IDE, Selenium RC, Web Driver, and Selenium Grid. The Selenium RC and Web driver have been merged into a single framework Selenium 2, which is widely accepted and used.
Selenium IDE is a browser plugin that can be installed and used for recording the flows inside the web application.
Selenium 2 as a framework is used for developing automated tests on a higher level. The Web Driver initializes the browser, accepts programmed commands, sends them to a browser locates the HTML elements on the page, and interacts with them.
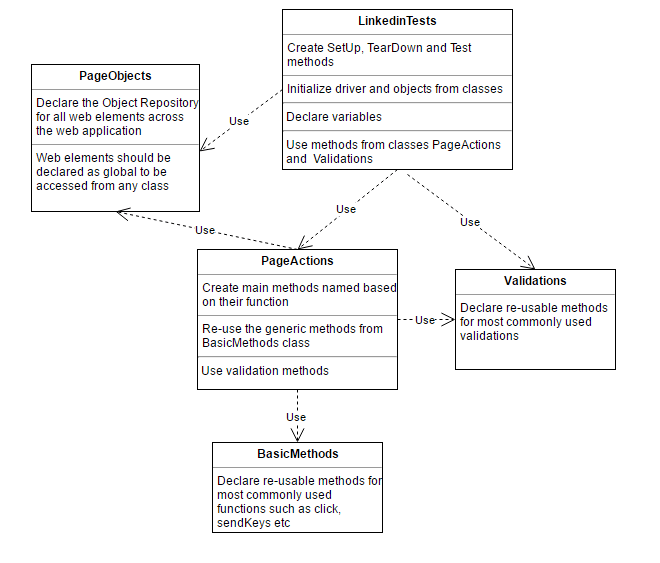
The sample scenario we will cover is creating a simple Smoke Test using the public LinkedIn webpage. The scenario will cover user log-in, navigation to the edit profile page, elements validation on the profile page, and user log-out. For that purpose, the project consists of the following classes: LinkedinTests, PageActions, BasicMethods, Validations, and PageObjects.

Code separation when writing automated tests is a good practice because it provides easier and quicker updates of tests. In this example, all page-specific methods are declared in one class (PageActions), and all validations are defined in another class (Validations). The class BasicMethods contains the most common user actions that are not page-specific. Finally, in the class LinkedinTests, all methods are reused and combined in several specific test scenarios.
The class PageObjects contains all hard-coded page element values (names, IDs, etc.). So, if any change is made to the page HTML, updates need to be done only in the class that corresponds to that page, without modification in all tests where that page is used. Also, with object declaration in one class, every object will be reusable around the entire project. As good practice, for easy test maintenance, web objects on a particular page can be separated into “groups”. Additionally, depending on the complexity of implemented tests, a test project can implement multiple PageObjects classes – one per page.
The benefits of using the POM paradigm can be summarized as:
- The Page Object Model helps make code more readable, maintainable, and reusable.
- It is a design pattern to create an Object Repository for web UI elements.
- The names of the variables and methods should be given as per the task they are performing. For example loginEmailInput – Web UI element; Login – method
- Page Object Pattern says operations and flows in the UI should be separated from verification. This concept makes our code cleaner and easier to understand.
- The object repository is independent of test cases, so we can reuse the same object repository. If a change is made to a web element only one change in code is needed. This is one of the greatest benefits of this pattern.
In this example, NUnit is used as an assertion tool. For example, attributes Setup, Test, Teardown, TestFixture, and Ignore were used in the main class LinkedinTests, while assertions such as Assert.IsTrue(), Assert.AreEqual() is used for validations.
Besides these, NUnit provides a very useful attribute Exception, which is used if a particular test is expected to throw an exception. The attribute gives the option to specify the exact type of expected exception, but also to include the exact text of the exception or the custom error message. The use of this attribute helps in testing negative scenarios.
Note: Here you can download the full article. You can also download the Visual Studio project with the complete code explained in this blog.

