

In this article we will describe the steps of integration of JMeter with Kafka testing.
Apache Kafka is a distributed publish-subscribe streaming platform that is very similar to a message queue or enterprise messaging system. Kafka is designed for distributed high throughput systems and works well as a replacement of a traditional message broker.
For more information go to the official Kafka documentation: https://kafka.apache.org/documentation/
The advantages of using Kafka as a messaging system are listed below.
- Supports low latency message delivery and guarantees for fault tolerance with 0% data loss. Kafka persists all data to the disk and all the writes go to the page cache of the RAM memory.
- Can handle a large number of diverse costumers.
- Is very fast and can perform 2 million writes per second.
- High throughput for publishing and subscribing messages, even if many TB of messages are stored it maintains stable performance.
Kafka has four core APIs:
- Producer API – allows an application to publish a stream of records to one or more Kafka topics. The producer is responsible for assigning the records to a specific partition within the topic.
- Consumer API – allows an application to subscribe to one or more topics and processes the stream of records produced to them.
- Streams API – allows an application to act as a stream processor, consuming an input stream from one or more topics and producing an output stream to one or more output topics, effectively transforming the input streams to output streams.
- Connector API – allows building and running reusable producers or consumers that connect Kafka topics to existing applications or data systems. (For more information on this, read here: https://kafka.apache.org/intro.html)
Let’s move on with the JMeter Kafka combination.
Producer Configuration
In order to integrate Kafka with JMeter there is a Pepper-Box plugin for the JMeter Kafka producer. How can you install the pepper box plugin? Download the jar file pepper-box-1.0.jar , copy the file in ${JMeter_Home}/lib/ext folder and restart JMeter.
Pepper-box plugin consists of 3 elements:
- Pepper-Box Plaintext Config allows building text messages according to a specified template (JSON, XML, CSV or any other custom format).
- Pepper-Box Serialized Jmeter Config allows building a message that is a serialized java object.
- PepperBoxKafkaSampler is designed to send the messages that were built by previous elements.
Pepper-Box Plaintext Config
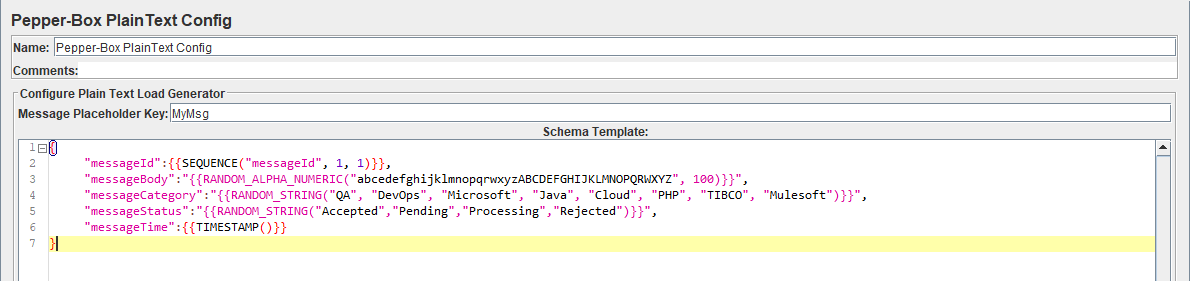
As a quality assurance engineer, with this configuration element you can send messages according to a specified template JSON, XML, CSV or any other format. To add this item in your JMeter test, go to Thread group -> Add -> Config Element -> Pepper-Box Plaintext Config.
The element has 2 keys:
- “Message Placeholder Key” – it is the key that needs to be specified in the “PepperBoxKafkaSampler”.
- “Schema Template” – this is the message template structure that accepts anything, from plaintext to JSON or XML. In the schema template you can also use JMeter variables and
Pepper-Box Serialized Config
In order to send Java serialized objects you can use Pepper-box Serialized Config Element. To add this element, go to Thread group -> Add -> Config Element -> Pepper-Box Serialized Config.
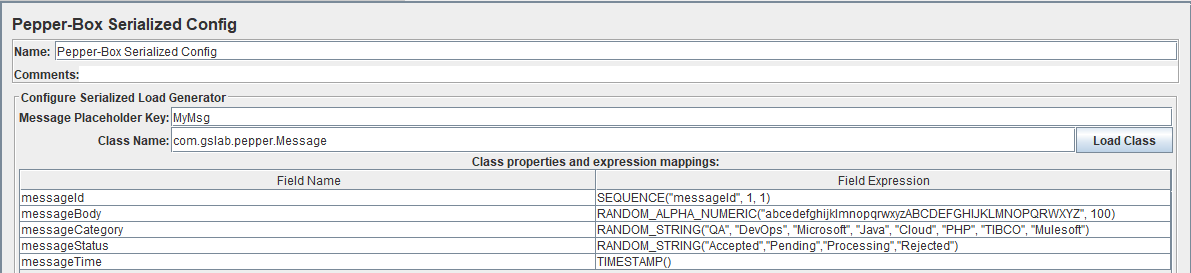
In order to configure this element, follow the steps below
- Enter the class name in the “Class Name” field ex. “gslab.pepper.Message”. This class should be present in jmeter class path folder (lib or lib/ext).
- Click on “Load Class” button and it will populate all the fields from the class with default values as “Ignore” which means the value is not set.
- Assign a function to each field as in the screen above.
PepperBoxKafkaSampler
This is a java request sampler. To add this element, go to Thread group -> Add -> Sampler -> Java Request and then select “com.gslab.pepper.sampler.PepperBoxKafkaSampler” class from the drop-down list.
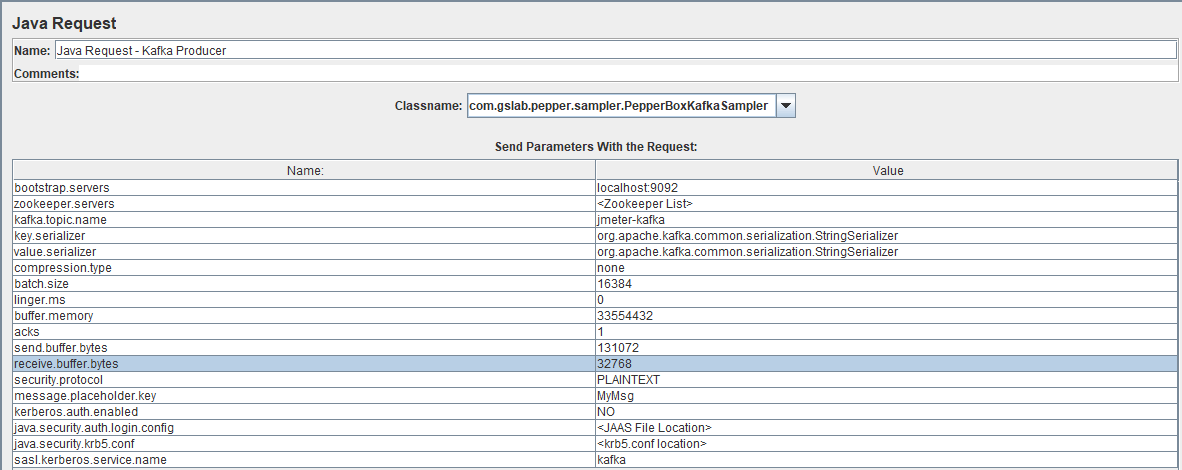
The “PepperBoxKafkaSampler” contains default properties for producer and topic that can be modified.
- bootstrap.servers/zookeeper.servers – the addresses of brokers/zookeepers (a zookeeper is an interface that distributes the load from the producers between different brokers) in the format of broker-ip-1: port, broker-ip-2: port, etc.
- kafka.topic.name – is the name of the topic for message publication.
- key.serializer – is a class for key serialization. Leave it unchanged if there is no key in the message.
- value.serializer – is a class for message serialization. For a simple text, the field remains unchanged. When using Pepper-Box Serialized Config, you need to specify “com.gslab.pepper.input.serialized.ObjectSerializer”.
- compression.type – is a type of message compression (none/gzip/snappy/lz4).
- batch.size – is the largest message size.
- linger.ms – is the message waiting time.
- buffer.memory – is the producer’s buffer size.
- acks – is the quality of service (-1/0/1 – delivery is not guaranteed/the message will surely be delivered/the message will be delivered once).
- receive.buffer.bytes/send.buffer.bytes – the size of the TCP send/receive buffer. -1 – use the default OS value.
- security.protocol – is the encryption protocol (PLAINTEXT/SSL/SASL_PLAINTEXT/ SASL_SSL).
- message.placeholder.key – is the message key, which was specified in the previous elements.
- kerberos.auth.enabled, java.security.auth.login.config, java.security.krb5.conf, sasl.kerberos.service.name – are a field group responsible for the authentication.
Consumer Configuration:
Because there isn’t an already developed JMeter Kafka plugin for the consumer, add a JSR223 Sampler with the consumer code. In order for it to work, you also need to add a kafka-clients-x.x.x.jar file that contains the required classes for working with Kafka. You can find the .jar file in the lib folder of Kafka installation directory and copy the file to the JMeter/lib directory. Below is the code for JMeter Kafka Consumer.
//Define the certain properties that need to be passed to the constructor of a KafkaConsumer

Properties props = new Properties();

props.put("bootstrap.servers","localhost:9092");

props.put("group.id",group);

props.put("enable.auto.commit","true");

props.put("auto.commit.interval.ms","1000");

props.put("session.timeout.ms","30000");

props.put("key.deserializer","org.apache.kafka.common.serialization.StringDeserializer");

props.put("value.deserializer","org.apache.kafka.common.serialization.StringDeserializer");


// Create the consumer using props

KafkaConsumer < String, String > consumer = new KafkaConsumer < String, String > (props);


// Pass a list of topics to subscribe

consumer.subscribe(Arrays.asList(topic));

long t = System.currentTimeMillis();

long end = t + 1000;

while(System.currentTimeMillis()<end)

{


 //The poll method returns fetched records based on current partition offset. The poll method is a blocking method waiting for specified time in seconds. If no records are available after the time period specified, the poll method returns an empty ConsumerRecords.

                 ConsumerRecords < String, String > records = consumer.poll(100);


                             for (ConsumerRecord < String, String > record: records) {

                                                  //print the message to the response

                                                  SampleResult.setResponseData(record.value());


                                      }


//commit offsets returned on the last call to consumer.poll() for the subscribed list of topic partitions.

                                consumer.commitSync();

}

consumer.close();
Functional JMeter Test
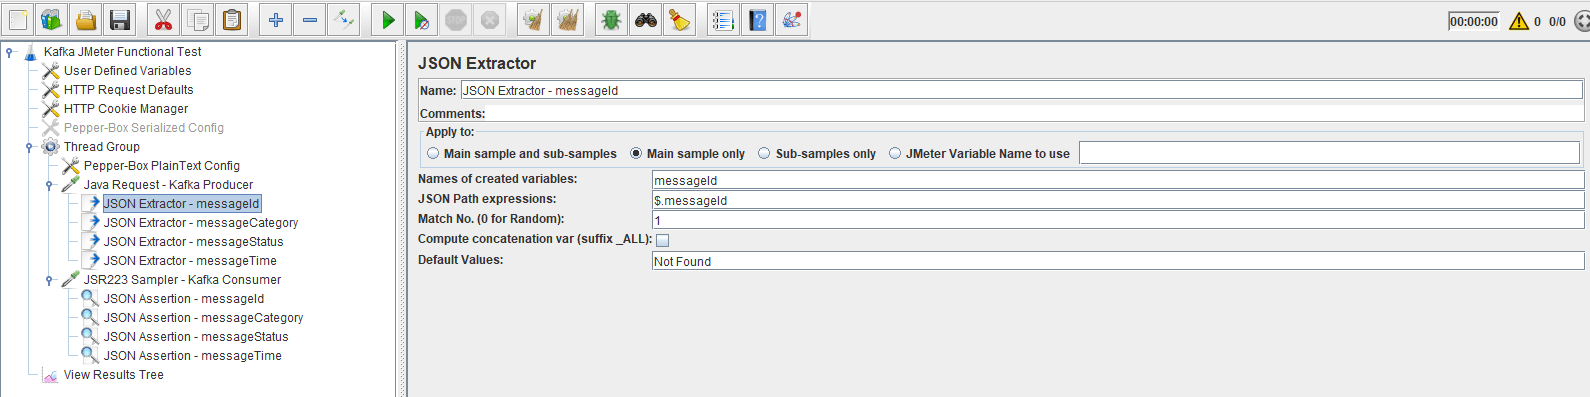
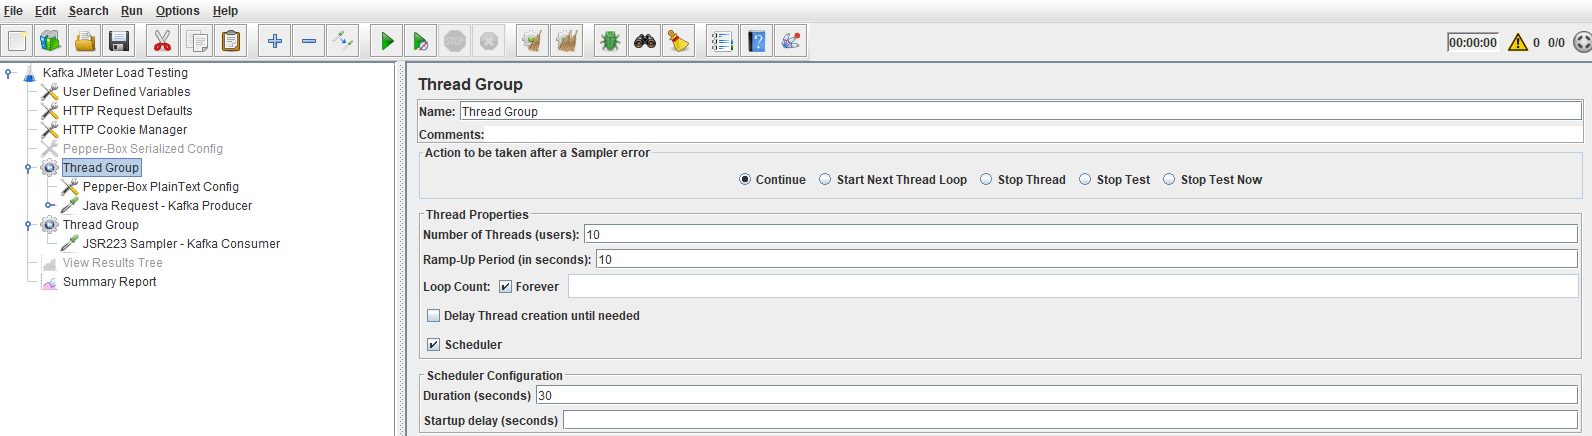
In order to execute functional JMeter test for Kafka add Kafka Producer and Kafka Consumer in single Thread Group as on the screen below.
You can extract the values from the response of Producer sampler and add the values as assertions in the Consumer in order to verify that the same message is received, which also makes the Kafka JMeter integration powerful.
Load JMeter Test
For the Kafka load testing with Jmeter add JSR223 Sampler (Kafka Consumer) and update the code with the following snippet:
long t = System.currentTimeMillis();
long end = t + 50000;
String FilePath = FileServer.getFileServer().getBaseDir();
FileOutputStream f = new FileOutputStream(FilePath + "\\data.csv", true);
PrintStream p = new PrintStream(f);
while (System.currentTimeMillis() < end) {
ConsumerRecords < String, String > records = consumer.poll(100);
for (ConsumerRecord < String, String > record: records) {
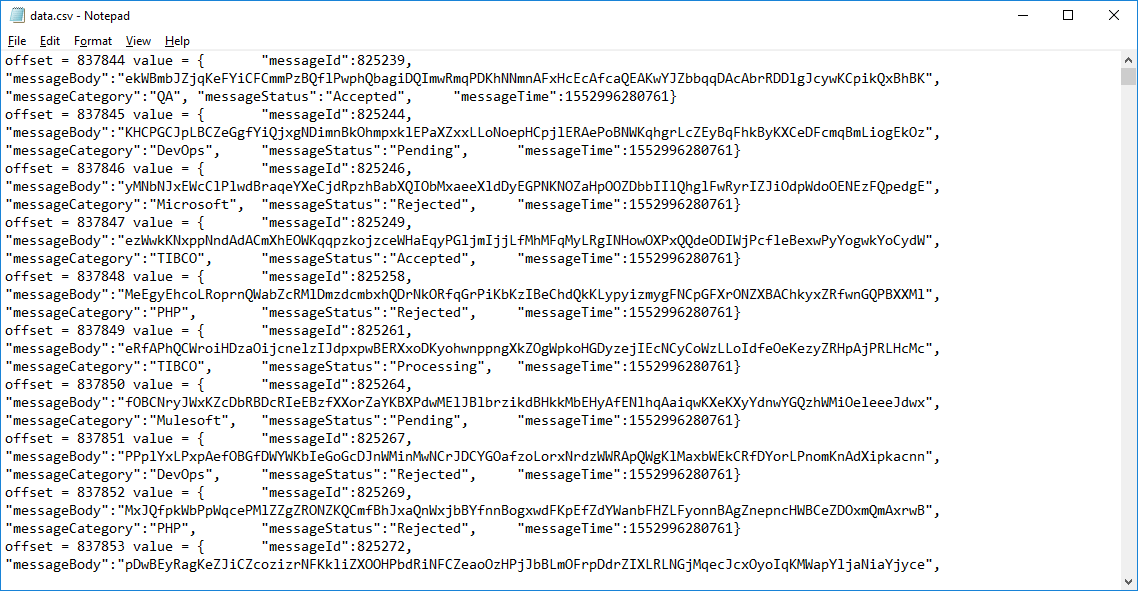
p.println("offset = " + record.offset() + " value = " + record.value());
}
consumer.commitSync();
}The modified part will save the data to a file, in order to have a better analysis of the results from the Kafka performance testing using JMeter.
Setup the thread group with the testing Kafka Producer with load of 10 threads (users) and duration of 30 seconds and execute the test. After the test runs validate that all messages from the producer are stored in the data file.
Now you know everything about the JMeter Kafka testing, so it’s time to try it yourself. Feel free to read our other blogs for any information you need!