

OAuth 2 protocol together with OpenID Connect give us the ability to use third-party applications without the need to create accounts for each application. Instead we can login with our already existing accounts from Facebook, Google, LinkedIn etc. In this blog we will see how these two components work together to achieve this.
The OAuth 2 specification gives us detailed implementation guidelines on how to implement the OAuth 2 protocol. It is important to note that this protocol only defines the process of authorization of the user. Because most applications also require authentication of the user, in the past each server had its own implementation of the authentication process that would vary from server to server. In order to standardize this process of authentication of the user, the OpenID Connect protocol has been created. OpenID Connect is used as additional identity layer on top of the OAuth 2 protocol and gives us a standardized way to implement authentication on our server. The OpenID Connect specification explains this protocol in greater details.
In the further explaining we will assume that the only addition that OpenID Connect provides to OAuth is the generation of an id token, that is used to authenticate the user. In reality there is more to this protocol but for simplicity sake we will skip some details.
Roles
Before we dive in into the different types of OAuth 2 flows, let’s have a quick overview of the entities that are taking part in this process.
- The Client
This is the third-party application that requires access to some portion of the user’s account. In order for the client to get the user’s info, the user needs to login with his credentials and explicitly give access to the client.
- The Resource Server
This is the server where all user information is stored.
- The Resource Owner
The resource owner is the user that is giving access to some portion of his account to the client.
- The Authorization Server
This is the server through which the communication between the client and the resource server is happening. If the user gives access to the client, then this server will generate an access token and an id token for that user and give it to the client.
Client Registration
In order for a client to request access to user accounts the first thing it needs to do is to register itself on the authorization server. The client needs to provide basic information such as the application name, website, logo, etc. But most importantly the client needs to register a redirect URI, where the authorization server will return the tokens after the OAuth 2 flow has completed. Once the registration of the client is complete, the authorization server will issue a client id and client secret. The client id is publicly available and is used to build login URLs. On the other hand, the client secret must be kept confidential, as it’s used as a proof that the client is making the requests, and not some malicious party.
OAuth 2 Grant Types
OAuth 2 provides several ways for authorization also known as grant types. The grant types are the following:
- Authorization code
The most widely used approach. It is used for clients that have a server that can keep the client secret private.
- Resource Owner Password Credentials
This grant type is used with trusted clients, such as those that are owned by the resource server, because the client has access to the users credentials.
- Implicit
Used with mobile or web clients that don’t have a server. With this grant type a client secret is not used because there is no way to keep it confidential. This approach is less secure and should be used when there is no other option.
- Client credentials
Sometimes the client may need an access token to act on his behalf. For example the authorization server may provide an endpoint where the client can update his information. In this case the client will use the client credentials grant type.
Now let’s explain the authorization code grant type flow in more details with an example.
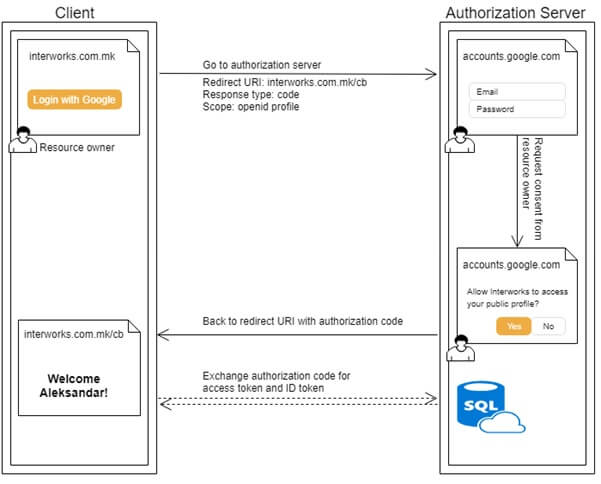
The user visits a client website. There he is given a choice to login with his Google account. Once the user clicks on the Login with Google button, he is redirected to Google’s authorization server. Right in the beginning of this flow as the client is redirecting it’s already passing along some configuration information that the authorization server needs, like the redirect URI, the authorization grant type, etc. Next, the authorization server prompts the user to enter his email and password, and once the user is logged in the authorization server renders a consent screen asking the user if he wants to give the requested permissions to the client application. If the user accepts, then the authorization server redirects back to the client application and sends an authorization code to the client. The client can then exchange this authorization code for an access token and an ID token.
The reason for this additional step of exchanging the code for tokens is in the way the client and the authorization server communicate. There are two ways, or two channels through which the client communicates with the authorization server: a front channel (safe, but not so safe channel) and a back channel (highly secure channel).
In our case the process of logging in, getting consent from the user all the way up to and including the receiving of the authorization code is happening in the browser, or using OAuth terminology it’s happening through the front channel. And because the front channel is a “not so secure” channel, it is not a good idea to send the tokens using this channel.
That is why, when the client receives the authorization code, it makes another request to the authorization server right away in the background to exchange the code for an access token and an ID token. This exchange is happening between the client’s server and the authorization server, using SSL encryption, or in other words this exchange is happening on the back channel.
And finally, once the client receives the tokens, it can make requests on behalf of the user without knowing the user’s credentials. This flow is shown on the image below. Note that the full line arrows represent the communication through the front channel, and dashed arrows are used for the exchange of the code that is happening through the back channel.
Conclusion
That concludes this short blog post about OAuth 2 and OpenID Connect. You should now have a good idea how these protocols work, and when a particular authorization flow should be used. If you want to learn more about OAuth 2 and OpenID Connect, or maybe even make your own authorization server, the specifications for these protocols linked at the beginning of this post are a good starting point. Happy coding!