

Being a leader in the market nowadays requires investment in process automation. Having visibility for monitoring, channeling errors and fast reaction in case of issues is a key point for creating a stable working environment, especially in the world of IT. Taking into consideration the importance of digitalization and automation we developed a solution based on two platforms MuleSoft and Jira which are leaders in their fields. The possibility to monitor and raise any kind of issue that can appear in the MuleSoft applications using Jira as an issue tracking tool has never been easier. Implementing this kind of solution is significantly speeding up the process for fast reaction and resolution of some possible issues.
Before we start with the actual Jira implementation part we should take into consideration that this kind of integration can be performed on both Cloud and On-prem/Server instances and with the combination of any Jira project types, it can be either Jira Core, Software, or Service Desk which as of recently has become Service Management. This allows any organization to integrate their Jira instance without having the concerned if they have the correct version and project type which is a big benefit in terms of spending additional unnecessary financial costs.
In addition to this article, we will give a clear overview of the configuration steps performed on both platforms and explain a real example of this solution. From the Jira side, we shall present two variations, one with a Cloud version using a Service Desk project, and the second one with an On-prem/Server version followed by a Jira Software project.
1. The first part will be dedicated to Jira implementation
I. Jira Cloud Service Desk Configuration Part
We are going to present how to prepare a Jira instance by following this necessary step for this automation process, the prerequisites are:
- Atlassian Jira Service Desk Cloud instance or
- Valid Atlassian Jira account in order to generate API Token for Cloud
- Configured and customized the Jira Service Desk project
We are assuming that the organization already possesses Jira Service Desk or any other Cloud version, but also for testing purposes, a free version can be acquired on the Atlassian official site in order to complete this configuration. Once we have our Cloud instance ready, from a security perspective we need to generate an API token that will be used as a password when posting. We can achieve this simply by creating a new token which can be accessed in your personal Atlassian Account under the API Tokens tab in the Security Settings menu using this link: https://id.atlassian.com/manage-profile/security/api-tokens.
In the next phase, we are going to demonstrate how to create an appropriate Jira Service Desk project and configuration part, that will match the errors that occur during pipeline failure in the MuleSoft project. From this step forward the configuration segments can be applied on both Cloud or On-Prem/Server versions which is the same in terms of logic in the background.
Service Desk project creation and configuration:
- Relevant project type, name, and key
- Issue types and request types
- Workflows and workflow schemas
- System, custom screen fields, and issue type screen scheme
- Components and component lead default assignee
- Queues with filters for each issue type
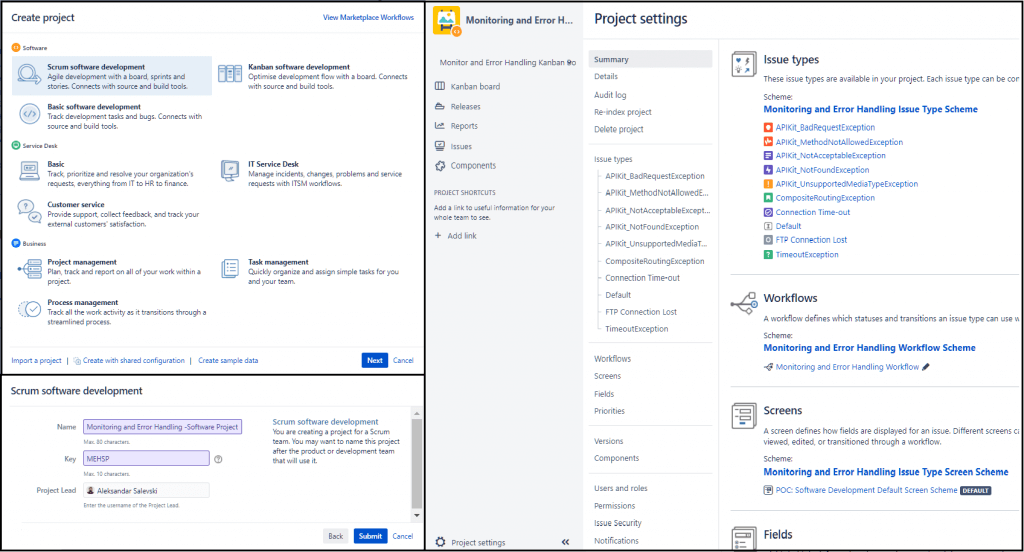
Under the create project section we will choose a classic instead of a next-gen project type because in classic we have more extra abilities and features in terms of project configuration. Next, we will select an External service template from the Service Project/Desk list, as this option is best suited for our needs and purposes. In the final step, we shall give a relevant project name and key.
By accessing project settings on the left menu in the project we can find all other configuration options. First, we will define issue types, and to do that we need to create an Issue Type Scheme that will be associated with the project and will contain our newly created issue types based on the kind of error that is expected to happen in the MuleSoft project.
Then we go into the Workflows section, create a new workflow, and define the kind of statuses and transitions that will be included in it. As with the previous configuration, a new Workflow Scheme has to be created as well. We include the workflow into that schema and assign the issue types that will be affected by this workflow.
The next part is where the new Issue Type Screen Scheme has been created and like the above configuration concept it has to be associated with the relevant project to become active. We create a new Screen with custom fields that will be shown either on the create, edit or view screen. For this project, we shall use the fields (Summary, Issue type, Component, Attachments, Description, Reporter, Assignee, etc.), and use the same screen for all views.
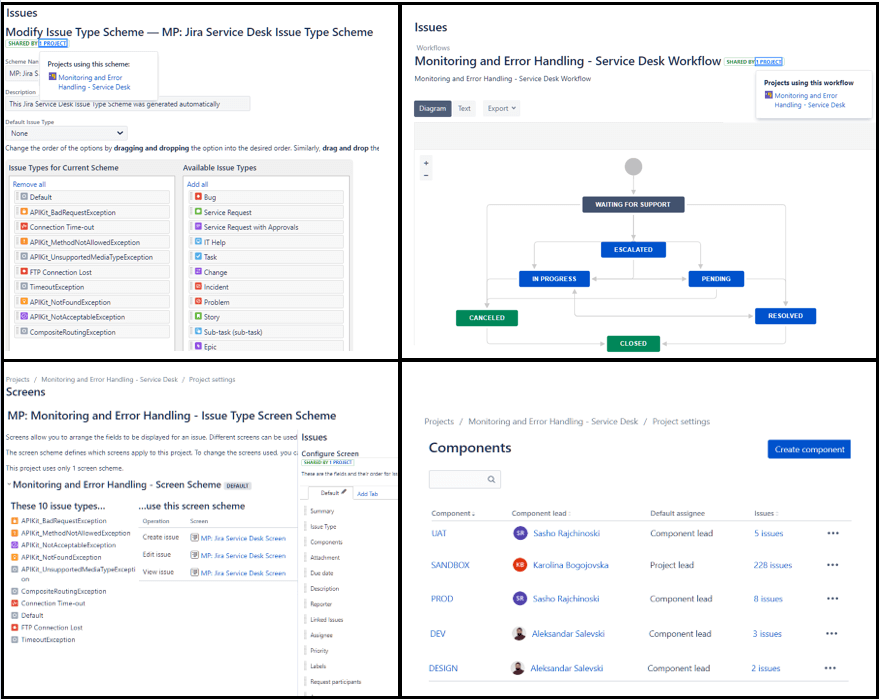
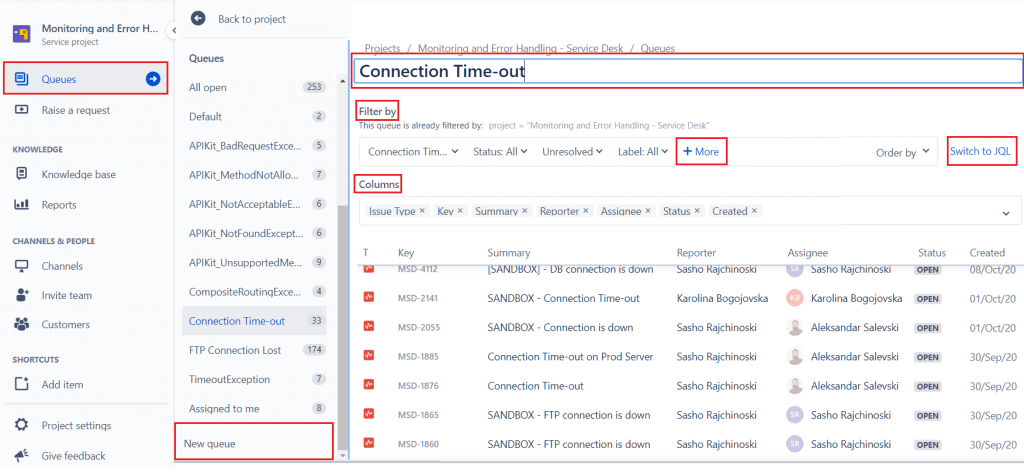
In the final stage of this procedure, we shall configure Service Desk queues with filters for each issue type. This can be done by navigating in Queues through the main menu and selecting new queues at the bottom of the list. We provide the name of the issue type, then we define what we will filter, we can select fields and values from the Jira system fields or the ones that we created additionally. For more advanced search we can create the filter using JQL query that gives us more searching possibilities. As a final step for better visual presentation in this configuration, in the columns section, we set the Jira issue values that will be shown in the queue (Issue Type, Project Key, Summary, Reporter, Assignee, Status and Created Date).
II. Jira On-prem/Server Software Project Configuration Part
The steps for preparing a Software project are very similar to the previous part where we have shown how to configure a Service Desk project. We will exclude the API Token validation segment because the natively On-prem/Server version is not supported, instead, it can simply use basic authentication.
Creating a new project as in the previous concept is equivalent to the Cloud version, but for this example, we will choose the Kanban board from the Jira software development options as a template. We will also skip the project configuration part (Workflows, Issue Types, Screens, Custom fields schemas…), and other segments because it is also the same, but with a slightly different user interface.
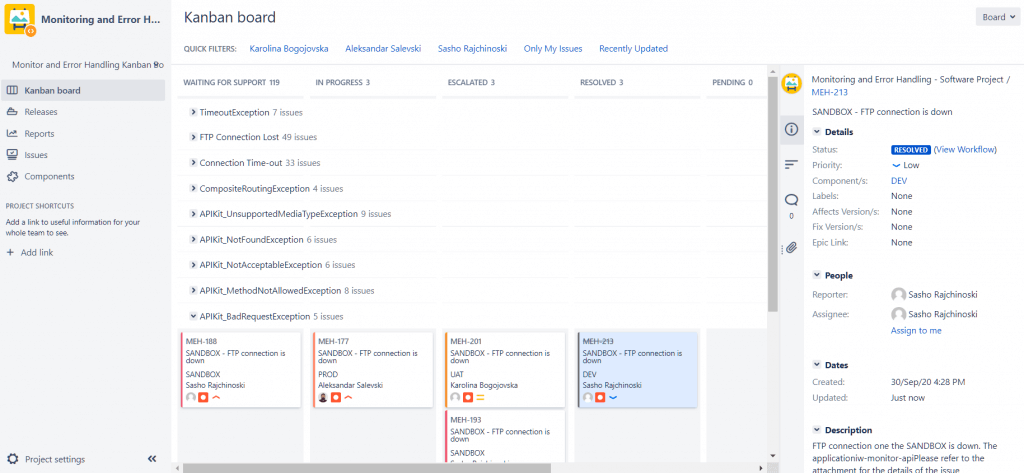
The differentiating and most important part of this model is the Kanban board, which is another way of issuing in columns and swimlanes instead of queues like in the Service Desk. For our project under the board configuration settings, we structured columns for all workflow statuses (waiting for support, in progress, escalated, pending, resolved, and closed), and for the swimlanes, we created filters for all issue types. This way we arranged our Kanban board overview, and we know the exact number of tickets, their issue type, and current statuses. Also, for a better presentation, we edited the card layout by assignee, description, and color for priority.
2. The second part will be dedicated to the MuleSoft implementation
In MuleSoft we have two different accelerator components that were found suitable for making integration with Jira for tracking possible issues.
An additional feature has been added to automate the process of JIRA ticket creation in our monitoring and error-handling accelerators. With this feature, the process of reporting the issues is automated and requires practically no human interaction. When an issue occurs, it is immediately reported if it is listed in our configuration. This ensures that all issues of interest are reported in a timely manner.
I. Jira creation flow in the monitoring accelerator
Once an issue occurs and we detect a problem with losing the connection, the error handling segment of the monitoring accelerator will be invoked. There we have a flow reference to the flow presented in the picture below.
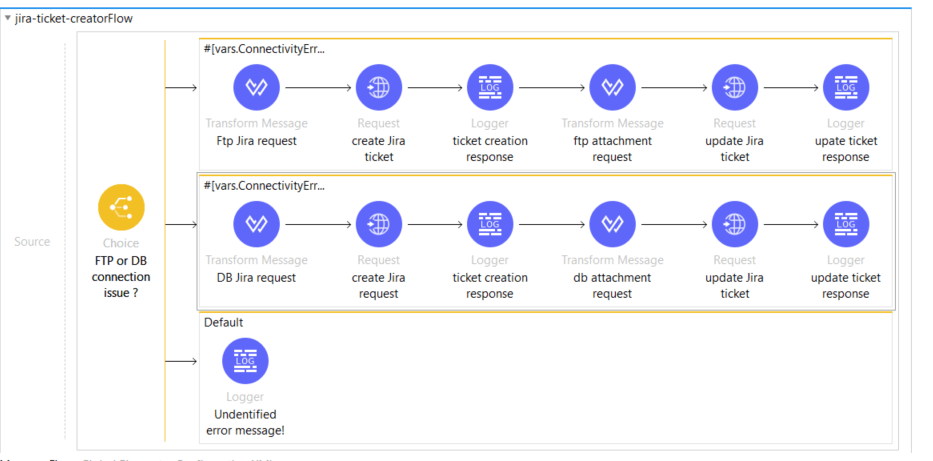
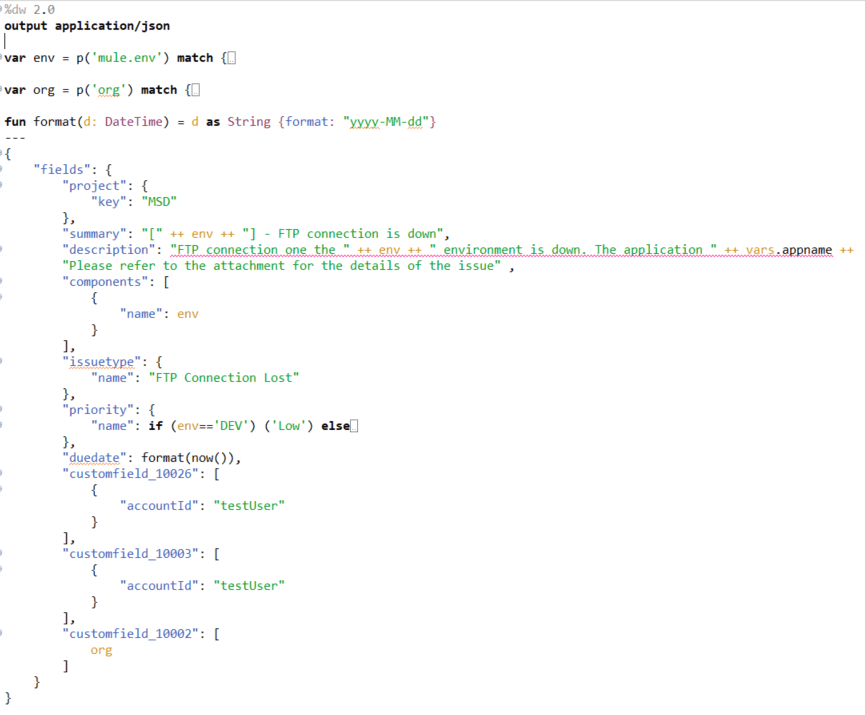
In the flow above we have a choice router which is differentiating two kinds of connection issues. In our example, we are working with just two different connections but this flow is easily upgradable, and if there is a need it can be extended with extra branches. The first step includes creating a JSON request message which will be sent to the JIRA exposed API. In that JSON message, we are populating all the elements that are defined together with the JIRA administrator in order to fill the labels on the board appropriately. The dwl file for that request message has the following structure:
After we create the JSON message structure we have a standard HTTP call. We are making the appropriate HTTP configuration based on the information provided by the JIRA team. We are setting host, port, and path, and the authentication type in our case is basic (username and password). Once we have everything set up correctly we are ready to create the ticket. However, we have one more step before we finish the whole implementation and that is the step for adding the attachment to the ticket which will be created. For that purpose, we are creating one more dwl file and we are performing one more additional HTTP call. Important to be mentioned here is that when we want to send an attachment to the Jira API the output type must be declared as multipart/from-data. The sample dwl file has the following structure:
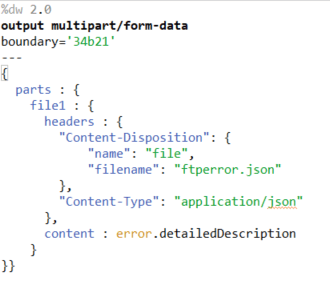
Also, worth to be mentioned is that instead of the standard HTTP configuration which is set up for invoking the Jira API when we want to add an attachment to the ticket, we need to add “project key” plus “/attachments” in the path part.
II. Jira creation flow in the error handling accelerator:
As we can see from the picture above in the error handler accelerator we have a very similar implementation of the Jira ticket creation in case of an issue as it is explained above in the first part related to the monitoring accelerator. We are developing the dwl file which will generate a JSON message for creating the ticket and message of type multipart/from-data to add the attachment. The only difference will be the type of the issue and based on that we will have different values in the corresponding labels when we look at the tickets on the Jira board.
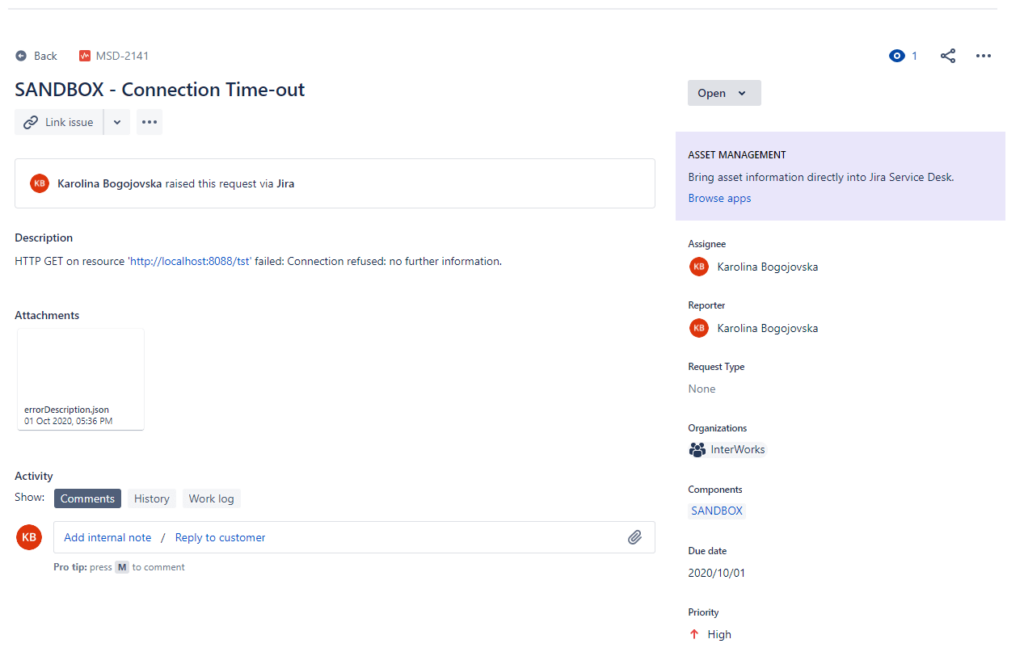
At the end, on the pictures below we can see the Jira board and two examples of the already created tickets.
Conclusion
After we summarized the explanation above we can say that implementing this kind of solution will rapidly increase processing time, decrease the costs, and automate the process of handling exceptions and reporting issues. What we also want to emphasize is that everything explained in this article is already packaged in two different accelerators and ready to be plugged in on any new or existing project where MuleSoft and Jira platforms are used. In both cases, we are talking about solutions that can be adopted as per the client’s needs and are very easily maintainable and upgradable. If you have any questions feel free to contact us.
You can find more info about the Accelerators here.