
How can you maximize project communication through Zoom and MuleSoft integration?
Project members want to have project information at their fingertips. Information, such as a number of errors in applications or associated vendors is essential when working with multiple applications or systems. Most of the projects use some communication tool (Zoom, Slack, Teams etc.) to ensure smooth communication between internal/external teams. These tools are usually used by people but are not limited to people.
Having this in mind while also looking for a solution to fast response regarding application specifics, which may not be available in an instant, we thought we could create some type of MuleSoft application, that will interact with the communication tool used in the project provided it has an API to interact with.
Zoom is one of the widely used business platforms for communication across a range of industries. Its popularity lies in its simplicity and the sheer number of features included in every plan. In addition to this, Zoom offers API which can be integrated into other websites and applications, making it an integral part. The Zoom API is the primary means for developers to request information from Zoom. On the other hand, Mule ESB has capabilities and various connectors to connect with the Zoom API and perform operations.
In the following lines, we will provide a step-by-step guide to integrating Zoom and MuleSoft, i.e. Zoom connector in AnyPoint Studio. To put it simply this will be a step-by-step guide for integrating Zoom API into Mule workflow.
Setting up Zoom API and Zoom APP
We leveraged Zoom API to provide project members with information about their project applications. Zoom API allows us to access all the basic functions we have available through the Zoom UI via code, or more specifically, HTTP requests. The base URL for all requests is https://api.zoom.us/v2/. The complete URL varies depending on the endpoint of the resource being accessed. Each HTTP request made to the Zoom API must be authenticated by Zoom. Zoom supports the following authentication request methods:
- JWT
- OAuth 2.0
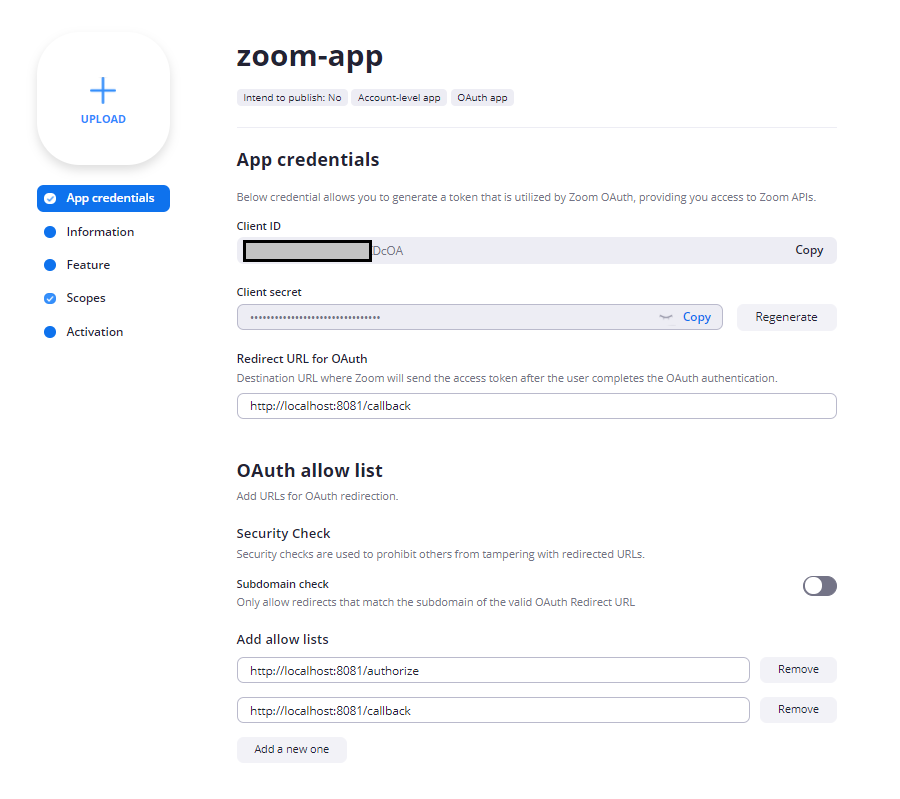
We used OAuth 2.0 protocol for authorization and created an OAuth app on the Zoom App Marketplace (https://marketplace.zoom.us). When we created the application, the system automatically generated the Client ID and Client Secret which generates a token that is utilized by Zoom OAuth. We set the redirect URL and allowed URLs. We set http://localhost:8081/callback as our redirect URL, which redirects us to after successfully authorizing our application. We can specify allowed URLs for OAuth flows by adding unique URLs that Zoom should accept as valid redirect URLs. We set http://localhost:8081/authorize and http://localhost:8081/callback as allowed URLs. Next, we added all chat and user scopes. The Scopes let us define the API endpoints/methods that our application is allowed to use to access specific user resources.
MuleSoft Implementation
Let’s dig now in Mule Anypoint studio where we have global.xml and zoom-project.xml files located in the src/main/mule package and properties.yaml file located in src/main/resources package.
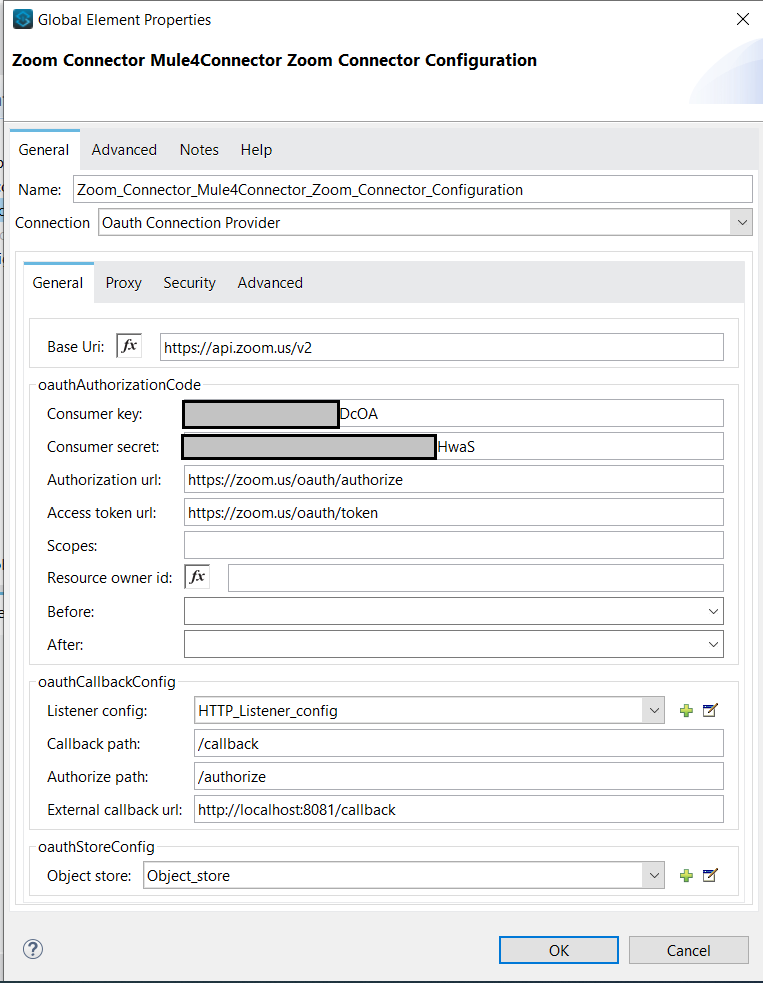
We added Zoom Connector and Object Store Connector from Anypoint Exchange to the project. To configure the Zoom connector, we chose OAuth Connection Provider from the drop-down list, and Base Uri, Authorization URL, and Access token were automatically populated for us. We got the Client ID and Client Secret from the application in Zoom Marketplace and pasted it for the Consumer key and Consumer secret in the connector configuration. We configured an HTTP Listener: http://localhost:8081 and added an Object Store.
For the Callback path, we set /callback, and for the Authorize path /authorize. It is important to note that the paths we specify will be reserved for the connector itself and their functionality will be predefined by the connector. So, in other words, we don’t need to implement the paths we specify ourselves, we just need to give the paths some values, and the configuration is done.
The global.xml file consists of Mule configurations needed for this project:

The zoom-project.xml file consists of one flow: zoom-project-flow and three subflows: message-not-reacted, implementation-error, and implementation-target-system which are referenced by zoom-project-flow.
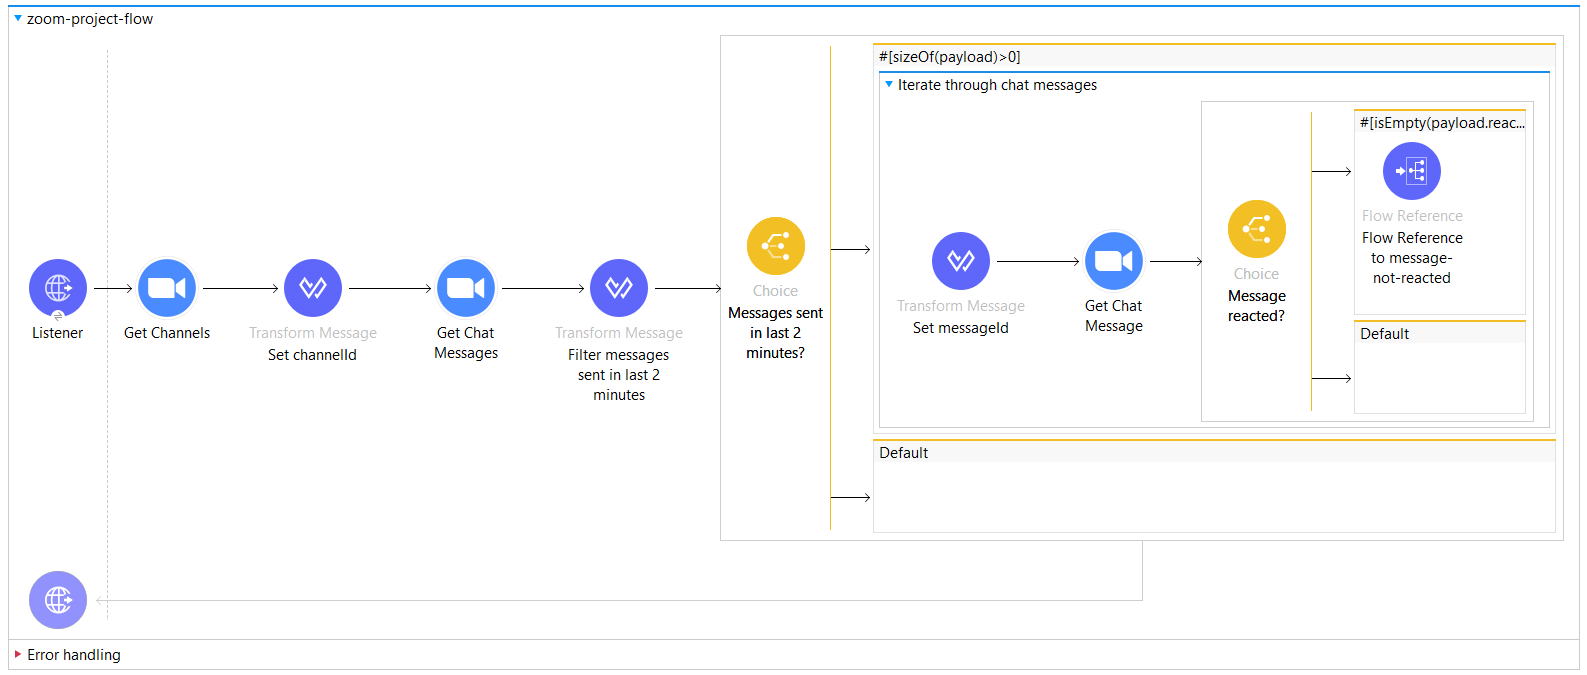
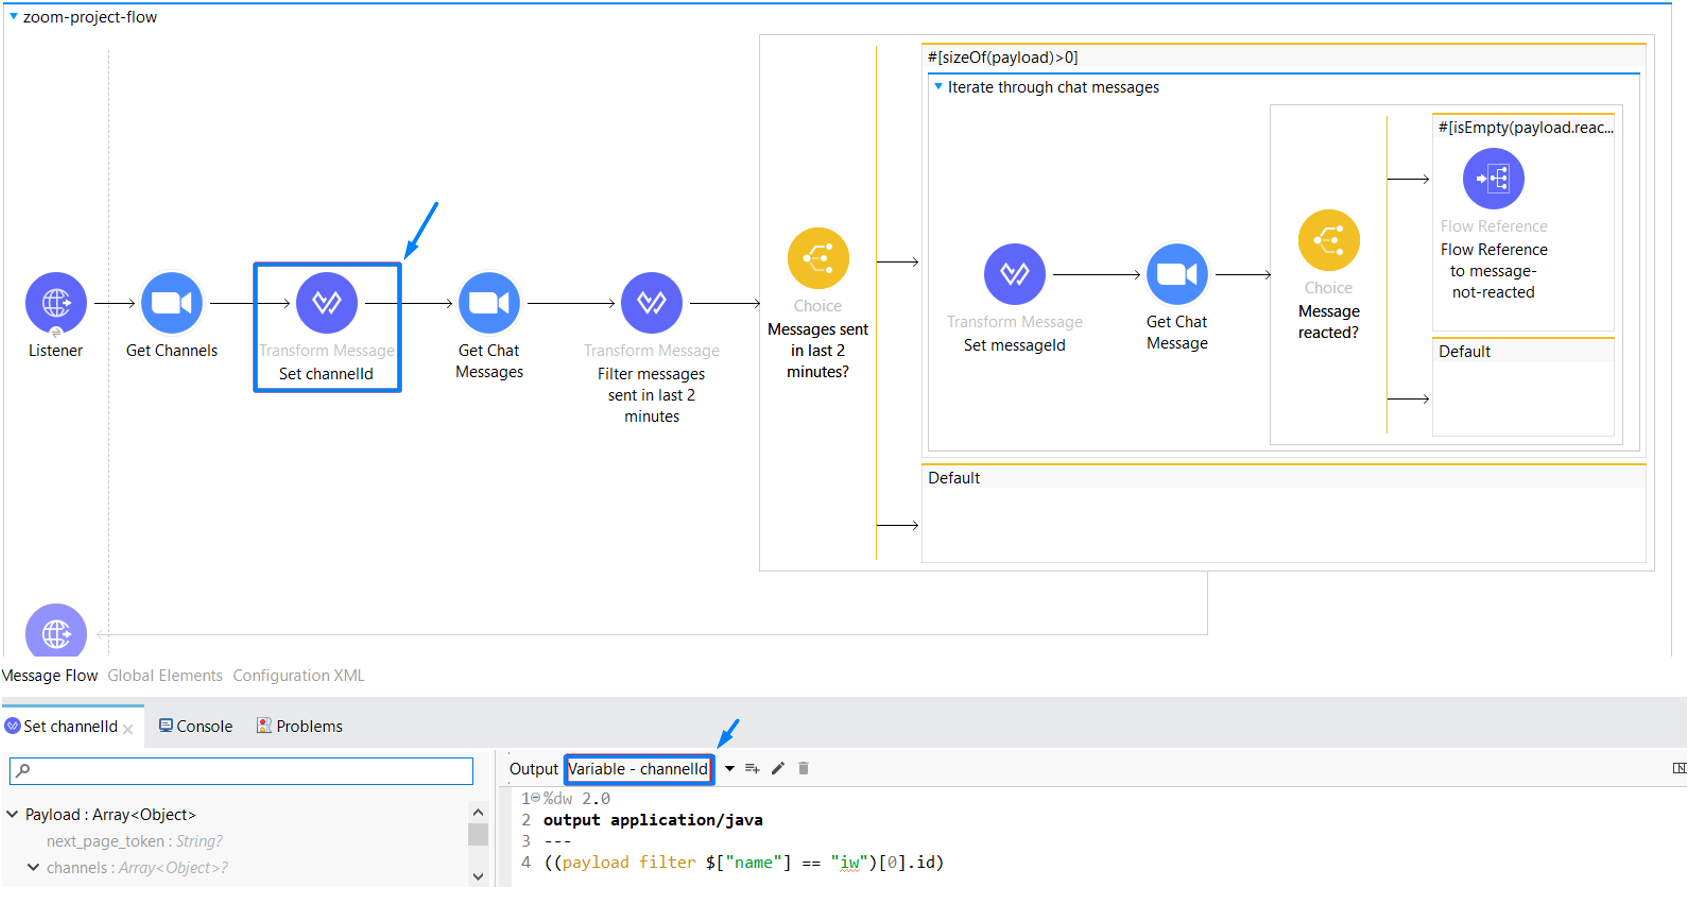
In our main flow: zoom-project-flow, we have an HTTP Listener as an event source with path: /iw. We use the Get Channels operation to list all of the user’s channels. Zoom chat channels allow users to communicate via chat in private or public groups. The endpoint is /chat/users/{userId}/channels. This API supports both user-managed apps and account-level OAuth apps. However, in an account level, to list channels of another user in the same Zoom account, the user calling this API must have a role that has a View or Edit permission for the Chat channels feature.
For this project we only retrieve chat messages from one channel and for that purpose we are searching the channel with the name “iw” and saving its id to a variable named channelId.
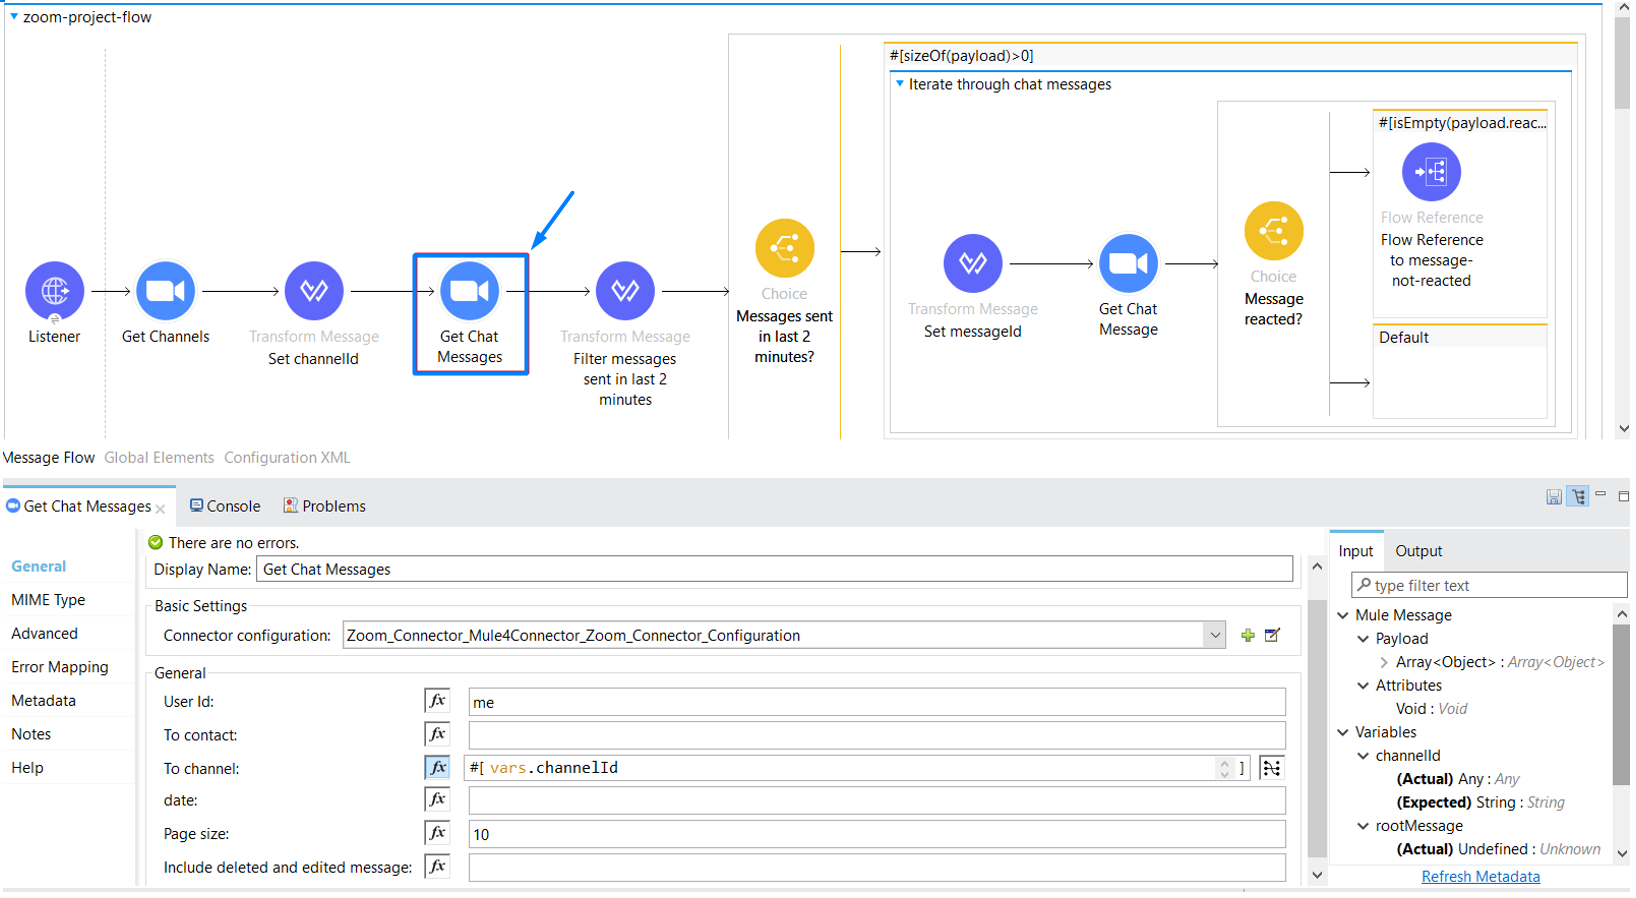
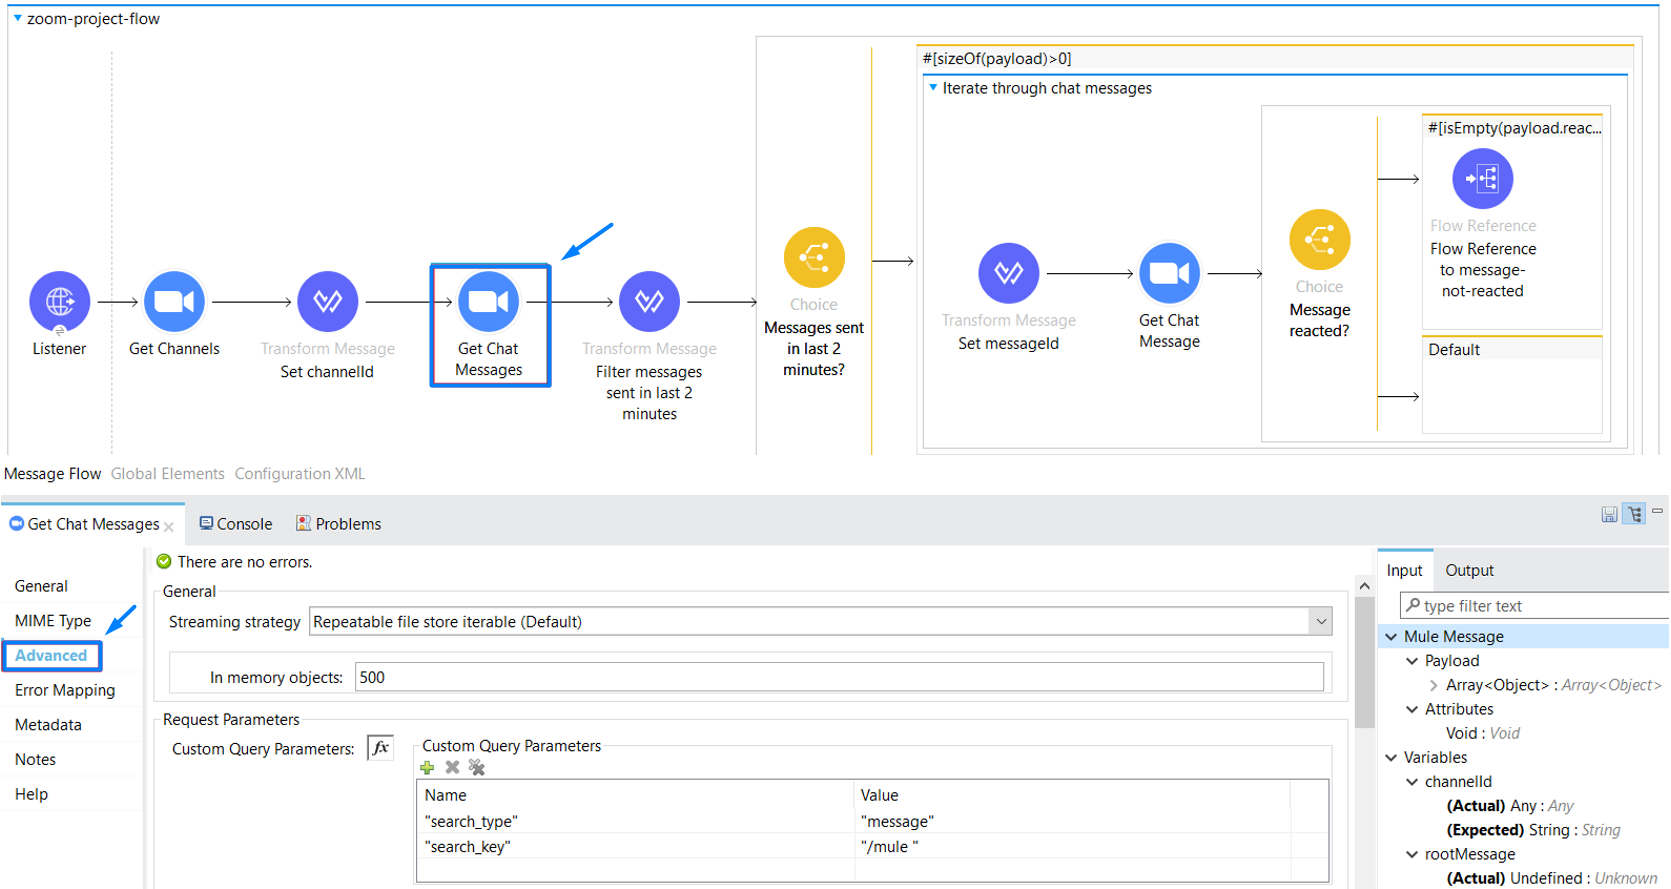
After we get the channel ID we have to get all messages in the channel. We use the Get Chat Messages and set the channelId variable value to the “To channel” property. The endpoint is /chat/users/{userId}/messages.
To send a request to this API we must provide a to_contact or to_channel parameter. Other query parameters like page_size, next_page_token, include_deleted_and_edited_message, search_type, search_key and date are optional. The query date is the date for which we would like to get the chat messages. This value defaults to the current date. The response consists of chat messages in the specified channel for the specified date (current date if not specified).
We set the “search_type” query parameter to “message”, so it will search only messages. The other option is “file” and will search only files. We are going to search all messages for the current date with search_key: “/mule ”.
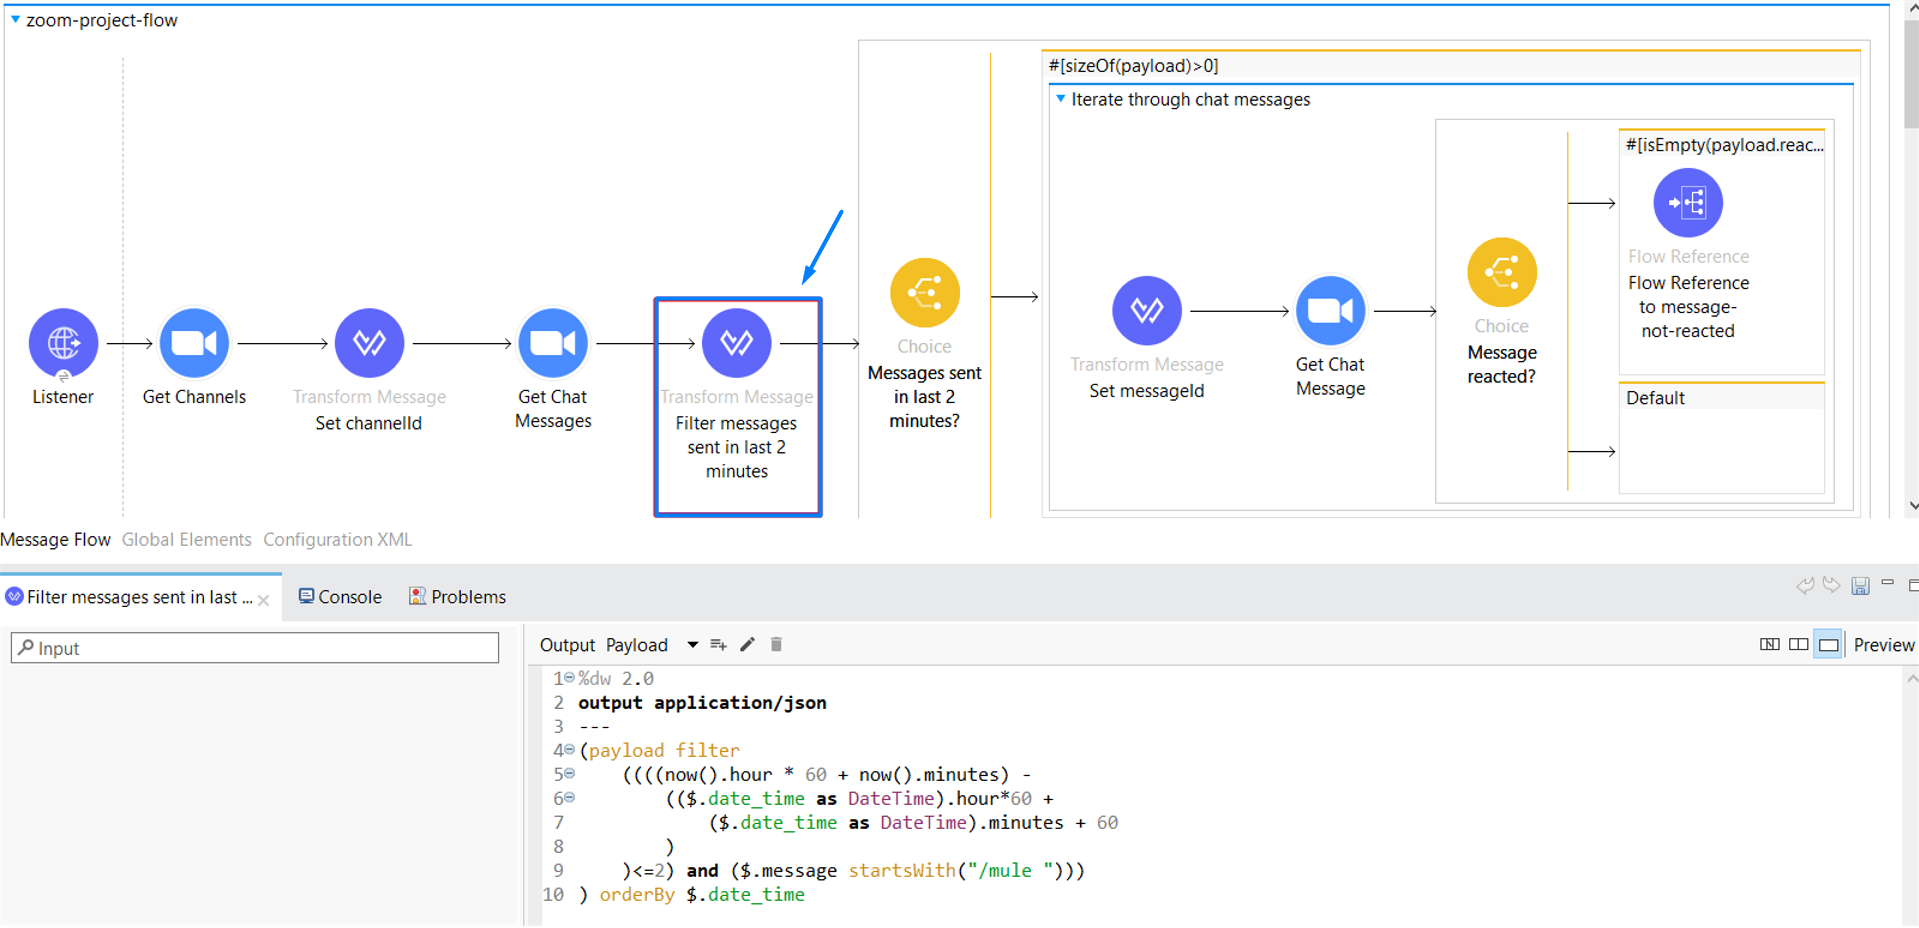
Then we filter all messages that start with the string “/mule “. Next, we are checking if there are any messages sent in the last 2 minutes or not. If there are, we are iterating through each of them.
In the For Each Scope, we get the message ID for each message, save it to a variable named messageId, and save the same message ID, but encoded to another variable named encodedMessageId and reference it to the Get Chat Message operation.
The endpoint for the Get Chat message is /chat/users/{userId}/messages/{messageId}. We set the User Id to me and we also must provide one of the following parameters:
- to_contact — The email address of the Zoom contact to whom you sent the message.
- to_channel — The ID of the Zoom channel where you sent the message.
The response that is returned is an object of all message properties like ID, the message content, the email address of the sender of the message, the timestamp of the message in microseconds, a list of emoji reactions etc.
Next, we are checking if the message is reacted. A chat message has a property named reactions which is an array of all the message’s reactions. If that array is empty it means that the message is not reacted and, in that case, we reference message-not-reacted subflow.
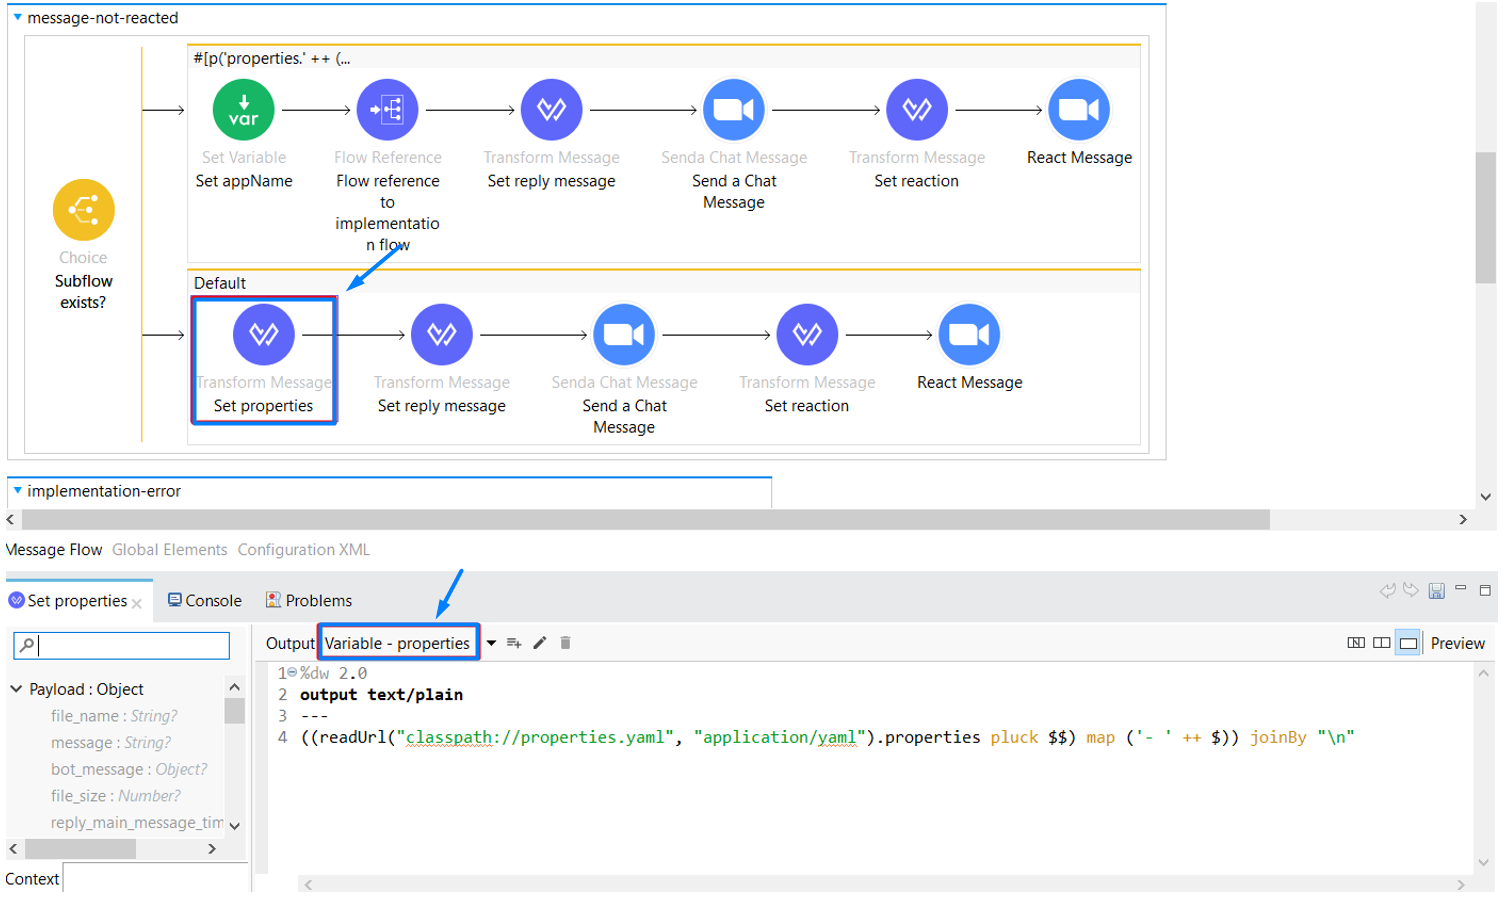
The content of properties.yaml file is the name of the subflows that can be referenced in our application.

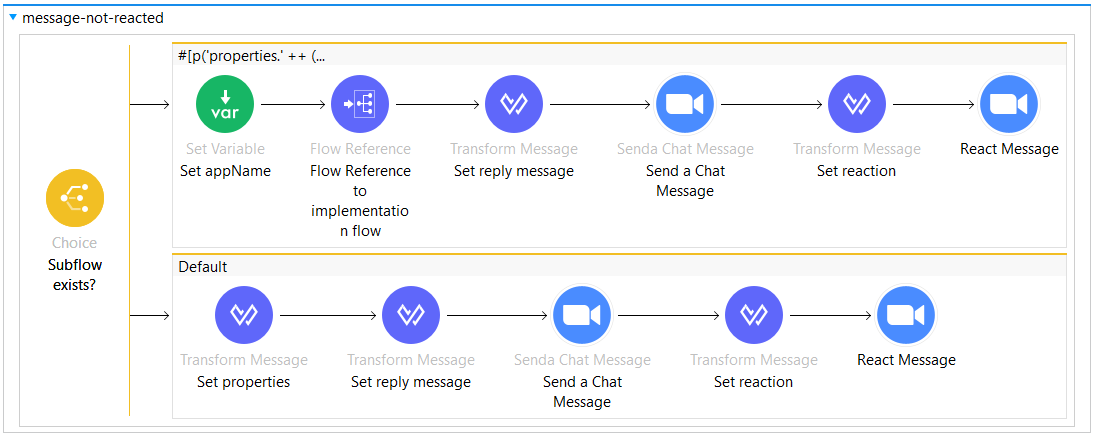
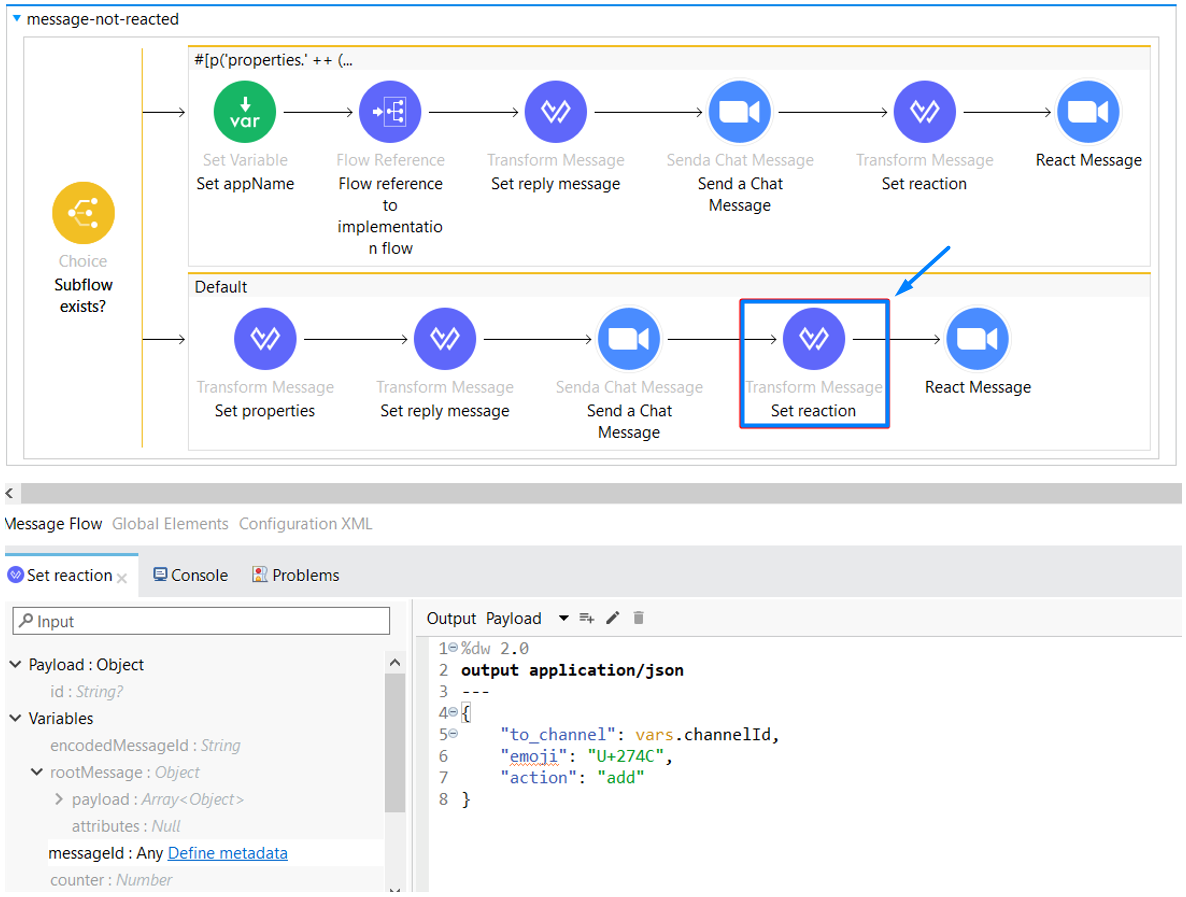
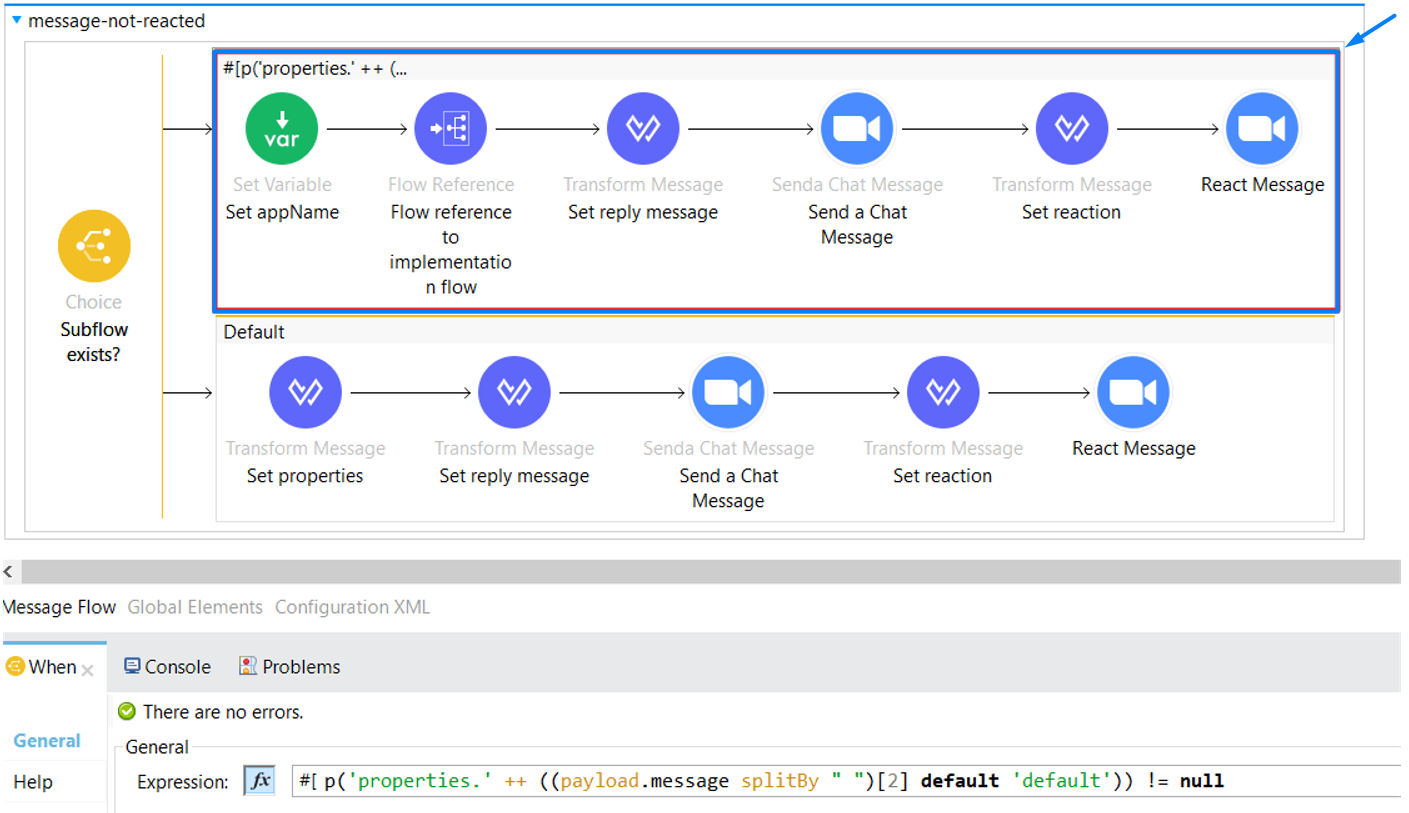
In the message-not-reacted subflow, we get the third word of the message and see if we have a property with the same word in our properties.yaml file, if we don’t, then we read all the properties from properties.yaml file, save it to a variable named properties, and reference that variable in the payload that we are structuring for the reply message.
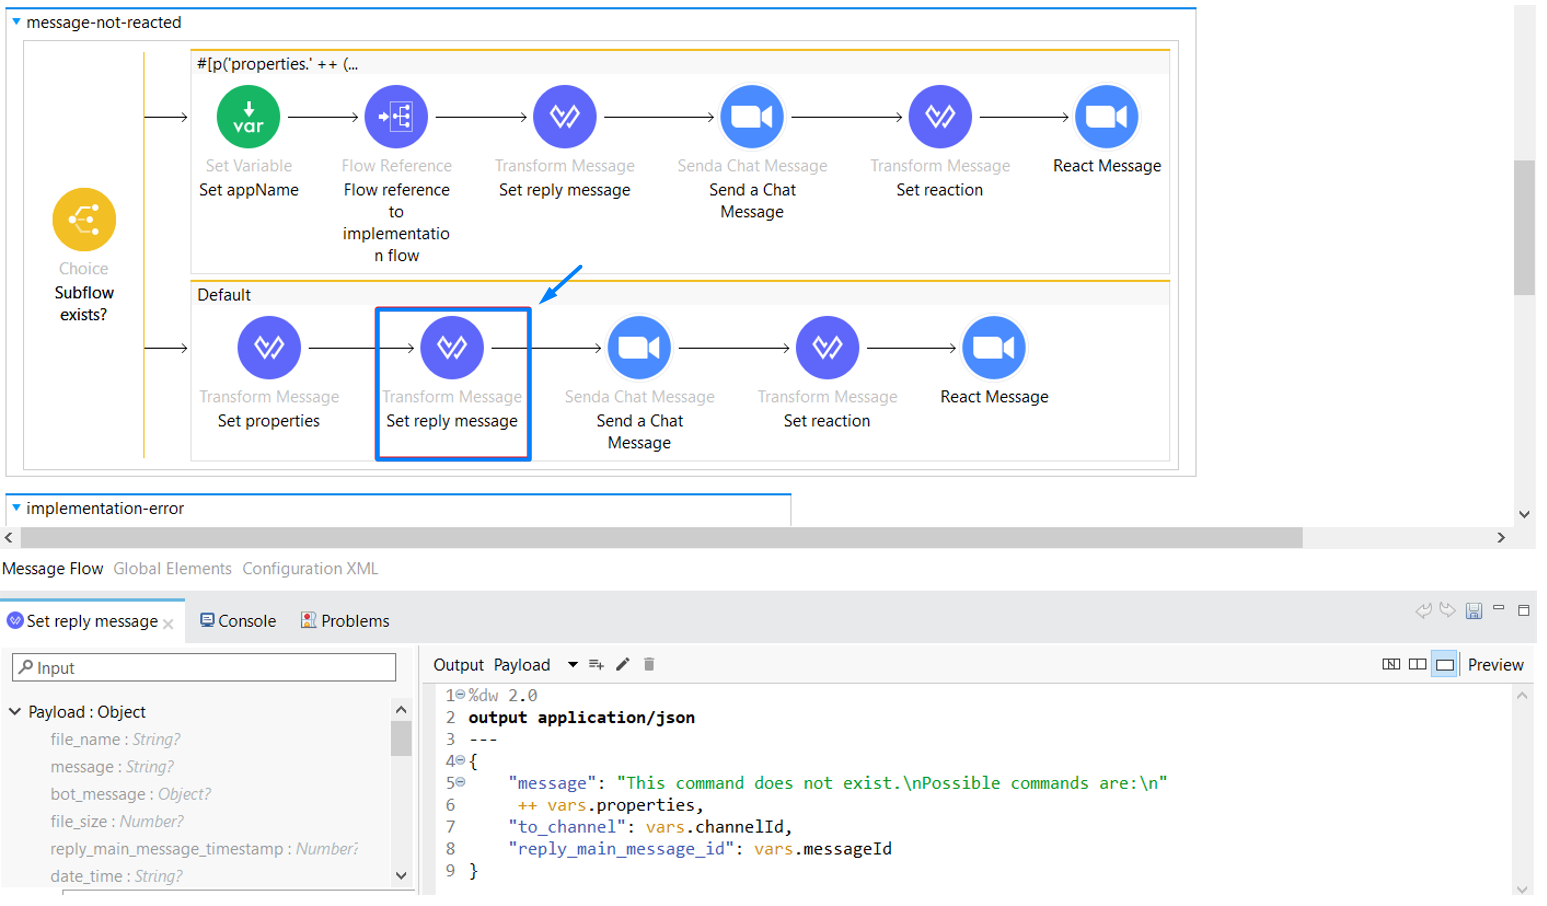
We put the message payload in the object for the property “message”, then we specify the to_channel and reply_main_message_id with the variables which we previously saved.
After we built the message payload where we inform the user that the specified command doesn’t exist, we need to reply to user’s chat message. To do that we use the Send a Chat Message operation from Zoom API.
The endpoint is /chat/users/{userId}/messages. This endpoint is used to send chat messages to Zoom to either an individual user who is in your contact list or to a channel of which you are a member. After we replied to the message, we set the payload for React Message operation. The endpoint is /chat/users/{userId}/messages/{messageId}/emoji_reactions and is used to react (add or remove) to a chat message with an emoji. We react to this message with a red cross mark. “U+274C” is the UTF format of cross mark.
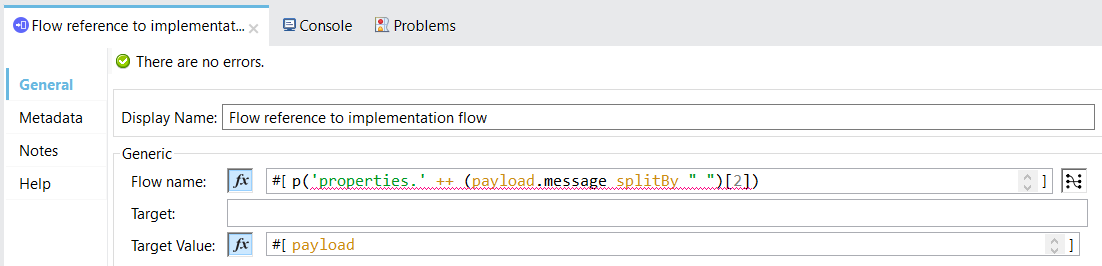
If the third word of the message is a name of a property in properties.yaml file, then we get the second word of the message, save it to a variable named appName, and reference the implementation-error or implementation-target-system subflow (it depends on the third word of the message).
After we have set the value of the appName variable, we reference implementation-error or implementation-target-system-subflow.
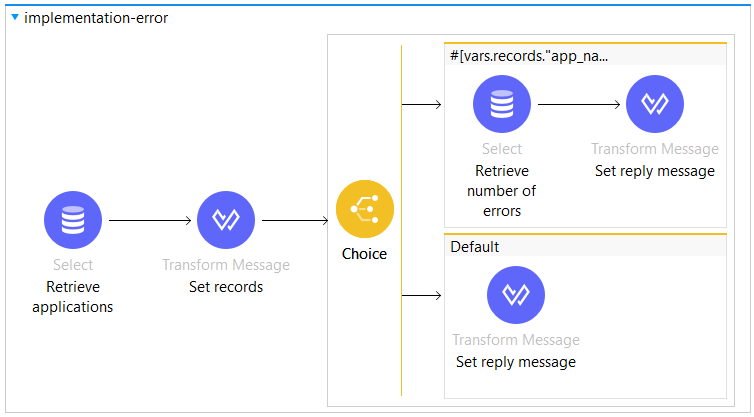
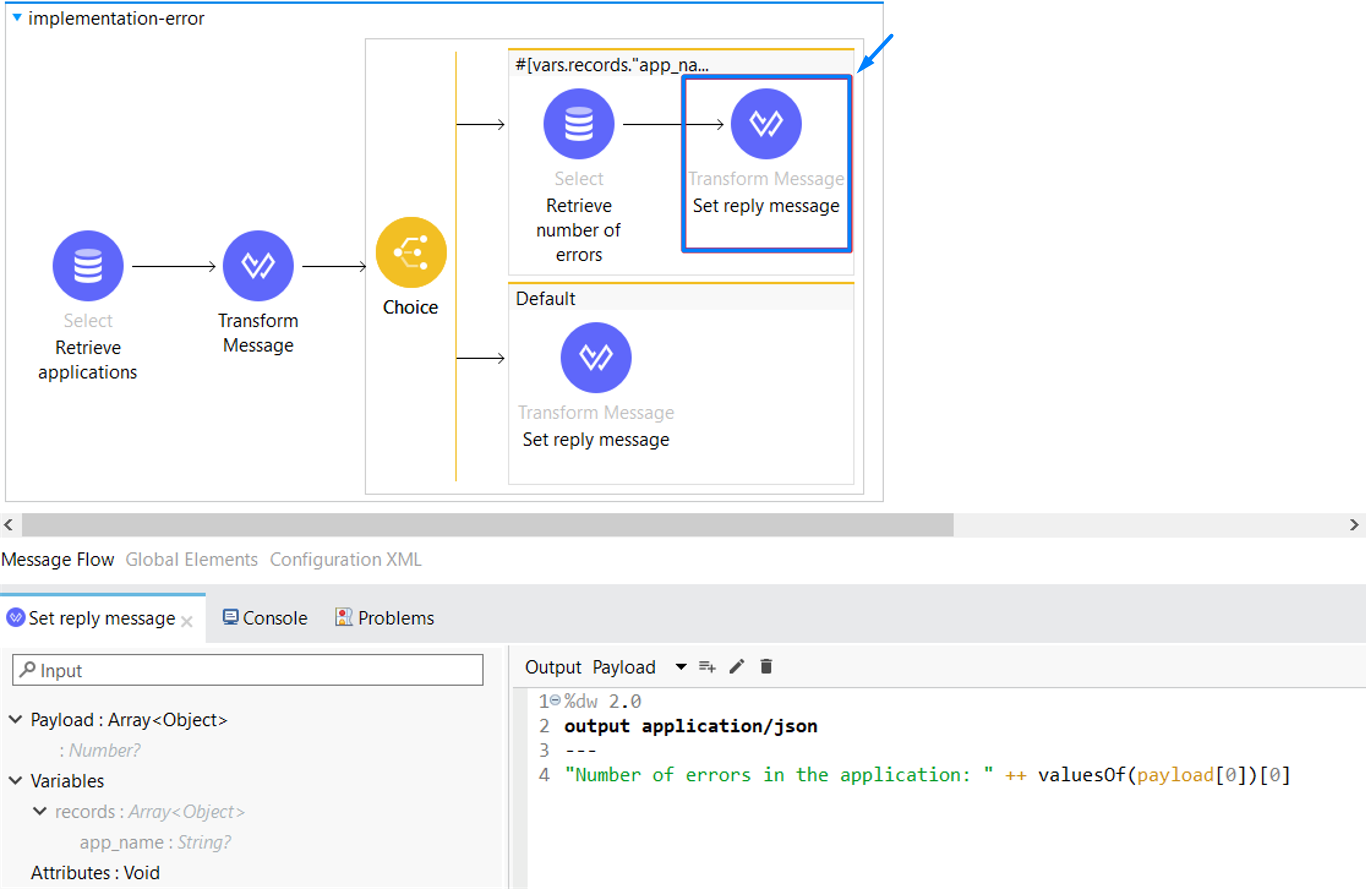
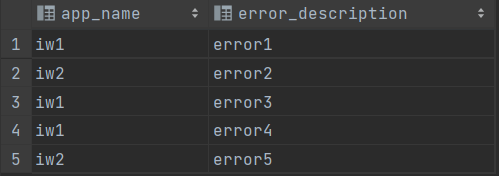
We are going to take a look at the implementation-error subflow. In implementation-error subflow we retrieve all application names from the app_error table in our database.

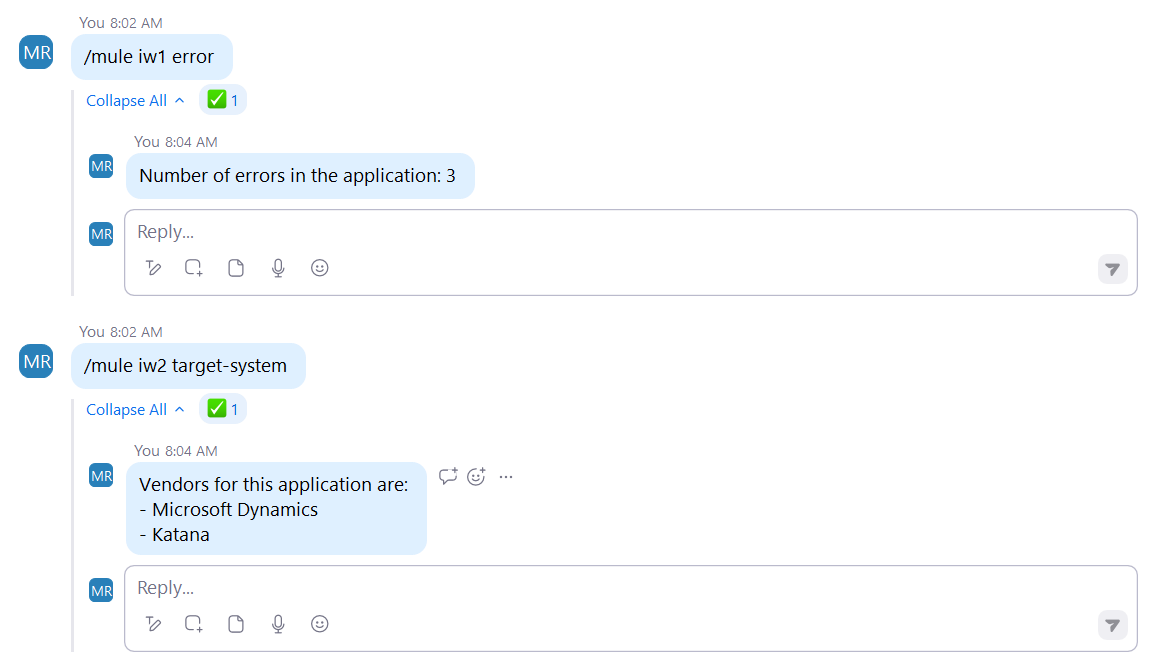
If the application name from the message (second word of the message) exists in the table, we build a message payload that consists of the number of errors of that application and we also set the value of the variable reaction to UTF format of green check mark.
We have Microsoft SQL Database with two tables: app_error and target_system.
Content of app_error table:
Content of target_system table:
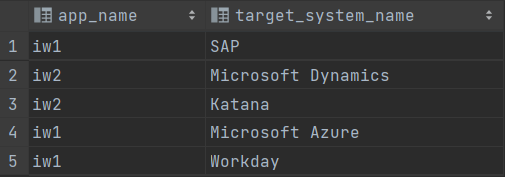
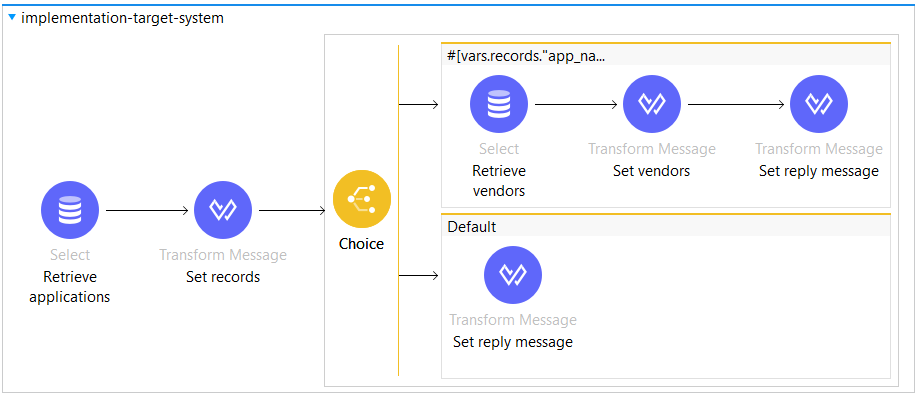
The implementation-target-system subflow has the same logic as implementation-error subflow, the only difference is the table which we are retrieving from and the message used for the reply.
Demo
After we run the application, we must do the OAuth dance to get an authorization code from Zoom which will be used to get the access token, which is needed for a successful interaction with the Zoom API. We do the OAuth dance via browser by entering http://localhost:8081/authorize. Then we need to click Authorize, which will give the application permission to use the account’s information.
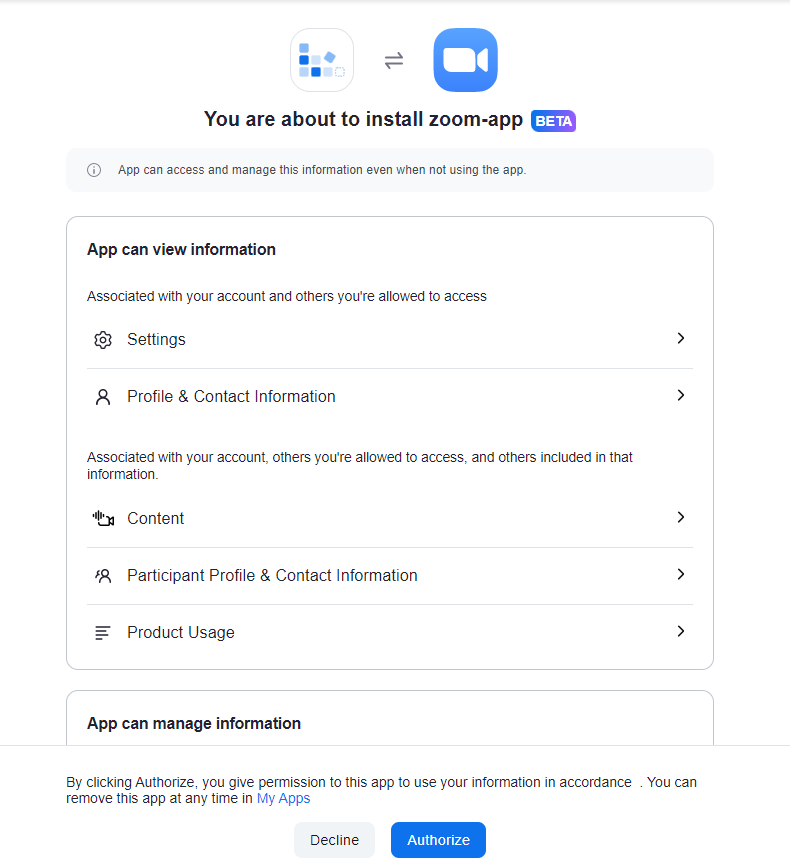
After we click Authorize, we are redirected to http://localhost:8081/callback and access token is successfully retrieved.

Next, we send GET request to http://localhost:8081/iw via Postman.
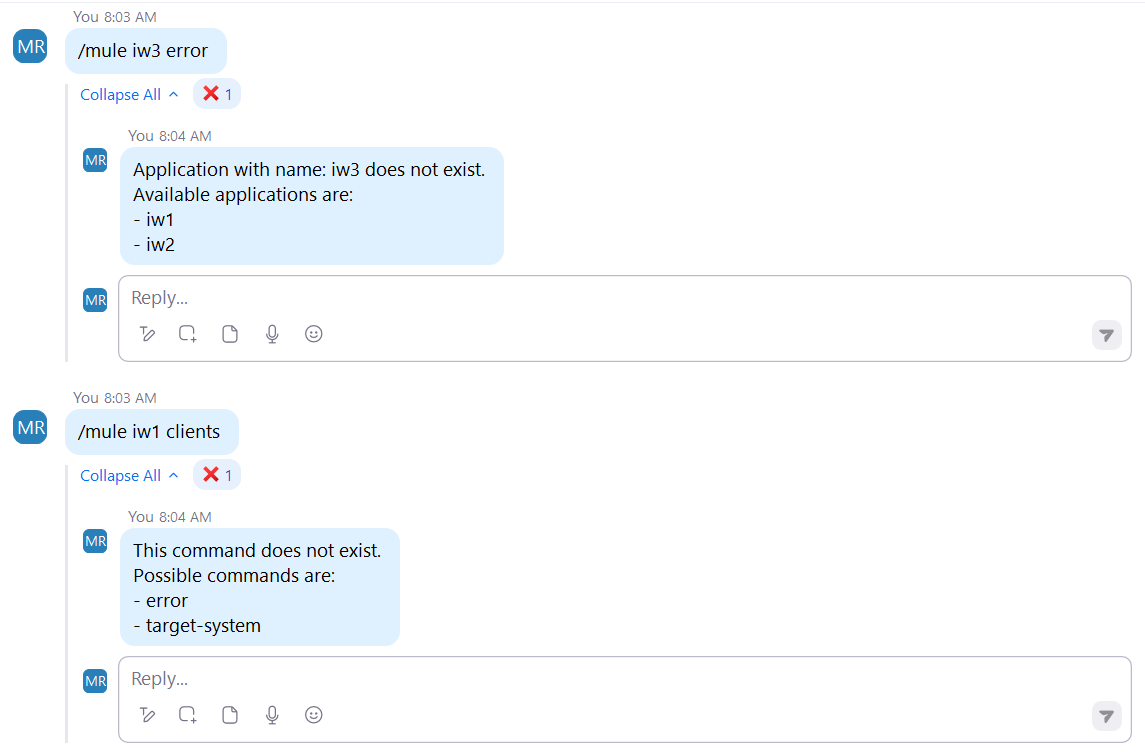
Here are a few samples of how the project’s functionality would work in practice:
Summary
This is one of the many features of the Zoom API. Even though we used free version of the Zoom API and we had limited resources, we managed to create a helpful solution to get fast information and help project members working on enterprise software systems by providing information about applications and associated vendors. This solution can be extended with other resources from the paid version based on the one’s needs.
If you want to see how the solution works, contact us via the contact form below.