

Robot is a mature test automation framework based on a keyword-driven paradigm that provides one interface for developing automated tests for different systems under tests – web, mobile, APIs, Databases, etc. This article describes an approach for testing web applications that follows the PageObject approach, enabling easy maintenance of automated tests implemented using the Robot framework. Therefore, let’s see the implementation of the Page Object Model in Robot Framework for web test automation.
Introduction
The process of continuous delivery is not possible without automated testing. The agile approach allows detecting defects and bugs faster, so test automation can make this process easier and more efficient. That’s why test automation became a vital part of testing lifecycle. But the shift from manual testing to automated testing, requires learning an entirely new set of skills. And, as software development and testing practices change over time, so do the tools and the technologies.
In the test automation landscape, automation tools certainly take a center stage for many technical support engineers worldwide. Here, at InterWorks, we are always trying to keep pace with the trends in software testing to best position ourselves in the world of QA. We have many testing assignments utilizing Selenium/Appium Robot Framework, Rapise, JMeter, Katalon Studio, Ghost Inspector, SOATest, SoapUI, Robot Framework, Kobiton and a lot more. And in this article, we are going to spend a little time talking about the Robot Framework.
About Robot Framework
Robot Framework is a generic keyword-driven test automation framework for acceptance level testing and acceptance test-driven development (ATDD). It has easy-to-use tabular test data syntax and it utilizes the keyword-driven testing approach. Its testing capabilities can be extended by test libraries implemented either with Python or Java, and users can create new higher-level keywords from existing ones using the same syntax that is used for creating test cases. (For more information about Robot Framework, you can read here: http://robotframework.org/robotframework/2.9.1/RobotFrameworkUserGuide.html)
Robot Framework IDE’s and Installation
Robot framework test cases can be written in any text editor. There are numerous plug-ins that can turn Notepad++, Atom or Brackets into powerful Robot Framework IDEs but we are going to recommend RED (based on Eclipse), PyCharm (by JetBrains) or the native ‘Robot Integrated Development Environment’ or RIDE. In this article, we are going to “ride” with RIDE Robot Framework.
Since the core framework is implemented using Python, in order to install Robot Framework RIDE and run it, we need to have Python installed on our machine. A simple check in the command line can tell us whether we need to download it or we have already installed it.
PS C:\> python –version
Python 2.7.14
A recent Python installation (2.7+ or 3.4+) will have pip included so no need to install pip separately.Since RIDE’s GUI is implemented by wxPython toolkit, the second precondition is to install wxPython. And lastly, we head back to the console to install Robot Framework and RIDE by typing:
pip install robotframework
pip install robotframework-ride
With this, we can start RIDE but Robot Framework’s actual testing capabilities are provided by test libraries. There are a lot of built-in and external libraries and users are also able to write their own libraries. Depending on what we plan to test with Robot framework, we need to install/import those libraries. Since in this post we are going to use Robot Framework and write a few tests for a WEB application, we will need to install and later import Selenium Library. That can be done by running the following command:
pip install robotframework-seleniumlibrary
Now we are ready to start RIDE and get familiar with its UI.
Writing and running our first test case in RIDE
To start RIDE, simply type ‘ride.py’ in the ‘Run’ dialog (Win+R) or create a shortcut of ride.py from /Scripts. Upon a successful start, we are presented with RIDE’s UI.
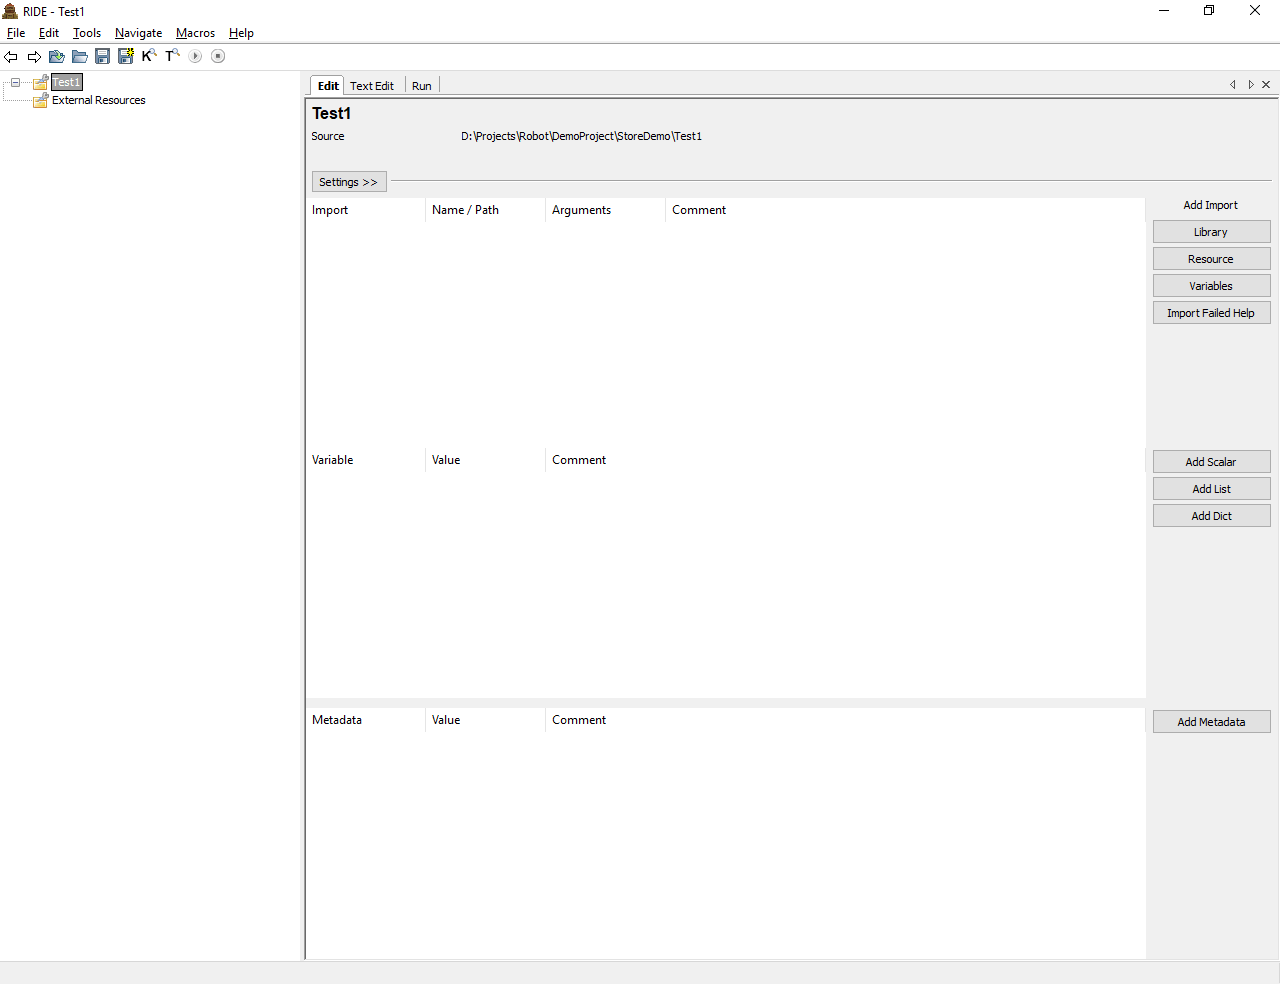
RIDE has a nice excel-style test editor that is pretty intuitive. On the left, we can see our project tree. One project can contain several test suites and every test suite consists of test cases.
Keywords are the foundation upon which all robot test cases are built. Probably the simplest explanation of a keyword would be to think of it as a test step. So, just like test cases are made up of many test steps, Robot test cases are made up of many keywords. There are generic keywords provided by robot, and there are special-purpose keywords that you can create yourself. The real power of robot framework is when you create your own keywords so that tests can focus on the test logic rather than the underlying implementation. By using keywords, you are able to hide the details of the web page implementation and focus on the logic of the test. Plus, multiple tests can reuse the same keywords.
Robot’s extensibility lies on the Robot libraries. Simply put, libraries are collections of keywords. Robot comes with many libraries, and there are many more available on the internet. Libraries can be written in the robot syntax, but they may also be written in programming languages such as Python and Java. Using a programming language makes it possible to do complex logic, using the robot language allows you to combine existing keywords into new ones more easily.
Besides the libraries and keywords, robot’s very powerful feature are the variables. Robot framework has three types of variables. They are scalar, list and dictionary variables whose syntax is ${LIST}, @{SCALAR} and &{DICTIONARY}, respectively. To create a new variable, right click on the Test Suite from the Project tree in RIDE and select the type of variable you want to create.
The first type, and probably the most commonly used, are the scalar variables. Scalar variables are mostly used to replace long strings but we can assign any objects, including lists, to them.
The second type are list variables. If the variable value is a list or list-like, this is the perfect variable type that we could use. It is possible to access a certain value of a list variable with the syntax @{LIST}[index], where index is the index of the selected value (indices start from zero).
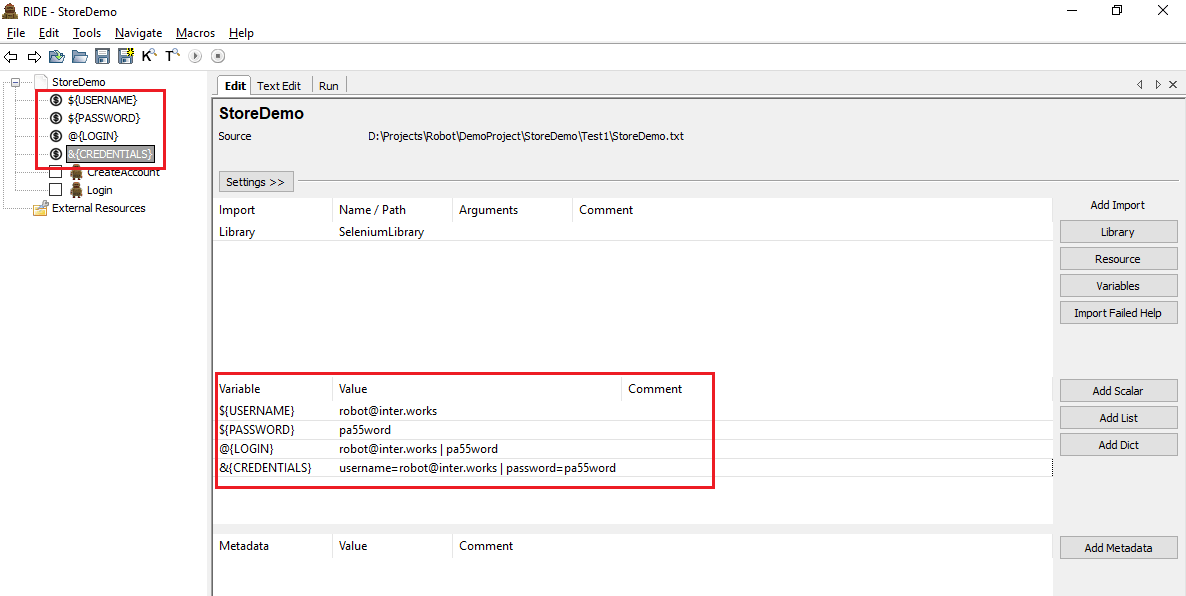
The third type, the dictionary variables, can be created in the variable table similarly as list variables. The difference is that the items should be created using ‘name=value’ syntax or existing dictionary variables. Dictionary variables have two extra properties compared to normal Python dictionaries. First of all, the values of these dictionaries can be accessed like attributes, which means that it is possible to use an extended variable syntax like ${VAR.key}. This only works if the key is a valid attribute name and does not match any normal attribute Python dictionaries have. For example, individual value &{CREDENTIALS}[username] can also be accessed like ${CREDENTIALS.username} (notice that $ is needed in this context), but using ${CREDENTIALS.1} is not possible.
So, now with the introduction of variables and keywords above, we are ready to start writing our very first Robot test case.
Our first test will consist of creating an account on a demo e-commerce site. The site that we are going to use for this demo project is http://automationpractice.com. For that purpose, the keywords available in the SeleniumLibrary will be enough.
We need to import the freshly installed SeleniumLibrary by clicking on ‘Library’ on the right pane and typing the library name.
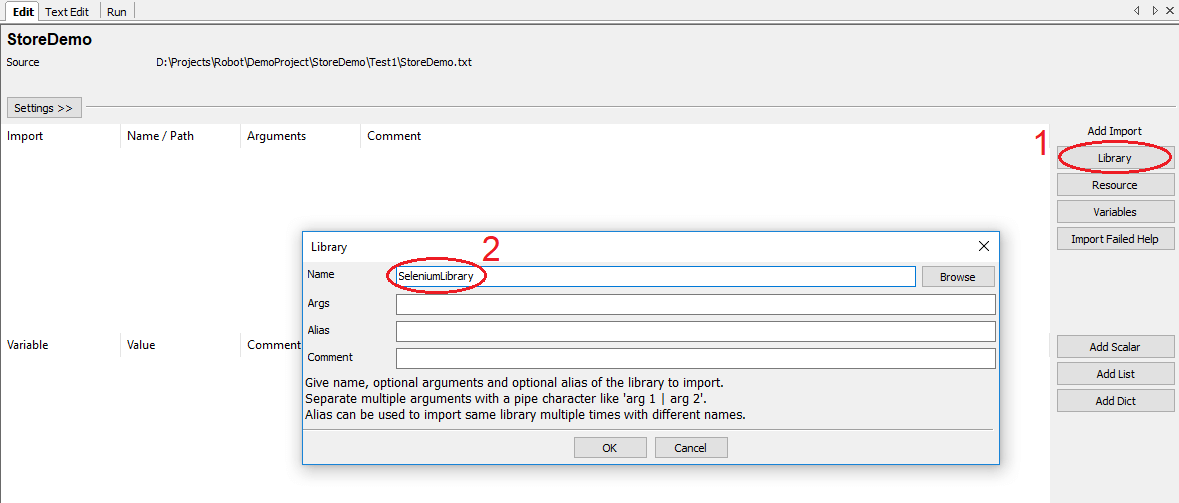
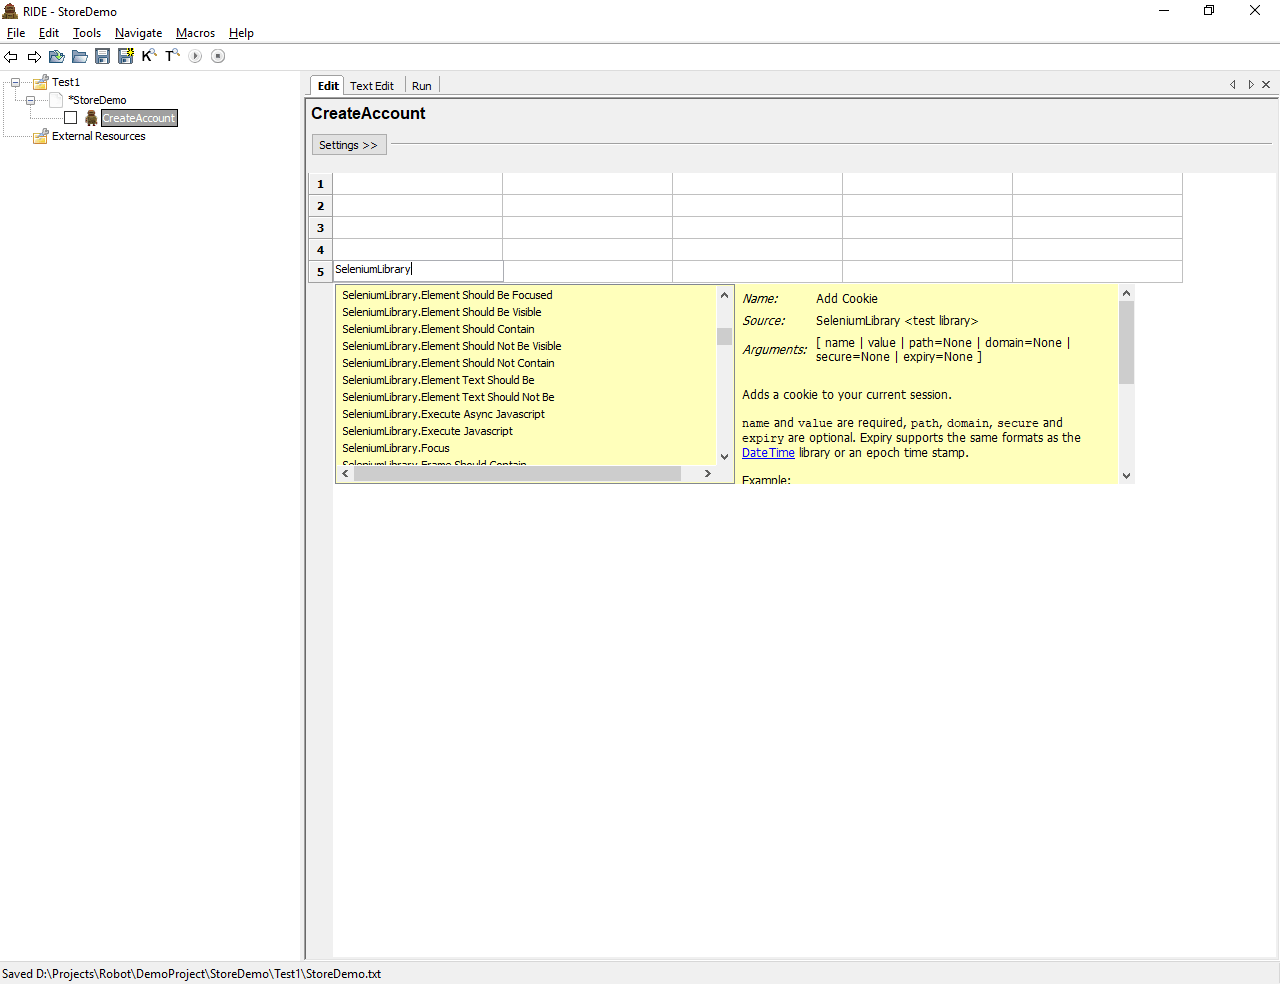
If all goes well, no errors will be displayed and the SeleniumLibrary will be imported into our project. We can go on and create a new test case and try to use a SeleniumLibrary keyword. The outcome should be something like the screenshot below – by typing Selenium and pressing CTRL+Space, a list with all the available keywords should show up.
Since we mentioned above that we are going to use an e-commerce site, our goal would be to create 3 test cases on the site. One would register a customer, one would use that customer data to create an order of an item available on the site and the last one would be to check the order status.
Starting with test one, we can start using the already available Selenium keywords. Our most used keywords for this test would be ‘Click element’, ‘Input Text’ and ‘Wait Until Page Contains Element’, whose names are pretty self-explanatory and give you an idea of what the keywords do. Once we make a plan of what should be clicked, what inputs we should use and what should wait, we can start using these keywords to populate the RIDE table editor and the outcome should be something similar to this:
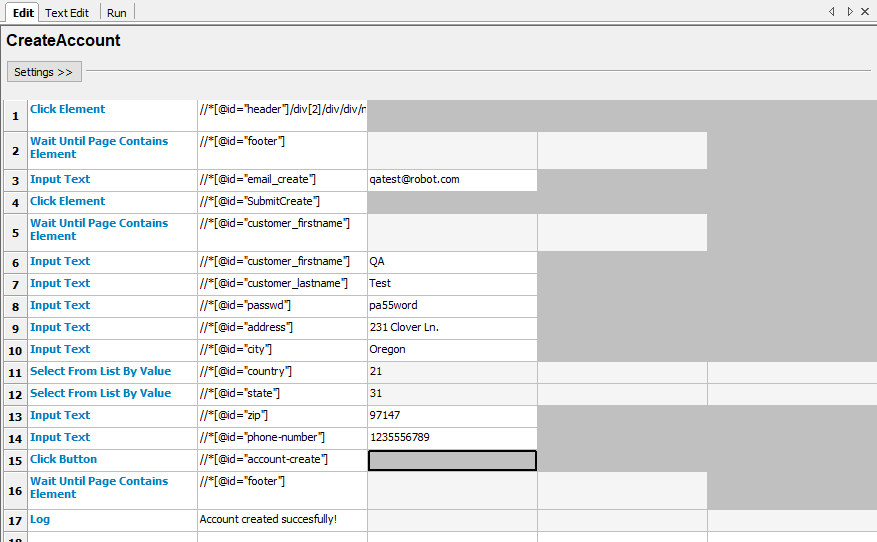
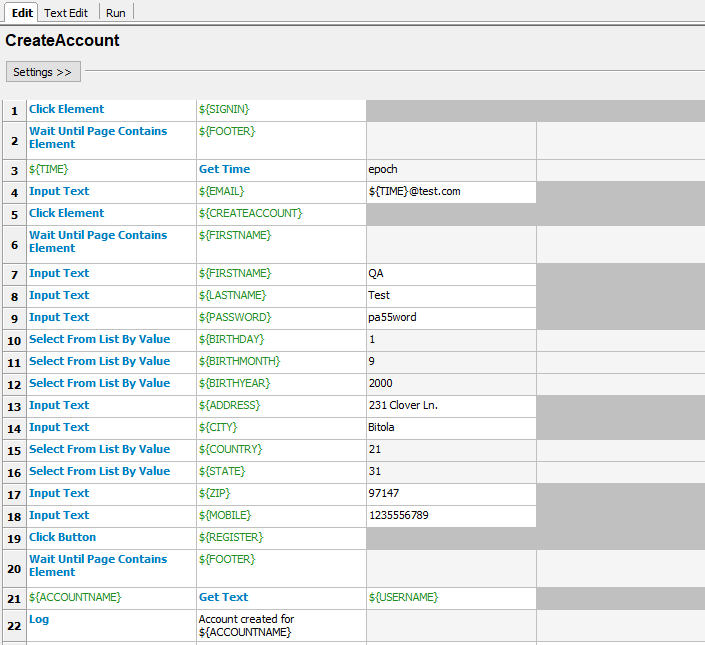
In the left column, we can see the SeleniumLibrary keywords. The middle contains all the object locators and on the right column you can see the values with which the fields are populated. Following the Page Object Model Robot Framework (POM) paradigm, a good approach would be if the locators are placed in a separate file as variables that we can (re) use in multiple test cases/test suites. So let’s see the Robot Framework Page Object Model process. Upon importing these in our test suite, we will get a more presentable and understandable test in RIDE that will be easier to edit or maintain.
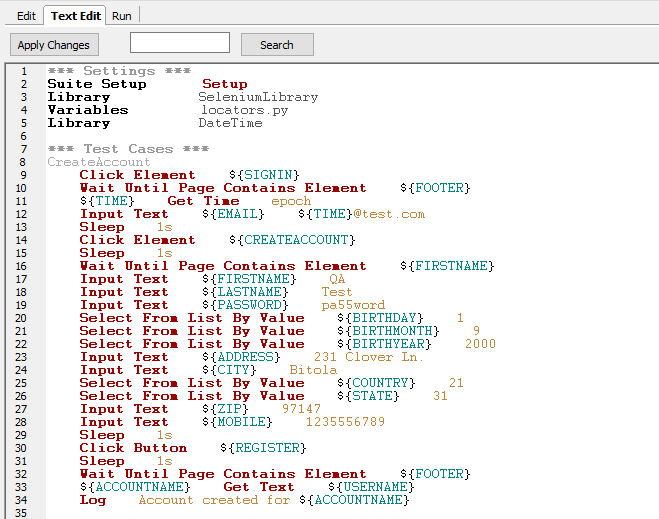
RIDE has an excellent UI compared to the other available Robot Framework editors. The actual syntax for these tests has a somewhat ‘gherkin’ look that we can check under the ‘Text Edit’ tab in RIDE.
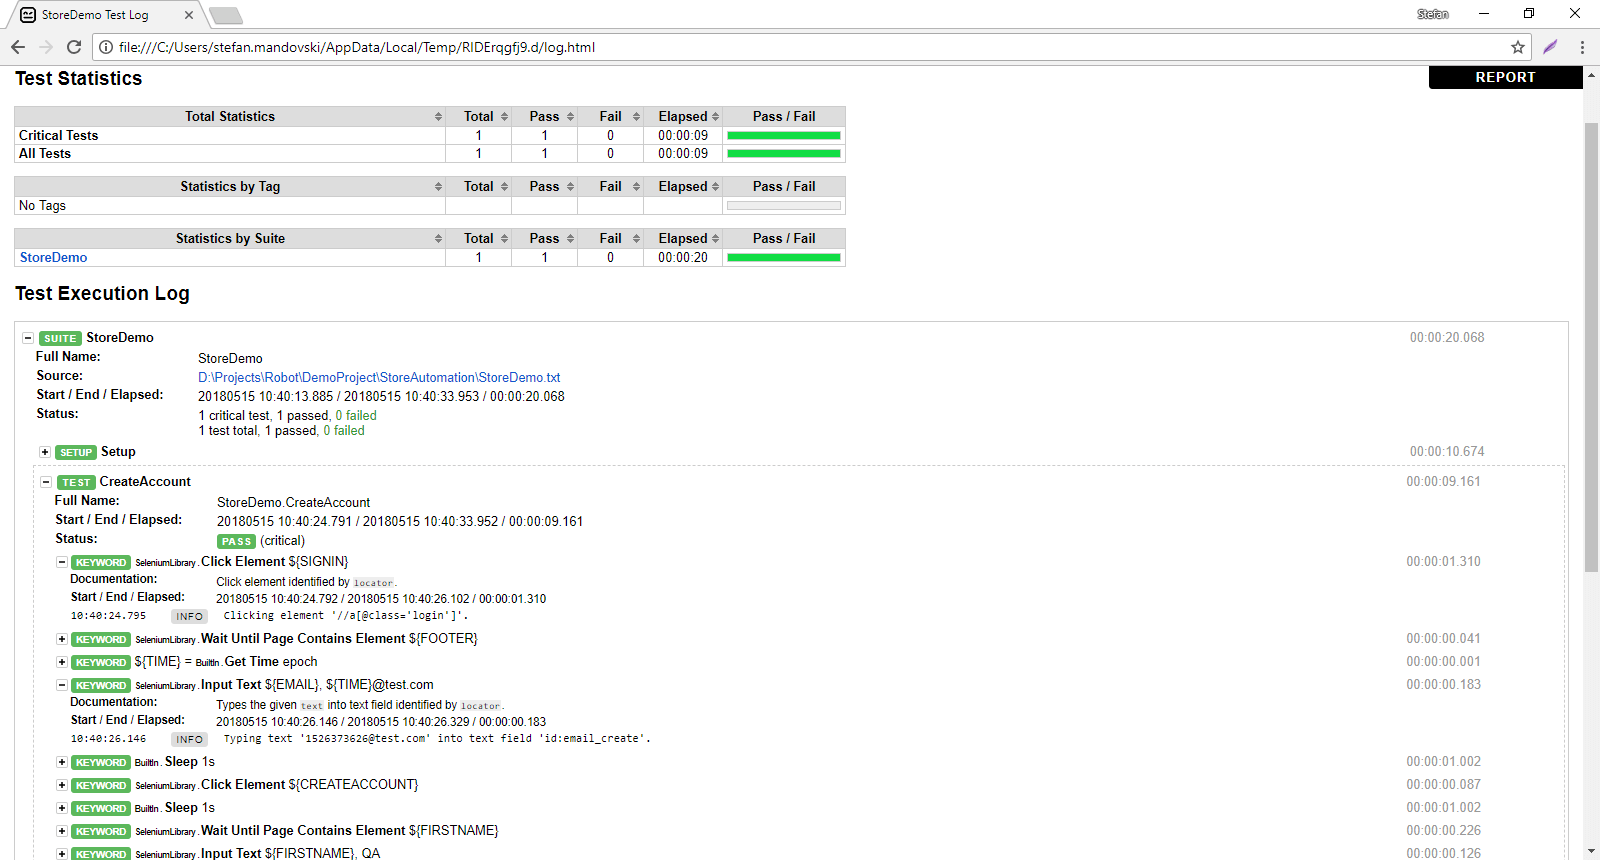
We can run this test as it is and upon a successful run, we can view the test report. Robot’s logs and reports are pretty powerful and offer deep insights into every action that is performed in the test case with lots of metrics and detailed descriptions. RIDE does a great job since it has an integrated ‘Run’ function. Tags can be additionally added to our test cases so we can group them into smoke tests, regression and etc. or run some specific scenarios.
If we are using other IDE’s that don’t have the capability to execute the tests, that can be done via the command line. Robot test execution is done by executing the following command line from the folder where the tests are located:
robot testfile.txt
Additional flags can be added to the command to further enhance the execution. Some of the available flags are:
- T stands for –timestampoutputs. This adds timestamps to the logs/reports filenames and is a good way to ensure that the new reports won’t overwrite the old ones.
- d stands for –outputdir. This flag is used to tell Robot where to put the report files.
- n stands for –noncritical. This tells Robot to only run noncritical tagged tests. Similarly, -c will run only the critical tests.
- i stands for –include. This can be used to include specifically tagged tests in the test execution.
An example of a test execution including flags could be:
robot –T –d Reports –n noncritical –i regression –t Test_cases TestSuite
The above Robot Framework example would create a ‘Reports’ directory for all the logs/reports from the test run and use timestamps in their names. It will execute all the test cases after the –t tag from the TestSuite that are marked as noncritical tests and also contains the tag ‘regression’.
A useful flag to add to this command line would be –dryrun. This will tell Robot to run through all the test cases and resource files and look for any syntax errors. This can save us a lot of time if we have lots of tests to execute and at the same time prevent test failures due to a syntax error in the middle of the test execution. For all the available flags and switches, you can view the official Robot Framework User Guide. After the test execution finishes, we are presented with an html report will all the details from the test run.
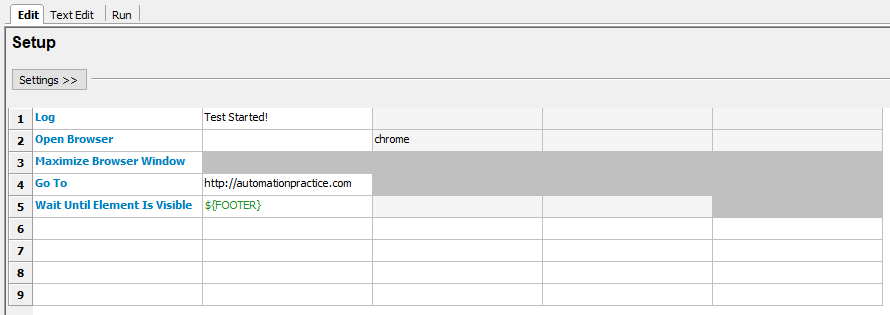
Robot framework allows creating custom (user) keywords, that we can further use as standard library keywords. This can be very useful in cases when particular steps are used in multiple test cases. A good example would be “Setup” and “Teardown” of the test cases/test suites. In our example, ‘Setup’ keyword would be able to open a browser, maximize it and go to a certain web application. That would combine the ‘Open Browser’, ‘Maximize Browser Window’, ‘Go To’ and ‘Wait Until Element Is Visible’ keywords.
Similar to the ‘Setup’ keyword, we can define the ‘Teardown’ keyword by simply adding the ‘Close Browser’ keyword and maybe the ‘Log’ keyword with a message saying that the test execution is finished.
Sometimes, we would like to do some action that keywords from libraries can’t do. Since Robot Framework supports writing custom keywords and later importing them, virtually nothing is impossible! Users can write their own custom libraries consisting of keywords and keyword definitions. Robot Framework itself is written with Python and naturally, test libraries that extend it can be implemented using the same language. When running the framework on Python, libraries can also be implemented using Java. When using Python, it is also possible to implement libraries with C using Python C API, although it is often easier to interact with C code from Python libraries using ctypes module.
class ExampleLibrary:
ROBOT_LIBRARY_SCOPE = ‘GLOBAL’
def sayHello(self):
print ‘Hello World!’
An example of Python library – class name is Library name in Robot and class methods can be used as Robot keywords.
In the picture above, there is a sample class that contains one method ‘sayHello’. We can use this block of code as our custom library, we just need to save the file as .py and we can use the methods defined in the class as keywords in robot – in our case just ‘sayHello’. Since this is a demonstration, we made the keyword print ‘Hello World’ to the log and now let’s see if it works.
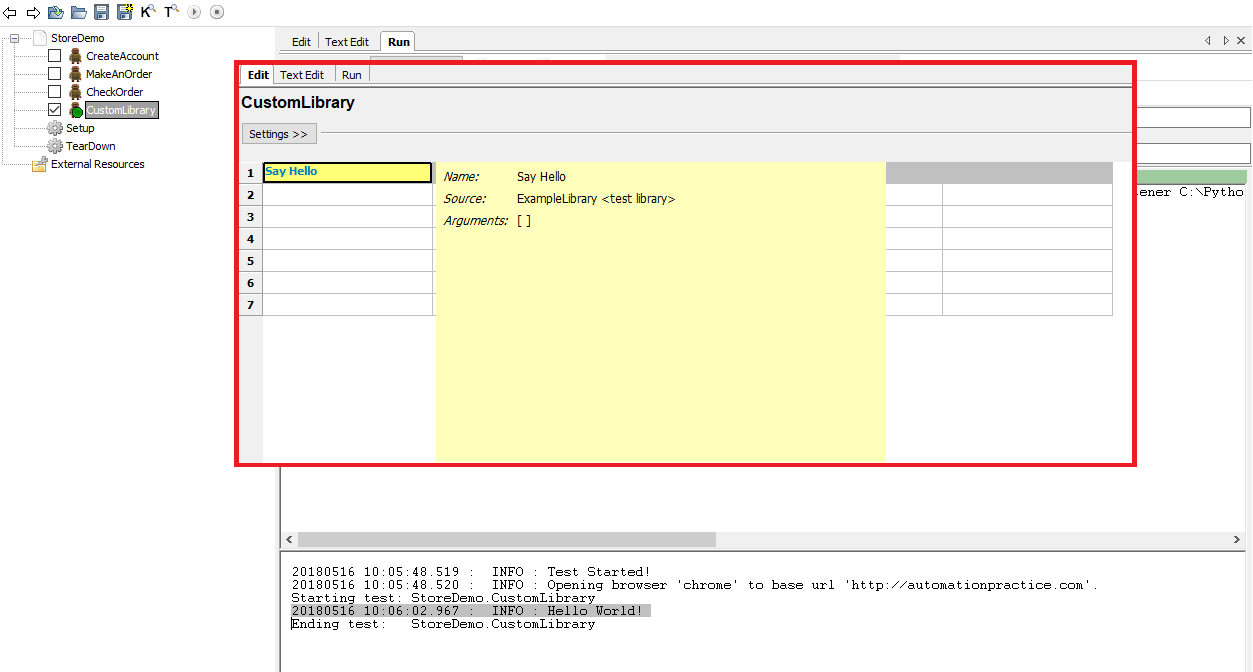
Upon a successful import of the library, we were able to use the keyword in a test case and upon execution, we can see in the log that the line ‘Hello World!’ was printed to the test log. This way, you can create and import any number of custom libraries with custom keywords to do whatever you like in Robot Framework that is not yet supported by the already available libraries. The possibilities are practically endless!
Conclusion
We saw the POM in Robot Framework implementation, and it’s obvious why the Robot framework is a very powerful open-source, keyword-driven framework for acceptance testing and ATDD. Test cases for Robot are written using keyword testing methodology written in a tabular format. These tests can be written in plain text, HTML, reST and other formats in many different text editors and IDE’s, including RIDE – Robot’s own IDE. POM Robot Framework functionality is being extended by test libraries – there are lots of already available libraries that are distributed with Robot Framework and custom libraries are being written every day by the Robot’s users whose numbers grow day by day.
Robot’s and RIDE’s simplicity can push even non-programmers into the ‘automation waters’ and that is why Robot Framework holds a bright future and is greatly appreciated among the QA community. It’s evident why the Page Object Robot Framework combination for testing will continue to be beneficial.