
What is a Headless testing? The term itself refers to executing automated web tests without “opening” a browser UI or loading any visual elements from web pages. Headless testing can be executed on so-called headless browsers, which are browsers without a graphical user interface. A headless browser is a browser that doesn’t “show” any human readable content and its output, i.e. the content of the website, is consumed by other programs. And why is it good to use headless testing? One of the most important reasons is that it allows a faster execution of automated tests, because headless browsers are faster than real browsers, since they do not start browser GUI, and do not load CSS, or JavaScript in order to open and render HTML pages.
The number of headless browsers is huge, here are some of them:
- PhantomJS – as it is said on the official website: it is a headless WebKit scriptable with a JavaScript API. It has fast and native support for various web standards: DOM handling, CSS selector, JSON, Canvas, and SVG.
- HtmlUnit – as stated on the official website: it is “GUI-Less browser for Java programs”. It models HTML documents and provides an API that allows you to invoke pages, fill out forms, click links, etc… just like you do in your “normal” browser.
- Chrome – as of version 59 (for Mac and Linux) and version 60 (for Windows), Chrome can be run in a headless mode
- Firefox – can be run in a headless mode as of version 55 (on Linux) and 56 (on Mac and Windows)
In this post you will see a simple example of how Selenium WebDriver can be used for executing headless test in Chrome. Selenium WebDriver tests can be developed with multiple programming languages, but we chose Ruby since it’s a dynamic programming language with a focus on simplicity and productivity, it’s easy to learn and personally, from test automation perspective, I like the maturity of the language and the speed of execution (no need to compile every test and support files every run).
Installation
For Windows:
- Install Ruby (and Devkit)
- Install the Selenium WebDriver gem using:
- gem install selenium-webdriver
- Download chromedriver and you’re ready to go.
For Linux:
- Install Ruby and RubyGems by typing following commands in the terminal:
sudo apt-get install ruby (ruby-dev)
sudo apt-get install rubygems
- Check the installations by typing:
ruby –version
gem –version
- Install the Selenium WebDriver gem using:
sudo gem install selenium-webdriver
- Download chromedriver and you’re ready to go.
Implementation
- First, we need to include the ‘selenium-webdriver’ gem to use all the functionalities of Selenium:
require 'selenium-webdriver'
- Then, we need to initialize the WebDriver that will be used throughout the test:
$driver = Selenium::WebDriver.for :chrome
- In order the url for the site under test to be provided as a parameter when we run the test, we can put the argument in a variable
$website = ARGV[0]
- And we open the site under test using that variable:
$driver.get $website
- An additional step here is adding the options that will be used while starting Chrome. First we create the (Chrome) options object:
Options = Selenium::WebDriver::Chrome::Options.new
- Then we add the arguments that will be used:
options.add_argument ‘--headless’
* For now, we also need to add an additional argument ‘–disable-gpu’ if we are running the tests on Windows. (Since there is still a bug active for this issue with Chrome on Windows) - We need to add these as options while initializing the driver:
$driver = Selenium::WebDriver.for :chrome, options: options
- Since everything is an object in Ruby, we define the xpath elements as objects, for easier readability. There are two ways of doing this:
element = { xpath: ‘xpath of the element’ }or
element = { :xpath => ‘xpath of the element’ } - For debugging purposes, we can capture screenshots after any step:
$driver.save_screenshot ‘image#.png’
- The last step is to close the browser:
$driver.quit
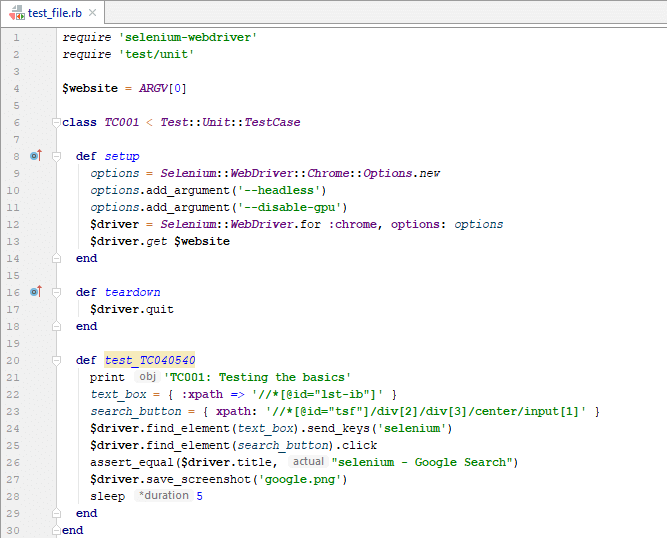
The full example would look like this:
We can start test using the command:
ruby test_file.rb “https://www.google.com”
where argument “https://www.google.com” is the starting url that is placed in the variable $website.
Conclusion
Running the tests in a headless mode speeds up the execution time, especially if you have more test cases that run sequentially where the browser closes and reopens for each test case.
This is also useful in order to run the tests in parallel without causing heavy resource consumption at the client side or running the tests on a machine with OS without GUI.