

Laravel is the best PHP framework at the moment. No need to talk more about that, all the statistics and rankings are clear. More information about Laravel can be found here.
Often, you, as a Senior PHP (Laravel) Developer , will come in a situation where while developing the backend of the application and making all the logic, you will need a frontend admin dashboard that will look nice to the end user and that will be easily configurable for you.
For example, you are developing a website with all the backend and frontend logic. Imagine something like WordPress. At the end, the user wants to change some content on the site, to add a blog post, add a new page etc. For this purposes, you need to provide an admin panel to allow the end user to make changes dynamically on the site.
According to some of the researches done, one of the best admin templates for that usage is the CoreUI Admin Template.
CoreUI is an open source Bootstrap 4 based admin template, and you can also use CoreUI PRO. Nevertheless, Core UI is the fastest way to build a modern dashboard for any platform, browser or device. CoreUI is a complete Dashboard UI Kit that allows you to quickly build eye-catching, high-quality, high-performance responsive applications.
In this tutorial, I will explain an easy and fast way to integrate the CoreUI Admin Template in Laravel Framework. I will also present creating and setting up of two pages.
Requirements
- Basic Laravel installation. Useful resource here. Latest version (recommended) is Laravel 5.7.
- Download the CoreUI Admin Template zip folder from here. The link provided is from the Git repository.
Adding necessary images, css and js files
After installation and setting up a skeleton Laravel application and after downloading the CoreUI Admin template zip folder, you are ready to start with the integration.
Open the package.json file, placed in the root of the Laravel project.
Replace the code in the file with the code below:
Open the command line and navigate to the project root. Run this command:
* Note: Node js and npm must be installed on the PC to make this command work. Installation guide can be found here.
After completing this step and installing all dependencies needed, the next step is adding the necessary scripts and css files.
First, let’s start with adding the css files. Open the app.scss file that is located in resources/sass/ folder. Remove everything from the file, and insert the code below:
After adding this code, open the app.js file that is located in resources/js/ folder. Again, remove everything from there, and insert the code below:
You can notice that there is one file which is not pulled from the node_modules packages. It is the ‘bootsrap’ js file. The ‘bootstrap’ js file is already there and comes with the Laravel installation. So, everything is ok for now.
The last step is compiling the added css and js files. Open the command line (Windows), navigate to the project folder, and run these commands:
npm run dev (to compile only once)
npm run watch (to compile the files and watch for other changes)
Adding css and javascripts is a done task for now.
About the images, go to the downloaded CoreUI zip folder, open the src folder and copy the ‘img’ folder. After that, open the project root folder, go to public folder and paste the copied ‘img’ folder there.
*Note – For the two pages presented in this tutorial, maybe all of the images copied are not needed, but images are not that big and also they can be used when creating more pages in further development process, so for now, everything is good.
Creating structure for the views
For the purposes of this tutorial, create one route in routes/web.php file. Add this code in the file:
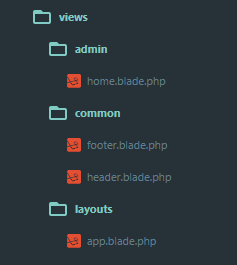
Open resources/views folder and create all the files and folders like in the structure shown on the image below:
Be sure to create all folders and files with the given names to fit the content of this tutorial.
Open app.blade.php file. Insert the code below:
You can notice the code before the closing body tag:
With this piece of code, the main.js file (that will be created later in the tutorial) will be loaded only on the home (front) page. This is done due to performance issues, and one of the things that you need to take care when adding css or js files is to add and load them only when necessary.
In our case, for the first page (home), we need the main.js file loaded, and for the second page, we don’t need the main.js file and that’s why we don’t add and load the script there.
Let’s continue with the integration.
Open header.blade.php file. Insert the code below:
Open footer.blade.php file. Insert the code below:
Notice @yield(‘content’) in the app.blade.php file. In Blade templating @yield directive is used to display the contents of a given section. So, with this structure, the only thing that you need to add is extending the app.blade.php in another file, add section with code to be displayed between the header and the footer.
According to this, for each new page in the application, you need to create a new blade file that will represent a new page in the application. You will see in the further examples.
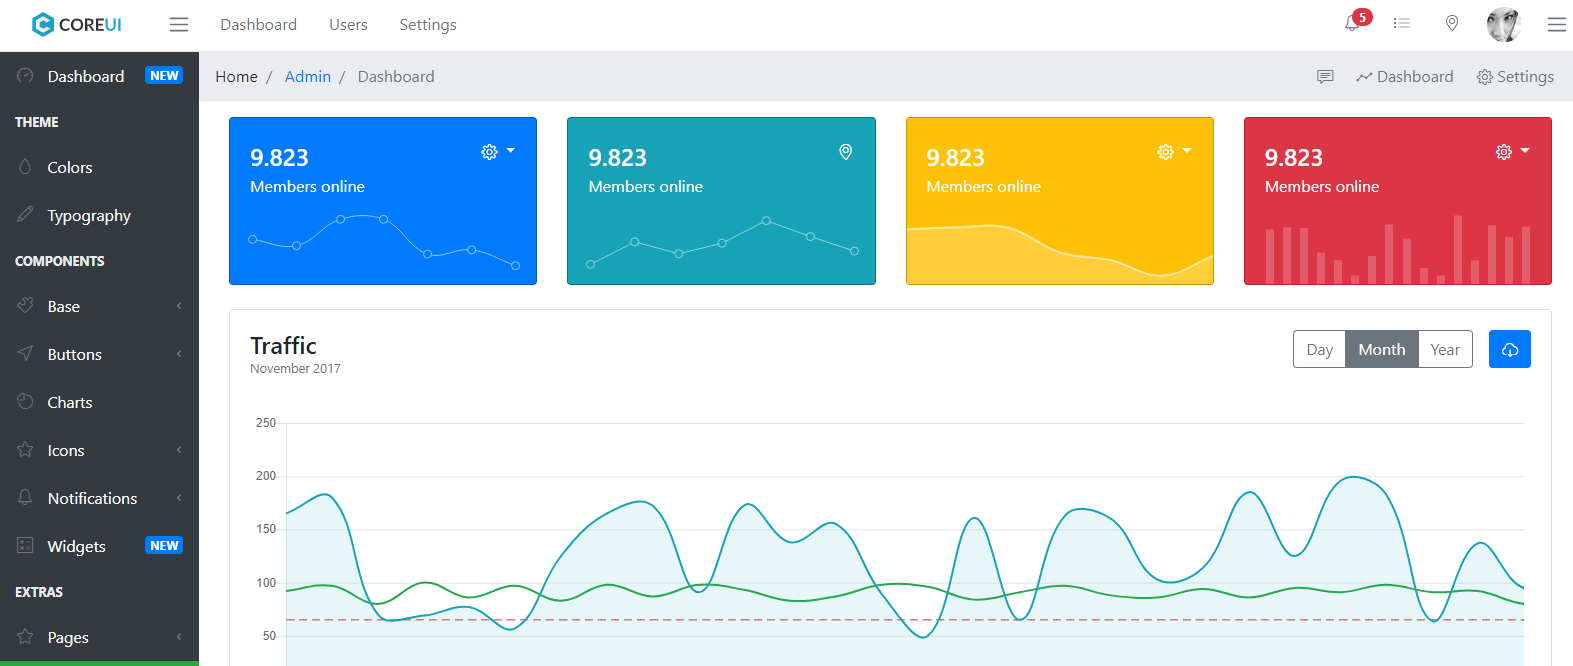
CoreUI Home page display
One of the pages that will be created just to explain the implementation, is the home page of CoreUI Admin Template. It looks like this:
You already downloaded the CoreUI Laravel zip folder. Extract and open the folder. Go to src folder. Inside, there are a lot of examples. The home page template is placed in index.html file. When the index.html is opened the whole structure of the page is placed there.
The code you need is placed in the div with class name app-body. It looks like this:
Copy the whole div with all its content between.
To successfully implement the home page, open the home.blade.php file and add these lines of code:
On the home page, you will find some chart elements. To make them work, you need to create a custom js file to make the animations of the charts work.
Create a new file in public/js folder and name it main.js. Download the file and add the code.
Navigate to the browser. Go to /admin route, the home page needs to be successfully displayed with all its features and components.
One more pageAdd the code below in the
As promised, we will add one more page to finally explain the whole process of integration of CoreUI Admin Template in Laravel, and get the entire Laravel Core UI.
The page to be added will be the Typography page and you can find it in the menu on the left side of the screen.
Let’s make the steps for creating a new page again.
Create a route in web.php file:
Go in the extracted zip folder of the CoreUI. Navigate to src folder. Open the typography.html file and copy the with its content.
Create new blade file in resources/views/admin folder and name it typography.blade.php. Insert the code below in the file:
That’s it. Navigate to /typography route in the browser and the CoreUI typography page will be displayed with all its features and components.
Conclusion
By following the steps, you will complete the integration of the CoreUI Template in Laravel successfully. Based on your project’s needs, you can easily add all the features and components offered with Core UI Laravel. You are ready to use a fully functional admin panel.
This beautiful combination, Laravel CoreUI, will ease your job and give the end user a user friendly UI to make the changes quickly and effectively. CoreUI is flexible and extensible, new components to different pages can be implemented easily. Enjoy!