
Introduction
This article describes how to integrate SpiraTest with JIRA, enabling end-to-end solutions for the management of the testing lifecycle. This integration is ideal for situations when SpiraTest is used as test management system, while development and bug tracking is accomplished by JIRA.
SpiraTest is a complete quality assurance and test management platform that comes with integrated defect monitoring and release scheduling. The solution provides management tools for requirements, test cases, and bugs/defects with coverage analysis in real-time as well as requirements traceability. JIRA is a well-known proprietary issue tracking product, that provides bug tracking, issue tracking, and project management functions.
When using SpiraTest with JIRA, you have an end-to-end solution for the management of the testing lifecycle. Using the power of SpiraTest integrated with JIRA you can manage your resources, releases, sprints, test cases complete with powerful scheduling, test execution, defect management, document management, collaboration and real-time reporting capabilities, to ease the development / testing process.
Implementation
The SpiraTest data-synchronization plugin for JIRA uses the built-in data synchronization capability of SpiraTest to synchronize bugs, issues, requirements and releases between the two systems.
There are three possible deployment options for the Spira data synchronization:
- You have SpiraTest and JIRA installed on-premise
- You have both SpiraTest and JIRA cloud-hosted
- You have SpiraTest cloud-hosted, but JIRA installed on-premise
SpiraTest installed on-premise


After installing and configuring the SpiraTest (and JIRA), get the Plug-In for Jira Integration add-on from Bug Trackers section on inflectra’s Add-Ons and Downloads page: http://www.inflectra.com/SpiraTeam/Downloads.aspx
Note: Integration explained in this article, requires at least version 5.0 of SpiraTest and version > 5.0 of JIRA.
Download the compressed Jira5DataSync.zip, extract it in the SpiraTest installation’s bin folder (usually C:\Program Files (x86)\SpiraTeam\Bin). This folder should already contain the DataSyncService.exe.config file. Edit the file, and it should look something like this:
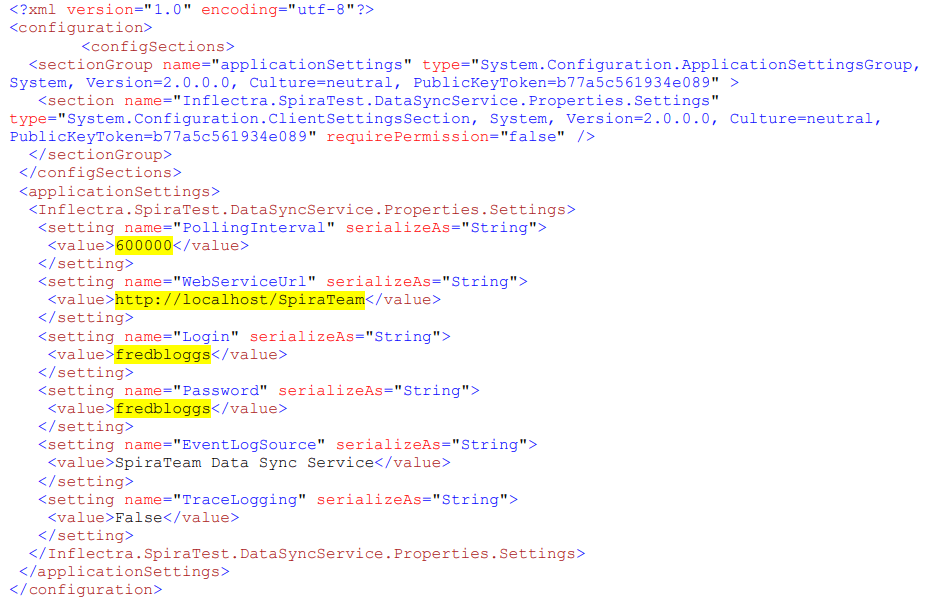
Verify only the marked values in yellow with your settings. PollingInterval is the synchronization frequency in milliseconds. WebServiceUrl is the URL to SpiraTest, with valid Login and Password.
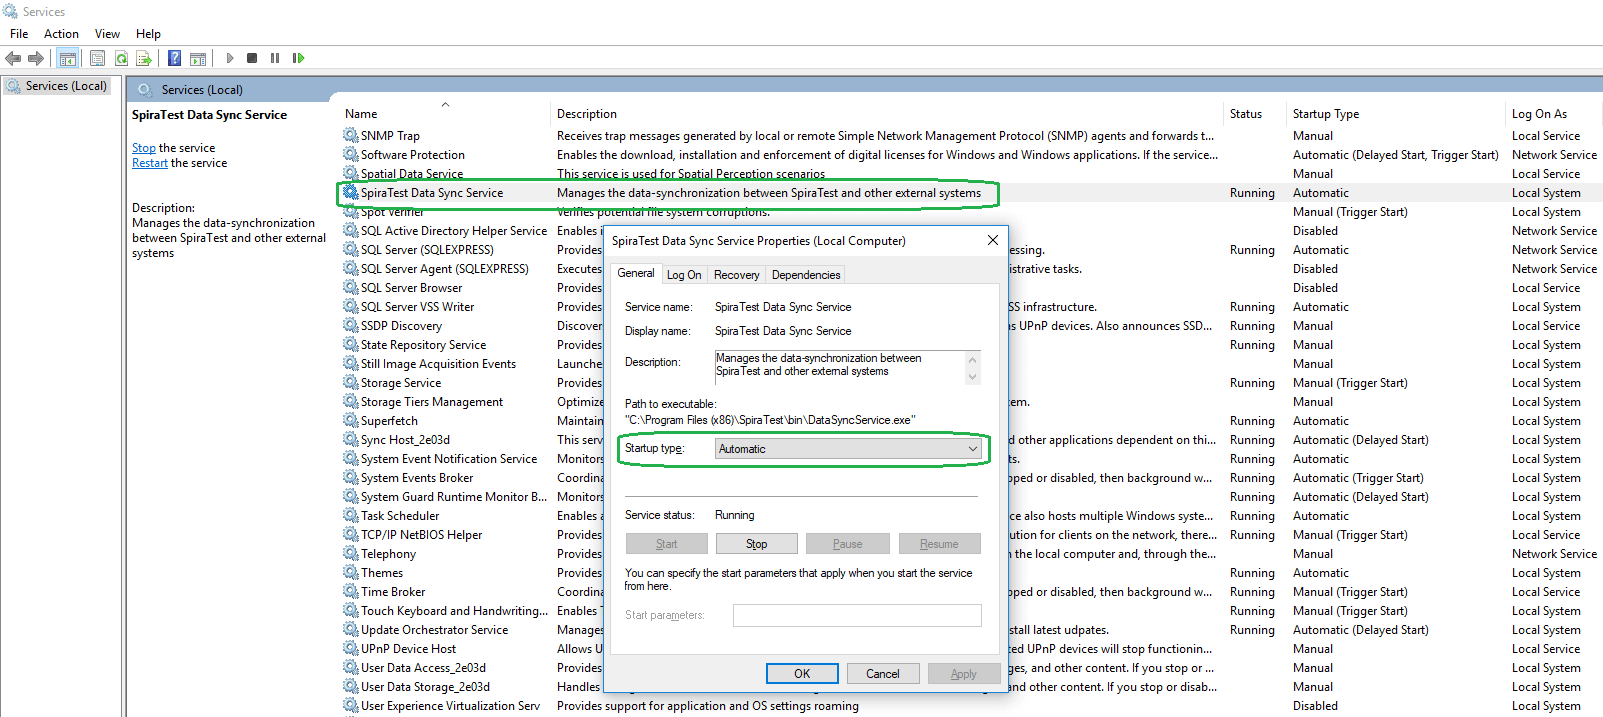
Next thing we need to do is to Start (and set to Automatic) SpiraTest Data Sync Service from the Windows Services. Right click on the service, select Properties and set it to Automatic.
Both SpiraTest and JIRA are cloud-hosted
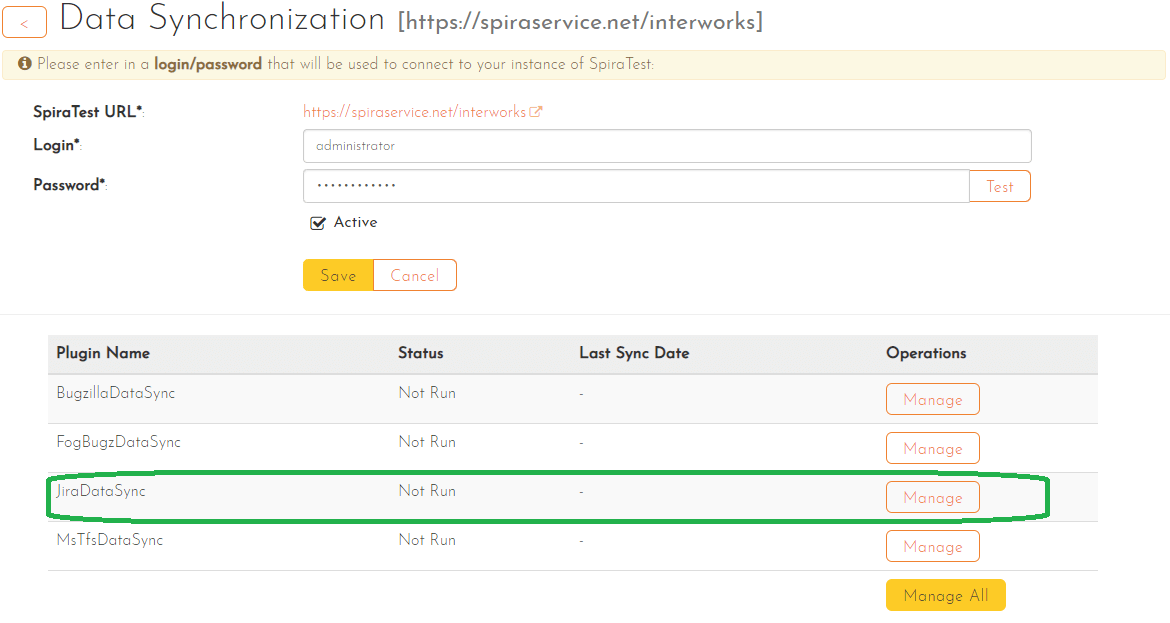
In order to enable SpiraTest integration with JIRA, in a case when both SpiraTest and JIRA are cloud hosted, make sure you include the Spira DataSync add-on with your subscription. Click on the Configure button associated with the Spira-DataSync add-on and enter a valid username and password that has access to the project you are synchronizing. Make sure the Active flag is checked and then click Save. You’ll be redirected to the list of plugins where you can click Manage to complete the configuration. (continued in Configure section)
Spira is cloud-hosted, but JIRA is installed on-premise
The Desktop Data Synchronization utility is a utility than can be used to run the various Data Synchronization Plugins without a server installation of Spira. Make sure you get the Desktop Data-Synchronization Utility from Bug Trackers section on Inflectra’s Add-Ons and Downloads page: http://www.inflectra.com/SpiraTest/Downloads.aspx


After installing it on the machine where JIRA is installed and running it you should enter the URL, login, password to your cloud-hosted SpiraTest and click Test. You will see a confirmation message.
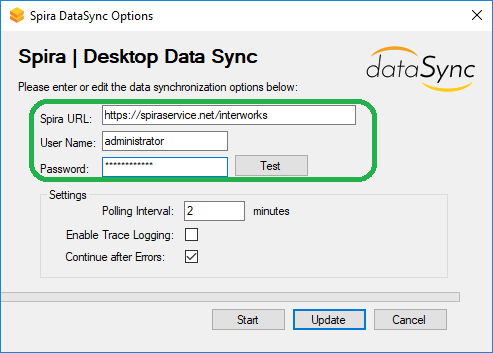
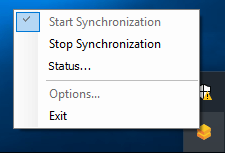
Then click the Update button to save your settings or Start to save your settings and start synchronization immediately and an icon in the tray for quick control will appear.
Configuration
Configure Plug-In
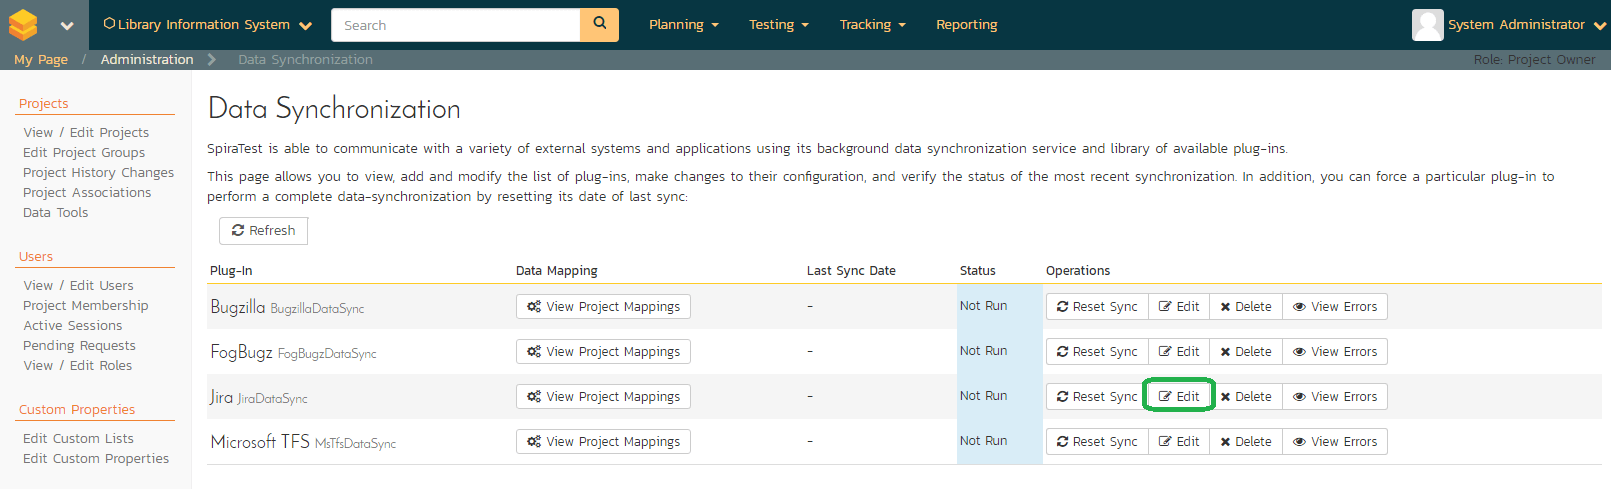
Log in SpiraTest using an account that has System-Administration privileges and click on the System > Data Synchronization administration option from the bottom of the left-hand navigation. In order to configure connection between JIRA and SpiraTest, click on JiraDataSync Edit button:
After clicking Edit, JIRA Edit Plug-in screen will appear:
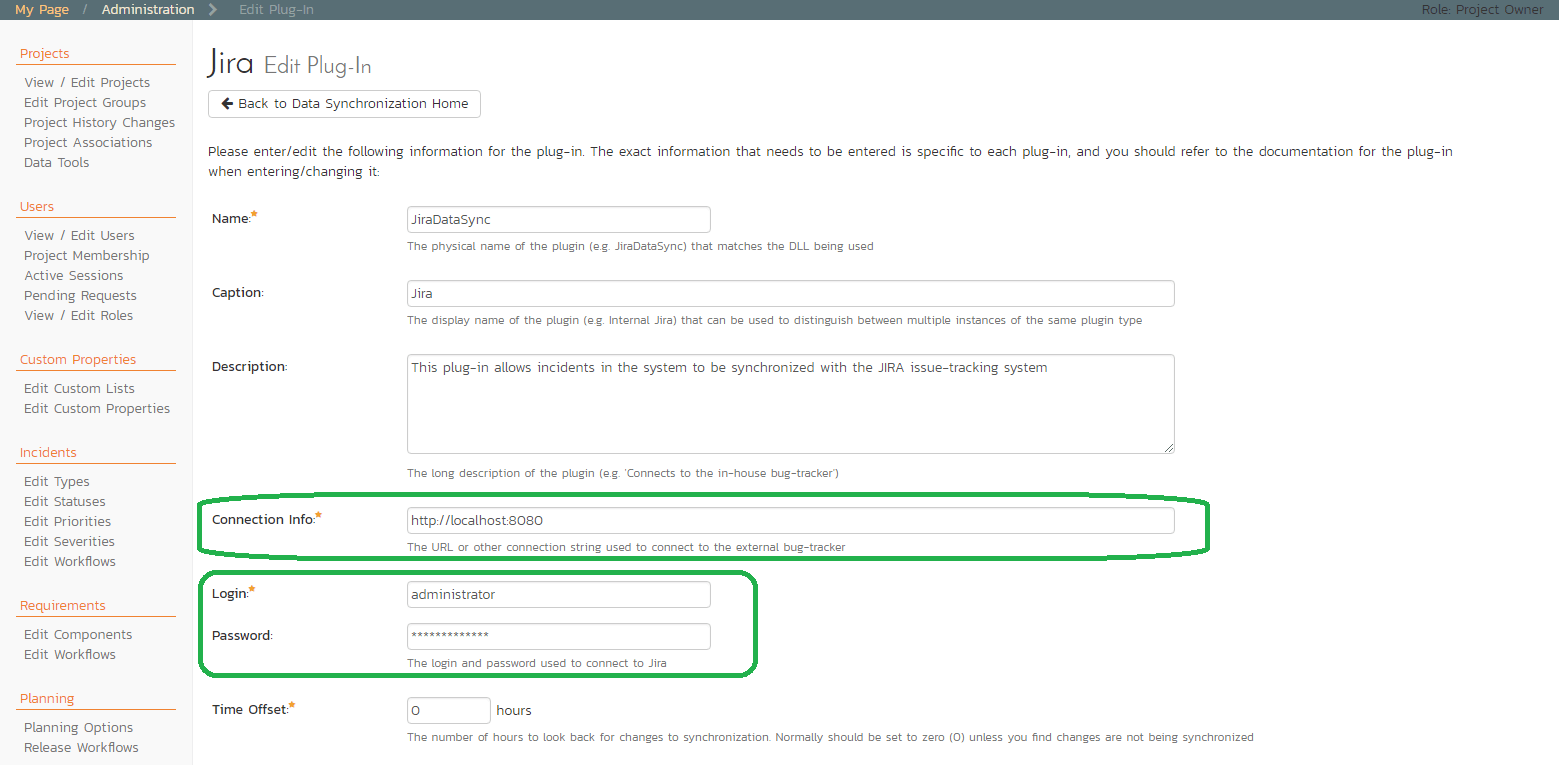
You need to fill out the following relevant fields for the JIRA Plug-in to operate correctly:
- Name – this needs to be set to JiraDataSync
- Connection Info – this should have the full URL to the JIRA being connected to
- For local JIRA, typical URL is: http://localhost:8080
- For cloud JIRA, it would be: https://mycompany.atlassian.net
- Login/Password – this should be set to a valid JIRA login that has permissions to create and view issues
- Time Offset – normally this should be set to zero
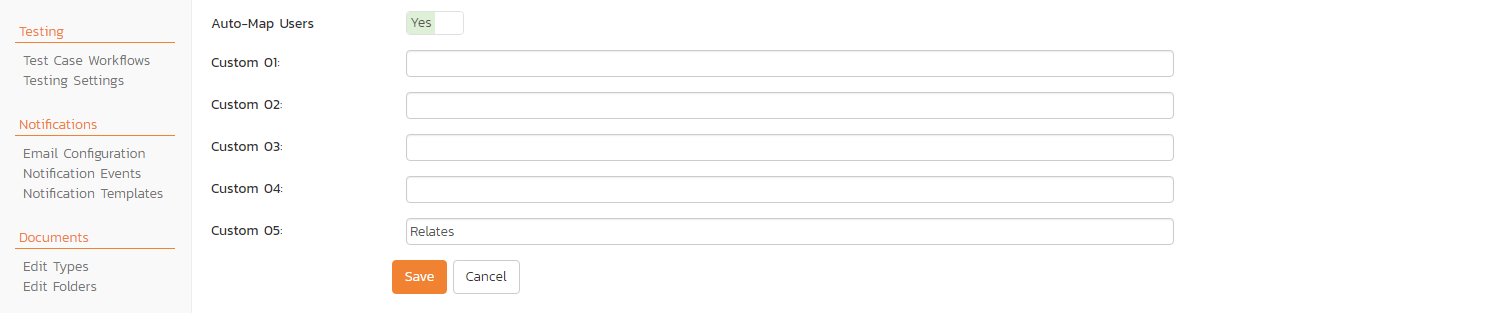
- Auto-Map Users – this changes the way that the plugin maps users. If Auto-Map Users is checked, all users in SpiraTest need to have the same username as those in JIRA
- Custom 01 – is incident severity
- Custom 02 – True to submit issues to JIRA using a specified security level (depending on JIRA config)
- Custom 03 – synchronization type (options: Blank, True, Both)
- By default (Blank), Spira will log new incidents in JIRA, created in Spira. It will also log new issues from JIRA in Spira.
- If True, the plugin will restrict synchronization to only loading new incidents and updating existing items from SpiraTeam to JIRA.
- If Both, the plugin will allow full bidirectional synchronization of new incidents/issues and also updates to existing incidents/issues in both Spira and JIRA.
- Custom 04 – comma-separated list IDs of JIRA issue types
Note: For most users, it is recommended leaving Custom 01 – Custom 04 blank.
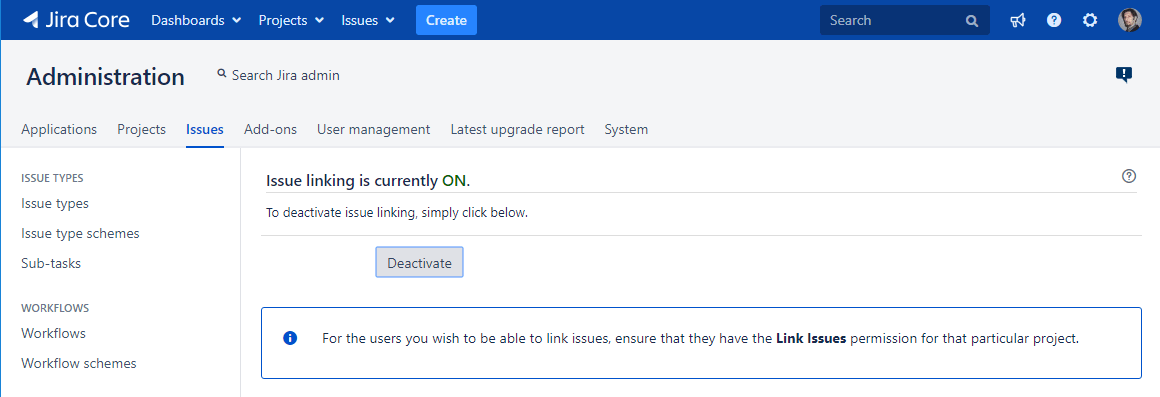
- Custom 05 – this should be set to the name of the JIRA issue link type that you want SpiraTest incident associations to use. If you leave this blank, incident associations in Spira will not be imported into JIRA. You can get the list of types from: Administration -> Issues -> Issue linking in JIRA:
Configure Mapping
Next, you need to configure the data mapping between SpiraTest and JIRA. This is important, as without a correct mapping, there is no way for the integration service to know that, for example: Enhancement in SpiraTeam is the same as a New Feature in JIRA.
From the data synchronization administration page, you need to click on the View Project Mappings hyperlink next to the JIRA plug-in name.
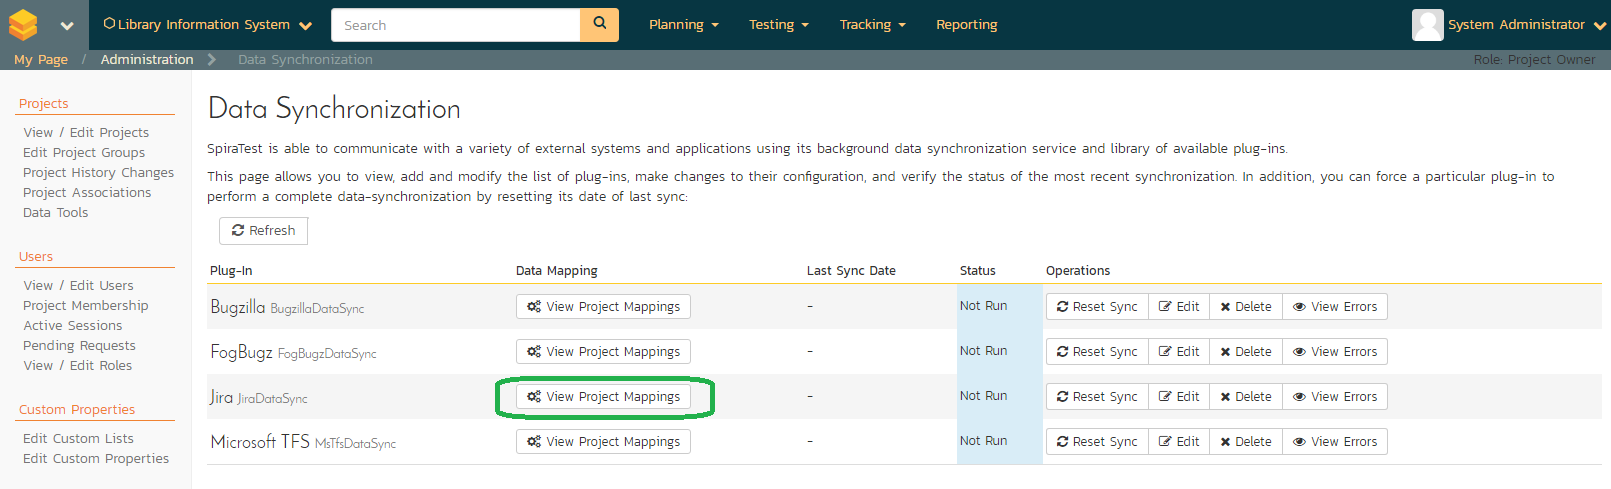
This will take you to the data-mapping home page for the currently selected project.
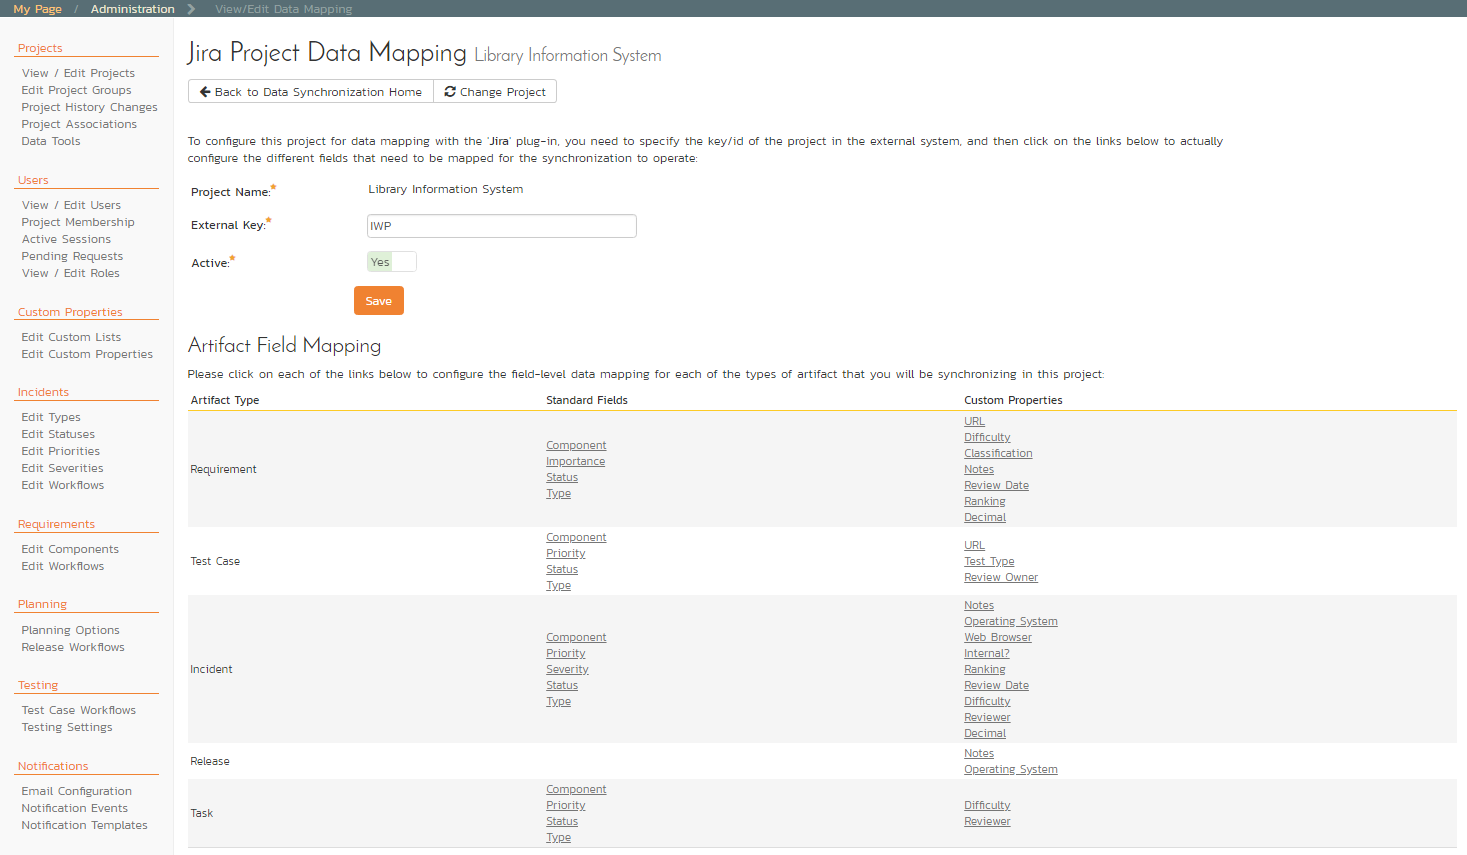
Required fields for data-mapping are:
- Project Name – is populated based on SpiraTest project for which mapping is defined. If the project name does not match the name you want to set mapping for, click on the Change Project.
- External Key – This is the name of the project Key in JIRA (acronym of the JIRA project)
- Active Flag – defines if the synchronization and data-mapping are active

There are much more fine-tuning settings in the Artifact Field Mapping section. Standard Fields like: Priority, Severity, Component, Status and Type are mostly used and are usually mapped with the field in SpiraTest as External Key, where External Key is the numeric ID of the Priority, Severity, Component, Status or Type inside JIRA, respectively. For example, in order to establish mapping between SpiraTest Incident artifact and JIRA Bug issue type, by clicking on Type link under Incident row, Edit Standard Field Mapping screen will be displayed:
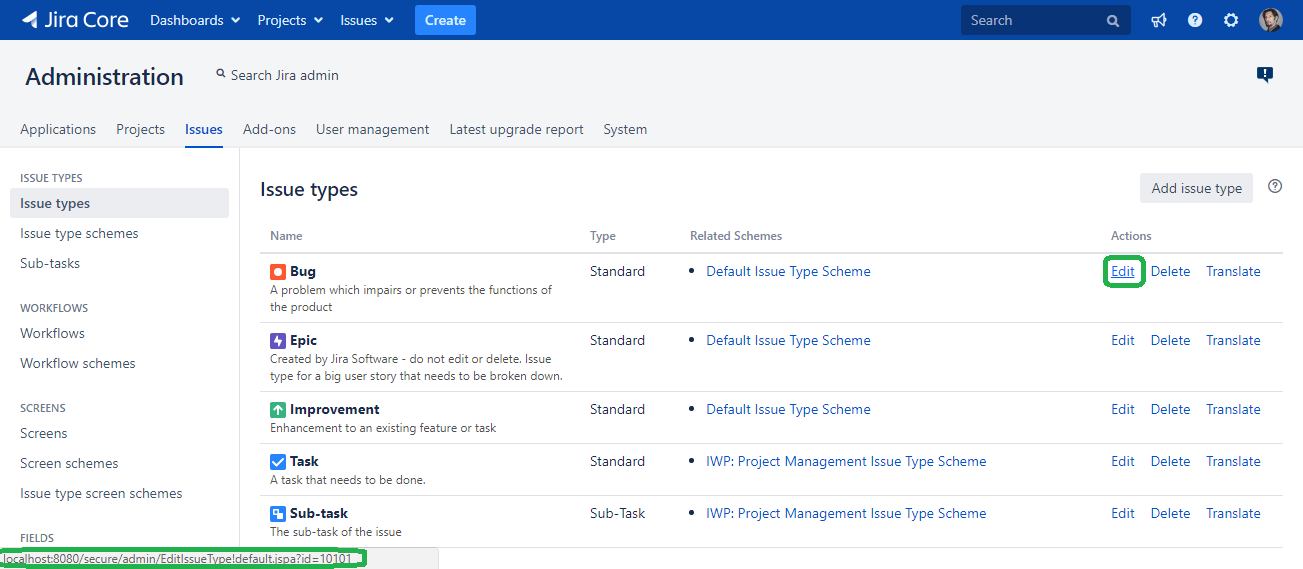
Under the External Key field, the ID of the Bug issue should be entered according to the configuration in JIRA. The easiest way to find the id of a particular JIRA issue type is by looking at the URL inside JIRA when choosing to View/Edit the Issue Type. The end of the URL will include section: id=X where X is the numeric ID of the Issue Type inside JIRA. This needs to be repeated for all basic Standard Fields: Priority, Severity, Component, Status and Type.
At this point it’s recommended to open the Windows Event Viewer and choose the Application Log. In this log, any error messages raised by the SpiraTeam Data Sync Service will be displayed. If you see any error messages at this point, stop the SpiraTeam service and check the errors. And if now errors appear, the final Result should look something like this:

Now that the integration service has been configured and the service started, initially any incidents created in SpiraTeam for the specified projects will be imported into JIRA and any existing issues in JIRA will get loaded into SpiraTeam as either incidents or requirements (depending on your configuration).