
ServiceNow as a platform offers a lot of different integrations, like inbound, outbound, scripted web services, and data sources. Many different techniques can be used to achieve this, like Web Services (REST, SOAP), EMAIL Inbound, JDBC, and Excel.
In the following lines, I will talk about integration between the ServiceNow platform and an external vendor. The integration is based on Push/Push architecture, where both the customer (ServiceNow) and the vendor expose web services to be used by the other party. The customer is responsible for pushing case creation, updates, and close requests to the vendor’s systems. The senior Jedi vendor is responsible for pushing problem acceptance, updates, and problem resolution messages to the customer. For push/push implementation, the web service endpoints use REST/JSON formats over HTTPS using TLS 1.2.
The integration process is initiated by ServiceNow: when a user creates an incident that is assigned to a certain predefined group, an outbound web service is called and a rest message is sent which will initiate the creation of another ticket in the external system. During the processing of this ticket by their agents, the information will be sent to and accepted by ServiceNow using inbound web service, which will update the incident table (using a Table Transform Map). The incidents can be closed either by the caller or by the vendor.
A. In the following few rows, I will talk about the main integration concepts and how they were applied. The vendor can’t create incidents in ServiceNow, only ServiceNow can create tickets in the vendor’s system.
In order to achieve this, an onBefore transform script was created for the inbound web service table transform map which if the action is Insert (the incident number sent in the vendor’s rest message does not exist in the ServiceNow database) sets the global ignore to true.
(function runTransformScript(source, map, log, target /*undefined onStart*/ ) {
if (action == ‘insert’)
ignore = true;
})(source, map, log, target);
B. Since the initiation process is generated only by assigning the incident to a predefined group, a backup process must be established to take in consideration that by mistake or maybe ignorance, the incident may first be assigned to another group, and then reassigned to the predefined one.
Besides the business rule which runs After Insert (if the Assignment Group = Group X) and sends the creation rest message, one more business rule was created After Update (if the Assignment Group changes to Group X) which will also send a rest message with all the details for the incident to be created in the vendor’s system.
C. The vendor’s system can accept incidents with max three attached files – one, two, or three files may be attached during creation or by a later update of the incident.
In the business rules that send rest messages for the creation and for updating a ticket in the vendor’s system a loop was added which queries the sys_attachment table details for the attached file, does the Base64 encode of the file content and sets the newly added field Sent to X to value true (marking the file as sent to the vendor’s system).
{
fName = att.getValue(‘file_name’);
fType = att.getValue(‘content_type’);
var sa = new GlideSysAttachment();
var binData = sa.getBytes(att);
base64Data = GlideStringUtil.base64Encode(‘binData’);
att.u_sent_to_X = ‘true’;
att.update();
}
D. The attachment file that has been sent once mustn’t be sent again during the incident update.
This is where the previously mentioned new field in the sys_attachment table helps determine whether when there is an update, files that are attached to the incident have been previously sent to the vendor
var att = new GlideRecord(‘sys_attachment’);
att.addQuery(‘table_name’, ‘incident’);
att.addQuery(‘table_sys_id’, current.sys_id);
att.addQuery(‘u_sent_to_X’,’false’);
att.query();
E. The vendor needs to receive a customized response on the sent web messages, not the default that is defined in the outbound rest web service.
An onAfter transform script was created for the inbound web service table transform map which adds a new element response.status_X in the rest web message response following the vendor’s requirements
(function runTransformScript(source, map, log, target /*undefined onStart*/ ) {
var gr = new GlideRecord(‘incident’);
gr.addQuery(‘number’, target.number);
gr.addQuery(‘u_X_incident_number’, target.u_X_incident_number);
gr.query();
if(gr.next())
{
response.status_X = “Successful”;
}
else
{
var resp = “No matching record found with Incident Number ” + source.getDisplayValue(“u_requesterid”) ;
response.status_X = resp;
}
})(source, map, log, target);
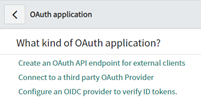
Oauth authorization
As part of an integration between ServiceNow and a third-party vendor, the vendor requires an OAuth authorization methodology for accessing their end point. With this methodology, after being presented with the identification code and the secret key, the consumer (in this case ServiceNow instance) must generate a bearer token and use it for authentication, before any other kind of interaction with the provider (in this case the third-party vendor).
STEPS to configure OAuth2 authentication for outbound REST Message integration:
- Getting Client ID and Client Secret from the provider (after an OAuth Provider is generated on the provider instance), as well as correct Authorization and Token URL
- Creating a new OAuth Application Registry record of type Connect to a third-party OAuth Provider with a unique name (X_Provider), using the Client ID, Client Secret, and URLs from the previous step. In this case, the Grant Type is Client Credentials.
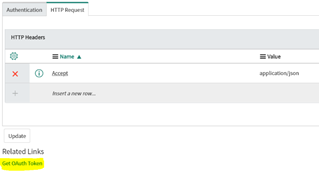
- Creating an outbound rest message (X Integration) with the Authentication type of OAuth 2.0 and the OAuth Profile defined in the previous step. Its HTTP Methods inherit the Authentication type from parent and have no specific setup. The generation of the token can be tested by clicking the option Get OAuth Token.
- Creating a business rule that will initiate sending the rest messages. First, an access token must be generated setting the Client ID and Client Secret as username and password:
var oAuthClient = new sn_auth.GlideOAuthClient();
var params = {grant_type:’client_credentials’, username:’xxxxxxxxxx’, password:’yyyyyyyyyy’};
var json = new global.JSON();
var text = json.encode(params);
var tokenResponse = oAuthClient.requestToken(‘X_Provider’, text);
var token = tokenResponse.getToken();
var accessToken = token.getAccessToken();
When setting the parameters for the rest message, the created OAuth profile (sys_id) and the token should be set first:
var r = new sn_ws.RESTMessageV2 (‘X Integration’, ‘Create Incident’);
r.setAuthenticationProfile(‘OAuth2‘, ‘325f1087db4b961972242ddb19753872’);
r.setRequestHeader(‘Authorization’, ‘Bearer ‘ + accessToken);
This is followed with setting all the other parameters in the rest message.
Though it is more complicated and expensive for implementation than the Basic model, the OAuth token management strategy allows you to approve one application interacting with another on your behalf without giving away your password. It also provides you with means for tracking each connected device that uses your API. So, if your plan is to organize a delegated access to your APIs, OAuth would be your choice.
Conclusion
Integrating different systems and enabling them to communicate easily with each other is a very powerful way to increase operational efficiency and reduce total cost. The described integration is only a small piece of all the ServiceNow integration capabilities, which will hopefully be a motivation to try some of the other options and different integration techniques.