
CodeceptJS is JavaScript-based test automation tool that is very easy to work with and it is getting more and more popular due to its compatibility. First of all, it allows us to write a test based on any of the most popular automation frameworks. Frameworks that are supported by CodeceptJS are:
- Playwright
- WebDriver
- Puppeteer
- TestCafe
- Protractor
Besides that, CodeceptJS has a lot of features that will speed up and facilitate the process of creating and maintaining automated tests. Some of the CodeceptJS features are:
- Scenario driven
- Driver agonistic
- Interactive Debug
- Rich locators
- PageObjects
More information’s about CodeceptJS can be found on the following link: https://codecept.io/.
Bitbucket is a Git-based source code repository hosting service, owned by Atlassian. Also, Bitbucket offers both commercial plans and free accounts with an unlimited number of private repositories. Besides its main features, it also provides 2 very useful additional features: Bitbucket Pipelines and Bitbucket Deployments.
In this article, we will explain how to run our CodeceptJS automated tests on Bitbucket Pipelines.
More information about Bitbucket and its features can be found on the following link: https://bitbucket.org/.
Codeceptjs tests structure for the git repository
For this concept, we already created automated tests in CodeceptJS using the WebDriver and committed the needed code on bitbucket.
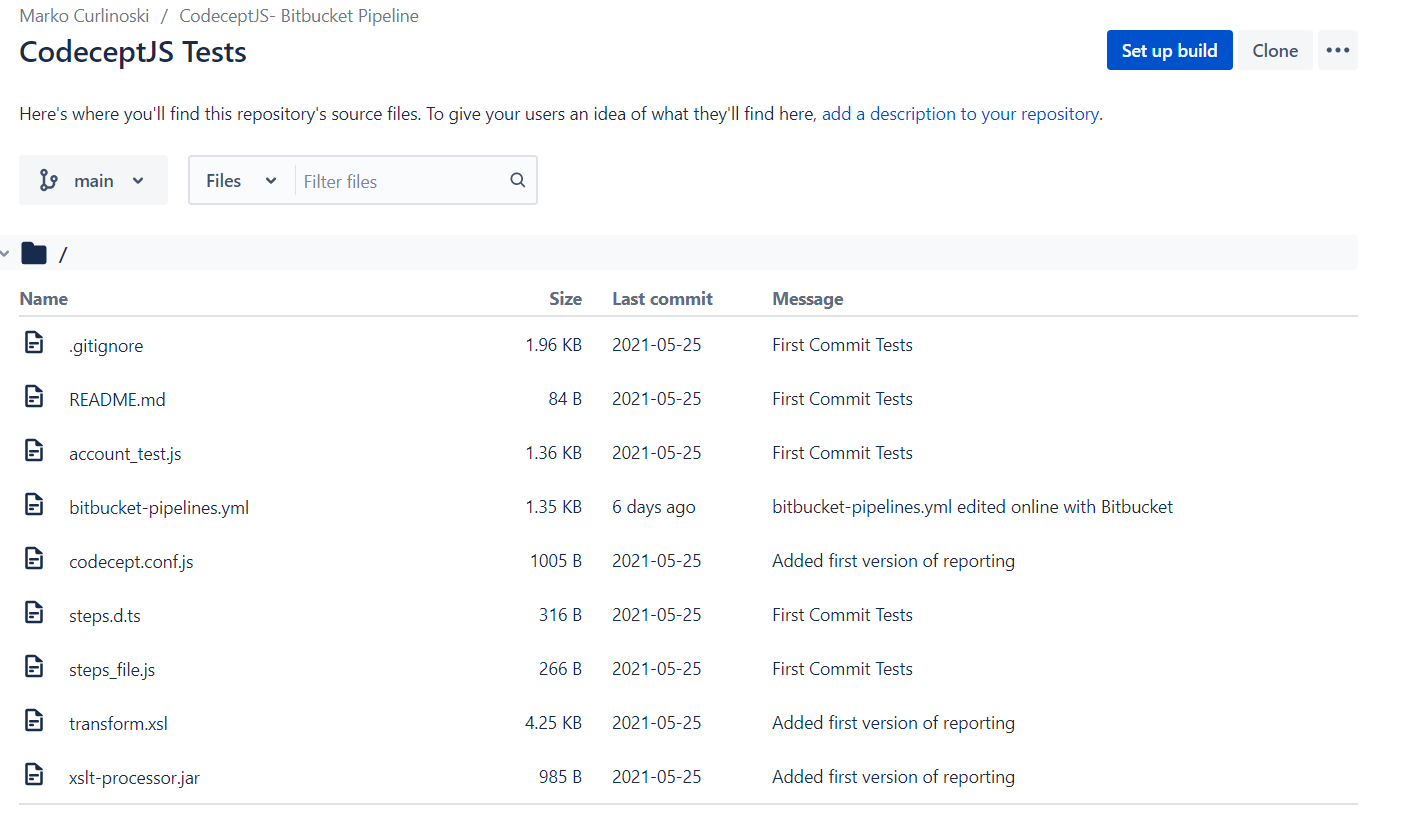
As we can see from image 1, we have all the files needed for running our tests. The most important files are:
- account_tests.js – where we are creating our tests that need to be executed
- codecept.conf.js – our CodeceptJS configuration where we configure our tests, the helpers and plugins we are going to use in our execution.
- steps_file.js – where we defined the tests steps.
- bitbucket-pipelines.yaml – a file that describes our process steps to set up an environment and executes our tests.
- transform.xsl – our xsl code to transform the XML results into beautiful detailed HTML reports.
- xslt-processor.jar – execution file that will apply the XSL file on the results XML file to generate HTML file.
The account_test.js, codecept.conf.js and steps_file.js are files predefined by CodeceptJS that are used to run the tests.
The bitbucket-pipelines.yaml is a file generated by Bitbucket where the environment setup and executing the tests steps are described.
The transform.xsl and xslt-processor.jar files are created by us, so we can create beautiful-looking test results.
Conclusion: we need the full CodeceptJS structure (excluding the node_moduls folder and package.json file) and 3 additional files: bitbucket-pipelines.yaml, transform.xsl and xslt-processor.jar.
Codeceptjs tests configuration
In our concept, we used the WebDriver framework, there four most of our CodeceptJS configuration is based on it. Besides the standard CodeceptJS configuration, we used 2 additional configurations:
- Mocha reporter- the one that generates JUnit XML reports that we can parse later for the report.
- WDIO – WebDriver service runner that will control our WebDriver automatically (open session, close session, start the correct needed version etc).
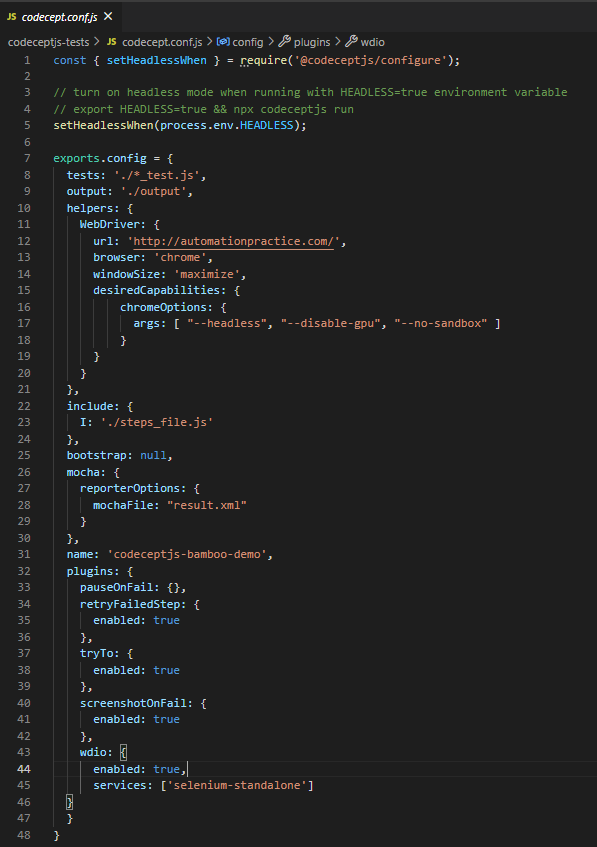
In the configuration file, we configure that we are going to use the WebDriver helper, with a base URL http://automationpractice.com/. The browser that we are going to use is Chrome, and we want to maximize our window and then pass additional arguments to the WebDriver according to our needs.
Another very important configuration for us is the reports. For that reason, in the mocha object, we define the report options. In our case, we define that we want our report to be stored in our root folder with the name: result.xml (line 26 to line 30).
And last but not least, we need to add the wdio plugin to our configuration. In its configuration, we define that it needs to be enabled and use the selenium-standalone service to serve our tests with WebDrivers.
After we finish with the CodeceptJS configuration, we can proceed with writing the Bitbucket pipeline file.
Bitbucket pipeline configuration
Once we have completed configuring the tests, we can proceed with configuring our bitbucket-pipelines.yaml file which will execute steps to set the environment and run the CodeceptJS tests. First, we need to create our bitbucket-pipelines.yaml. Then we need to write our configuration.
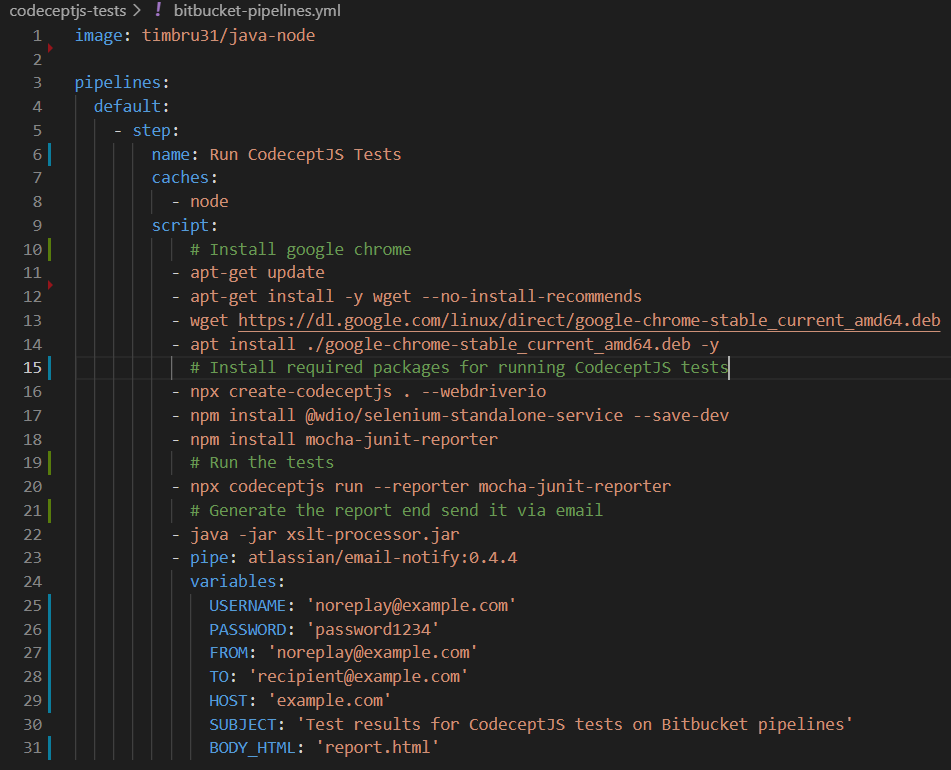
Because the working of Bitbucket pipelines is Docker-based, the first step in our configuration is to select an image that we are going to use. It can be any image available on https://hub.docker.com/. In our case, we are going to use the timbru31/java-node image (more information about this image can be found on the following link: https://hub.docker.com/r/timbru31/java-node). We have selected this image because we need Java and Node JS for our execution.
Next, we need to name our step for executing the CodeceptJS tests (line 6). In our case, this step is called Run CodeceptJS Tests because in this step we set up the environment for test execution, and then we run the tests.
Now we are ready to write the script with all the needed commands for setting the environment and running the tests. The first part is installing Google Chrome (because we are running the tests on Google Chrome as we have set it up in our codecept.conf.js file). To complete this part, we are running a few Linux commands:
- apt-get update – to update our package list
- apt-get install -y wget –no-install-recommends – a command that will install a wget so we can download the google chrome package for Linux
- wget https://dl.google.com/linux/direct/google-chrome-stable_current_amd64.deb – a command that will download the official and latest stable version of the Google Chrome package.
- apt install ./google-chrome-stable_current_amd64.deb -y – a command that will install the newly downloaded package.
At this point, we have downloaded and installed Google Chrome. Now we can proceed with the next part, setting the environment for execution of the CodeceptJS tests. This is why we are going to use a few commands that will install the CodeceptJS and all plugins and helpers we are going to use:
- npx create-codeceptjs . –webdriverio – is a command for a quick installation of CodeceptJS and doing most of the configurations automatically for writing and running tests using the WebDriver.
- npm install @wdio/selenium-standalone-service –save-dev – a command that will install all needed files for our wdio plugin (that we configured in the codecept.conf.js file) to work properly.
- npm install mocha-JUnit-reporter – the helper that will help us to create XML reports that we can parse.
After this command, we have successfully set up a full environment for executing our tests. Our next command is for executing the tests:
npx codeceptjs run –reporter mocha-junit-reporter
With this command, we are executing the tests and we are giving an argument that we want our reports to be created using the helpers we installed and configured (mocha JUnit reporter).
Our next goal is to parse the tests and send the test results via email. In order to complete this goal, first, we are going to execute our xslt-processor.jar file. This file, will automatically collect the generated result.xml file from our mocha reporter and the transform.xsl. As a result, it will return a file named report.html.
Now, the only thing left is to send this file by email to all recipients that need our report. For this purpose, we are going to use the atlassian/email-notify:0.4.4 pipe (line 23 to line 31 in image number 3). This is predefined by Bitbucket Pipelines and can be used for sending emails using SMTP. Therefore configuring this pipe using our SMTP details is the only thing left (username, password, port, host, etc.), set the email recipients, set the email subject, and in the BODY_HTML parameter insert the file name that was generated from the .jar file, in our case report.html.
How bitbucket pipelines works?
After we finish all our configurations and write some tests, we can commit our code to the already-created Bitbucket GIT repository. Our pipeline starts executing automatically after every commit to the GIT repository. We can see all our executions and run our pipeline in the Pipelines section of our repository.
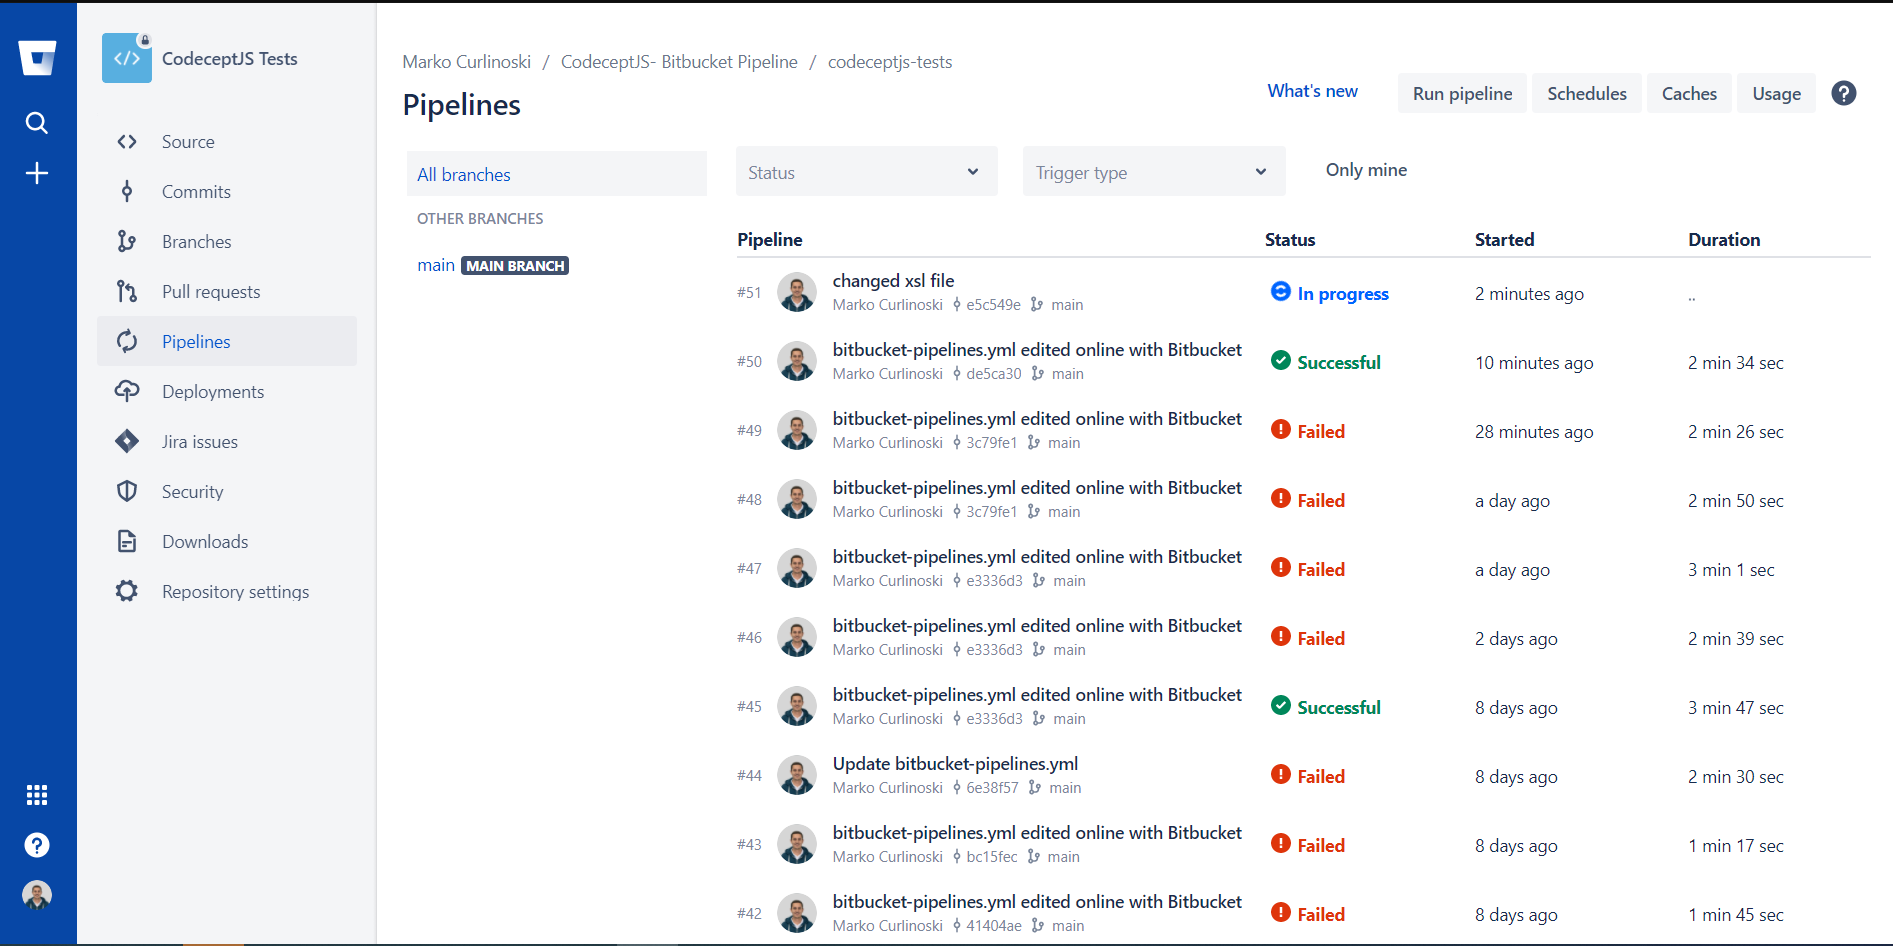
At the screen represented in image 4, we can see a lot of details about our executions. We can run the pipeline by clicking on the Run Pipeline on the top right corner of our screen. We can see all past executions, their status, time of the last run, and execution duration.

After we click on any of the executions represented on image 4, we will be redirected to the screen on image 5, where we can see all the details about our execution, see the logs for every command we executed and check if everything went as we planned.
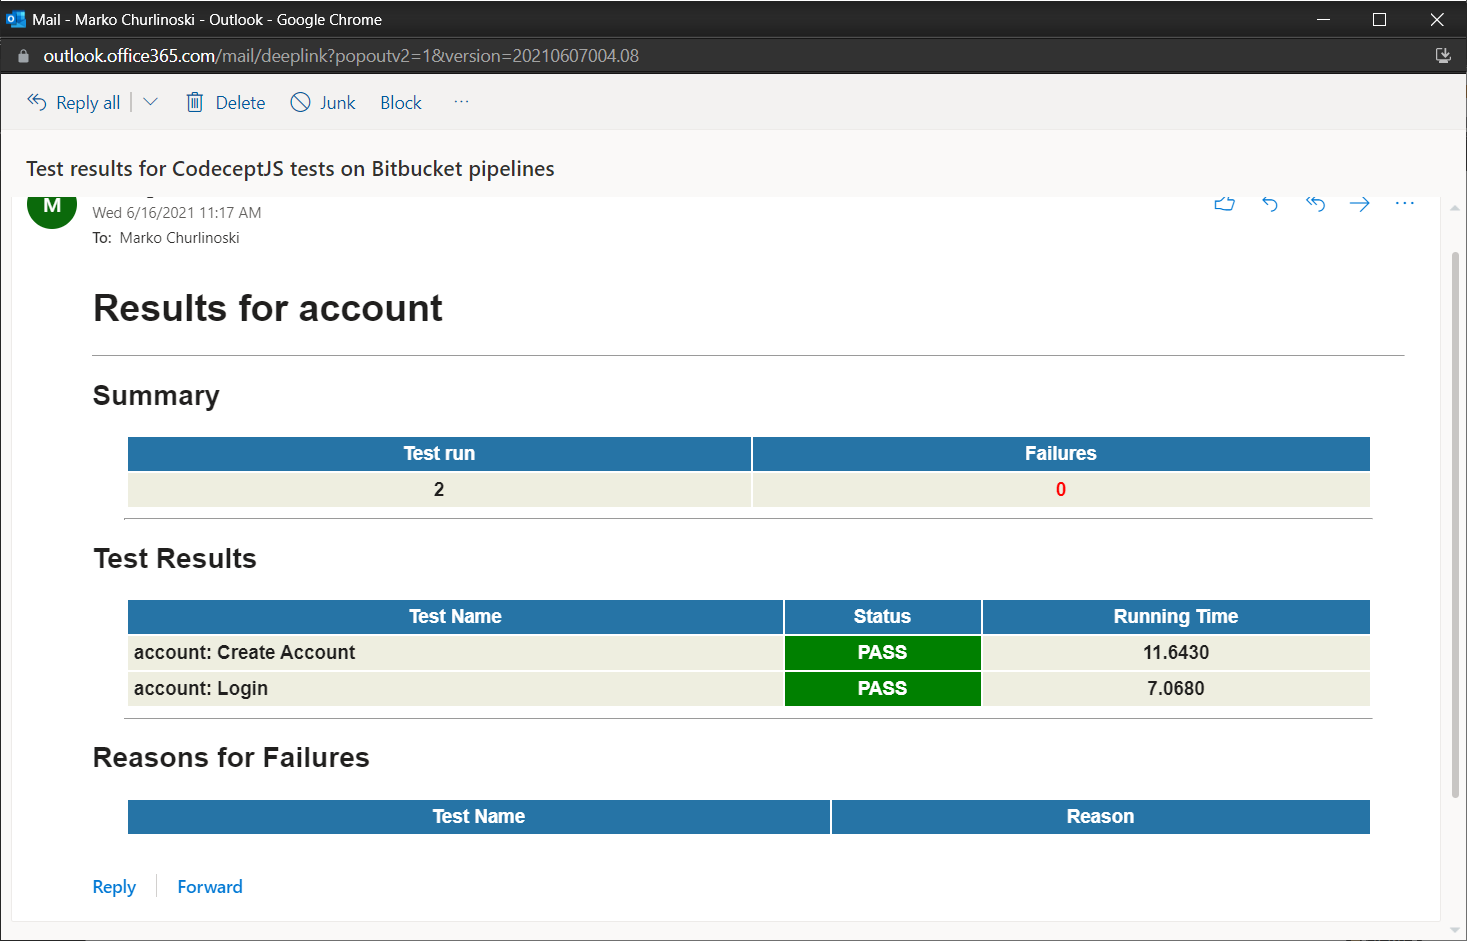
After every execution (as we set in our pipeline configuration), we will receive an email with detailed test results.
Conclusion
In the past years, software delivery has made a big step forward thanks to the implementation of continuous delivery. Quality Assurance is no exception, and the acceleration of the QA pipeline has helped shorten delivery cycles and bring higher quality software. This is why having implemented your automated tests into the CI/CD process is important.
With the fast-growing technology (new testing tools as well as new CI/CD tools) our job is to continue exploring all the possibilities for better, more stable, and faster software development.
The best practice is to set up your automated tests on the same CI/CD tool as the software development, and this is why we selected Bitbucket Pipelines.
Bitbucket Pipelines is a very simple tool. All the pipelines can be created very easily and it is supporting a variety of technologies and environments. As a free version, it allows us to only have 50 minutes of execution time.