
In the fast-evolving world of frontend development, new tools, libraries, and frameworks are released on daily basis, so choosing the right ones to use in a project is one of the most important decisions to make.
Following that logic, for our next project, we decided to use React.js for building an Admin Dashboard application.
React is an open-source, declarative, efficient, and flexible JavaScript library used for frontend development, which was developed by Facebook. It is a component-based library that enables us to build high-quality user-interfaces for web apps. Although it’s a front-end library, React is not opinionated and can be paired with a variety of other technologies executing the back-end, too.
In our case, the Admin application will have an authorized communication with an external Laravel application which will serve all the API calls to fetch and manipulate the data.
In the next sections we will focus on building a multifunctional gallery component in React which will have the following features:
Install the dependencies
One of the many advantages of using the popular front-end libraries/frameworks is the usage of already existing packages so we don’t have to reinvent the wheel all over again. For creating the photo component, we are going to use these packages:
- react-dropzone
Which is a simple React hook to create an HTML5-compliant drag’n’drop zone for files, we will use it to create a drag’n’drop container for the upload of the photos.

- React sortable HOC
It consists of a set of higher-order components to turn any list into an animated, accessible, and touch-friendly sortable list. We are going to use it to reorder the photos according to the end-user needs.

- React Image Lightbox
A flexible lightbox component for displaying images in a React project. We are going to use it to create a gallery of the selected photos in their original size.

Photo Upload
As mentioned above we will implement the react-dropzone component as an upload container and the render function will include the following statement:
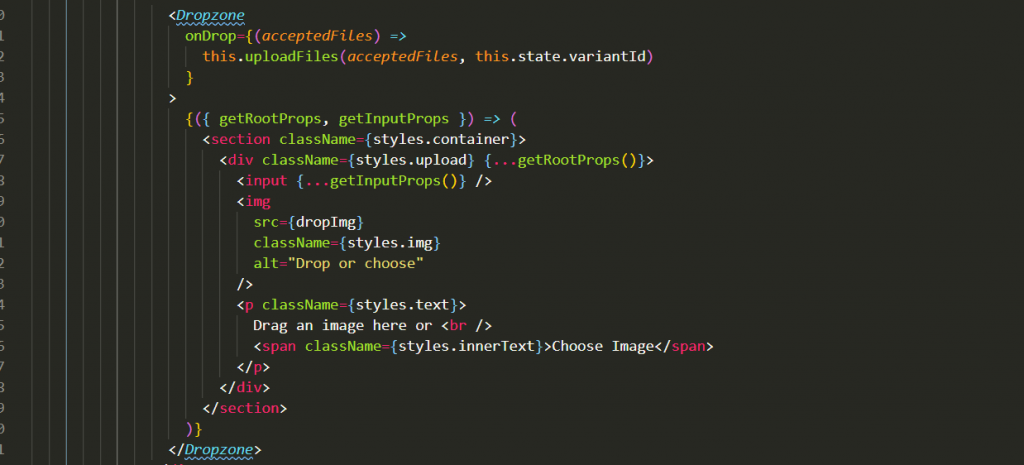
As we can see in the code sample we are extending the component to use style components to enhance the style and to place an image in the container for better visual representation, also we created a custom function for onDrop action to upload the selected files to the server.
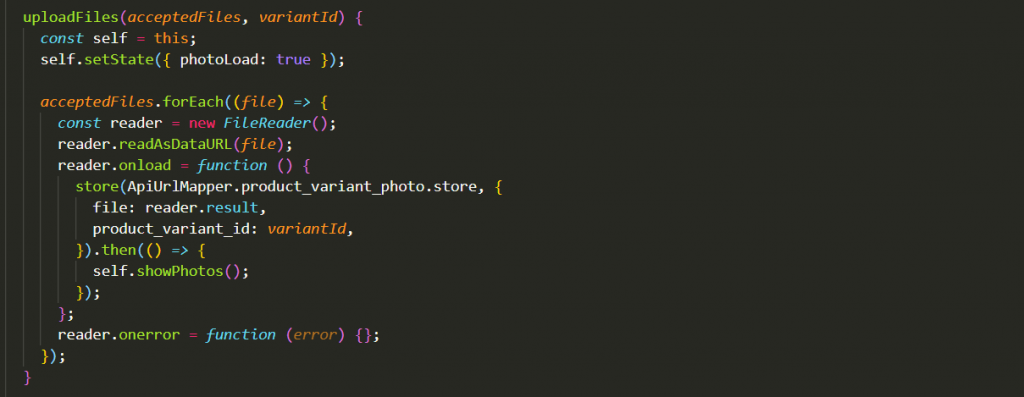
Here we are making an axios call to the Laravel server application to save the images to the storage folder and to create a thumbnail of the photos. In the next section, we will show how they will be used for photo preview. To make this component more user-friendly, whenever a photo is uploaded to the server, we are showing a loading spinner, to simulate that something is happening and the user will not see just a static page. This action is handled by simply setting the state of the photoLoad to true which further renders the loading spinner in the appropriate location.
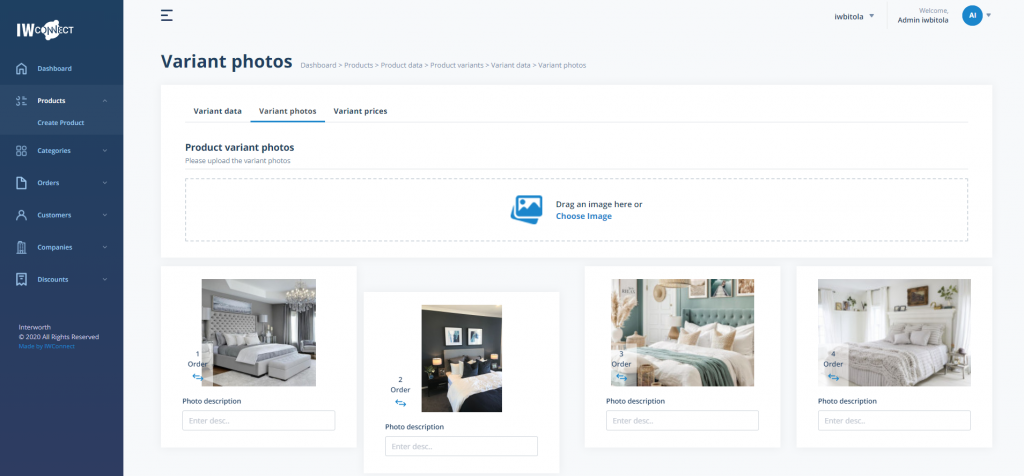
Until now this component in our Admin application will look like the image below.
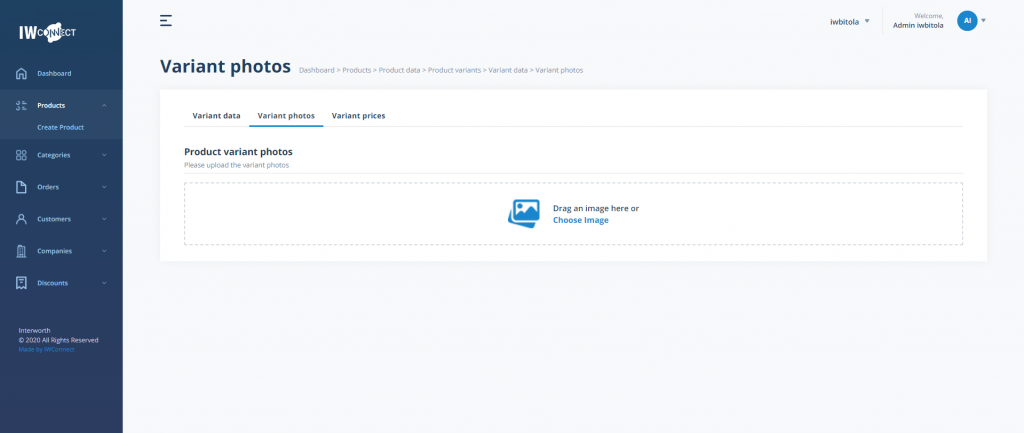
Photo preview & sort
In order to be able to see the uploaded photos when the photo component is mounted we will make another axios call to get the photo thumbnail data, and then the data will be set in the state of the component so we can easily display the photos in the render function below the upload container.

Before displaying and sorting the photos we need to make initialization of the Sort container where all the sort properties will be applied and to define the Sort item according to our requirements.
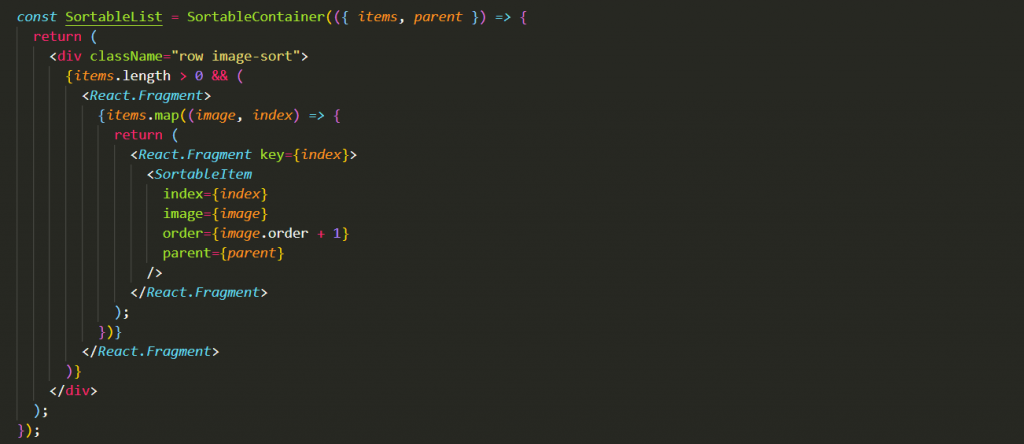
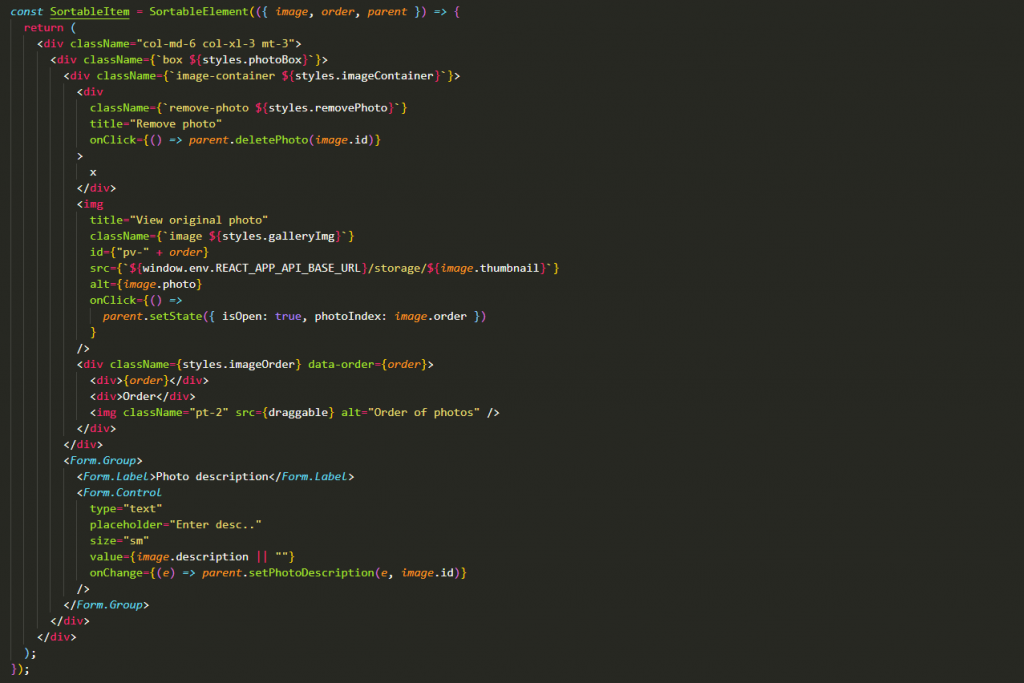
And finally, in the render function we have the following statement:

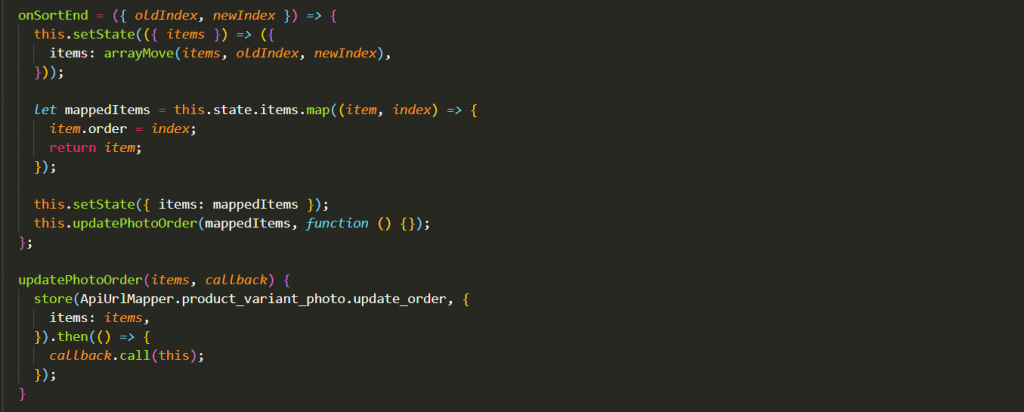
At this stage, we have the items shown in the component and ready to be sorted but we are missing the last piece of the puzzle, we want when the item is reordered, the order to be saved on the server so next time the photos will be loaded in the correct order. For that purpose, the onSortEnd function comes in place to remap the items and to send the correct order to the server.
Now we have the complete functionality with preview and sort, and the second image demonstrates how the user can drag & drop the image to change the order position:
Lightbox gallery implementations
While the component now is showing the photos, they can only be visible in the thumbnail size, sometimes we need to see the photo in the original size and also to easily shuffle through the selected photos. To achieve that we are going to implement the third and final package for this multifunctional component, the lightbox gallery.
To be able to loop over the images we are going to use these state properties:
- Items – the list of photos
- Photo index – the order of the photo will be used as an index
- isOpen – true/false value to mark when the lightbox needs to be shown
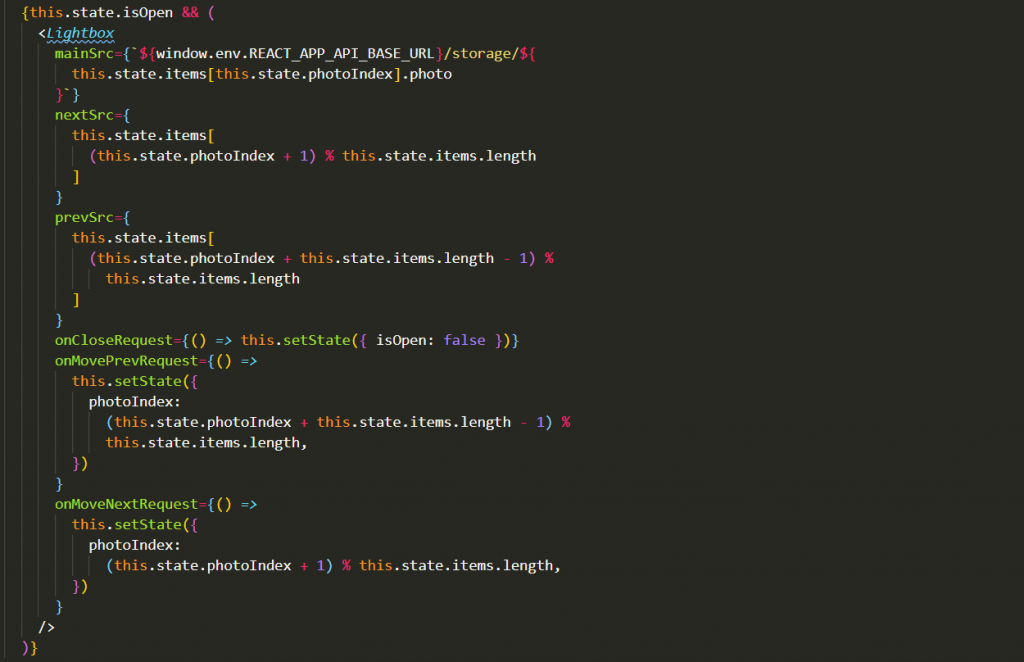
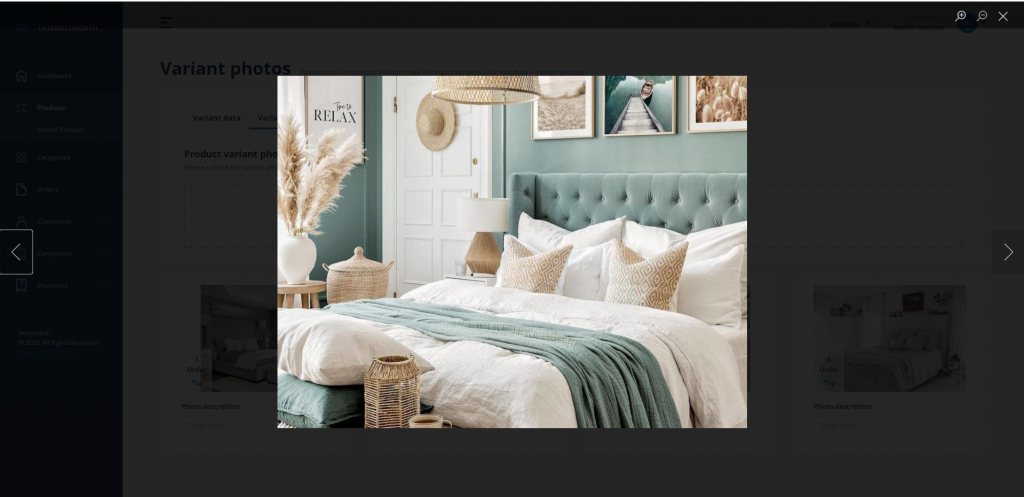
The original photo URL is used here, and by clicking on some of the photos we can trigger the gallery (this event is visible in the previous sections of the code) which looks like this:
Delete Photo
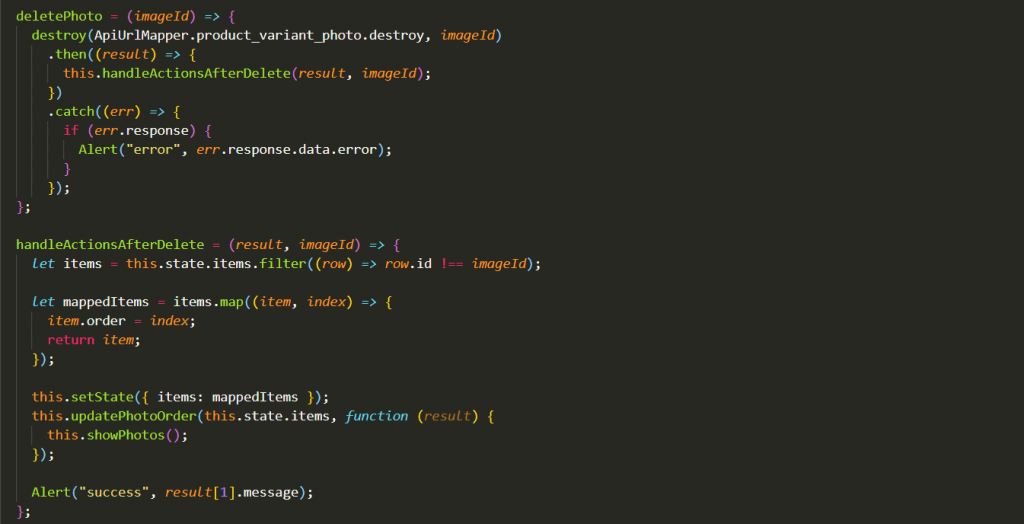
For each of the photos, the delete action is available. What is important to note here is when we are deleting the photo for the rest of the remaining images the order needs to be remapped so we have order consistency after deletion.
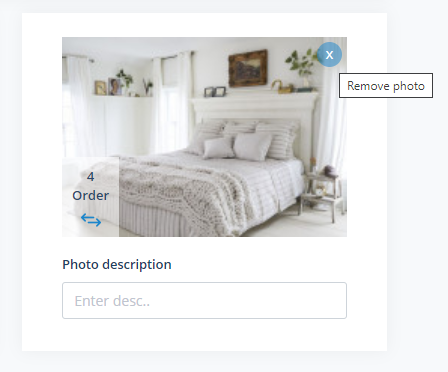
When the delete action is triggered, Axios call is made to the server, and if the action is successful the rest of the images are shown in the correct order, and an Alert notification is displayed for the end-user which is another reusable custom component built by our team to make this application more user friendly.
Conclusion
In this blog post, we saw how we can create a complete multifunctional photo gallery component in React that can be used in many other situations. React gives us the flexibility to make fully functional components by using already existing packages and reusable components so we can make the process of development faster but also to be able to concentrate on the specific project needs in order to deliver the best possible outcome.
If you want to discuss the process of creating a complete multifunctional photo gallery component in React.
In the fast-evolving world of frontend development, new tools, libraries, and frameworks are released on daily basis, so choosing the right ones to use in a project is one of the most important decisions to make.
Following that logic, for our next project, we decided to use React.js for building an Admin Dashboard application.
React is an open-source, declarative, efficient, and flexible JavaScript library used for frontend development, which was developed by Facebook. It is a component-based library that enables us to build high-quality user-interfaces for web apps. Although it’s a front-end library, React is not opinionated and can be paired with a variety of other technologies executing the back-end, too.
In our case, the Admin application will have an authorized communication with an external Laravel application which will serve all the API calls to fetch and manipulate the data.
In the next sections we will focus on building a multifunctional gallery component in React which will have the following features:
Install the dependencies
One of the many advantages of using popular front-end libraries/frameworks is the usage of already existing packages so we don’t have to reinvent the wheel all over again. For creating the photo component, we are going to use these packages:
- react-dropzone
Which is a simple React hook to create an HTML5-compliant drag’n’drop zone for files, we will use it to create a drag’n’drop container for the upload of the photos.
- React sortable HOC
It consists of a set of higher-order components to turn any list into an animated, accessible, and touch-friendly sortable list. We are going to use it to reorder the photos according to the end-user needs.
- React Image Lightbox
A flexible lightbox component for displaying images in a React project. We are going to use it to create a gallery of the selected photos in their original size.
Photo Upload
As mentioned above we will implement the react-dropzone component as an upload container and the render function will include the following statement:
As we can see in the code sample we are extending the component to use style components to enhance the style and to place an image in the container for better visual representation, also we created a custom function for onDrop action to upload the selected files to the server.
Here we are making an axios call to the Laravel server application to save the images to the storage folder and to create a thumbnail of the photos. In the next section, we will show how they will be used for photo preview. To make this component more user-friendly, whenever a photo is uploaded to the server, we are showing a loading spinner, to simulate that something is happening and the user will not see just a static page. This action is handled by simply setting the state of the photoLoad to true which further renders the loading spinner in the appropriate location.
Until now this component in our Admin application will look like the image below.
Photo preview & sort
In order to be able to see the uploaded photos when the photo component is mounted we will make another axios call to get the photo thumbnail data, and then the data will be set in the state of the component so we can easily display the photos in the render function below the upload container.
Before displaying and sorting the photos we need to make initialization of the Sort container where all the sort properties will be applied and to define the Sort item according to our requirements.
And finally, in the render function we have the following statement:
At this stage, we have the items shown in the component and ready to be sorted but we are missing the last piece of the puzzle, we want when the item is reordered, the order to be saved on the server so next time the photos will be loaded in the correct order. For that purpose, the onSortEnd function comes in place to remap the items and to send the correct order to the server.
Now we have the complete functionality with preview and sort, and the second image demonstrates how the user can drag & drop the image to change the order position:
Lightbox gallery implementations
While the component now is showing the photos, they can only be visible in the thumbnail size, sometimes we need to see the photo in the original size and also to easily shuffle through the selected photos. To achieve that we are going to implement the third and final package for this multifunctional component, the lightbox gallery.
To be able to loop over the images we are going to use these state properties:
- Items – the list of photos
- Photo index – the order of the photo will be used as an index
- isOpen – true/false value to mark when the lightbox needs to be shown
The original photo URL is used here, and with click on some of the photos we can trigger the gallery (this event is visible in the previous sections of the code) which looks like this:
Delete photo
For each of the photos, the delete action is available. What is important to note here is when we are deleting the photo for the rest of the remaining images the order needs to be remapped so we have order consistency after deletion.
When the delete action is triggered, axios call is made to the server and if the action is successful the rest of the images are shown in the correct order and Alert notification is displayed for the end-user which is another reusable custom component build by our team to make this application more user friendly.
Conclusion
In this blog post, we saw how we can create a complete multifunctional photo gallery component in React that can be used in many other situations. React gives us the flexibility to make fully functional components by using already existing packages and reusable components so we can make the process of development faster but also to be able to concentrate on the specific project needs in order to deliver the best possible outcome.
If you want to discuss the process of creating a complete multifunctional photo gallery component in React, you can contact us at sales@iwconnect.com.