

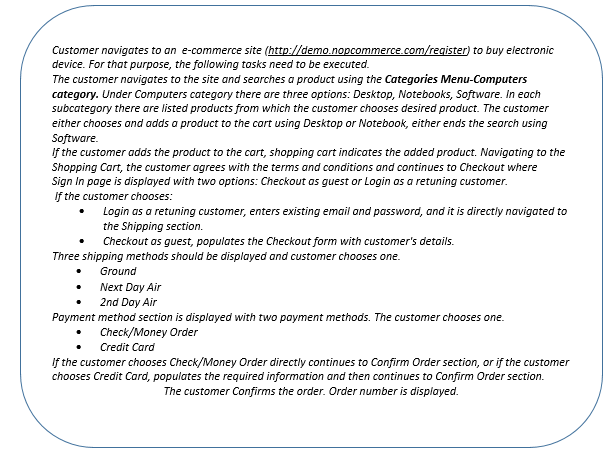
Software testing is a crucial part of the entire software development lifecycle. As sooner as the testing is included major defects in any further phase can be avoided.
The whole procedure of testing especially writing the test cases can be a time consuming process. This article describes the Model Based Testing technique that is more efficient and time saving, and it includes generation of test cases that can be run in a respective automation tool.
By analyzing the requirements of the system under test we can graphically describe the behavior of that system into a Model. Adding additional parameters as pre-conditions, post-conditions, actions, input sequences, we can get a precise description of the whole system that will be practically understandable and reusable.
This technique is a popular approach for optimizing the application testing and in some way it combines manual and automation testing.
As a demonstration of this technique we will use MISTA academic tool that will generate the test cases from a given Model-Implementation Description (MID) in a chosen language and execute the generated test code in a test engine – Keyword Based Testing and Robot Framework in this case.
It allows a test model together with all the required test automation code to be created, managed, and analyzed in one interface. MISTA uses function nets (lightweight high-level Petri nets or Finite State Machine) as the primary input format for specifying test models. Also, it uses different algorithms for generating test cases to meet a chosen coverage criterion of a test model like reachability tree coverage (all paths in reachability graph), reachability coverage plus sneak paths (negative tests), state coverage, transition coverage, depth coverage, goal coverage, deadlock/termination state coverage, random generation, and generation from given sequences. MISTA provides partial ordering and pairwise combination techniques for dealing with complex test models.
More information and details can be gathered in MISTA user manual. MISTA, including all documentation and examples can be downloaded from the following site:
http://cs.boisestate.edu/~dxu/research/MBT.html
To install MISTA, unzip the file MISTA.zip and you will find an executable jar file MISTA.jar. To start MISTA, double click on MISTA.jar or use the following command from the command line: java -jar MISTA.jar.
Use-Case Scenario in MISTA using Robot Framework
Creating the model
For the following scenario we will explain how to create a model in MISTA and generate specified test scenarios in executable code file that will be run in Robot.
Requirement example:
If it is successful, a graphical user interface as shown in the Figure 1 below will show up. The dropdown menu lists the supported test coverage criteria (e.g., Reachability Tree), languages (e.g., Java), and test tools (e.g., JUnit).

(Figure 1 – The GUI of MISTA)
To create a new MID, select the menu item “New” from the “File” menu. Three options will be displayed: Function Net, State Machine and Contracts. In our case, we will use State Machine for modeling with Finite State Machines input format. MISTA will present an editor with an empty MID as shown in the Figure 1.
Any system where particular inputs cause particular changes in state can be represented using finite state machines. With Finite State Machines we use only places (states) and simplified transitions.
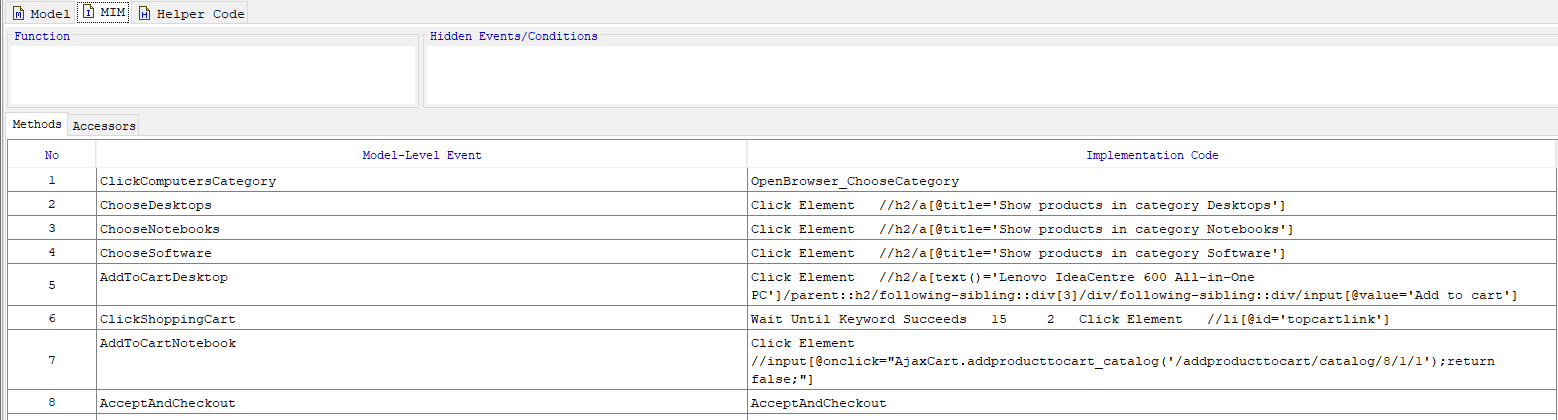
The MID editor provides three tabs: Model, MIM, and Helper Code. For each of these tabs, the “Edit” menu has a submenu of available operations.
- The “Model” tab allows you to edit the test model. The editor depends on the model type.
(Figure 2 – The Model Tab)
- The “MIM” tab allows you to edit the MIM of a test model like spreadsheets, as shown in Figure 3 below. The MIM specification maps the elements of the test model into implementation code. Generally, the MIM specification depends on the chosen language.
(Figure 3 – The MIM tab)
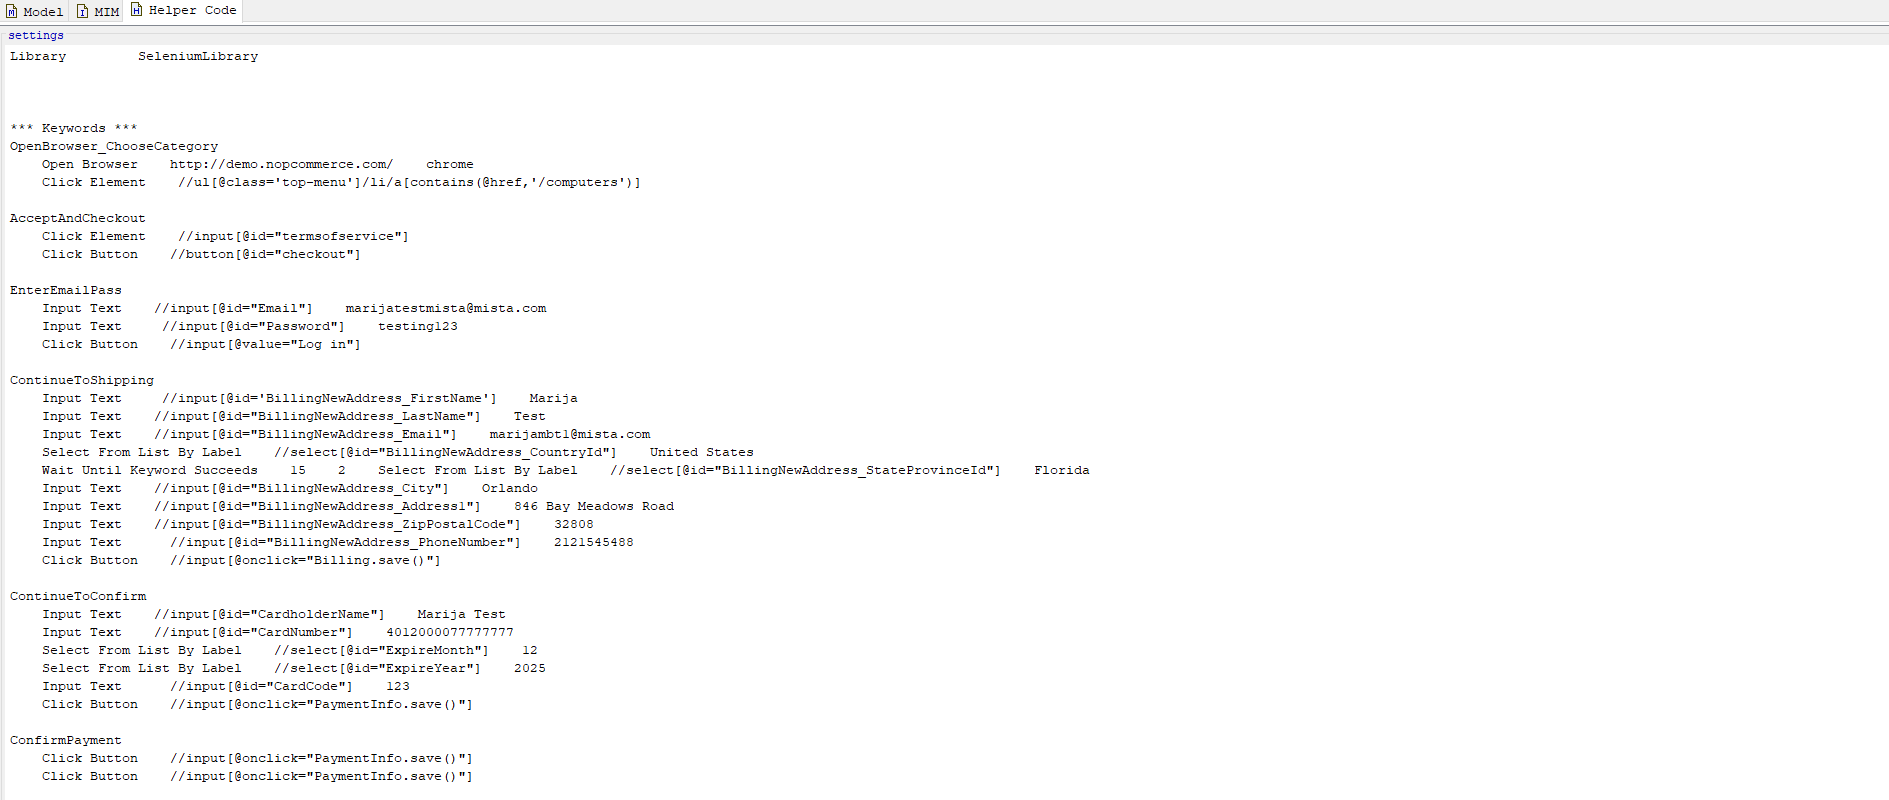
- The “Helper Code” tab allows you to provide additional code that is necessary to make the generated test code executable. It depends on the target language. For example, Java test code generally needs package and import statements. In our example, we will use the Helper Code for generating the Keywords and include the corresponding Library.

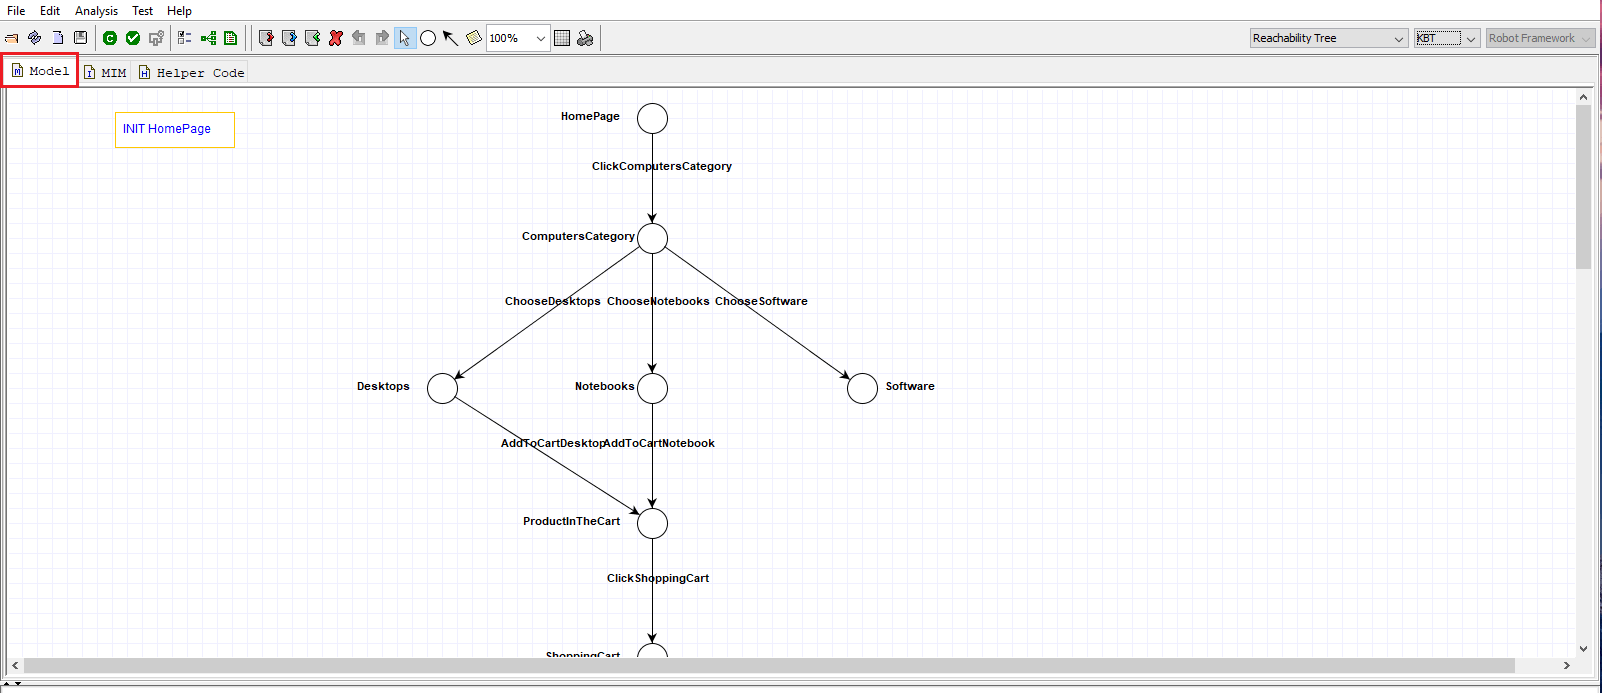
In Model Based Testing, first it is necessary to understand the concept of the system requirements so that we can model the system. In our example, we have an e-commerce site, so each landing page or finite condition, such as Home Page, Computers Page, Add to Cart Page, Login Page, Payment Page, Delivery Option page, Selected Credit Card, etc. will represent a State. Each action that is used to go to some of these pages/states, like navigating to some category, or clicking the Add to Cart button, selecting some option like payment method or delivery method, will represent a Transition between the corresponding states.
In the menu below the States and Transitions are noted. The circle itself represents a State and the arrow a Transition between a state.
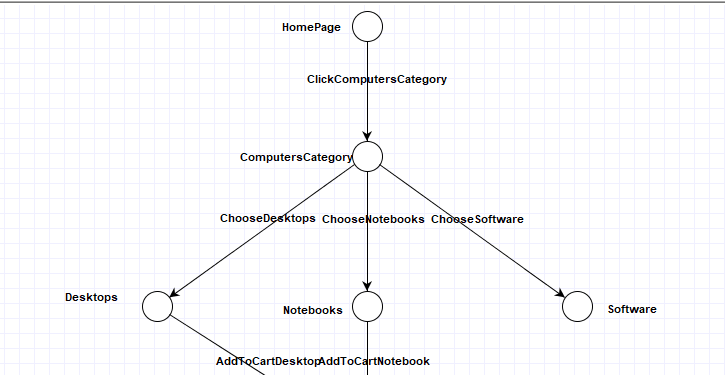
Our initial State will be the Home Page of the e-commerce site. Since the customer wants to buy some computer products, by clicking on the Computers category, we will have another state -> Computers Category page. There are three options in the Computers Category, choose Desktop, Notebooks or Software. In our use case scenario, by clicking on Software the customer ends the search.
By choosing Desktop or Notebooks, the customer selects some item from that subcategory and adds it to the cart. Figure 5 below represents the model so far.
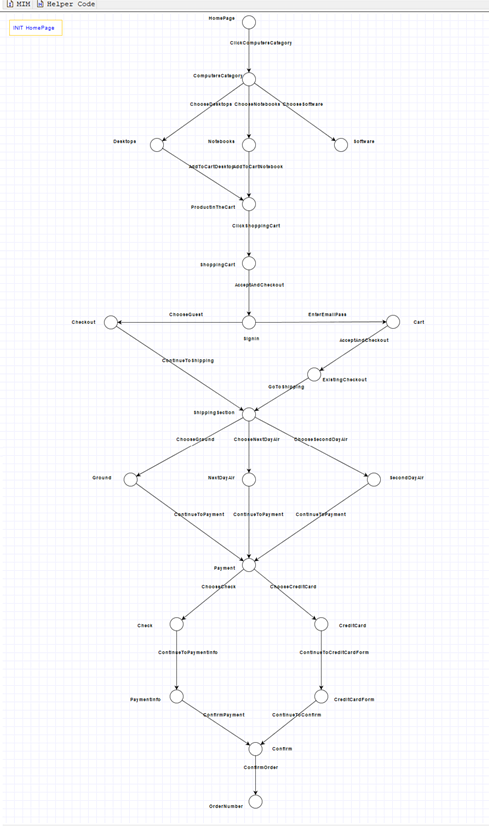
Following all the requirement details as stated in the use case example, we designed the model displayed in Figure 6.
Test Case generation
Once we have designed the model, the test cases can be generated.
Note: the initial state always has to be declared, and that is done by adding an Annotation INIT Home Page.
Under the main menu toolbar, the following options are used for generating and editing the test case scenarios.
- Options
- Generate Test Tree
- Generate Test Code

(Figure 7 – Options for generation of test cases)
It is important before generating the test cases, to choose the executable test code in the appropriate language and the Test engine.
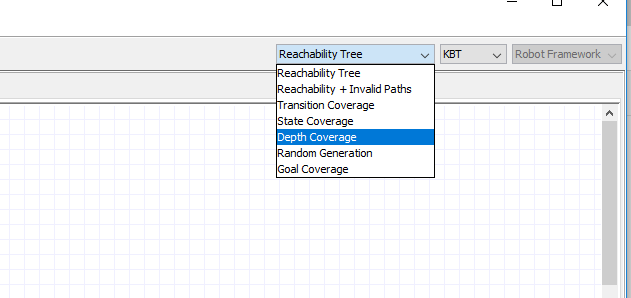
Also, the coverage of the test cases should be chosen from the dropdown menu of test coverage.
In our scenario we will use Depth Coverage so all tests whose lengths are no greater than the given depth are generated, in other words all possible flows of the given model should be covered from the initial state to the final.Once we click on Generate Test Code, the test scenarios will be generated.
According to this model, we have 25 Test Cases generated.
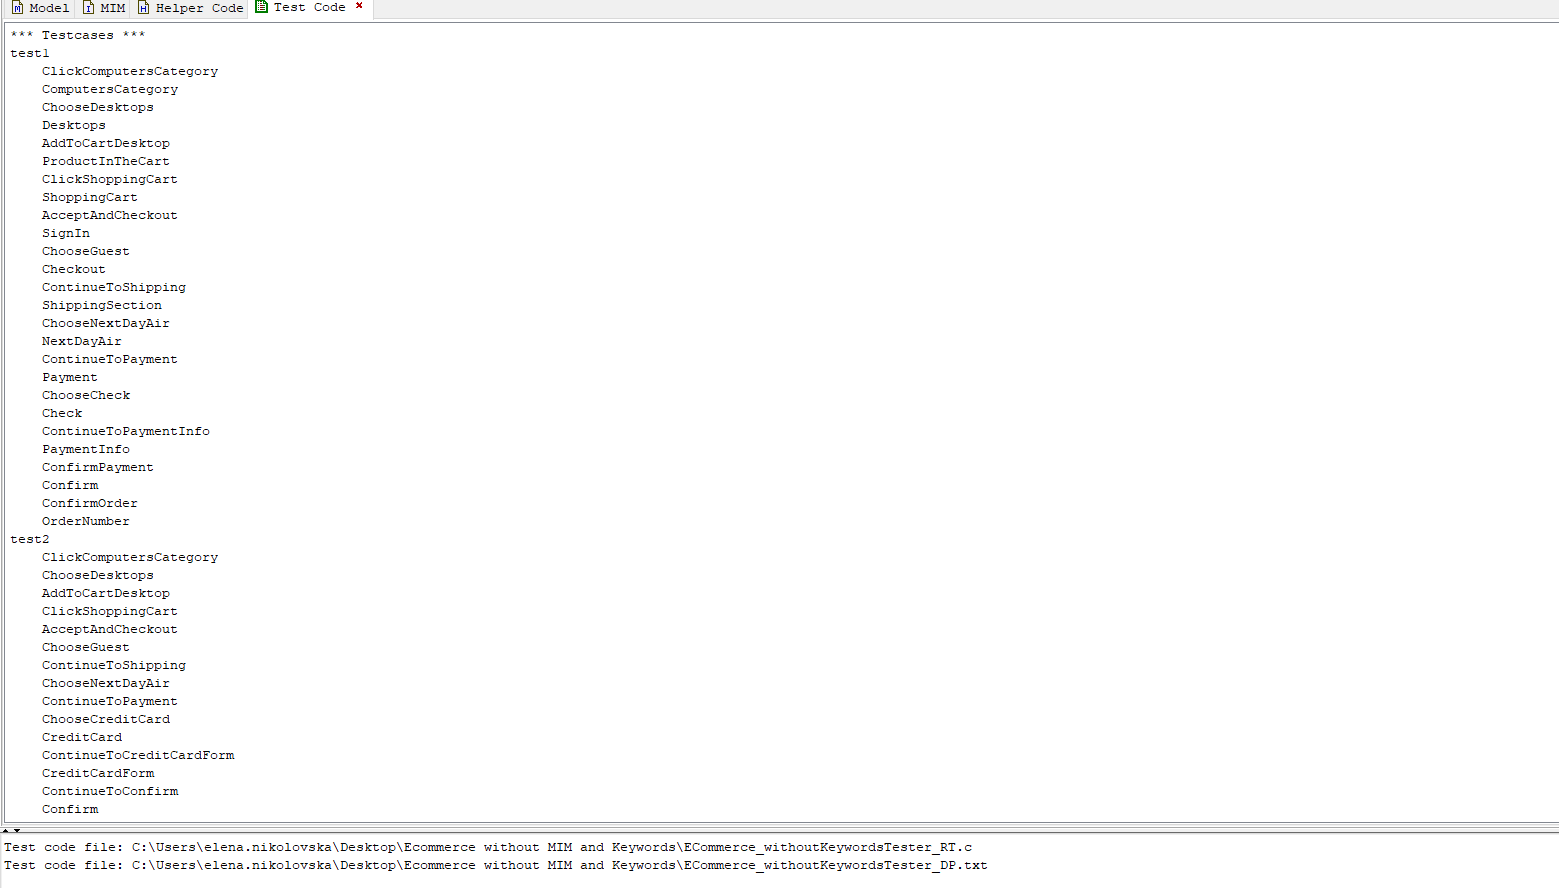
(Figure 9 – Test Code)
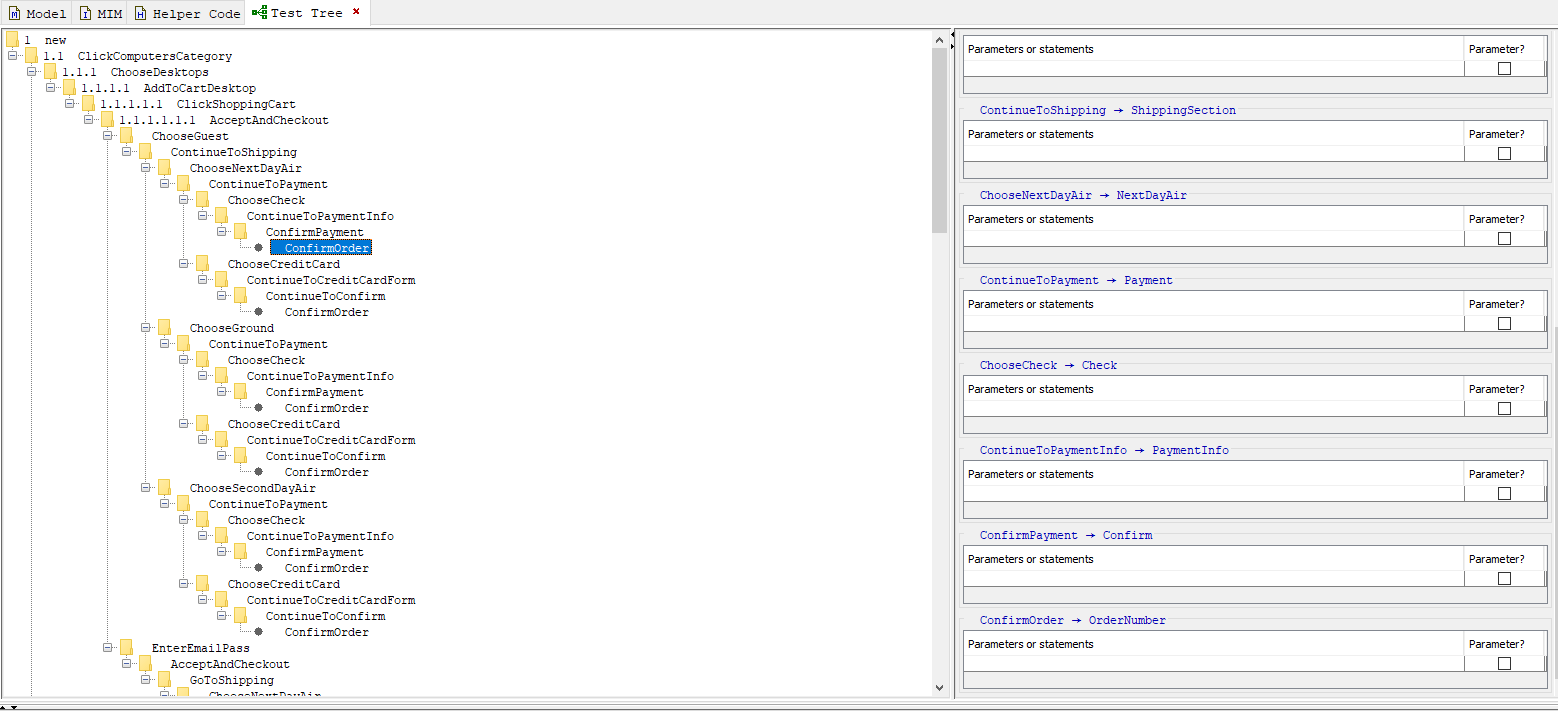
Choosing Generate Test Tree, the Test Cases will be displayed as below:
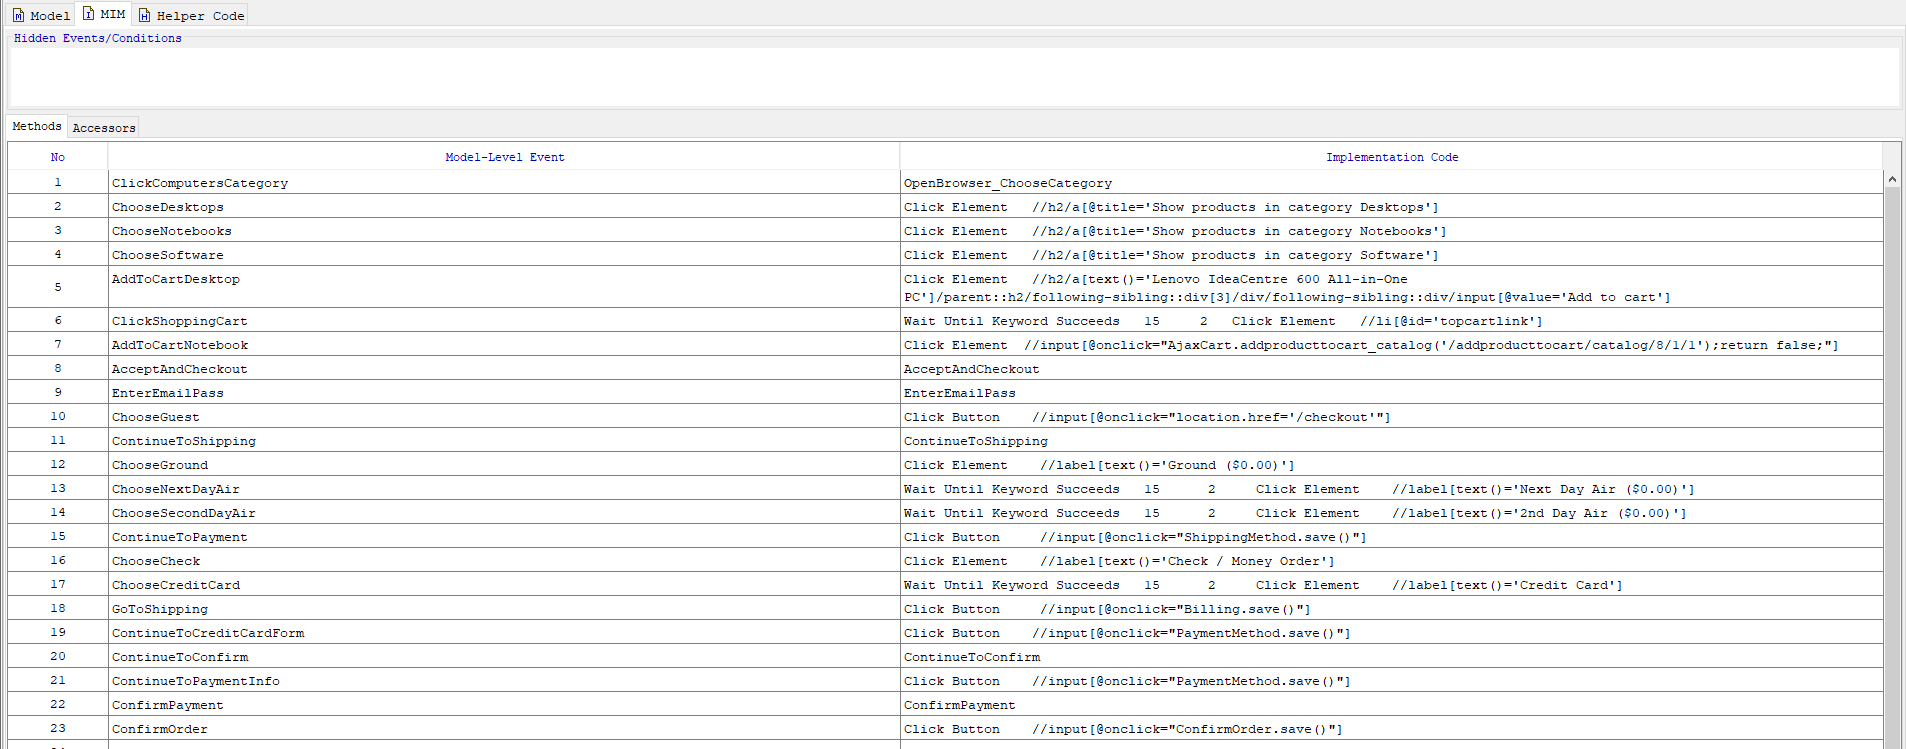
(Figure 11 – Methods tab in MIM)
Since we choose Keyword Based testing language all test steps are generated as Keywords. When all the Keywords and actions in MIM are defined, we can open the generated file in Robot and run the scenarios.
Methods and Accessors tabs are used to define the actions and states respectively.
(Figure 11 – Methods tab in MIM)
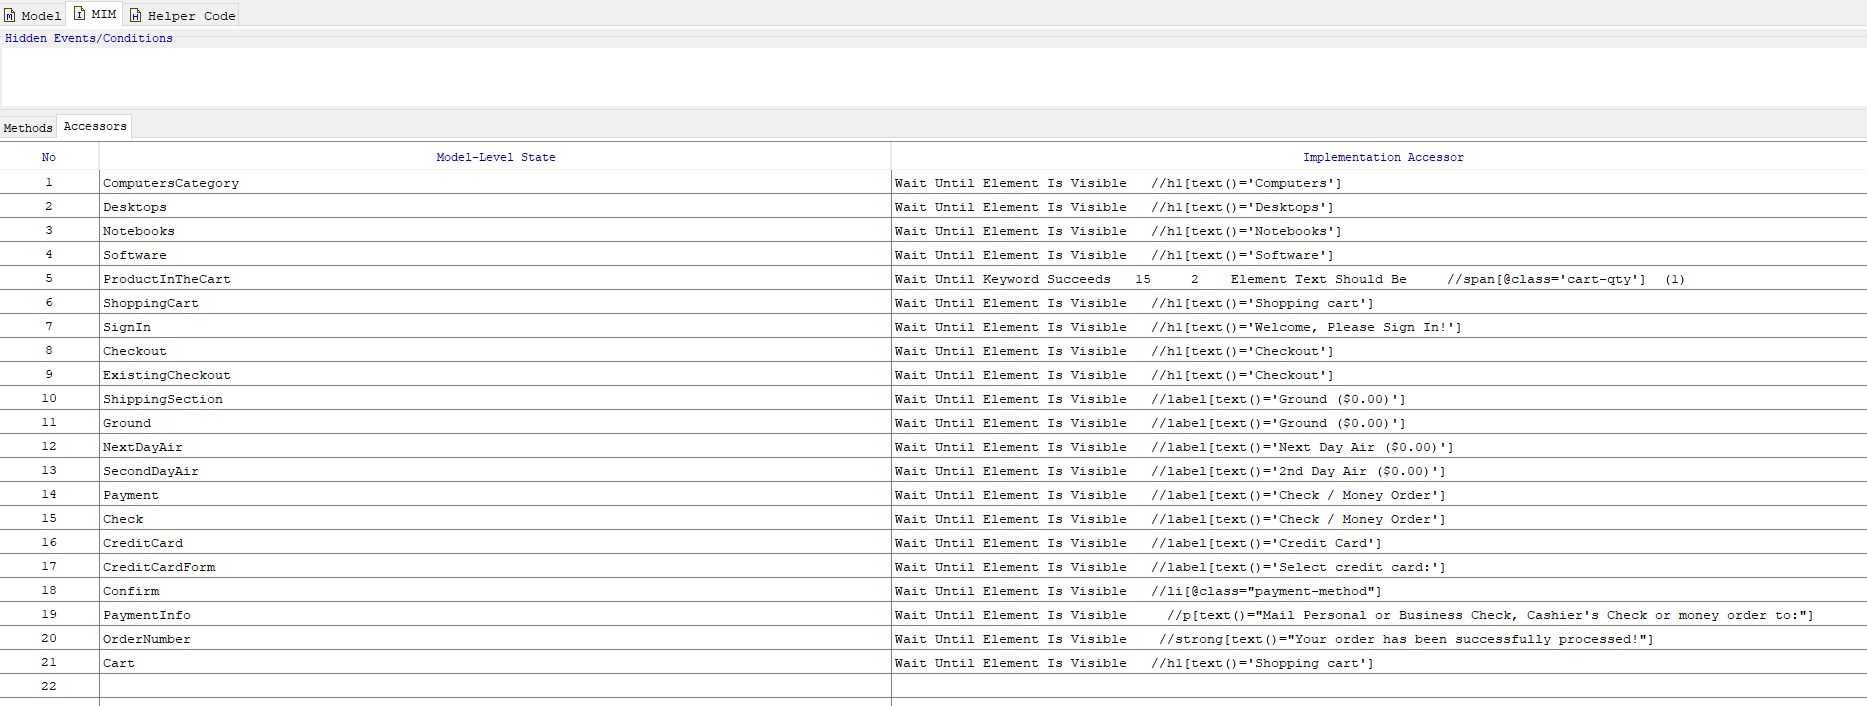
(Figure 12 – Accessors tab)
In the Helper Code we define the Library – Robot SeleniumLibrary and the Keywords.
(Figure 13 – Helper Code)
Once the MIM and Helper Code are completed, again we generate the test code with the implemented code. The executable txt file now can be opened and run in RIDE.
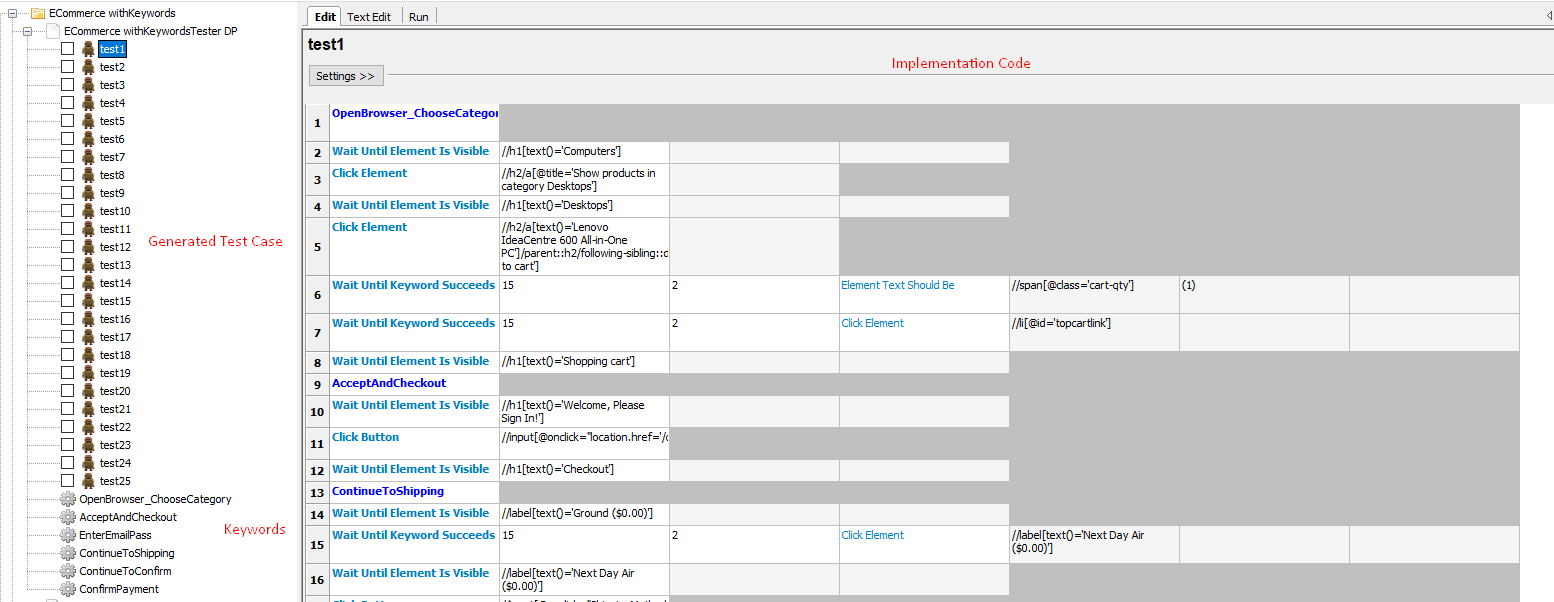
(Figure 14 – Test Cases in Robot)
Conclusion
The demand for high analytical skills for modeling the system can be considered as a challenge for this testing procedure. When we have complex systems, it can be difficult and complicated to create the model that will precisely describe the system. Putting too many details can lead to wrong abstraction.
However, there are a lot more benefits of the Model Based Testing approach and it has a significant impact on the entire QA testing process, reducing the time spent for writing test cases and later automating them. In fact, if this process is included from the beginning of the software development lifecycle it will result in improved communication with the stakeholders to create better perception of the system and it will be easier to detect defects.
Every change of the requirement can be implemented in the model without huge efforts. Using different algorithms for generating test cases improves the test coverage. The analysis of the model and generated test cases is a lot easier with this visualization on the system under test.