
1. Introduction
Xray easily integrates with other tools, whether we as integration developers implement continuous integration on our system or we simply want to obtain some data. Xray supports the most common Test Runner reports when importing execution results like Cucumber, Junit, TestNG, NUnit.
If the Test cases being imported are not yet created in Xray/Jira, then Xray will create them automatically. The created tests will have the Generic test type and will contain the identifier or the name in the definition field. Xray will reuse the same Test issues in JIRA for subsequent imports of execution results.
GitHub is a web-based code hosting platform for version control and collaboration. It lets users work together on projects from anywhere. The primary benefit of GitHub is its version control system, which allows seamless collaboration without compromising the integrity of the original project. Also, as of recently (November 13, 2019), GitHub provided the ability to automate workflows using GitHub Actions. With GitHub Actions, GitHub provides the ability to automate, customize, and execute software development workflows right from the user repository. We can discover, create, and share actions to perform any job we like, including CI/CD, and combine actions in a completely customized workflow. There are plenty available actions from GitHub Marketplace to automate steps, which help to kick off workflows with GitHub events like push, issue creation, or a new release.
It provides hosted runners for every major OS or using self-hosted runners in the cloud or on-prem, or containers, VMs etc. which makes the building and testing projects on different environments easy. GitHub-hosted runners execute code within ephemeral and clean isolated virtual machines, meaning there is no way to persistently compromise this environment, or otherwise gain access to more information than it was placed in this environment during the bootstrap process. GitHub Actions share configuration similarities with Azure Pipelines, GitLab CI/CD, Jenkins, CircleCI, which makes migrating from one to another relatively straightforward. We can combine and configure actions for our needs and for the purpose of this documentation we will use GitHub Actions to run a Cucumber test from our repository and send results to Xray where the Test Execution is created related to a particular Test issue.
2. GitHub Actions
2.1 Pre-settings in Xray
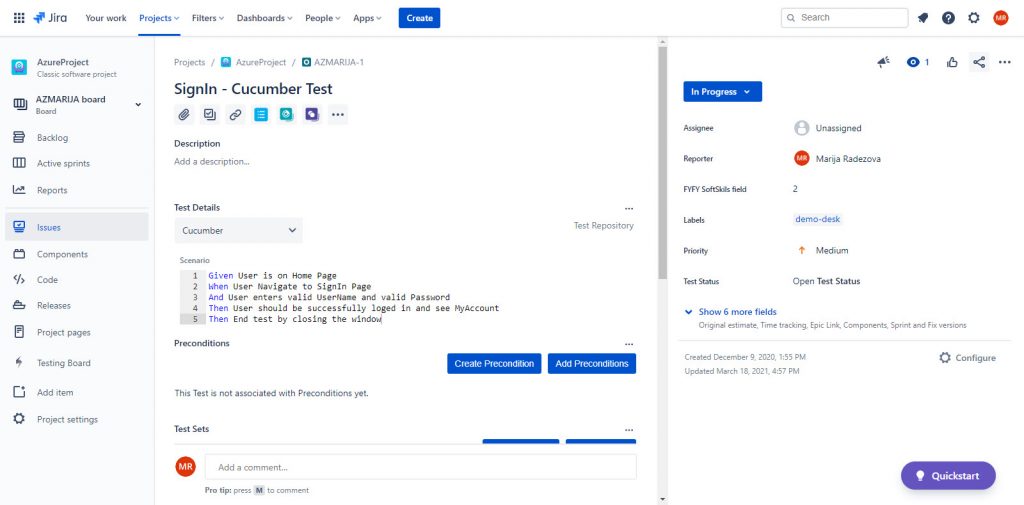
Xray supports integration with Continuous Integration tools, thanks to its REST API. For this sample we have a cloud instance of Jira set up with Xray plugin. First, we create one issue with ‘Test’ type and we add Gherkin reference in the Scenario section and for Test Details, we choose Cucumber as in Image 1:
Cucumber feature files can be exported from Xray UI or through the command line and executed externally. They can be generated also from other Xray issue types, like Test Set, Test Execution, and Test Plan. Here is the curl command for exporting the features for the above issue:
curl -H “Content-Type: application/json” –output features.zip -X GET -H “Authorization: Bearer ${token}” “https://xray.cloud.xpand-it.com/api/v1/export/cucumber?keys= AZMARIJA-1″The following feature file is exported from the sample above:
Feature: SignIn - Cucumber Test

                @TEST_AZMARIJA-1 @demo-desk
                Scenario: SignIn - Cucumber Test
                                Given User is on Home Page
                                When User Navigate to SignIn Page
                                And User enters valid UserName and valid Password
                                Then User should be successfully loged in and see MyAccount
                                Then End test by closing the window
2.2 GitHub settings
Actions are the building blocks that power the workflow. A workflow can contain actions created by the community or created custom actions directly within the application’s repository. In order to build a workflow, which is a configurable automated process made up of one or more jobs, in GitHub Actions we need to know the YAML structure to define workflow configuration and CI or pipeline executions. That is why we need to store. yml or. yaml workflow files in the. github/workflows directory of our repository.
Because the purpose of this document is QA-oriented, not DevOps, we will stick just to the execution configuration of the test. It can execute whatever test type, with whatever tool we want but in this sample, we will use the Cucumber test tool as one of the default test kinds in Xray executions, but the process more or less is the same for Junit, NUnit, or other testing tools.
To use GitHub Actions services, we need to sign up for a GitHub account here. After successfully signing in the first step is to create a repository that is used to organize a single project and can contain folders, files, images, videos, spreadsheets, and data sets– in this sample we name it “Demo”. For test purposes, we will add a sample IWECProject test folder which contains Cucumber tests with all dependencies as shown in Image 2, or by command line, if we have installed a version of Git (the version control software GitHub is built on). We prefer to add git version control in our local drive where the code is located because that is how the changes will be tracked and synchronized in both locations.
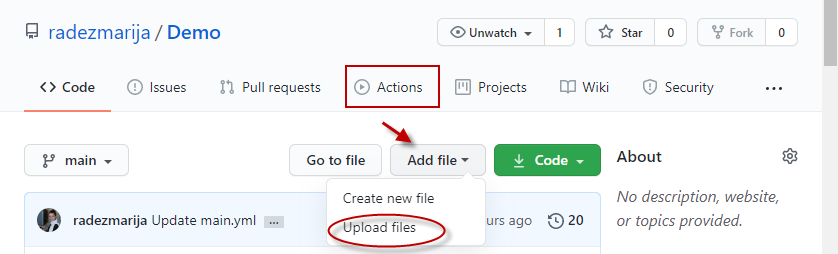
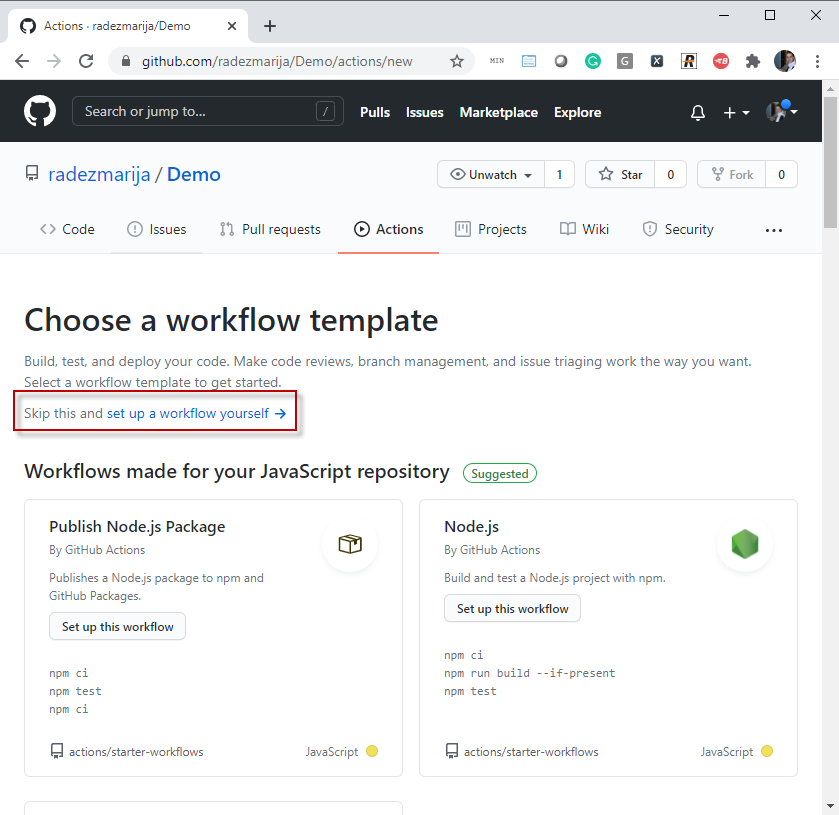
We will select the Actions tab (Image 2) where we can choose the New workflow button to create the workflow. On the next screen (Image 3) we can choose the existing configuration as a base with the already set environment and OS, or we can skip this step and write the configuration with the template provided by GitHub.
In a nutshell, workflows are automated processes described as YAML files, stored under .github/workflows. These are usually triggered by events (e.g. code-commit, pull-request) or can be also scheduled. Each workflow is in turn composed of one or more jobs, that can run sequentially or in parallel. A job performs a set of sequential steps to achieve a certain goal. A step is an individual automation task; it can be either an action or simply a shell command.
No matter which way we choose to create our workflow configuration file, we can still use the Marketplace tab on the right side, next to the edit file panel to include steps from the market. The configuration file for this sample should consist of the specification of the OS machine that we will use for running the test project (in runs-on (1)), java, and maven tools as prerequisites for running the IWECProject (actions defined in steps-> uses (2)), and shell (curl) commands for communication with Xray REST API from the cloud JIRA service (defined in steps-> shell (3)). In this sample, we choose to use creating a custom configuration workflow file, with the default name main.yml (Image 4).
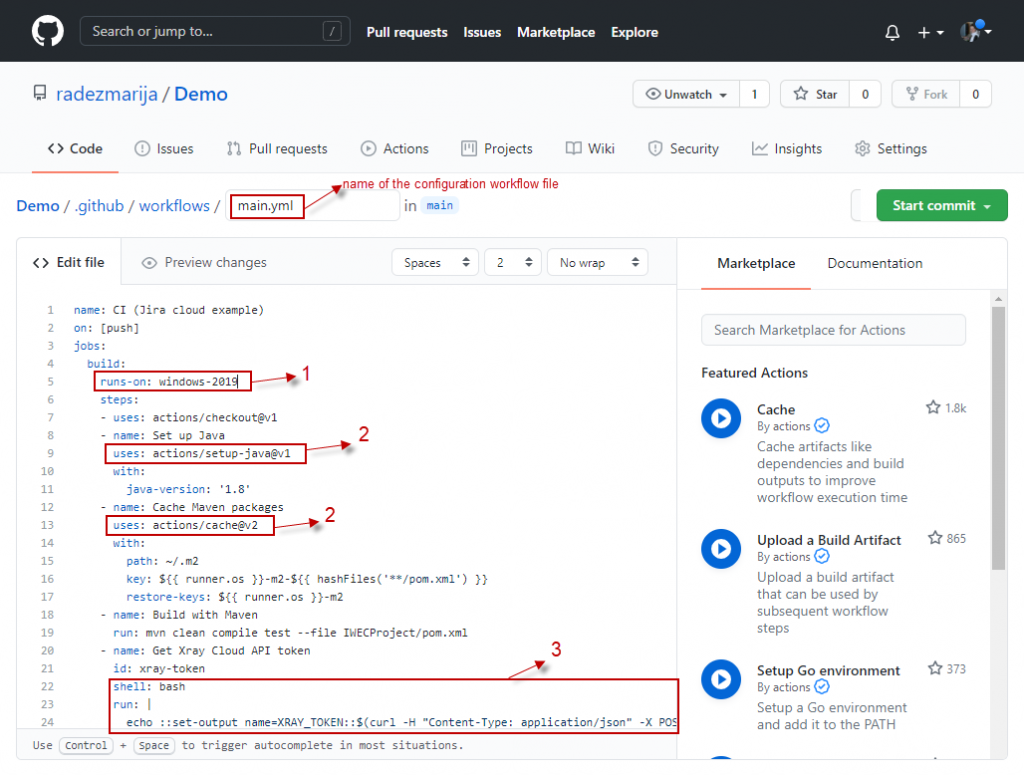
From Figure 4, we can see that our test project IWECProject will be run on a machine with windows-2019 (or use the latest) OS (1), it gets the latest versions of Java and maven and installs them (2) in order to run the test with the maven command line run: mvn clean compile test –file IWECProject/pom.xml. The shell–bash commands are used for interaction with the Xray REST API for getting authentication (XRAY_TOKEN) and sending (importing) the result JSON file in Xray. Also, before starting the test we can get a feature file from an existing test issue in Xray and run the test for that scenario. The following REST API calls are used in the shell commands for Xray interactions:
1.	Get XRay Token:
curl -H "Content-Type: application/json" -X POST --data "{ \"client_id\": \"$CLIENT_ID\",\"client_secret\": \"$CLIENT_SECRET\" }" https://xray.cloud.xpand-it.com/api/v1/authenticate| tr -d '"')

2.	Get feature.zip file from specified Xray test issue:
curl -H "Content-Type: application/json" --output ./features.zip -X GET -H "Authorization: Bearer ${{ steps.xray-token.outputs.XRAY_TOKEN }}"  "https://xray.cloud.xpand-it.com/api/v1/export/cucumber?keys=$keys"
    unzip -o features/features.zip -d ./IWECProject/Features

3.	Post/send json result file to Xray:
curl -H "Content-Type: application/json" -X POST -H "Authorization: Bearer ${{ steps.xray-token.outputs.XRAY_TOKEN }}" --data @IWECProject/target/cucumber.json "https://xray.cloud.xpand-it.com/api/v1/import/execution/cucumber"
The whole content of main.yml is shown in Image 5.
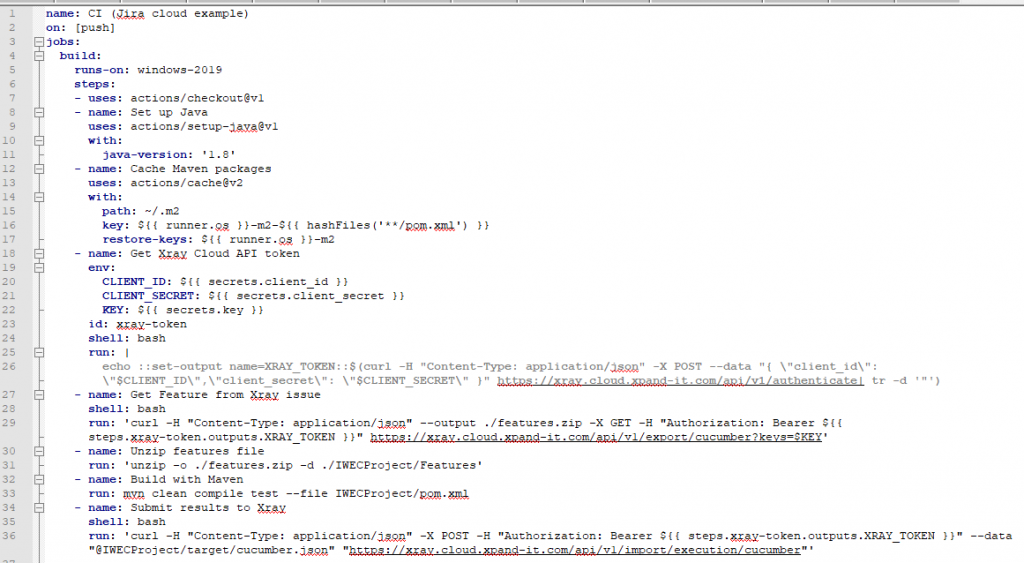
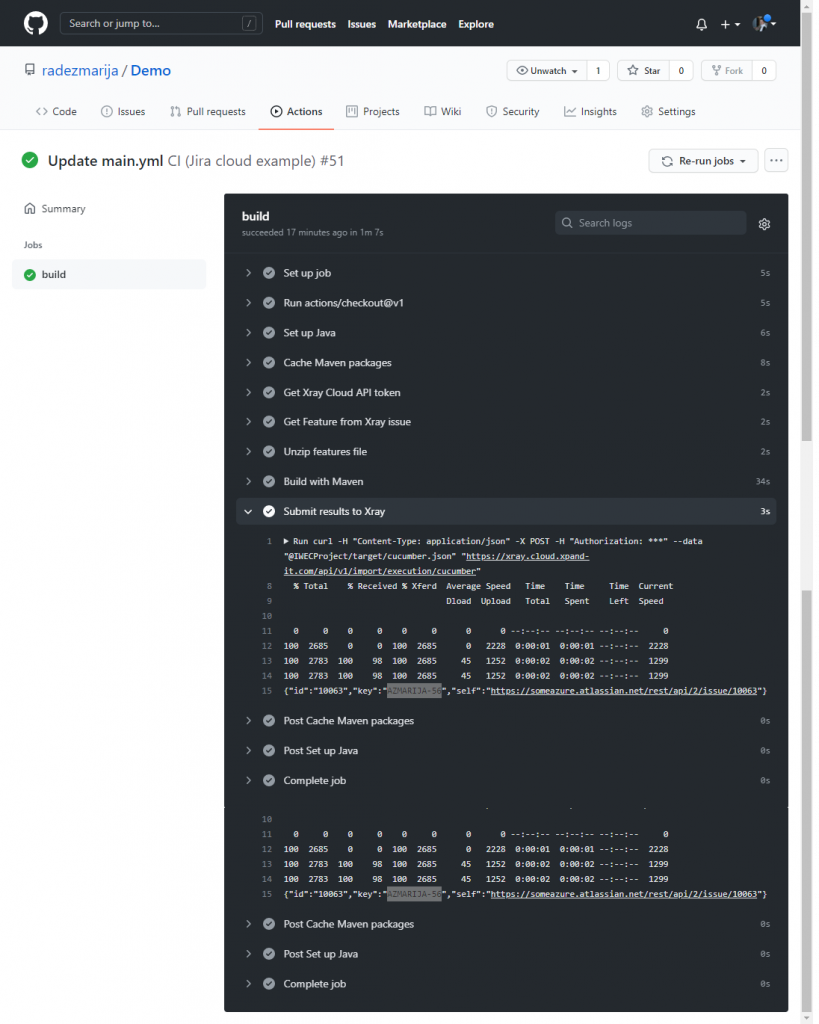
As we can see from the main.yml on the 2nd line the workflow is run on: push – that means every time we make a push request to the repo the workflow will be run. If the workflow is successfully completed the cucumber.json output from the test execution will be sent to Xray REST API and create a Test Execution (Figure 6) linked to the test issue that we exported in the feature file.
Besides curl command, there is also another way to publish the results in Xray from GitHub, by using the already built action from GitHub Marketplace called xray-action, developed by Mike Penz, which can replace the last curl command by following:
- name: Submit results to Xray
      uses: mikepenz/xray-action@v0.9.4
      with:
        username: ${{ secrets.client_id }}
        password: ${{ secrets.client_secret }}
        testPaths: "**/target/cucumber.json"
        projectKey: "AZMARIJA"
        testExecKey: "AZMARIJA-52"
The action is available in the Marketplace panel with all parameters explained that we can use with the action. In the above sample, we use only the required parameters such as username and password, used for authorization with Xray instance, testPaths of the file/s that should be published/sent to Xray, projectKey with the project name specified, testExecKey the key of the issue related to the execution, but there are also others like xrayCloud, testExecKey, testPlanKey, etc which are not required fields.
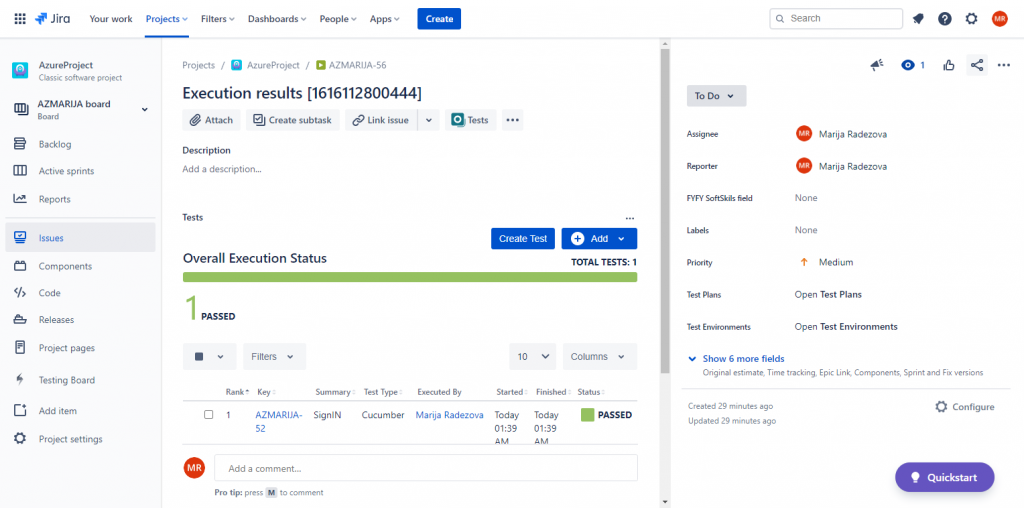
The cucumber.json result output file (–data @IWECProject/target/cucumber.json), generated by the Test runner class, is used to be sent back to the Xray issue and will create Test Execution type issue with an automatically generated name “Execution results $timestamp” and will be related to the Cucumber Test that we pulled the feature file (“AZMARIJA-56”) as on Image 6.
Conclusion
Xray for Jira project management tool is a highly recommended plugin, because of the easy usage and possibility for integration with a lot of applications/tools. One of the abilities of Xray is integration with GitHub and its Actions tools, thanks to the Xray REST API. With such integration, we can track all changes, modifications, or regressions in one place. By creating an Xray issue, for example with Gherkin kind reference, we can automatically run and have execution status updated with minimal or no human effort. The automation process is done by GitHub workflow by pulling the features, executing the test, and sending the results back to the Xray – by creating a Test Execution for the related issue.
If you want to discuss the integration of GitHub with Xray, you can contact us via the form below.