

Salesforce has come to be a platform that is used almost in every company. Its capabilities are huge, and due to that, we can see more companies incorporating it into their companies and integrating it with their internal systems. The following blog post will show how we integrated Salesforce into a WordPress website in a secure and reliable manner. In this particular case, Salesforce has been used for storing different inventory items.
Salesforce is one of the most used and best-known CRM (Customer Relationship Management) available today. There are many reasons why Salesforce has become so popular. When a company is choosing which CRM platform to use they should consider not only the current requirements but also the future ones because CRM software is an investment that can cost the business if in the future their needs are not satisfied. Salesforce is known for its scalability and customization. The performance is equal either for big or small businesses and the multitenant architecture ensures that updates and upgrades are instantaneous, without any intervention from the client. Data security has been one of the focus points of Salesforce right from the beginning, making it a very reliable and secure software.
On the other side, WordPress dominates the CMS (Content Management System) market. Due to its wide usage all over the world, there are many guides, tutorials, and resources that can be found online as well as many developed plugins for usage (free or paid). WordPress is SEO-friendly which is very important for the visibility of our website.
Getting started
We are going to use the latest available version of WordPress. In Salesforce we are going to use the free trial option by creating a new profile.
https://www.salesforce.com/form/signup/freetrial-elf-v2/?d=70130000000EqoP
After the user signs in, we can create all the Inventory items and their dependencies according to the needed requirements. For this particular project, we will assume that the Inventory is already created and our job is to integrate the data into our website.
For this purpose, we are going to create a custom plugin for WordPress that will handle all the requests and rendering on the Inventory data.
Custom plugin configuration
For the creation of the plugin we are going to follow the official documentation of WordPress, so let’s create a simple plugin called salesforce-inventory.
In the root / wp-content / plugins create a folder with that name and create salesforce-inventory.php file in it. At the beginning of the file place the following code:
/*
Plugin Name: Salesforce inventory
Description: Display Salesforce inventory items
Author: InterWorks
Version: 1.0
Author URI: https://interworks.com.mk
*/
if ( ! defined( ‘ABSPATH’ ) ) {
exit; // Exit if accessed directly
}
Now we can activate it from within the WordPress admin Dashboard > Plugins. You won’t see any changes yet because we haven’t written any actual code into the plugin.

The next step will be to create a WordPress Salesforce widget. So, we can use the output data and its config files on every page where this functionality should be rendered.
Widget configuration
To create the new widget, we need to extend the WP_Widget class which includes a number of functions:
- function to process the widget
- form() function – to display the form with form elements (input, labels) in the dashboard screen when the widget is used in some of the registered sidebars
- update() function – to get the user input from the above-mentioned fields and to update the new values from the form
- widget() function – responsible for the output of the data either is from the form or like in our case from the external endpoint
In this example, we are excluding the update function because at the moment we don’t need any user input for this widget. The actual code will look like this:
class Salesforce_Inventory_Widget extends WP_Widget {
function __construct() {
}
function form( $instance ) {
}
function widget( $args, $instance ) {
}
}
To make sure our widget is working we need to register it with WordPress. The registration process is done like this:
function salesforce_inventory_register_widget() {
register_widget(‘Salesforce_Inventory_Widget’);
}
add_action(‘widgets_init’, ‘salesforce_inventory_register_widget’);
The register_widget() function is a WordPress function whose single parameter is the name of the class you just created.
The __construct() function will do what you expect – it will construct the function. Inside that function, we are defining the unique parameters of the widget.
function __construct() {
parent::__construct(
// widget id
‘salesforce_inventory_list_widget’,
// widget name
__(‘List Salesforce Inventory Items’, ‘salesforce’ ),
// widget options
array (
‘description’ => _(‘Shows Salesforce inventory items if any.’, ‘salesforce’)
)
);
}
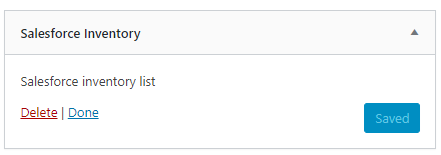
If we navigate to the Dashboard > Appearance > Widgets our new widget will be displayed here.
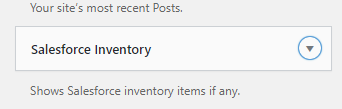
To add the markup to our widget we are going to populate the form function. For the need of the plugin, the form will contain just one label which will be visible to the end-user when this widget is called to function.
The function will have the following simple construction:
function form($instance){
echo ‘<p>’;
echo ‘<label>Salesforce inventory list</label>’;
echo ‘</p>’;
}
For the moment we are not going to add any code to the widget function for output. After the authenticated call to Salesforce is done we are going to come back here and finish the process.
Making the connection to Salesforce
To be able to access any data from Salesforce we will have to make the authentication using OAuth 2.0. The first step is to enable OAuth 2.0 on our Salesforce account by creating a connected app.
1. In the drop-down list of the account (in the upper-right corner), select Setup.
2. In the left-hand pane, go to Apps > App Manager > New Connected App.
3. On the New Connected App page, fill the required fields
a) Connected App Name. For example, WordPress Integration.
b) API name. For example, WordPress Integration.
c) Contact Email.
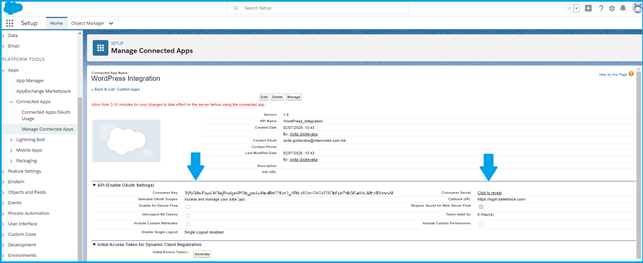
4. Go to API (Enable OAuth Settings),and select Enable OAuth Settings.
a) In the Callback URL field, enter https://login.salesforce.com/.
b) In the Selected OAuth Scopes field, select Access and manage your data (api), and then click Add.
5. Click the Save button to save the new Connected App.
6. Go back to the Connected Apps list, and click the App that you just created.
7. Go to API (Enable OAuth Settings), and note down the Consumer Key and Consumer Secret, which will be used for the configuration of credentials for WordPress integration.
Note: Make sure that your current Salesforce edition has API access enabled. Some of the editions have API access already included, we need just to enable it from the setup (if it’s not already) and for some, it must be purchased additionally.
Editions with API Access:
- Enterprise Edition
- Unlimited Edition
- Developer Edition
- Performance Edition
Editions without API Access:
- Group Edition
- Essentials Edition
- Professional Edition
For more detailed information check the official documentation here.
Salesforce supports the following OAuth flows:
- Web server flow, where the server can securely protect the consumer’s secret.
- User-agent flow, used by applications that cannot securely store the consumer’s secret.
- Username password flow, where the application has direct access to user credentials.
Your OAuth flow will depend on the requirements of your project and for this blog post, we are going to use the Username password flow.
To access data on Salesforce we need to authorize ourselves using an access token. Using the OAuth flow, we will be generating the access token.
Get the access token
To make the POST request for getting the access token we are going to use cURL which is a PHP library that helps you send files and also download data over HTTP and FTP. It supports proxies, you can transfer data over SSL connections, you can set cookies, and even get files that are behind a login. For more info read the manual.
Before starting to use any API service we need to read their documentation on how to construct the call and get back data in the format that we need. Good documentation will contain detailed information on how to connect to the API, with instructions for each language, and also the main API endpoints.
The POST request will have the following params:
$url = ‘ https://login.salesforce.com/services/oauth2/token’;
$postFields = array (
‘grant_type’ => ‘password’,
‘client_id’ => The Consumer Key from the connected app,
‘client_secret’ => ‘ The Consumer Secret from the connected app,
‘username’ => End-user’s username,
‘password’=> End-user’s username + security token,
);
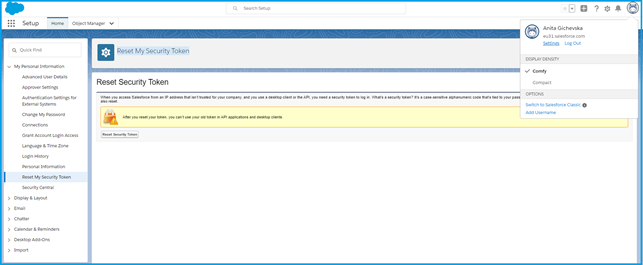
The value for the password is a string concatenated from the password of the end-user plus their personal security token.
The security token can be obtained by going to Profile > Settings > My Personal Information > Reset My Security Token. The value will be sent to the logged user’s email.
The following code same sample shows the complete curl execution for getting the access token.
// Create the CURL object
$handle = curl_init($url);
curl_setopt($handle, CURLOPT_RETURNTRANSFER, true);
curl_setopt($handle, CURLOPT_FOLLOWLOCATION, true);
curl_setopt($handle, CURLOPT_POST, true);
curl_setopt($handle, CURLOPT_POSTFIELDS, $postFields);
$auth = curl_exec($handle);
$output = json_decode($auth);
if($output) {
$sfAccessToken = $output->access_token;
}
curl_close($handle);
And now we can use this access token to access the data on Salesforce.
Collect the data
Before we proceed to the final request call we need to gather the Salesforce version. To do that we hit this endpoint provided by the Salesforce API documentation.
URL: https://yourInstance.salesforce.com/services/data/
Method type: GET
Because now the version is a known parameter for use we can construct the endpoint URL according to specific needs. Some available options are:
- GET the List of Objects
URL: https://yourInstance.salesforce.com/services/data/v20.0/{resourceName}
– Provides us the available objects in the resource, (subjects) passed in the URL - GET Object Metadata
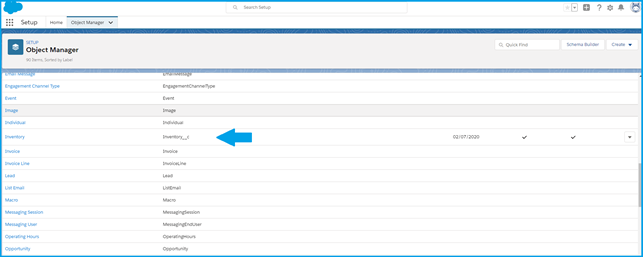
URL: https://yourInstance.salesforce.com/services/data/v20.0/sobjects/{Object Name}
– Provides us the metadata for the Object, it can be a custom object which will have the suffix __c (ex. Inventory__c) after the name or some of the default objects from Salesforce.
The list of objects together with their API name can be found in the Object Manager.
- GET Record Data
URL: https://yourInstance.salesforce.com/services/data/v20.0/sobjects/Invetory__c/{Record ID}
– Provides us data of the objects based on the ID which we pass into the request - SOQL for custom data retrieval
URL: https://yourInstance.salesforce.com/services/data/v20.0/query?q=Select+name+from+Inventory__c
– Salesforce provides an option to execute SOQL queries which are very similar to SQL queries to retrieve data
Let’s proceed with our project. We are going to use the SOQL to create a custom query in the url and get the data based on the query parameters.
$customUrl = https://eu31.lightning.force.com/services/data/v48.0/query/?q=SELECT(SELECT+Id,ContentDocumentId,Title+FROM+AttachedContentDocuments+ORDER+BY+Title+LIMIT+1),Id,Name,Year__c,Make__c,Model__c,Odometer__c,Retail_Price__c+FROM+Inventory__c++WHERE+Trailer_Length__c=’53\”+AND+Account__c=null+ORDER+BY+Year__c+ASC+LIMIT+12+OFFSET+0′;
$curl = curl_init();
curl_setopt_array($curl, array(
CURLOPT_URL => $customUrl,
CURLOPT_RETURNTRANSFER => true,
CURLOPT_FOLLOWLOCATION => true,
CURLOPT_ENCODING => “”,
CURLOPT_MAXREDIRS => 10,
CURLOPT_TIMEOUT => 30,
CURLOPT_HTTP_VERSION => CURL_HTTP_VERSION_1_1,
CURLOPT_CUSTOMREQUEST => “GET”,
CURLOPT_HTTPHEADER => array (‘Authorization: Bearer ‘ . $sfAccessToken),
));
$response = curl_exec($curl);
$err = curl_error($curl);
curl_close($curl);
if ($err) {
echo “cURL Error #: ”. $err;
} else {
return $response = json_decode($response);
}
If the data is retrieved without an error we can use the response data in the widget () function in the class and render the data. If the data is not in the wanted format or contains additional information that is not for display we can apply some filter functions before rendering.
foreach ($responseList as $item) {
$output = ”;
$output .= ‘<div class=”card”>’;
$output .= ‘<div class=”card-img”>’;
$output .= ‘<img src=”‘. $item->src .'” />’;
$output .= ‘</div>’;
$output .= ‘<div class=”card-body”>’;
$output .= ‘<p>”‘. $item->name .'”</p>’;
$output .= ‘<p>”‘. $item->model .'”</p>’
$output .= ‘</div>’;
$output .= ‘</div>’;
echo $output;
}
Here we loop through the items and we output their properties.
When the widget is included in some of the registered sidebars, it will look like in the image:
When the dynamic sidebar is called in some of the pages, the rendered items will look like in the following picture:

Plugin files
If we want to make the entire functionality independent we should use separate .js and .css files for the customization of the items and their visual display. In that way, we can ensure that whenever the plugin–widget–sidebar is called it will work perfectly.
In the root directory of the plugin we will create two files:
- salesforce-widget.js
- salesforce-widget.css
These files should be registered before we can use them in the code.
/**
* Register the Salesforce js file
*/
function register_salesforce_script(){
wp_register_style(‘salesforce-widget-js’, plugins_url(‘/salesforce-widget.js’, __FILE__ ));
}
add_action( ‘wp_enqueue_scripts’, ‘register_salesforce_script’);
/**
* Register the Salesforce css file
*/
function register_salesforce_style(){
wp_register_style(‘salesforce-widget-css’, plugins_url(‘/salesforce-widget.css’, __FILE__ ));
}
add_action( ‘wp_enqueue_scripts’, ‘register_salesforce_style’);
After the registration we can update the widget () function, to include these files before the items are rendered and these custom changes are applied.
/**
* Include the Salesforce js file
*/
wp_enqueue_script(‘salesforce-widget-filters-js’);
/**
* Include the Salesforce css file
*/
wp_enqueue_style(‘salesforce-widget-css’);
Final thoughts
In this blog post, we covered the main aspects of integrating Salesforce as a service API endpoint which contains Inventory items. This solution can be applied in real-life projects with some modifications that are not included here. For example, one important aspect is caching the data so we limit the number of requests that are sent, only to create a mechanism to automatically get a new token if the previous one has expired.
You can read a real case scenario of integration between WordPress and Salesforce on the following link: https://iwconnect.com/optimizing-the-selling-and-buying-process-by-using-salesforce-and-wordpress/