
What is Release Management?
Release Management is a process that entails the management, planning, scheduling, and controlling of an entire software build through every stage and environment involved, including testing and deploying software releases. Although this is a relatively new discipline in terms of software engineering, it is also one that is rapidly expanding. Software systems, resources, and software development processes are becoming more and more distributed, which makes it inevitable that they also take on greater amounts of complexity and require specialization. (Source: Panaya.com)
ServiceNow offers the possibility of creating and implementing a Release Management process, providing its users with very powerful functionality. In our blog post, we will explain how to create a process for Release Management in ServiceNow.
Creating the form
The first step includes creating a form based on a catalog variable. In our case, we will use different types of variables.
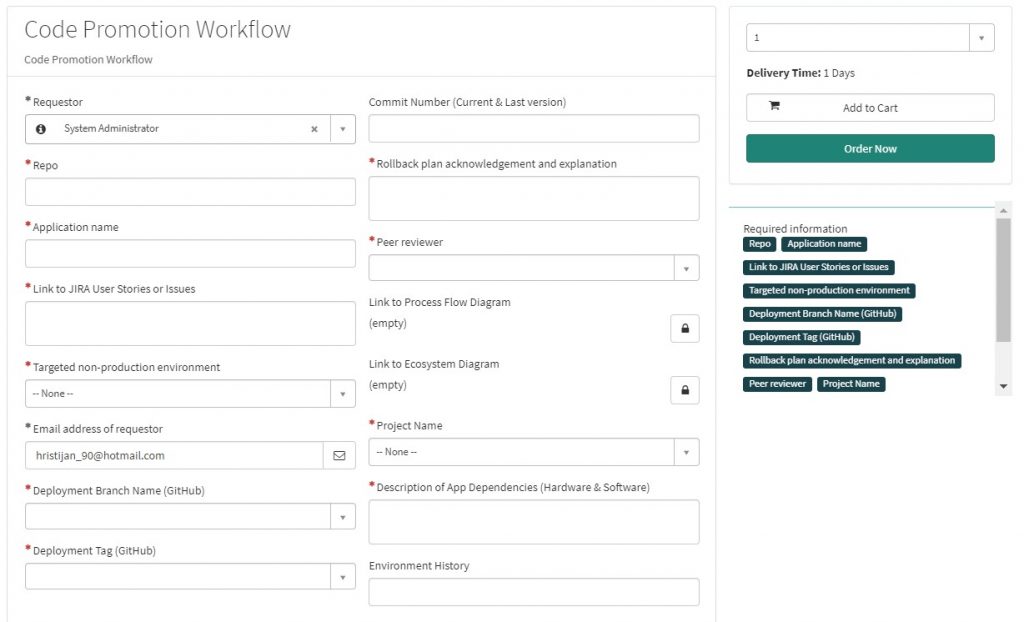
Here we want to emphasize the logic and the scripts running behind this form. As we can see, the Email address of the requestor is auto-populated. This is done with a JavaScript function inserted into the default value of the variable.
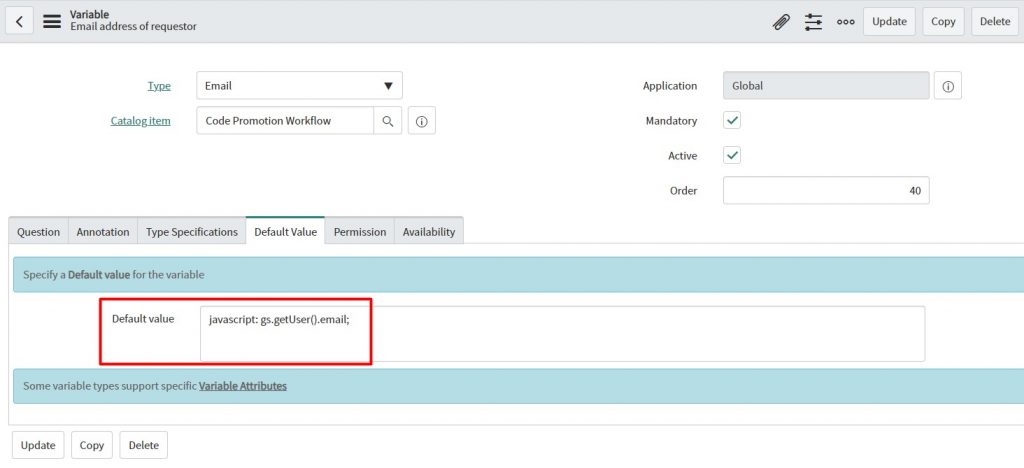
This functionality runs on a load of the form. The next functionality that we want to mention is based on a script that is triggered on a change of the Repo field.
function onChange(control, oldValue, newValue, isLoading) {
    if (isLoading || newValue == '') {
        return;
    }
    var repo = g_form.getValue('repo');
    var res = repo.split("/", 6);
    var lastOne = res[res.length - 1];
    g_form.setValue('application_name', lastOne);
This script takes the link from GitHub which is inserted in the Repo variable, splits it into pieces, takes the application name, and fills the Application Name field in our form with that value. Once we have value in the Application Name field, three additional scripts are triggered.
The first script checks the table u_code_promotion which keeps the information of available environments for every application.
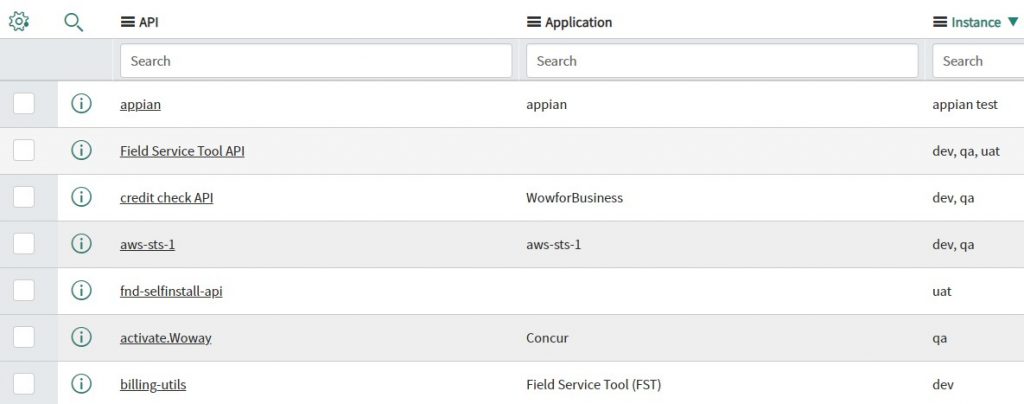
Because the biggest part of the developers who will use the deployment form does not have an ITIL view, the form from the Service Portal must be filled. As the functionality should happen on the server-side within the catalog client script we will use the AJAX technology.
function onChange(control, oldValue, newValue, isLoading) {
    if (isLoading || newValue == '') {
        return;
    }
    var app = g_form.getValue('application_name');
    var ga = new GlideAjax('CaseUtilsAjax');
    ga.addParam('sysparm_name', 'getUserDetailnew');
    ga.addParam('sysparm_userid', app);
    ga.getXML(getUserDetail);

    function getUserDetail(response) {
        var answer = response.responseXML.documentElement.getAttribute("answer");
        if (answer == '1') {
            g_form.clearOptions('targeted_non_production_environment');
            g_form.addOption('targeted_non_production_environment', 'dev', 'dev');
        } else if (answer == '2') {
            g_form.clearOptions('targeted_non_production_environment');
            g_form.addOption('targeted_non_production_environment', 'qa', 'qa');
        } else if (answer == '3') {
            g_form.clearOptions('targeted_non_production_environment');
            g_form.addOption('targeted_non_production_environment', 'uat', 'uat');
        } else if (answer == '4') {
            g_form.clearOptions('targeted_non_production_environment');
            g_form.addOption('targeted_non_production_environment', 'dev', 'dev');
            g_form.addOption('targeted_non_production_environment', 'qa', 'qa');
        } else if (answer == '5') {
            g_form.clearOptions('targeted_non_production_environment');
            g_form.addOption('targeted_non_production_environment', 'dev', 'dev');
            g_form.addOption('targeted_non_production_environment', 'qa', 'qa');
            g_form.addOption('targeted_non_production_environment', 'uat', 'uat');
        } else {
            g_form.clearOptions('targeted_non_production_environment');
            g_form.addOption('targeted_non_production_environment', 'appian test', 'appian test');
        }
    }
}
Depending on the value that will be the answer returned from the Script Include the Targeted Non-production environment field will be populated.
In addition, we will share the Script Include which is called from the catalog client script.
var CaseUtilsAjax = Class.create();
CaseUtilsAjax.prototype = Object.extendsObject(AbstractAjaxProcessor, {
    getUserDetailnew: function() {
        var userid = this.getParameter('sysparm_userid');
        var gr = new GlideRecord('u_code_promotion');
        gr.addQuery('u_api', userid);
        gr.query();
        var arr = [];
        while (gr.next()) {
            arr.push(gr.u_instance.toString());
        }
        return arr.toString();
    },
    type: 'CaseUtilsAjax'
});
The second script which runs on the change of the Application name field is about filling the dropdown field Deployment Branch Name (GitHub) with the branches that are part of the current repository.
This functionality should also happen on the server side within the catalog client script and we will use the AJAX technology.
function onChange(control, oldValue, newValue, isLoading) {
    if (isLoading || newValue == '') {
        return;
    }
    var appSelected = g_form.getValue('application_name');
    var appDetails = new GlideAjax('appDetailsUtil');
    appDetails.addParam('sysparm_name', 'getAppDetails');
    appDetails.addParam('sysparm_appSelect', appSelected);
    appDetails.getXMLAnswer(returnCodes);

    function returnCodes(response) {
        var answer = response;
        var answers = answer.split(',');
        for (var i = 0; i < answers.length; i++) {
            g_form.addOption('deployment_branch_github', answers[i], answers[i]);
        }
    }
}
In addition, we will share the Script Include which is called from the catalog client script.
var appDetailsUtil = Class.create();
appDetailsUtil.prototype = Object.extendsObject(AbstractAjaxProcessor, {
    getAppDetails: function() {
        var uid = this.getParameter('sysparm_appSelect');
        var r = new sn_ws.RESTMessageV2('WOW Deployment', 'Default GET');
        r.setStringParameterNoEscape('application', uid);
        var response = r.execute();
        var responseBody = response.getBody();
        var responser = JSON.parse(responseBody);
        var arrRoles = [];
        for (i = 0; i < responser.length; i++) {
            arrRoles.push(responser[i].name.toString());
        }
        return arrRoles.toString();
    },
    type: 'appDetailsUtil'
});
In order for this functionality to be completed, we should create a REST Message with the GET method, so we can take the information from GitHub. In our case, we will build a dynamic Endpoint.
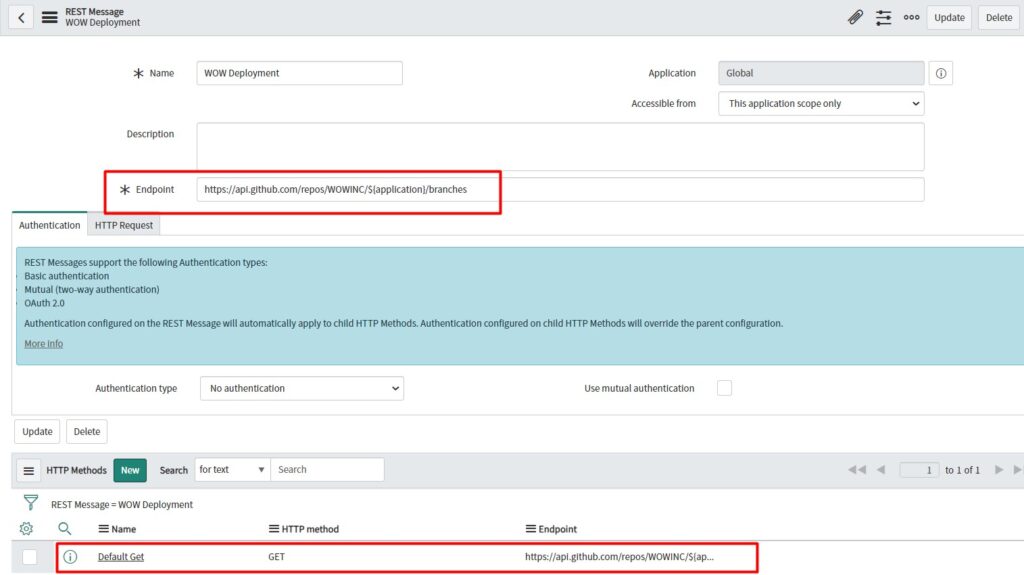
The endpoint will be updated with the appDetailsUtil script include which is shown above.
Depending on the value that will be the answer returned from the Script the Deployment Branch Name (GitHub) field will be populated.
The third script, which runs on a change of the Application name field, is about filling the dropdown field Deployment Tag (GitHub) with the tags that are part of the current branch.
This functionality should also happen on the server side within the catalog client script and we will use the AJAX technology.
function onChange(control, oldValue, newValue, isLoading) {
   if (isLoading || newValue == '') {
      return;
   }
	var appSelected = g_form.getValue('application_name');
	var appDetails = new GlideAjax('appDetailsUtilTags');
	appDetails.addParam('sysparm_name', 'getAppDetailsTags');
	appDetails.addParam('sysparm_appSelect', appSelected);
	appDetails.getXMLAnswer(returnCodes);

	function returnCodes(response){
	        var answer = response;
	        var answers = answer.split(',');
		for (var i=0; i < answers.length; i++){
		     g_form.addOption('deployment_tag_github',answers[i],answers[i]);
			}
		}
}
In addition, we will share the Script Include which is called from the catalog client script.
var appDetailsUtilTags = Class.create();

appDetailsUtilTags.prototype = Object.extendsObject(AbstractAjaxProcessor, {
    getAppDetailsTags: function() {
        var uid = this.getParameter('sysparm_appSelect');
        var r = new sn_ws.RESTMessageV2('WOW Deployment Tags', 'Default GET Tag'); // In this case, we are using GET method
        r.setStringParameterNoEscape('apptag', 'aws-sts-1');
        var response = r.execute();
        var responseBody = response.getBody();
        var responser = JSON.parse(responseBody);
        var arrRoles = [];
        for (var i = 0; i < responser.length; i++) {
            arrRoles.push(responser[i].name.toString());
        }
        return arrRoles.toString();
    },

    type: 'appDetailsUtilTags'
});
Once the form is submitted the workflow starts to run.
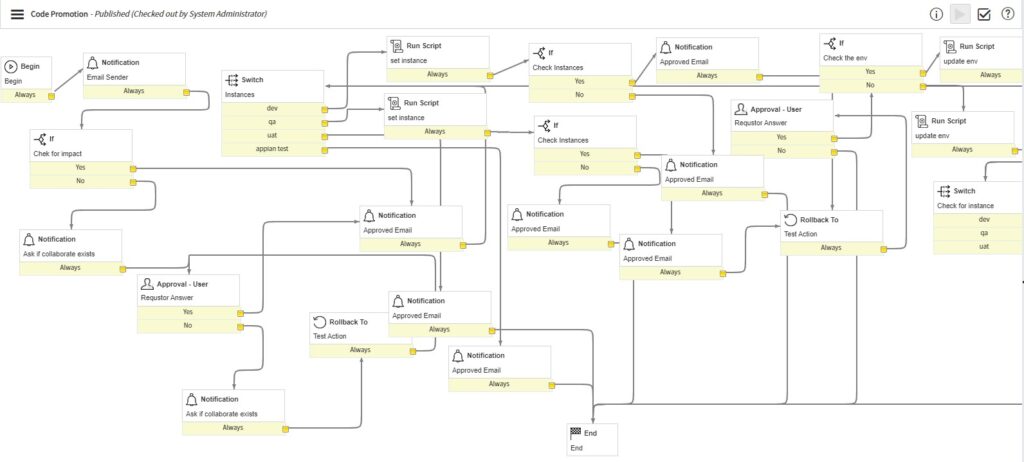
The first action is notifying the release management team about the new Deployment Request.
The second action that is crucial for our process is the IF action of the workflow which is based on the code below:
answer = ifScript();
function ifScript() {
	// Set the variable 'answer' to a comma-separated list of user or group sys_ids that you want the email sent to.
	var currentUser = current.variables.requestor;
	var tarEnv = current.variables.targeted_non_production_environment;
	var lastUser = [];
	var groupOfUsers = [];
	var api = current.variables.application_name.getDisplayValue();
	var instance = "";
	var lastSysID;
	var getUser = "";
	var testSysID = [];

	var date = new Date();
	var year = date.getFullYear();
	var month = '0' + (date.getMonth() +1); // date offset, array zero based
	var day = '0' + (date.getDate() -14);
	var hour = '0' + date.getHours();

	var days = day.substr(day.length-2, 2);
	var months = month.substr(month.length-2, 2);

	var actualDate = year + '-' + months + '-' + days;
	current.description = tarEnv;
	current.update();
	var gr = new GlideRecord('sc_item_option_mtom');
	gr.addQuery('request_item.current.variables.application_name', api);
	gr.addQuery('request_item.description','CONTAINS', tarEnv);
	gr.addQuery('sys_created_on', '>', actualDate);
	gr.orderByDesc('sys_created_on');
	//gr.setLimit(2);
	gr.query();
	workflow.info("befor GR");
	while(gr.next()){
		testSysID.push(gr.request_item.toString());
		workflow.info("inside gr");
		}
	var arrayUtil = new ArrayUtil();
testSysID= arrayUtil.unique(testSysID);

function countProperties(obj) {
    var count = 0;

    for(var prop in obj) {
        if(obj.hasOwnProperty(prop))
            ++count;
    }
    return count;
}
	var numOfTrue = countProperties(testSysID);

	if(numOfTrue > 1){

	lastSysID = testSysID[1].toString();
		var fr = new GlideRecord('sc_item_option_mtom');
		fr.addQuery('request_item', lastSysID);
		fr.query();
		while(fr.next()){
			workflow.info("inside fr");
			getUser = fr.request_item.variables.requestor;
			instance = fr.request_item.variables.environment_history;
			}
		}
		if (!lastSysID) {
		workflow.info("inside yes");
		return 'yes';

	}

	else if(currentUser == getUser){
		return 'yes';
	}
	else if(currentUser != getUser && instance.toString().indexOf(tarEnv)){
		return 'no';
	}
	else {
		return 'no';
	}
}
The code above checks who was working last time on the application which is mentioned in the current Deployment Request. Also, the code checks the instance on which the last changes were applied when the last time the current application was changed. This means that with one ticket the changes can be deployed on more than one instance, and there is no need to create a new ticket for transferring the code from DEV to TEST.
Based on the output from the IF action in the workflow the next steps are defined.
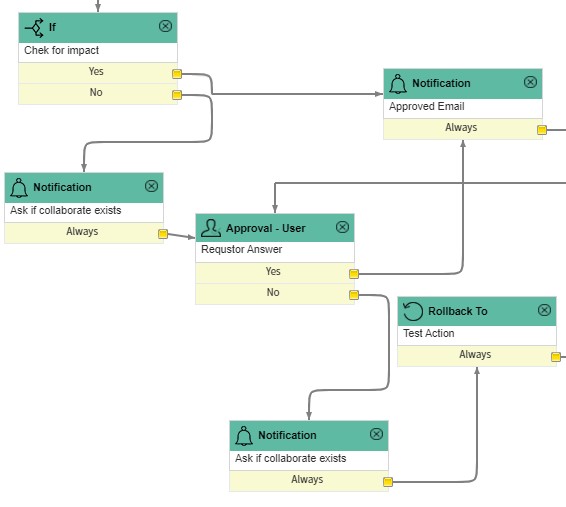
If the current user that requested the deployment is the same person that was working the last time on the application mentioned in the request, the output of the IF action will be Yes and the request will be automatically approved, and that will be confirmed with an e-mail. If that is not the case the output will be No and the requestor will be asked if he is collaborating with the previous developer who made the last changes to the current application. If yes, the request will be automatically be approved, and that will be confirmed with an e-mail. If no, the requestor will be asked to communicate with the developer who worked previously on the current application. After the confirmation from the current requestor that the communication is done and everything is good to go, the request will be automatically approved.
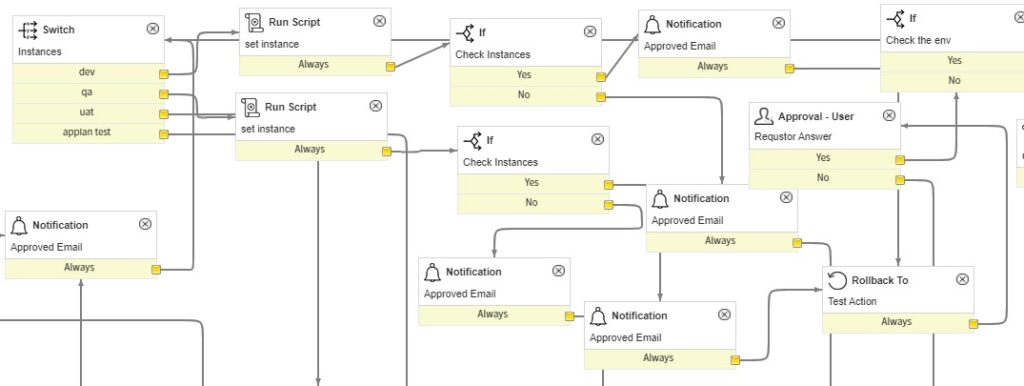
Next, once the code is deployed to the instance that was requested if there is another available instance for the current application, the requestor is asked if he/she wants to proceed with deploying the code to the next instance, to put the flow on pause or to terminate the flow. The procedure explained above is applying if the code is going to some of the available instances.
Conclusion
Implementing the Release Management process in ServiceNow provides a lot of benefits to enterprises. First of all, it is a lightweight and highly organized automated process that increases efficiency, transparency, consistency, and compliance in the Release Management process. Next, the Release Management team can benefit a lot, as this process reduces the time to 100% of checking the relation between applications and instances and, also reduces the time of manually approving and sending e-mails to the developers by 100%. In other words, the RM team has more time to focus on developing new inventive processes and improving the existing ones.