
Quite often, front-end automation is feared with the notion that it’s complex, requires resources and repetitive investments. The automating time-consuming tasks that involve minifying HTML, CSS and JavaScript files, automatically reloading the browser once a file has been edited, compiling CSS preprocessors (SASS, LESS, etc), running tests, compressing images and several others are a lot of repetitive and not-so-interesting tasks. All of this can be handled by using a toolkit called Gulp, a tool that solves the problem of repetition.
How Gulp works?
Gulp accepts a source (can be a file, or a set of files), processes it based on a task and then passes it to the next task in the pipe for further processing. The pipes continue with processing till the last task. These tasks are loaded using Gulp plugins.
Plugins are Node Transform Streams that encapsulate common behavior to transform files – often placed between src() and dest() using the .pipe() method. Streams can change the filename, metadata, or contents of every file that passes through the stream.
There are a huge number of plugins provided, contributed and actively developed by community.
Installation
1. In order to use Gulp, we need the following tools installed: Node.js with NPM (Node Package Manager) on the machine, before proceeding.
If you don’t have it installed, you can go to https://nodejs.org and download the latest stable version. Installing Node and NPM is pretty straightforward using the installer package available from the Node.js® web site. By default, the installation will include NPM.
You can check if you have installed them by visiting your command line/console and type:
$ node –v

	$ npm -v
If either of these commands go unrecognized, you need to follow the link above and download the appropriate installer based on your OS.
Once finished, reload your console and you can continue.
2. Next, we need to create a new project folder:
$ mkdir project-gulp

$ cd project-gulp
This utility will walk you through creating a package.json file. It only covers the most common items, and tries to guess sensible defaults.
4. Now we have to install Gulp.js and create gulpfile.js:
$ npm initTo check if Gulp is installed locally and globally, we can type:
$ gulp -vIn the root project folder we should create gulpfile.js (file that contains the configurations of individual Gulp tasks)
1.	var gulp = require('gulp');
2.	var less = require('gulp-less');
3.	var browserSync = require('browser-sync').create();
4.	const autoprefixer = require('gulp-autoprefixer');
5.	var cleanCSS = require('gulp-clean-css');
6.	var sourcemaps = require('gulp-sourcemaps');
7.	var concat = require('gulp-concat');
8.
9.	gulp.task('less', function() {
10.	    return gulp.src('./less/*.less')
11.	    .pipe(less())
12.	    .pipe(gulp.dest('./css'))
13.	    .pipe(browserSync.stream());
14.	});
15.
16.	gulp.task('serve', ['less'], function() {
17.	    browserSync.init({
18.	        server: './'
19.	    });
20.	    gulp.watch('./less/*.less', ['less']);
21.	    gulp.watch('./*.html').on('change', browserSync.reload);
22.	    gulp.src('./css/*.css')
23.	    .pipe(autoprefixer({
24.	        browsers: ['last 2 versions'],
25.	        cascade: true
26.	    }))
27.	     .pipe(gulp.dest('./css'))
28.	});
29.
30.	gulp.task('minify-css', function() {
31.	    return gulp.src('./css/*.css')
32.	      .pipe(sourcemaps.init())
33.	      .pipe(cleanCSS())
34.	      .pipe(sourcemaps.write())
35.	      .pipe(gulp.dest('./css/maps'));
36.	});
37.
38.	gulp.task('scripts', function() {
39.	    return gulp.src('./scripts/*.js')
40.	    .pipe(concat('all.js'))
41.	    .pipe(gulp.dest('./scripts/'));
42.	});
43.
44.	gulp.task('default', ['serve', 'minify-css', 'scripts' ]);
Some of the plugins used were Gulp plugins for preprocessing, and they automatically reload the browser when we save an edited file, minify CSS, etc. Each plugin only does small amount of work, so finally they are connected like building blocks. You may need to combine a bunch of them to get the desired result. In this project Gulp is used with LESS, but only with some minor changes, it can be used with SASS. (Simply change less with scss/sass in gulpfile.js and in the command line when installing with npm, change – gulp-less with gulp-sass).
Gulp-less: (Automatically converts .less files to .css files.)
$ npm install gulp–less --save-dev BrowserSync: (Changes a file locally and instead of having to refresh, the browser automatically refreshes or injects the changes.)
$ npm install gulp browser-sync --save-dev Autoprefixer: (Will use the data based on current browser popularity and property support to apply prefixes for you.)
$ npm install --save-dev gulp-autoprefixerClean CSS: (Minifying CSS and SourceMaps, will reduce CSS files size, removes whitespace, strips comments, combines files, etc.)
$ npm install gulp-clean-css --save-devConcat: (Combines JavaScript files in one main file.)
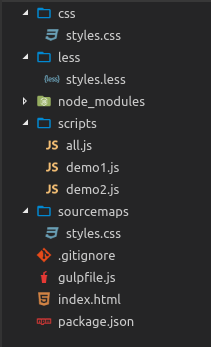
$ npm install --save-dev gulp-concatAfter we have completed all of the commands in the console and created folders/files, the project root should look like this:
Write down some HTTML, LESS and JS and see how magic works :). That’s pretty much everything you have to do!
Oh, just one more thing, do not forget to type:
$ gulpConclusion
Using Gulp toolkit shows us that the work of a web developer can be greatly facilitated, accelerated and, more importantly, Gulp unifies the work in a team. This way the unified configuration can be shared by the whole team and one does not have to worry that every developer creates, for example, different CSS from LESS/SAAS, or that there will be conflicts in JavaScript files.
Resources:
http://gulpjs.com/
https://libraries.io/npm/gulp/3.9.1
https://www.npmjs.com/