

Introduction
Even though we live in an era where digital transformation is the main characteristic of top-notch businesses, many of them still rely on legacy systems and robust applications to perform crucial business processes. These practices have a major impact on productivity, response time, and application performance. Unprecedented connectivity issues might appear which will create an additional burden to the overall experience.
In order to keep pace with the increased competition, a staggering amount of businesses are relocating many processes on microservices and data integration platforms like MuleSoft, which helps developers to connect applications quickly and easily while simultaneously enforcing security practices in compliance with the latest security standards.
While migrating the processes to an integration platform saves a considerable amount of time, it is highly cost-effective and generates a great impact on the business, it may happen that an application lacks certain integration capabilities, or there is a need to perform a vast variety of repetitive tasks like retrieving information from databases, documents, scanned documents, photos, etc.
To overcome this potential obstacle, an integration platform may be complemented with a business process automation tool for even greater convenience and speed. But business process automation is not simply about streamlining or automating a process; rather, it is an approach for taking data from back-end systems and self-serving it to the business to create processes that might become enablers of digital transformation. One of the emerging technologies nowadays is the RPA (Robotic Process Automation), which is a form of business process automation and allows anyone to configure computer software, or a “robot” to emulate and integrate the actions of a human interacting within digital systems.
For that purpose, our MuleSoft and QA team have partnered up to create an innovative solution by automating data extraction and insertion from a specific website into the Salesforce platform in a faster and more controlled fashion. This joint solution removes barriers to digital transformation, making it faster and more efficient to automate different systems in a sustainable, scalable way.
Creating the process
1. RPA
The described process is a combination of getting data from a specific website in the browser with Data Scrapping, which as output has a variable containing the table with its values. Then, the output data table is converted into JSON string and afterward sent as a body of an HTTP request to the MuleSoft endpoint where a new contact in Salesforce is created.
Data Scraping is an activity in UiPath, that enables you to extract structured data from a specific browser, application, or document to a database, .csv file, or Excel spreadsheet.
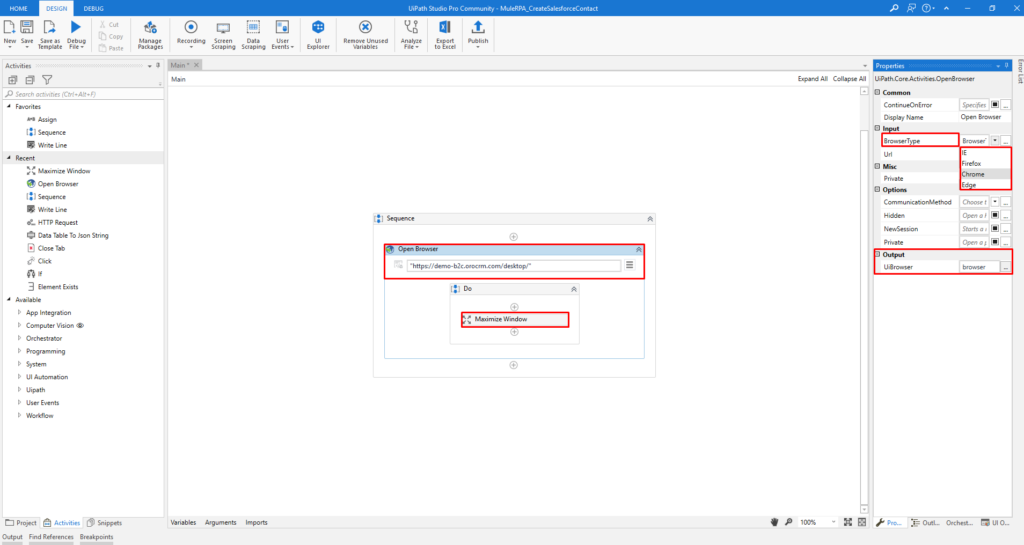
Therefore, to create this flow, UiPath Studio should be installed on the computer. After we open UiPath Studio in the Main workflow window, we add a sequence. To go to a specific website to get the data, we will use the Open Browser Activity, where we will insert the URL of the specific website in the designated input field. On the right side when Open Browser Activity is clicked, in the properties panel there is an option to change the browser on which you want the process to be executed. Also, in the output section, there is an option to create a browser variable which as a value will have the opened browser session which we will need later to close the same browser when the work in the browser is done. In the Do part of the activity, first of all, we will add the maximize window activity, which maximizes the indicated window (Image 1).
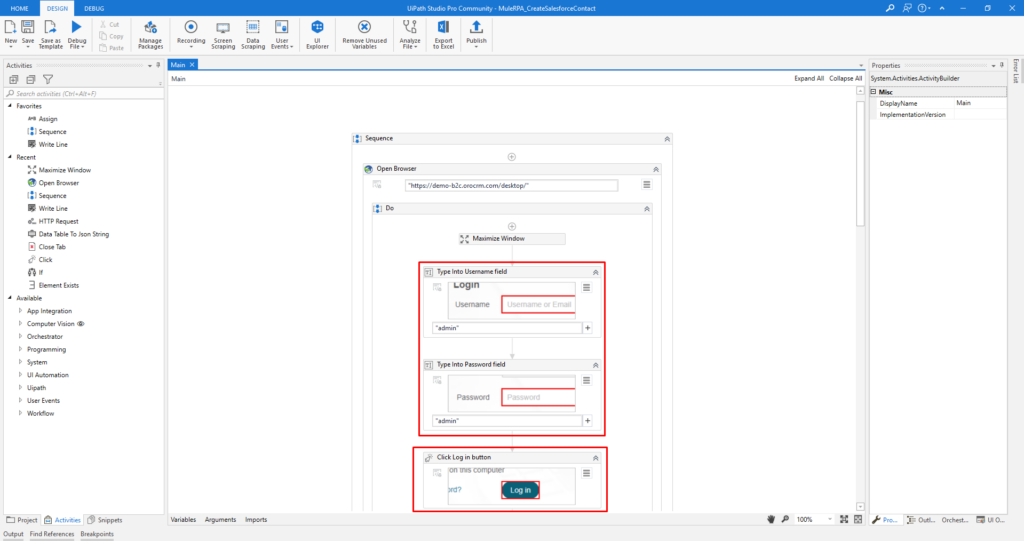
In this case, when the URL is loaded, the login page is opened, so we will use two Type Into Activities where we can indicate the desired elements on the screen and in the field below to enter the username and password for the user, which will be typed in the particular indicated input fields on the website (Figure 2). After the user credentials are inserted, the login button should be clicked. Thus, a Click Activity is used, where we only indicate the element on the screen that should be clicked (Figure 2).
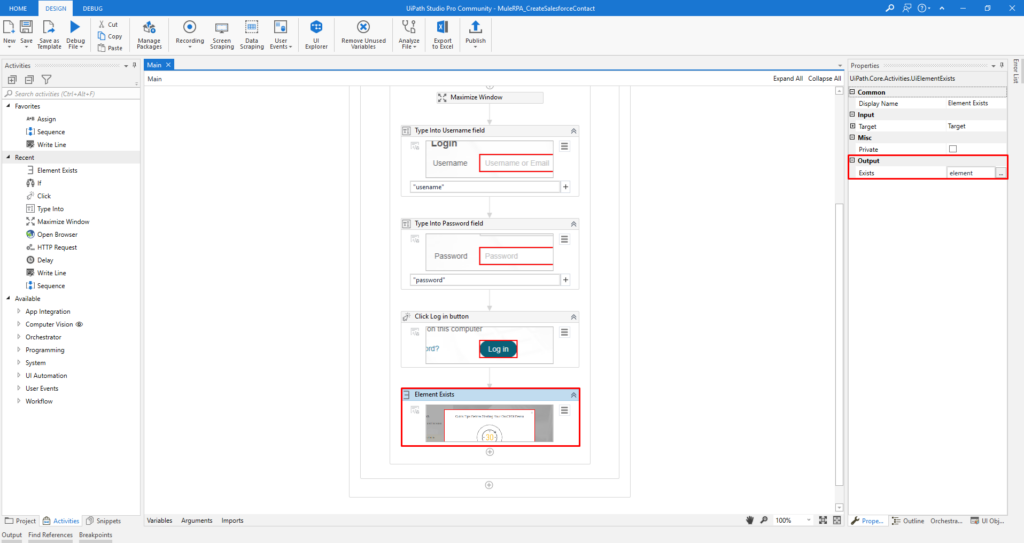
When the user is logged in, sometimes a pop-up with quick tips appears. Therefore, to check if that pop-up is visible, i.e. it exists, we use Element Exists Activity, where we indicate the element on the screen. On the right, in the properties panel, in the output section, we create a new variable of type Boolean which will return true or false if the element exists or does not exist, respectively (Image 3).
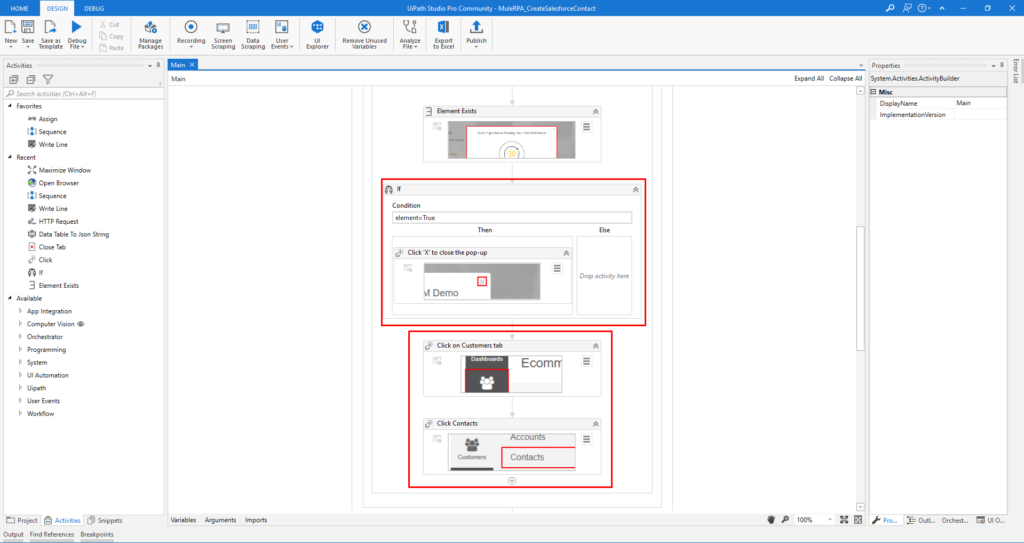
The created variable will be used in an If Activity, where it checks whether the element exists. If it does it will have a click activity to click on the “x” button to close the pop-up (Image 4). Otherwise, the process continues with two clicking activities, i.e. the first one to click on the Customers tab on the left, which will open a sidebar with three options, and the second one to click on the second option, that is Contacts (Image 4).
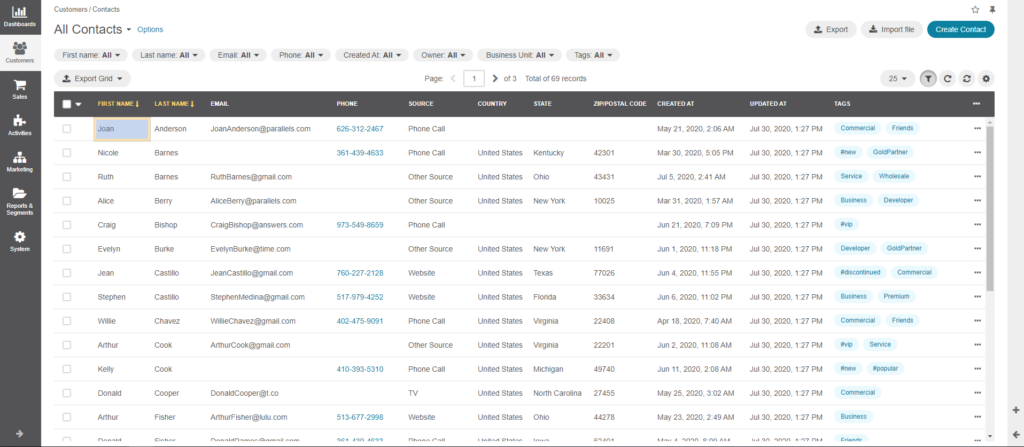
When the contacts page is loaded, a table with contacts appears. Namely, we are going to use Data Scraping Activity, in order to get the entire data from the table in a single variable of type data table. In the ribbon of the Design tab in UiPath Studio, you can see a Data Scraping button. Next, the data scraping wizard appears, where we have to hover the mouse cursor over the element data that we want to get, and click it (Image 5). In this case, when we click on the first contact in the table because it is stored in a table, we will be asked whether we want to extract the data from the entire table.
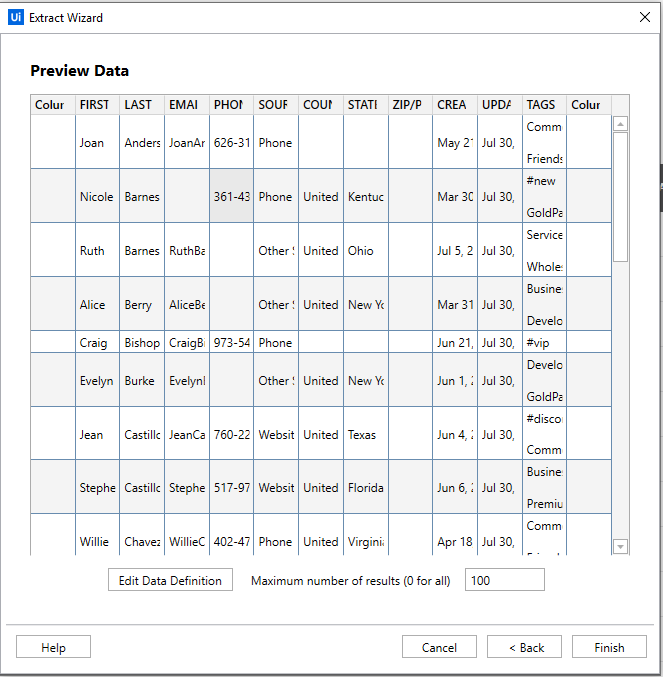
When clicked yes, a preview data window appears, and if it is OK, click finish (Image 6).
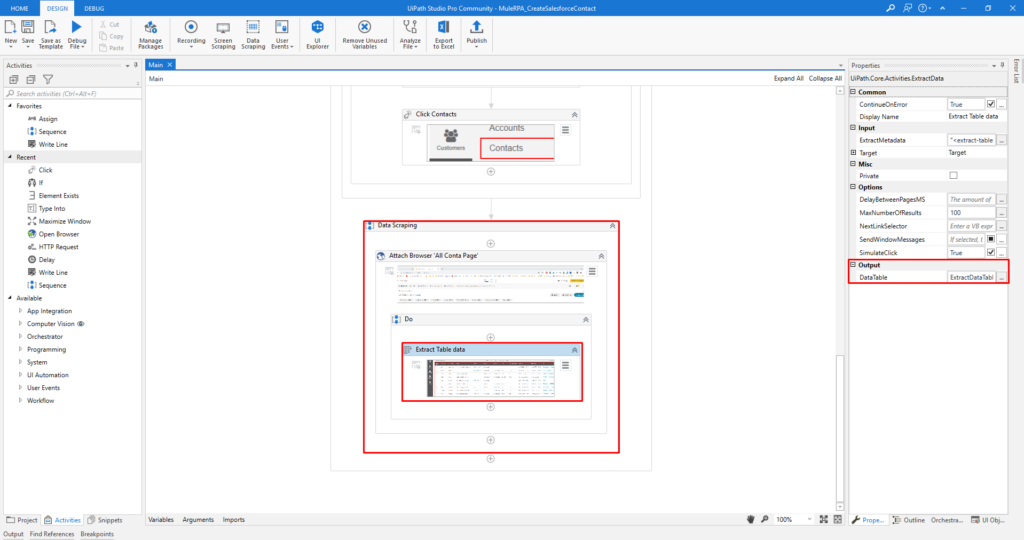
After that in the UiPath Studio, a Data Scrapping activity is added. The activity to extract the data in the Do section, as an Output has an automatically created variable that as a value has the data of the website table with the contacts (Image 7).
Hence, we will close the opened browser with the Close Tab Activity where in the input section in the browser field we will pass the previously created variable of the open browser activity.
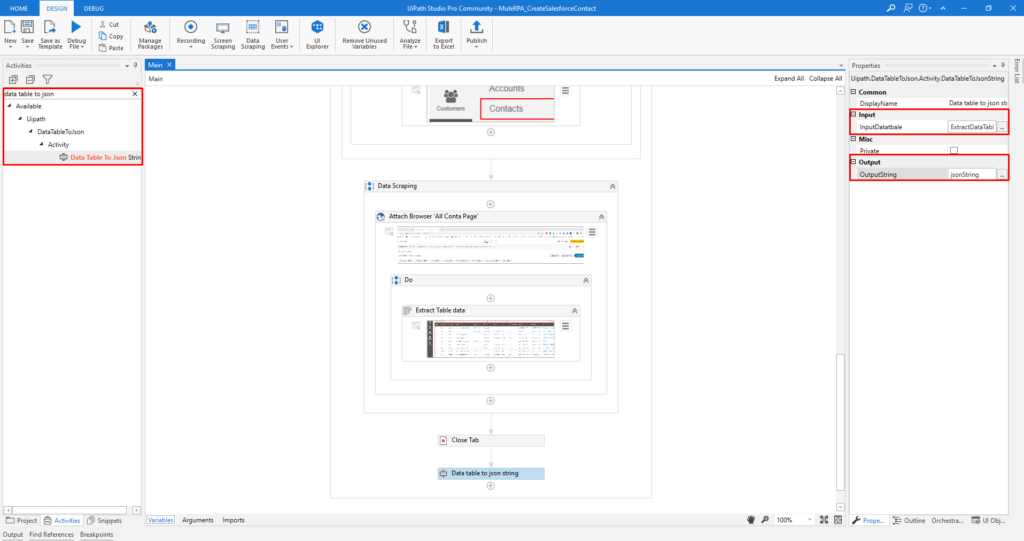
After the browser is closed, we will use the Data Table for JSON string activity. For this activity to be available in the project, we have to install it through the ribbon button, Manage Packages, from where we can search and install the required package – UiPath.DataTableToJson.Activities. After the installation is over, in the left panel, in the activities tab, search for the activity Data Table to JSON String and add it to the sequence. When the activity is clicked, on the right in the properties panel we should populate the input and output section. In the input, we should insert the already created output variable of the data scraping activity, and in the output, we should create a new variable, which as a value will have a collection variable as a string in JSON format (Image 8).
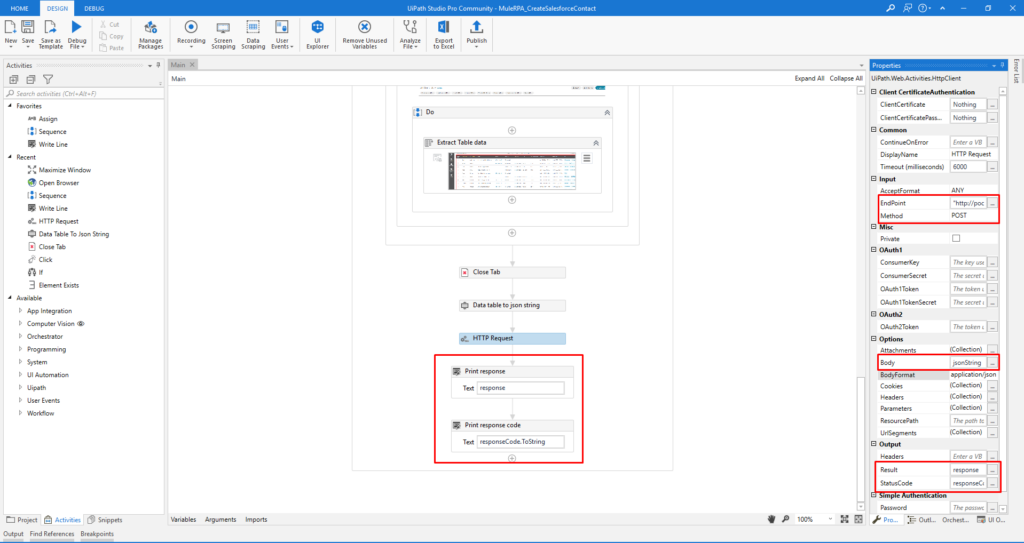
In the end, we will add an HTTP Request activity. For that purpose, there has to be installed the UiPath.Web.Activities package. That can be done by clicking the Manage Packages button where we can search for the particular package and install it in the current project. After the installation is over, in the left panel, in the activities tab, search for the activity HTTP Request and add it to the sequence.
In the properties panel, into the Endpoint field, we will insert the MuleSoft application URL, and set the request method to POST. Under the Options section, we will add the JSON string output that we set earlier, which will send the scraped data to the MuleSoft endpoint which will then continue the process of creating a new contact in Salesforce with the provided data (Image 9).
Optionally, in the properties panel in the output section, variables for the response can be created, and the response code of the HTTP Request (Figure 9), which are going to be sent to the MuleSoft endpoint. Also, they can be printed in the console of the UiPath Studio, as some kind of review of what response the API call produces.
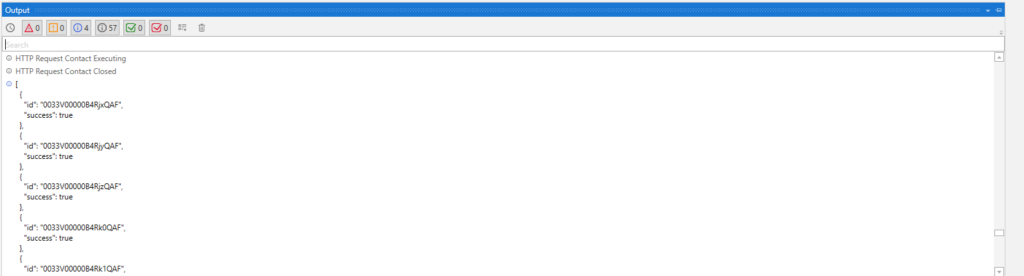
So, when the process is running, the HTTP POST Request is sent to MuleSoft and the response and the response code value are printed in the console (Image 10).
2. MuleSoft Application
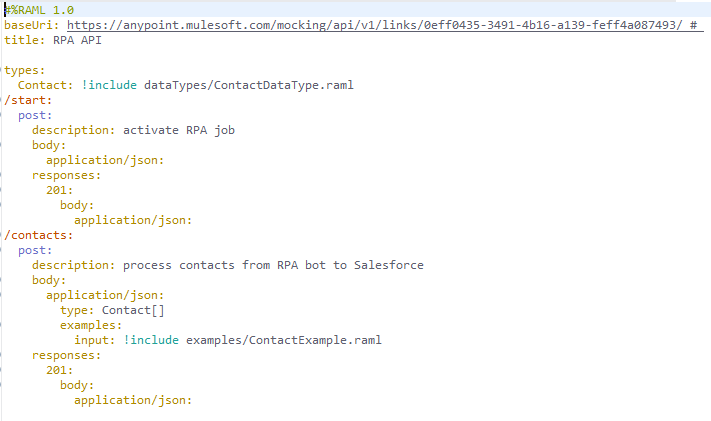
A RAML is created for the purpose of API description, validating the incoming data from the RPA robot so as to secure the correct format of data representation in the transformation that follows. Two operations have been added, the first one is to start the bot and initialize the process, and the other one is created to upsert the data into Salesforce (Image 11).
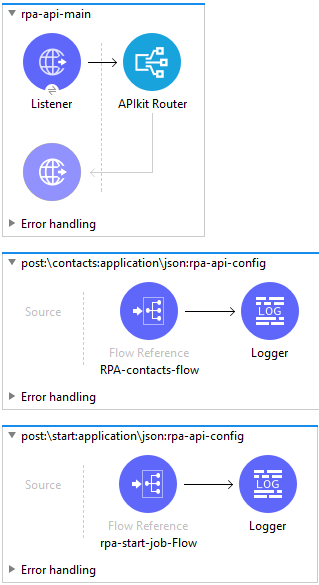
The flows have been generated after the RAML creation, which appears like this (Figure 12).
Several properties should be created first, so the configurations may access the critical information from them (Image 13). They contain environment info, various hosts, and ports so the requests can be created accordingly, and login info to Anypoint Platform and Salesforce.

Multiple configurations have been created to enable the connection between the robot and Salesforce, as well as enabling multiple REST calls, for access tokens and to start the robot job (Figure 14).

Once all of the configurations have been set, the process may be implemented. An additional logic has been added to store the access token and reset it after a day. The trigger will be a POST call to the application’s start operation as defined in the RAML. It will look for an already existing token and will send the request to the UiPath endpoint to start the robot (Image 15).
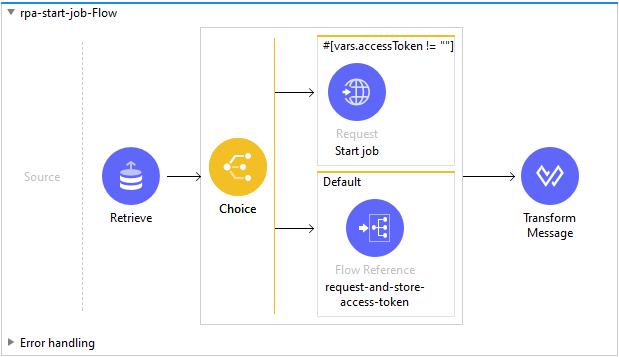
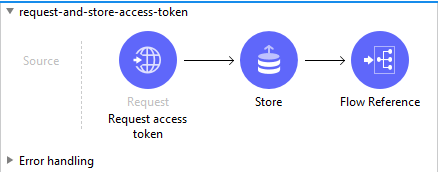
If a token hasn’t been retrieved, a request for a new token will be sent (Image 16).
Once the robot finishes the “data scraping” process as we call the extraction itself, it will send the data as an array of JSON objects with an HTTP POST request on the contacts operation where the data will be processed and transformed into SF Objects of type Contact (Image 17).
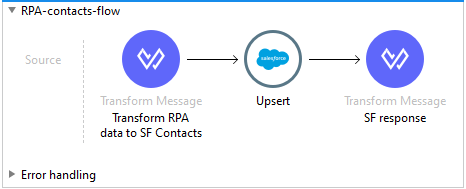
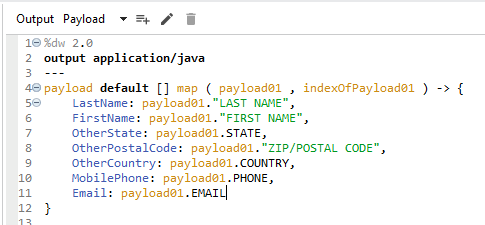
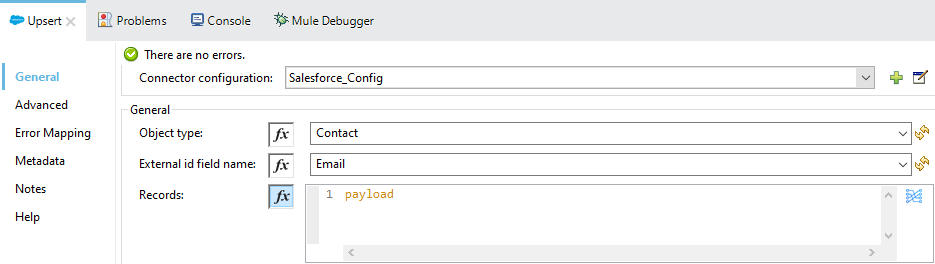
The following transformation will create SF objects, ready to insert or update with the SF upsert operation (Image 18).
The upsert operation from the Salesforce connector in Mule uses the payload that has just been transformed into Salesforce Objects whether insert or update Contacts, based on the email address of the Contact. So, when the email is non-existent, a new Contact will be created, and if the email exists, the Contact will be updated accordingly. (Image 19)
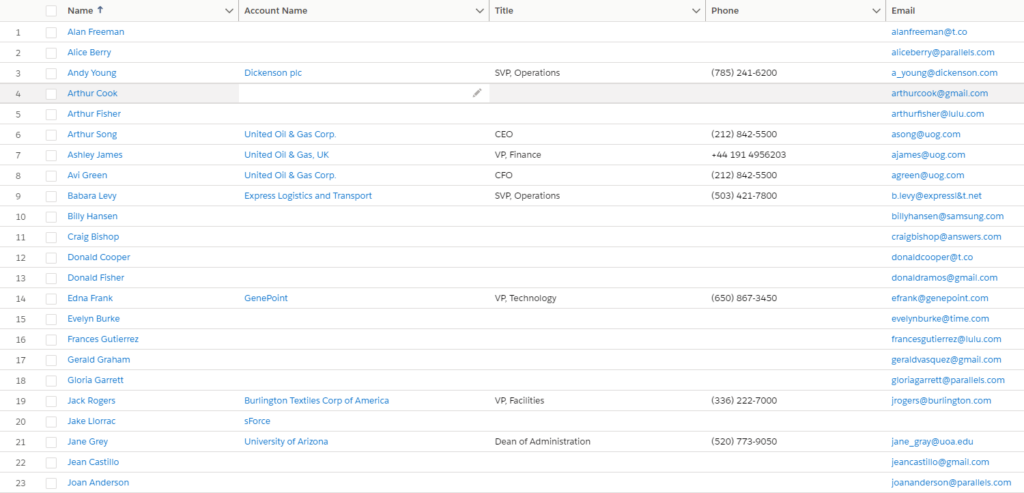
From the figure below (Image 20), it can be noticed that new contacts have been added, which means that the flow is completed successfully.
After insertion, Salesforce returns a response whether the transaction was successful or not, so the response has been formatted (Image 21). This will output what is shown in the UiPath console in Figure 10 above.
Conclusion
Since digital transformation is of utmost importance nowadays, automating business processes, even eliminating mundane repetitive tasks is possible by using the MuleSoft platform as the main integration platform, combined with UiPath as an RPA tool.
The aim of RPA is to create processes, replacing human interaction for continual tasks of the same nature, to ease and accelerate the daily activities of the end users.
Together, MuleSoft and RPA will deliver the promise of seamless, efficient, and connected experiences through powerful automation for sustainable business value.