

In this article we describe the steps needed for running Appium Java tests on Kobiton Test Cloud service and Jenkins configuration for automated test execution on Kobiton and collecting test results in Jenkins.
Kobiton is a mobile cloud platform that enables users to perform manual or automated testing on physical iOS and Android devices. When compared to other test cloud platforms the main differences of Kobiton are:
- No change to your automation scripts: Execute automation tests on Kobiton devices by updating the device settings to your required configuration, i.e. in order to run the tests on Kobiton devices only the device capabilities needs to be changed so you don’t need to use a specific framework like on the other test cloud platforms.
- Test sessions history: Kobiton preserves all automation executions, including commands, logs, screenshots and metadata.
- Automate from A-Z: Kobiton automatically cleans your test apps and data after the session ends.
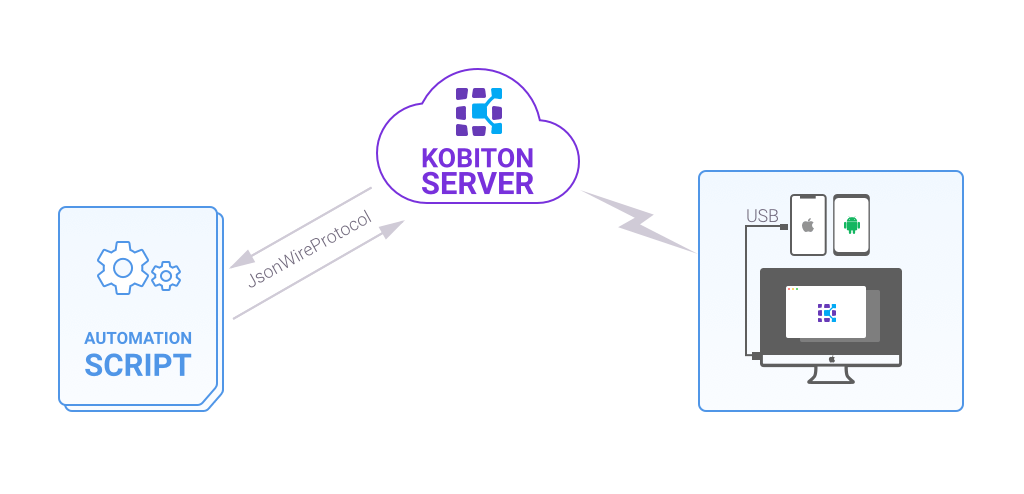
The diagram below shows the communication between a machine used to create test scripts, the Kobiton server, and the machine where test devices are connected.
Running Automated Tests on Kobiton
Kobiton provides the so-called Automation Settings for each device on which you want to run tests. Actually Automation Settings are the desired capabilities that need to be added to the Appium test script in order tests to be executed on the Kobiton device.
To get the desired capabilities of the device where the automated tests will be executed, after we log into Kobiton, from the Devices page, we click on the settings button on the device where we will run the tests, which displays Automation Settings for the chosen device.
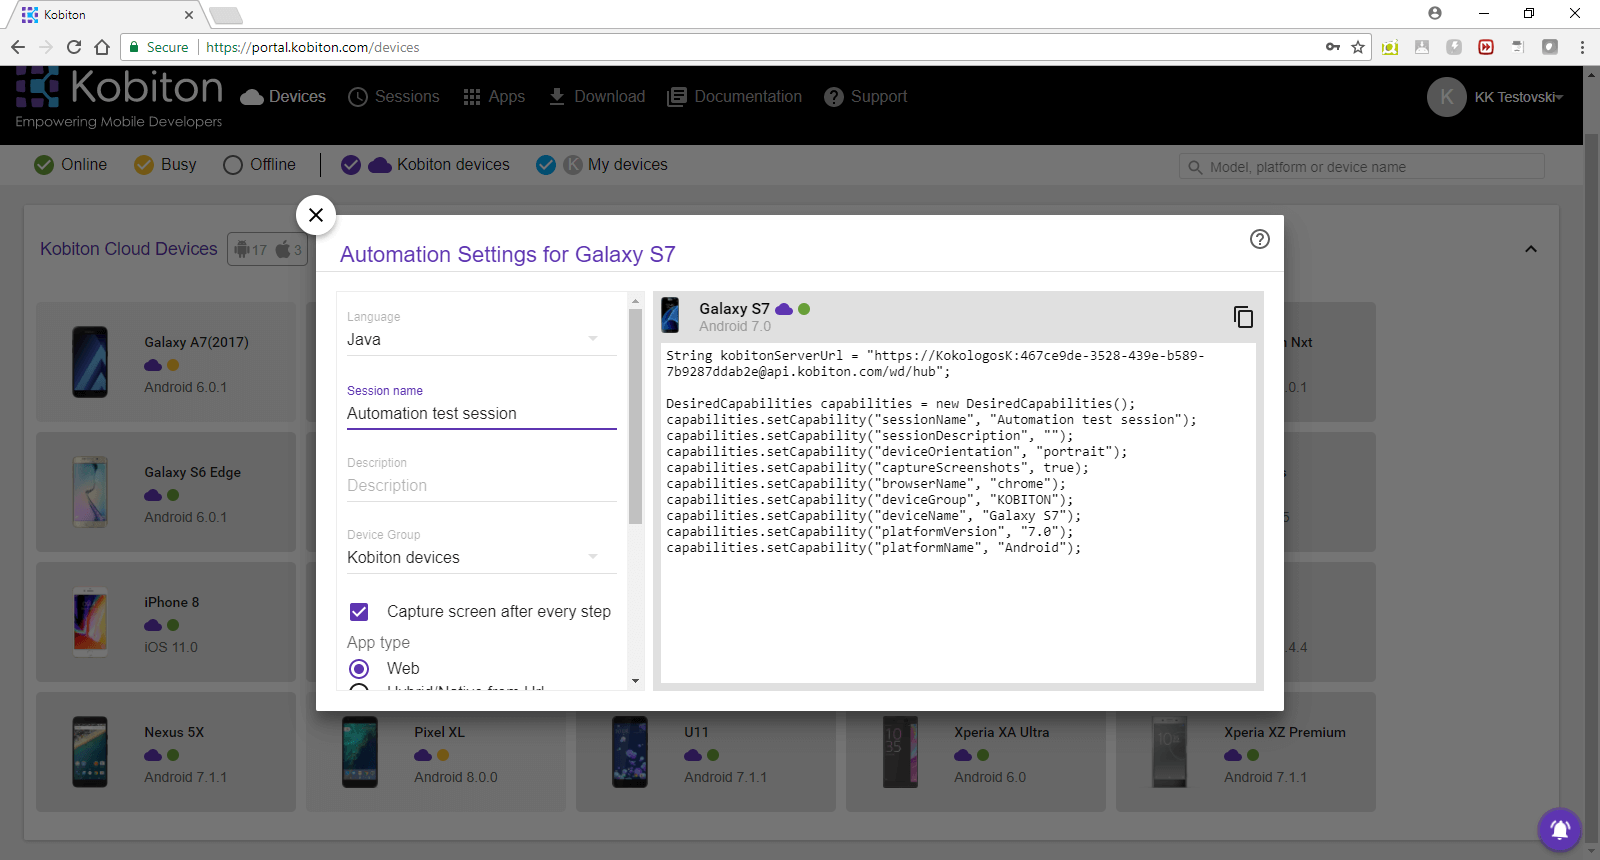
Figure 2. Automation Settings in Kobiton
We copy the Automation Settings from Kobiton and then add to the test.
Note that in a case of tests for native application we must add app, appPackage and appActivity capabilities. The value of app capability is generated by Kobiton after uploading the application under test.

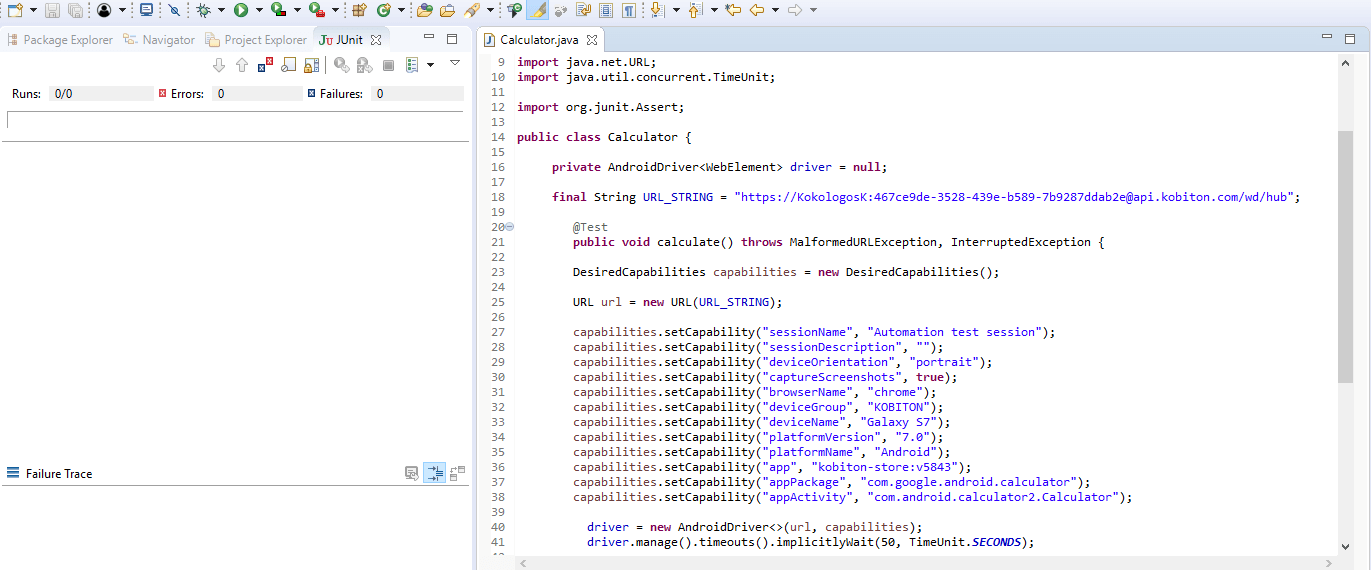
From Eclipse, we run the project/tests as JUnit tests. After the test has finished, we navigate back to Kobiton and go to the Sessions page. On the Session page can be found all details from the current and previous test runs with the statistics.
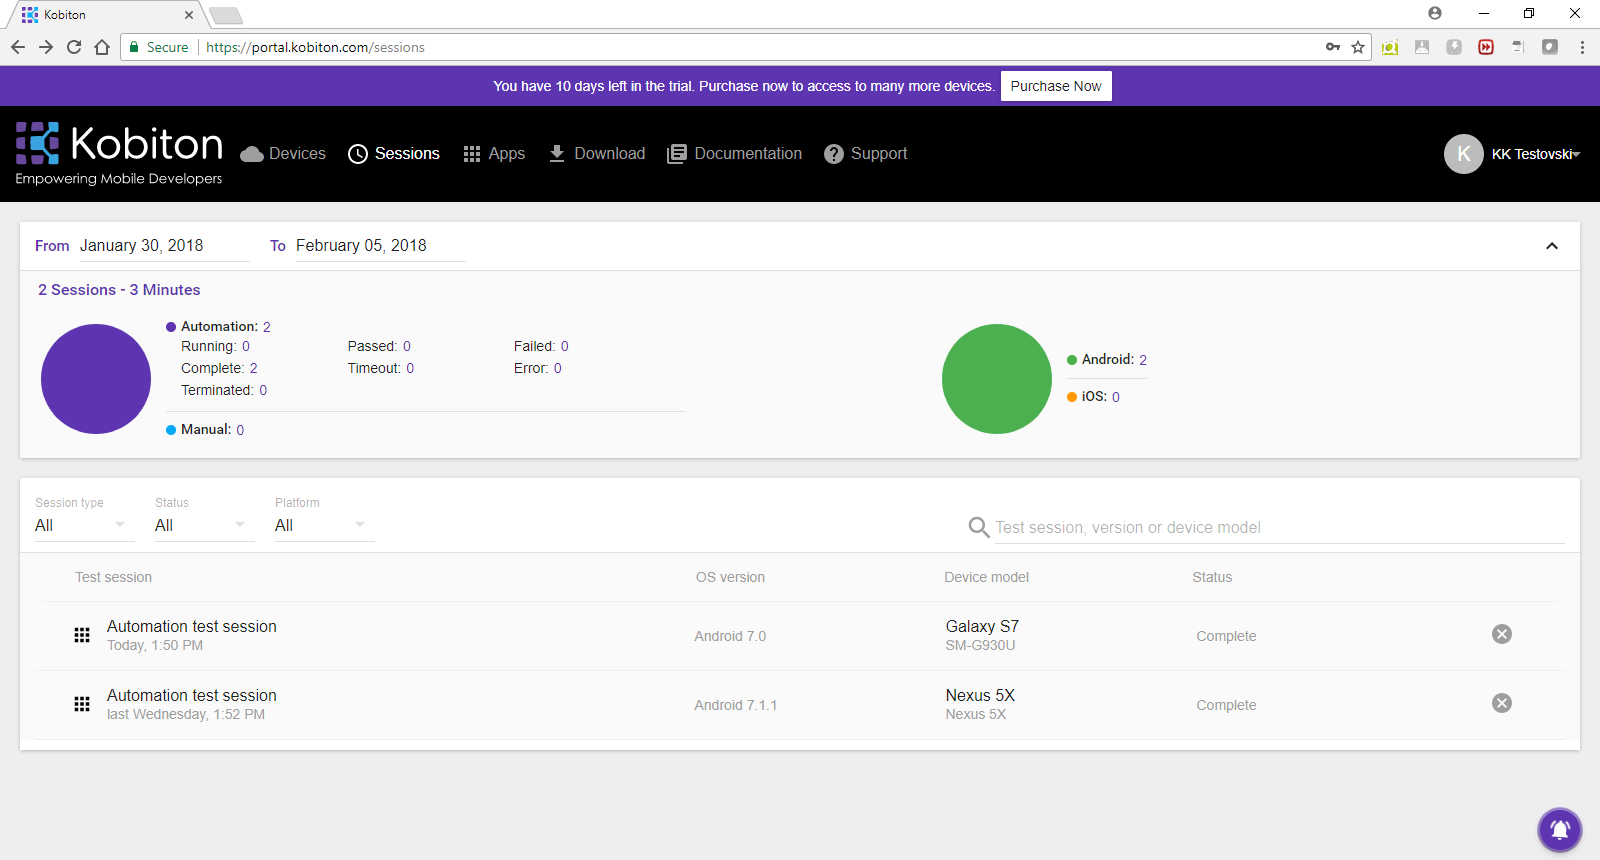
If we want to see results from a particular test run, we click on one of the listed test sessions and under Session Overview tab there is information about the test duration, the device on which test was executed and the application under test.

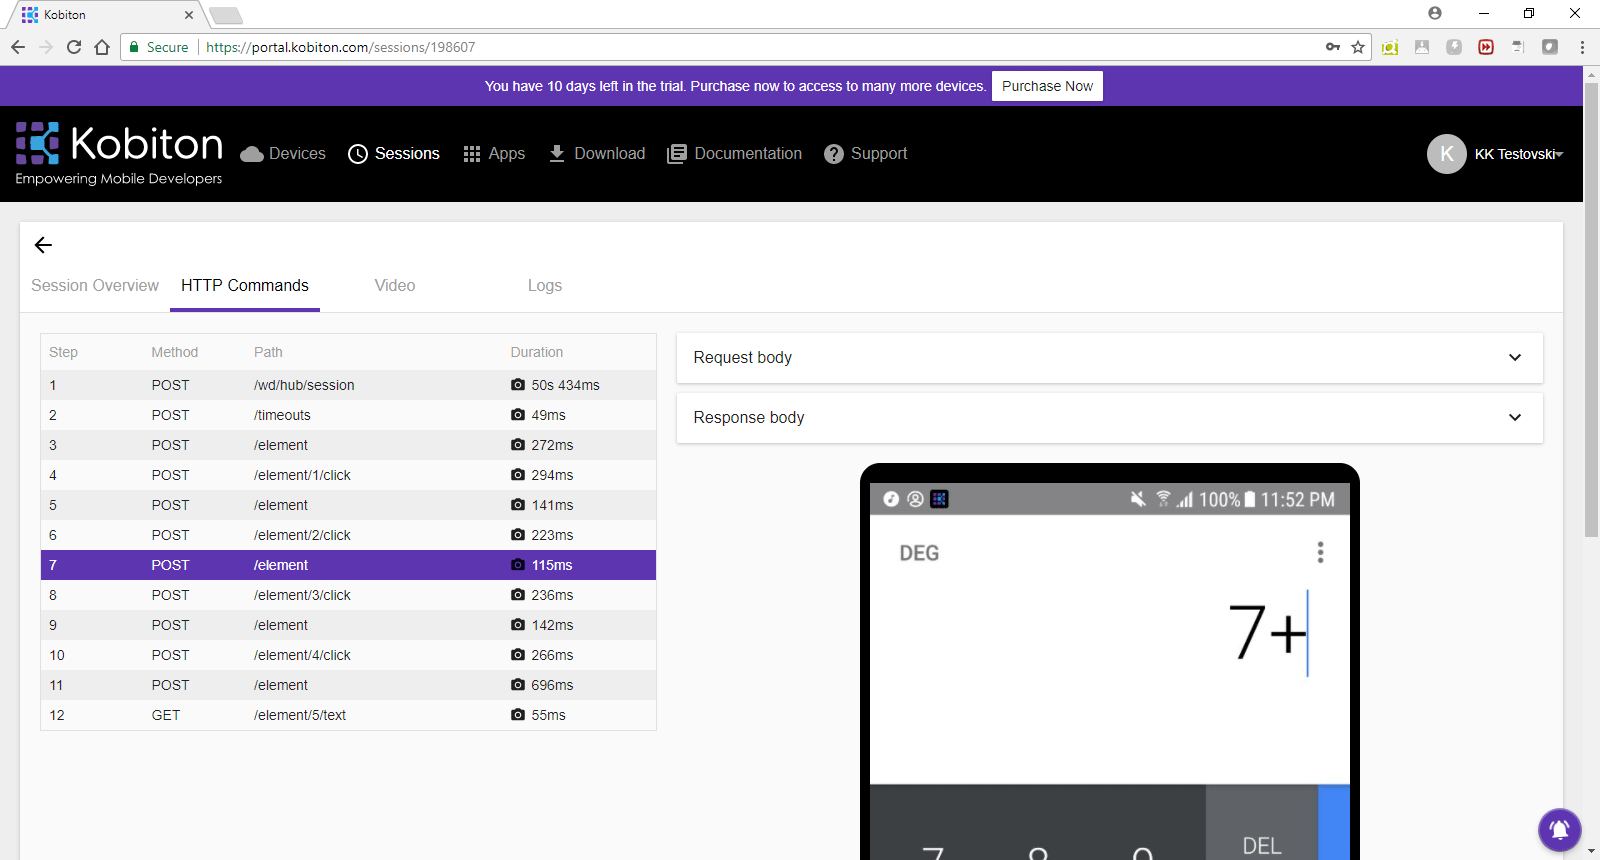
All test actions in the form of HTTP requests/responses, as well as screenshots for each test action can be found under the HTTP Commands tab.
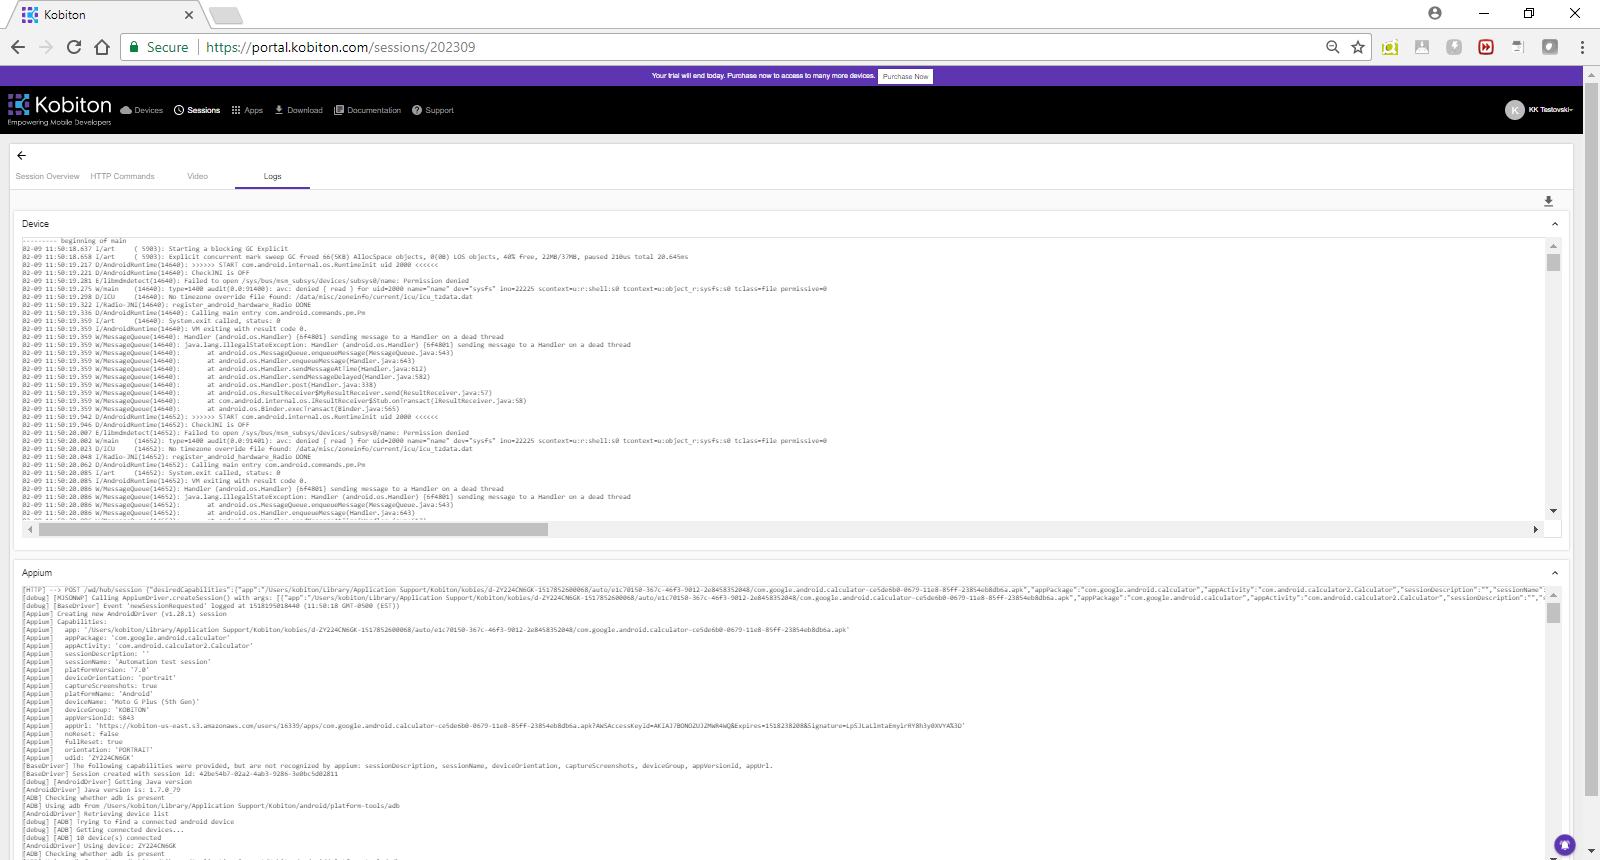
The video tab contains video from the test execution, while Logs tab contains device logs on OS level, but also Appium logs of test execution. In addition, Kobiton has the feature of downloading screenshots, video and logs locally.
Jenkins integration
Jenkins job that will trigger test execution on Kobiton can be done by building tests with batch command, Maven or Apache Ant. The configuration of Ant is described below.
Define project name, base directory and set variables which will be used later
<project name="JUNIT" default="main" basedir=".">

<property name="src.dir" location="src" />
<property name="test.dir" location="src/tests" />
<property name="build.dir" location="bin" />
<property name="build.test.dir" location="bin/tests" />
<property name="test.report.dir" location="testreport" />
Define the classpath which includes the junit.jar, related appium and selenium jars
<path id="junit.class.path">
	<pathelement location="dependency-jars/ant-junit.jar"/>
	<pathelement location="dependency-jars/selenium-android-client-2.0a7.jar"/>
	<pathelement location="dependency-jars/selenium-android-driver-2.39.0.jar"/>
	<pathelement location="dependency-jars/other/appium-1.1.jar"/>
</path>
Delete the existing build, docs and destination directory from previous build and create new ones for the new build
<target name="clean">
	<delete dir="${build.dir}" />
	<delete dir="${test.report.dir}" />
</target>

<target name="makedir">
    <mkdir dir="${build.dir}" />
    <mkdir dir="${build.test.dir}" />
    <mkdir dir="${test.report.dir}" />
 </target>
Compile the Java code including the usage of the library for Junit
<target name="compile" depends="clean, makedir">
	<javac srcdir="${src.dir}" destdir="${build.dir}" includeantruntime="false" includejavaruntime="false"><classpath refid="junit.class.path" />
	</javac>

	<javac srcdir="${test.dir}" destdir="${build.test.dir}" includeantruntime="false" includejavaruntime="false"><classpath refid="junit.class.path" />
	</javac>
</target>
Execute Junit tests and generate the report of the results
<target name="junit" depends="compile">
	<junit printsummary="true" showoutput="true" haltonfailure="false" fork="no">
		<classpath refid="junit.class.path" />
		<classpath location="${build.dir}"/>
		<formatter type="xml" />
		<test name="tests.Calculator"/>
	</junit>
</target>
Configure Jenkins project
Configuring Jenkins job that will trigger test execution on Kobiton is a simple job, that builds Appium/JUnit test with Ant using the configuration described above.
To create a new Jenkins project, we click on New Item from the left panel on the Dashboard and from create New project page, we choose Freestyle project, enter project name and click OK.
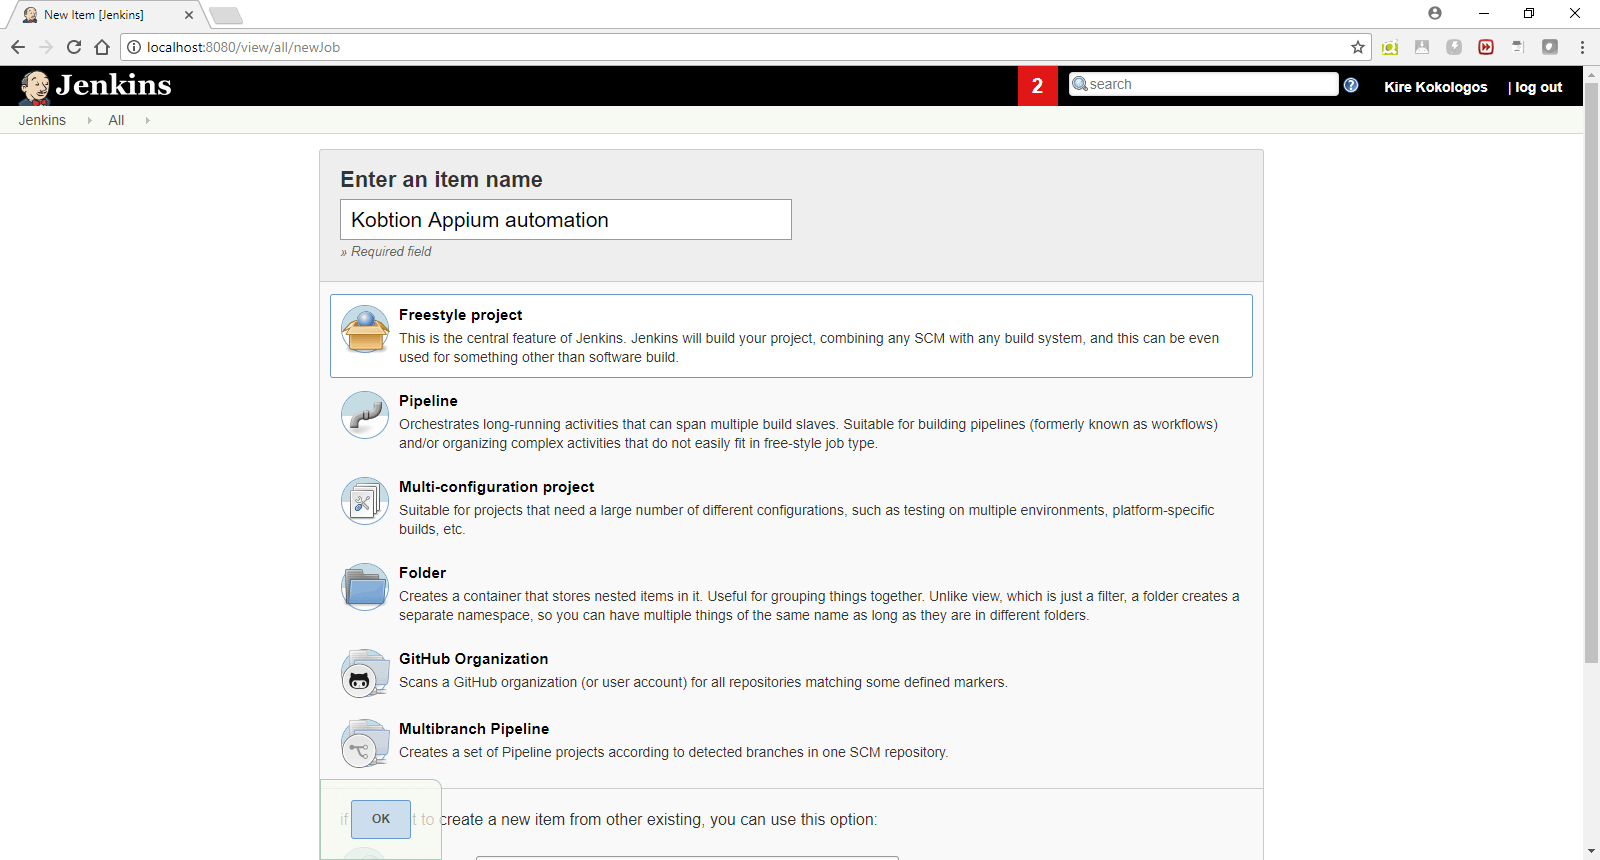
(Figure 9 – Creating a new project in Jenkins)
Moreover, we can specify the directory where the Eclipse project is located via the project configuration page under the General tab

(Figure 10 – Specifying Eclipse project location in Jenkins)
In the Build Environment tab, we click on the Add build step dropdown button and select Invoke Ant. In the Build File text field, we add the file name of the ant configuration file ex. “build.xml”.
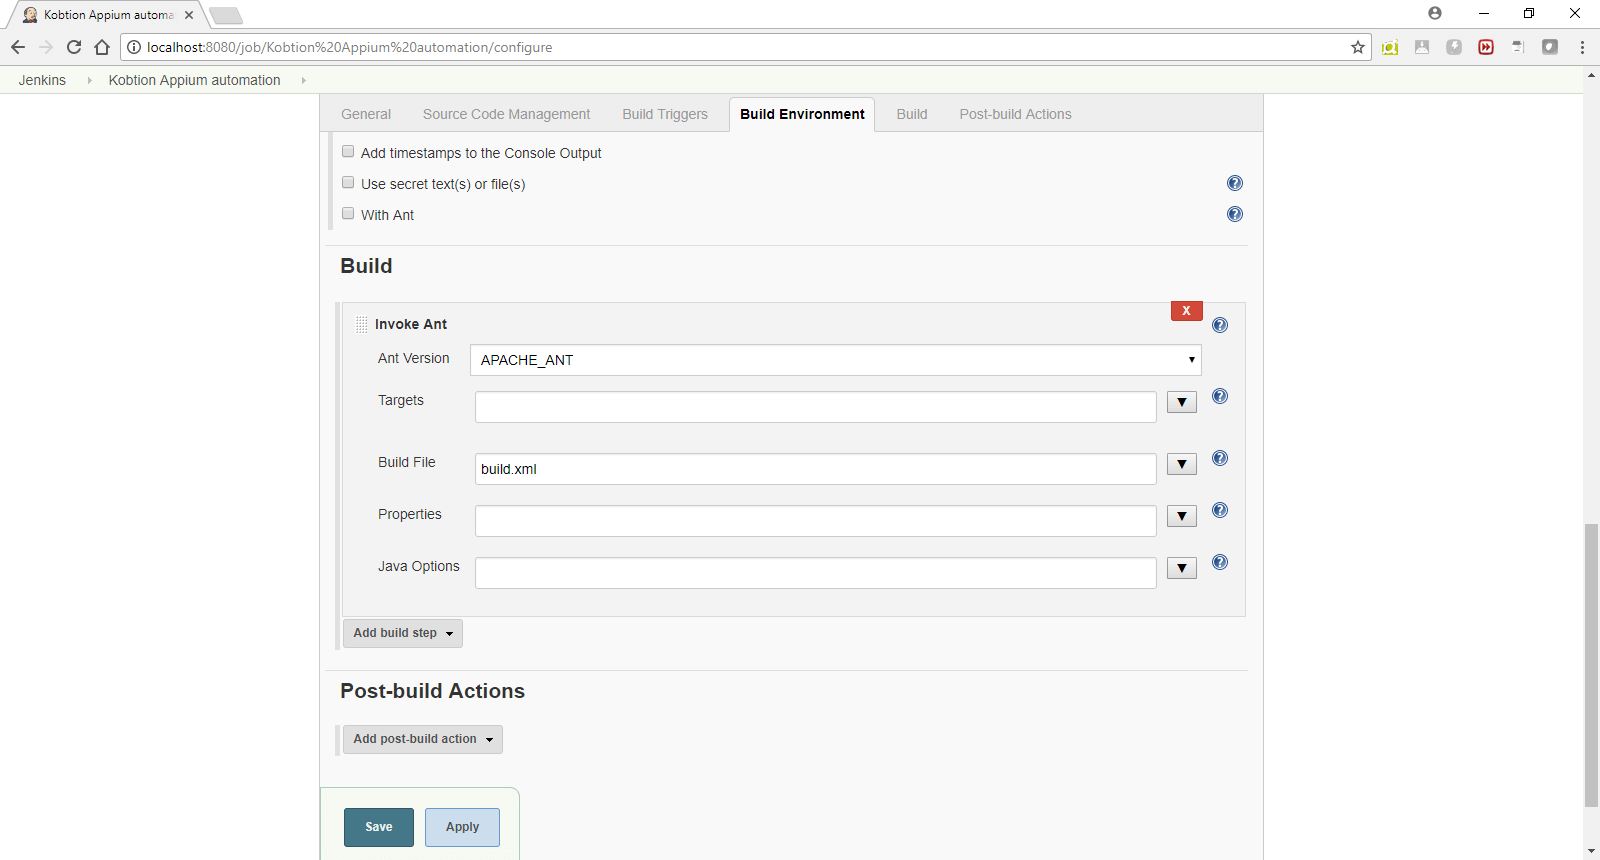
(Figure 11 – Configuring the build step in Jenkins)
In order for results from executed tests to be properly formatted Junit Plugin for Jenkins can be installed which consumes XML test reports generated during the builds and provides some graphical visualization of the historical test results. After installing the plugin we configure Post-build Actions in Jenkins project. Click on the Add post-build action drop-down button and select Publish Junit test result report. In the Test report XMLs text field add “TEST-<package name.test name>.xml” , where <package name.test name> is the name of the file of JUnit test results in XML format, as defined in the Ant build configuration, for ex. “TEST-tests.Calculator.xml”.
Finally, click the Save button and the Jenkins project is configured.
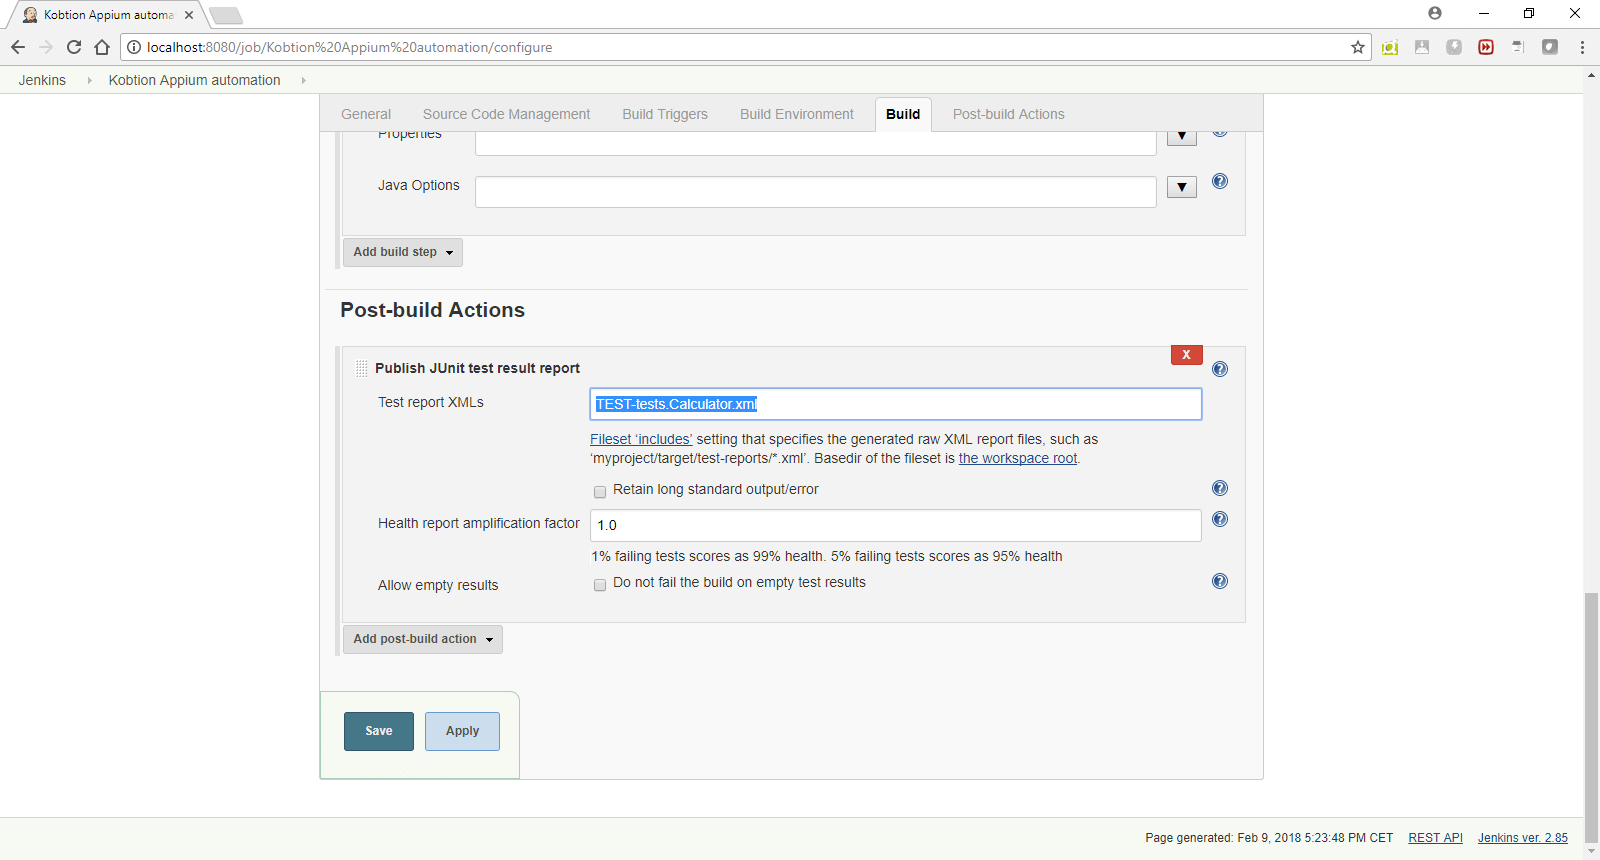
(Figure 12 – Configuring post-build Actions in Jenkins)
We start execution tests on Kobiton by clicking on Build Now. After the tests are executed, i.e. build is finished, we click on the build number from the left-down panel. Finally, in order to see the test results, we click on the Test Results link and the report of the results will be displayed.
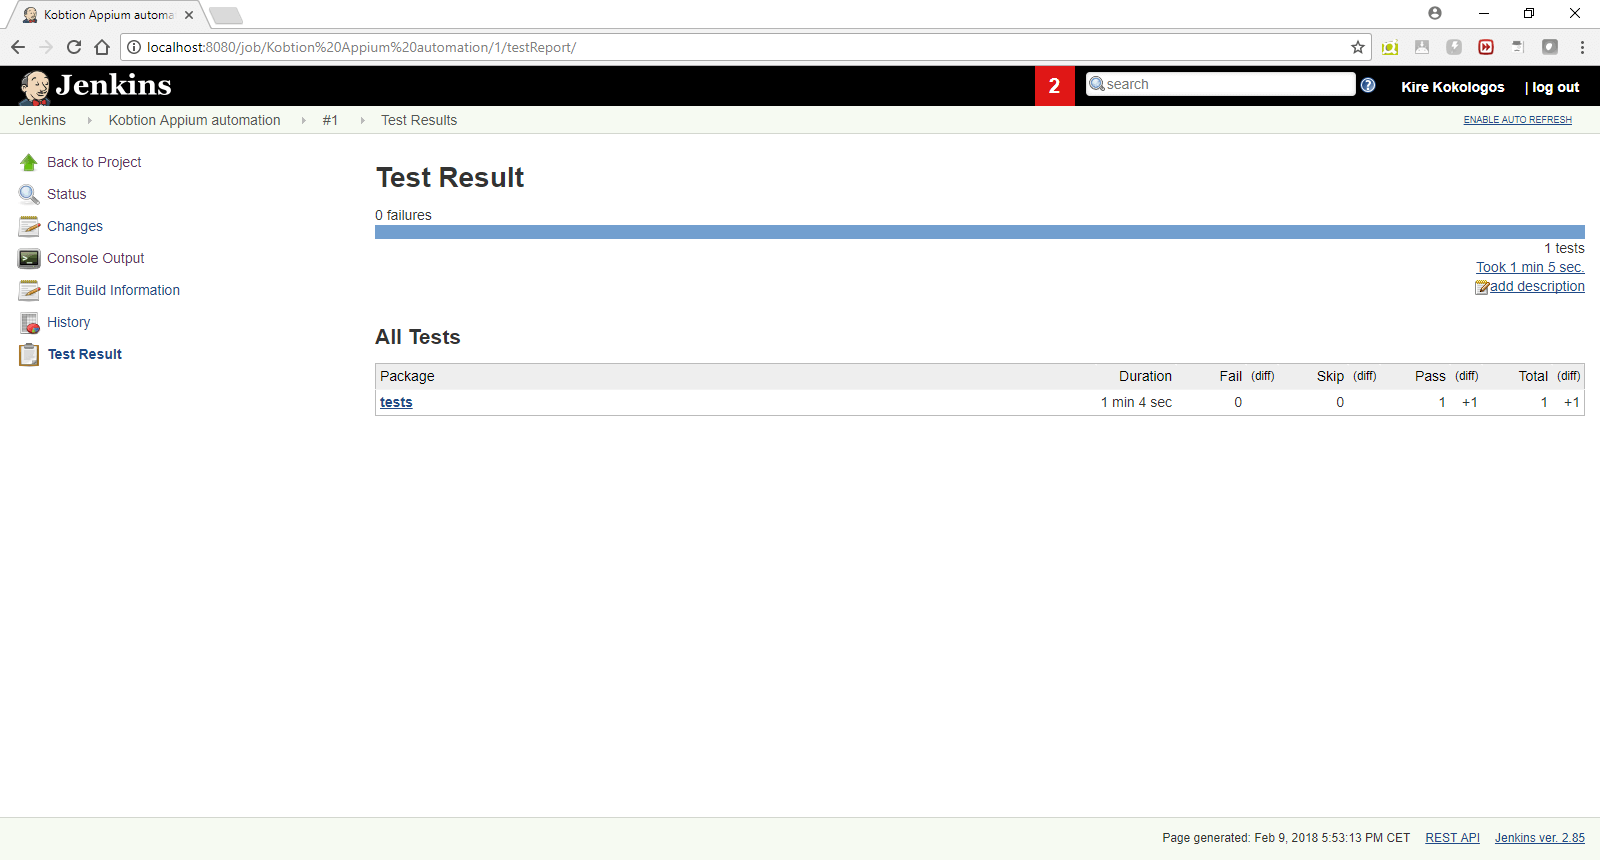
(Figure 13 – Test results from executed tests on Kobiton in Jenkins)
Conclusion
Kobiton is a mobile device farm platform that enables automated or manual execution on real devices that is increasing in popularity. As main advantages, among others, is that it supports devices with the latest Android or iOS versions, has very good logging capabilities including Appium logs of test execution, and finally very easy configuration of your Appium-JUnit tests for execution on Kobiton real devices.