
In today’s digital landscape, where software has become the basis of businesses, the demand for quality and reliability has reached extraordinary heights. As organizations strive to deliver exceptional user experiences and stay ahead of the competition, the importance of robust backend API automation cannot be overstated.
The need for high-quality software has become a paramount concern as users have grown accustomed to seamless interactions, lightning-fast responses, and flawless performance. As a result, organizations are seeking ways to optimize their testing processes and ensure the reliability of their backend APIs, the foundation upon which their digital offerings are built.
Through digital transformation and fast-changing environments, organizations are embracing backend API automation with the tools and techniques necessary to meet the ever-increasing expectations for software quality.
By implementing backend API automation, organizations can unlock a multitude of benefits. The ability to automate repetitive test scenarios and perform comprehensive regression testing enables faster release cycles, reduces human error, and frees up valuable resources for more strategic initiatives. Moreover, automation allows for early detection of issues, providing developers with immediate feedback and empowering them to address potential pitfalls before they impact end-users.
Throughout this blog post, we will reflect on the importance of using the Postman open-source API testing tool and the most essential elements required to build a solid foundation for backend API automation success.
One of its key strengths lies in its ability to give and assert test results by defining the expected outcomes of the API requests and validating the responses. These powerful assertion capabilities enable you to verify various aspects of the API’s behavior, ensuring that it meets the desired specifications and requirements.
Parametrization is another remarkable feature. This flexibility enables a wide range of test cases, ensuring thorough validation of the backend APIs across various scenarios.
Furthermore, Postman offers seamless integration with Jenkins, a popular continuous integration and delivery (CI/CD) platform. By leveraging this integration, we can seamlessly incorporate our backend API automation into our CI/CD process. This enables automated execution of the Postman tests, ensuring that APIs are rigorously tested with every build and deployment. Moreover, Postman’s integration with Jenkins allows you to generate detailed HTML reports using the htmlextra Newman reporter, providing comprehensive insights into the test execution results and facilitating effective collaboration between teams.
Grouping Requests in Postman Collections
Grouping Requests in Postman Collections
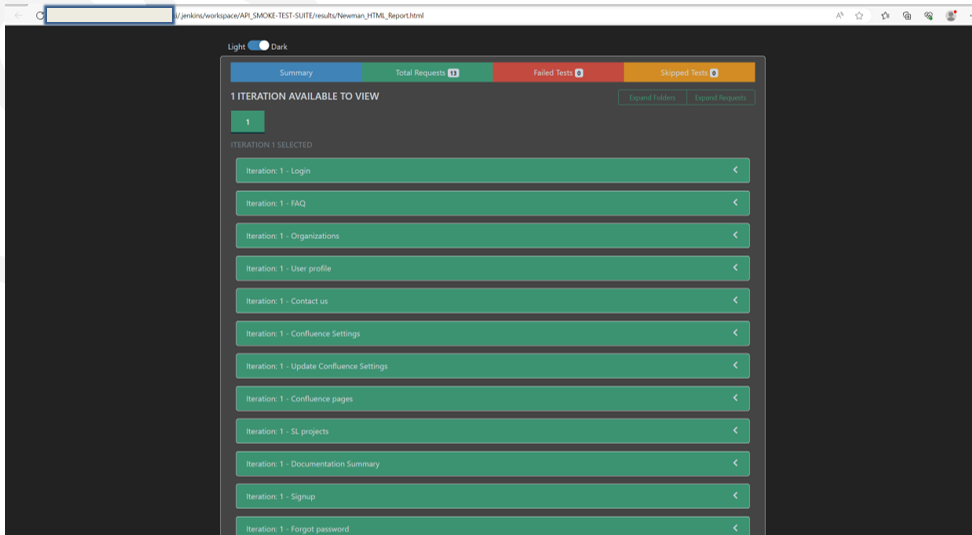
For this testing solution performed was Automated API Testing for all the REST APIs from the major functionalities of the Web Application under test in QA Environment with Postman API testing tool.
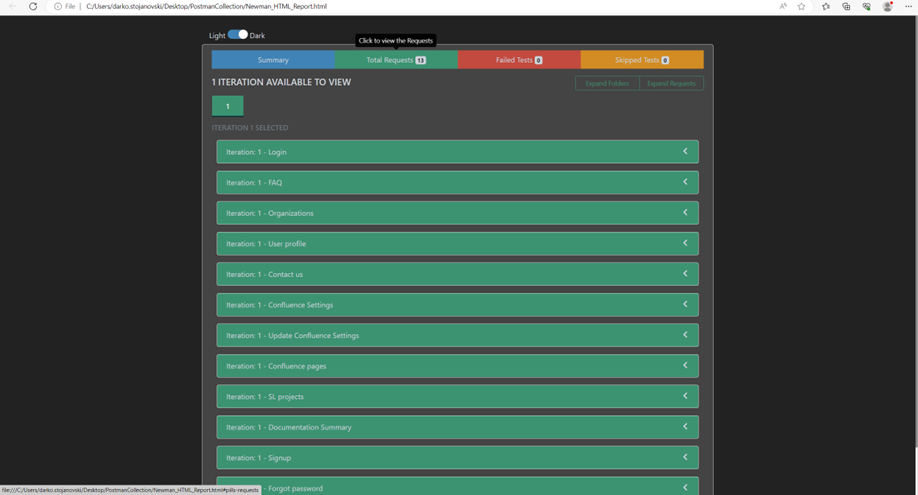
Smoke Test Suit was created with all the REST APIs for the major functionalities for the application under test that are grouped in one Postman collection.
What Is a Postman Collection?
Postman collection is nothing but a container or folder for storing Postman requests. In simple terms, it’s an aggregation of Postman requests. Collections play an important role in organizing requests belonging to the same application etc.
For example, if we are testing or validating a restful APIs for example 10 endpoints. Then, it makes sense to organize them in a collection that would make things like applying collection variables, import/export easier and could be run as part of a single collection.
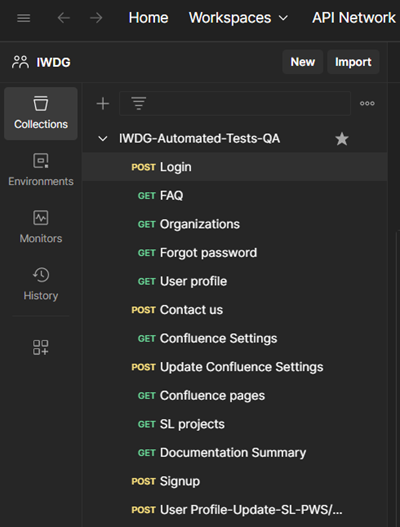
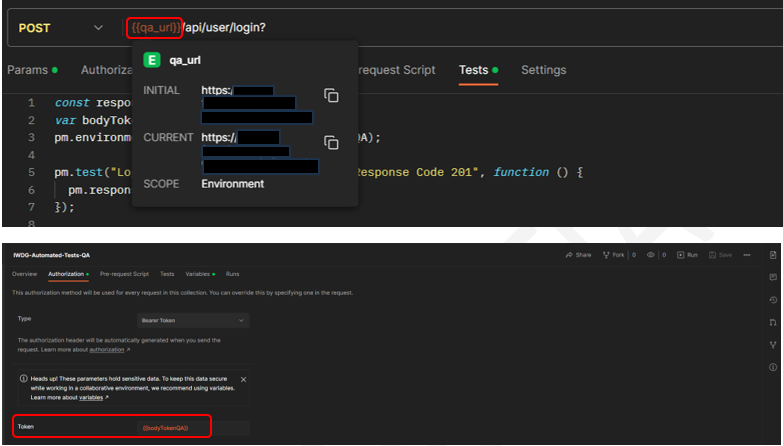
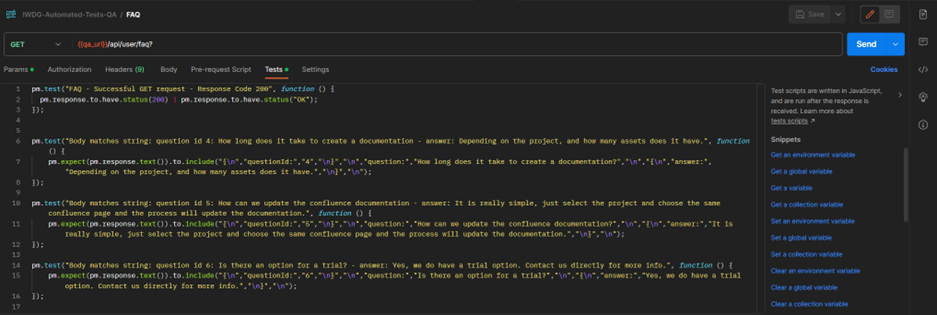
The APIs in the Postman collection were parametrized to be executed in sequential order starting from the first mandatory Login functionality.
When running the first API for the Login functionality an access token is generated and the rest of the APIs in the Postman collection are using that access token for the current test iteration.
Parametrizing Requests
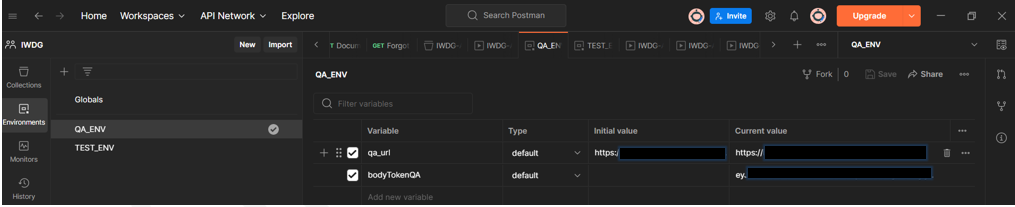
What is an Environment in Postman?
The APIs in the Postman collection were parametrized to be executed in sequential order starting from the first mandatory Login functionality.
When running the first API for the Login functionality an access token is generated and the rest of the APIs in the Postman collection are using that access token for the current test iteration.
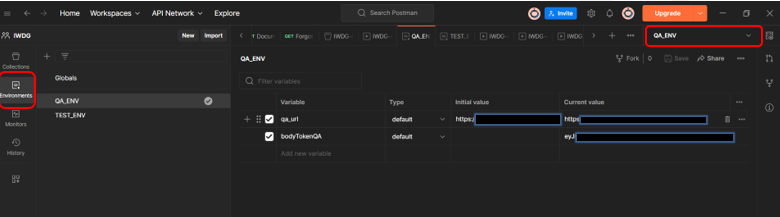
What is an Environment Variable in Postman?
A variable in the Postman is same as in any programming language. A variable is an entity whose value can be changed. The key part in the key-value set in environment is called variable. This variable can have any value and in place of the key we can use the variable name in every request.
When we choose an environment using the environment selector, Postman treats it as the active environment and runs all requests with values from that environment (if our requests are referencing environment variables).
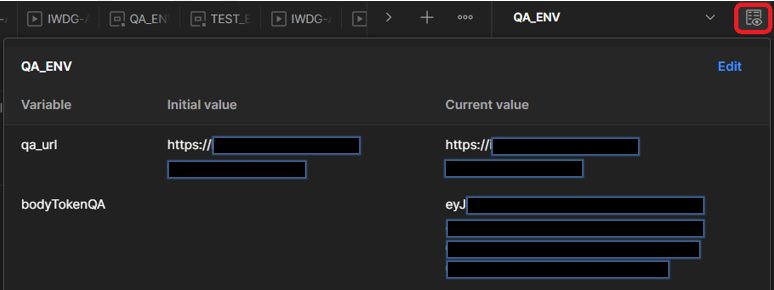
When using an environment variable value in a request or collection level, it should be referenced by its name, surrounded with double curly braces:
{{base_url}}
Scripting in Postman
Postman’s runtime is based on Node.js and enables adding dynamic behavior to requests and collections. We can use pre-request and test scripts to write API tests, build requests that can contain dynamic parameters, pass data between requests, and more.
When using Scripts in Postman we can add JavaScript code to execute during two events in the flow:
Before a request is sent to the server, as a pre-request script under the Pre-request Script tab.
After a response is received, as a test script under the Tests tab.
Setting environment variables from scripts
The environment variable values can be updated from the Pre-request and from the Tests scripts using (i.e. pm.environment) to set an environment variable in the active (currently selected) environment:

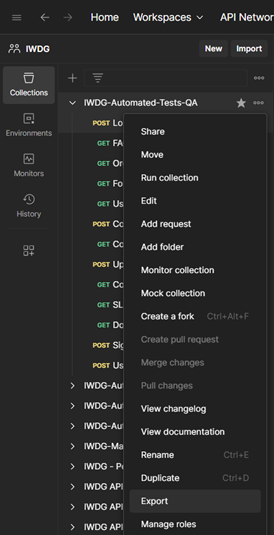
Exporting Collections
Postman can export data, including collections and environments, to be used outside of Postman. This is especially important when using Newman (their command-line collection runner).
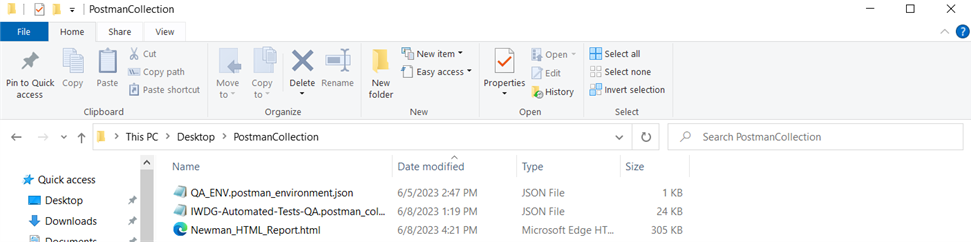
Export the Postman Test Collection JSON file to specific destination folder
- Select a collection to export in the workbench
- Select the more actions icon, then select Export to download the newly generated JSON file
Exporting environments
Export the Postman Environment JSON file to specific destination folder.
- Select an environment to export
- Select the more actions icon, then select Export to download the newly generated JSON file
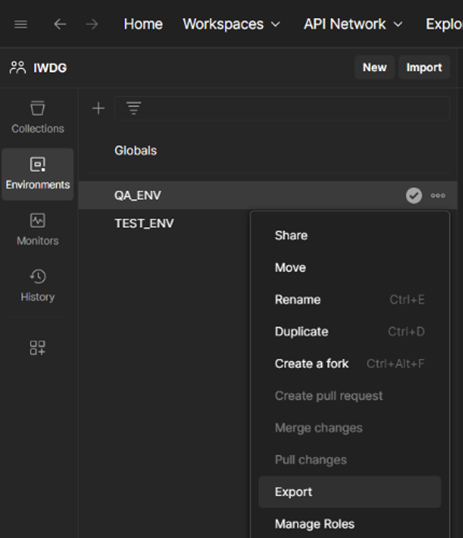
Postman Collection and Environment JSON files exported into the specific destination folder.

Automating Response Validation with Tests and Assertions
Writing tests
Tests confirm that your API is working as expected, that integrations between services are functioning reliably, and that any changes haven’t broken existing functionality. We can write test scripts for your Postman API requests in JavaScript.
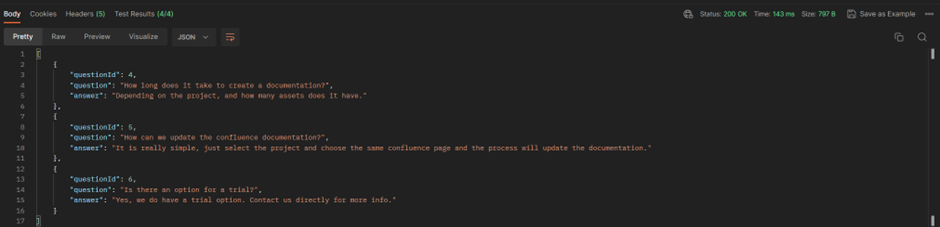
To validate the data returned by a request, we can use the pm.response object in a test. We can define tests using the pm.test function, providing a name and function that returns a Boolean (true or false) value indicating if the test passed or failed. To apply the force on the function parameters, we assert the predicted values during a test run with the actual values.
Validating responses with Assertions in Postman
Assertions help us to assert that expected and actual values should match during a test run. If the actual and expected values don’t match, then the test will fail with the output pointing to the failure. This is a powerful feature and could help to create some robust and fast integration tests thereby making regression for API endpoints easier. Below are a few examples of implemented tests with assertions. We can explore various assertions types from the Postman website.

Test Execution Process Workflow
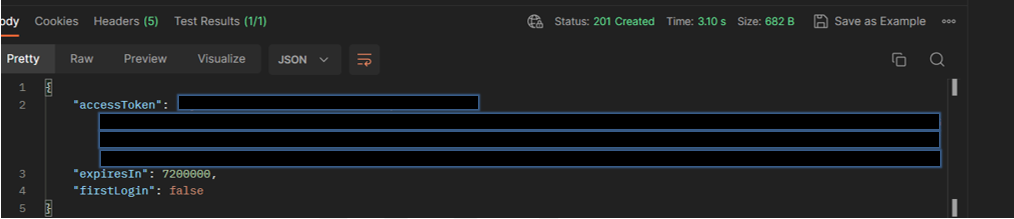
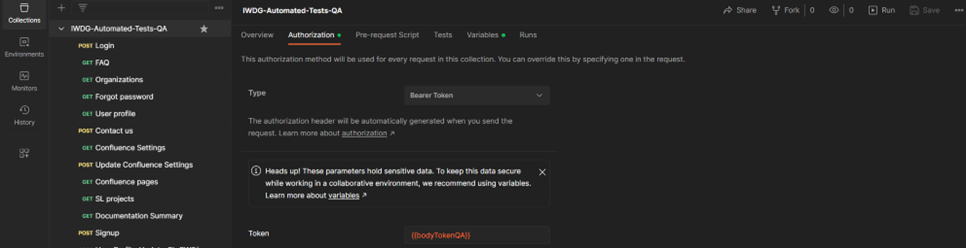
For the first Login functionality dynamic access token extraction was performed and the access token received from the response was stored as an environment variable (i.e. {{BodyTokenQA}}) for the mentioned QA Environment regarding the fact that the rest of the API’s from the Postman collection are using the same access token for the current test iteration.
For all the APIs in the Postman test collection we are using Authorization Type: Inherit auth from parent, which in our case is the environment variable (i.e. {{BodyTokenQA}}) value that we are fetching from the received access token for the Login API, and we are using it as collection level authorization.

Implementation of a Workflow
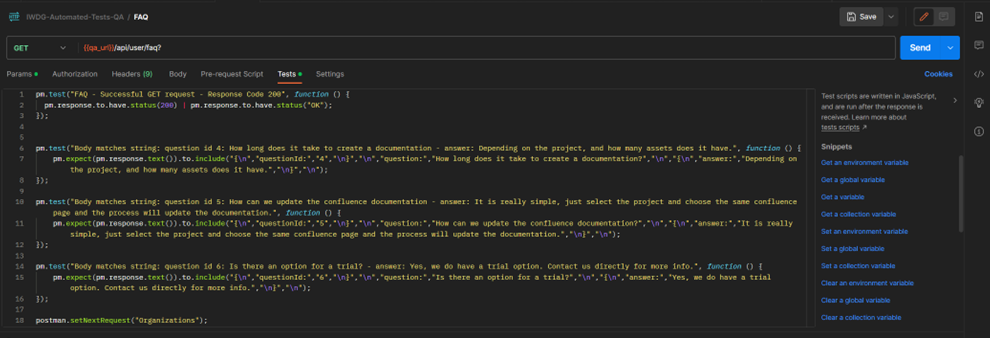
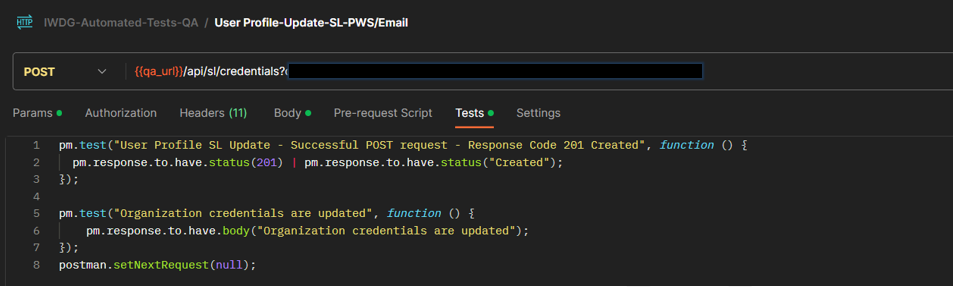
If we want to change the order of the request to be executed (for example, first the Login Request shall run, followed by FAQ, then Organizations Request until the last Request in the test collection). We have to take the help of the function postman.setNextRequest(“name of request”).
This function has the feature to state which request shall execute next. The request name to be executed next is passed as a parameter to this function.


Infinite Workflow Loop
The remaining APIs in the Postman Test Collection are configured using the same sequence order pattern hence the test execution flow will be the same for all the remaining APIs in the test collection.
If we want to stop the infinite Workflow loop via script, we have to add the script (i.e postman.setNextRequest(null)) for the last request in the Postman test collection.
Installing and running Newman
Newman is a command-line collection runner for Postman that allows a Postman collection to be effortlessly executed and tested directly from the command-line. It is built with extensibility in mind so that you can easily integrate it with your continuous integration servers and build systems.
To run Newman, ensure that Node.js >= v10 is installed on your system.
We can download the latest LTS version from the official Node.js website from the download section. We can verify the installation by running the following commands in terminal:
node -v
npm -v
Install Newman
The easiest way to install Newman is using NPM.
npm install -g newmanUsing Reporters with Newman
Reporters provide information about the current collection run in a format that is easy to both: disseminate and assimilate. Reporters can be configured using the -r or –reporter options.
Install htmlextra reporter package
npm install -g newman-reporter-htmlextraCommand-line Execution of Postman Collection Using Newman CLI
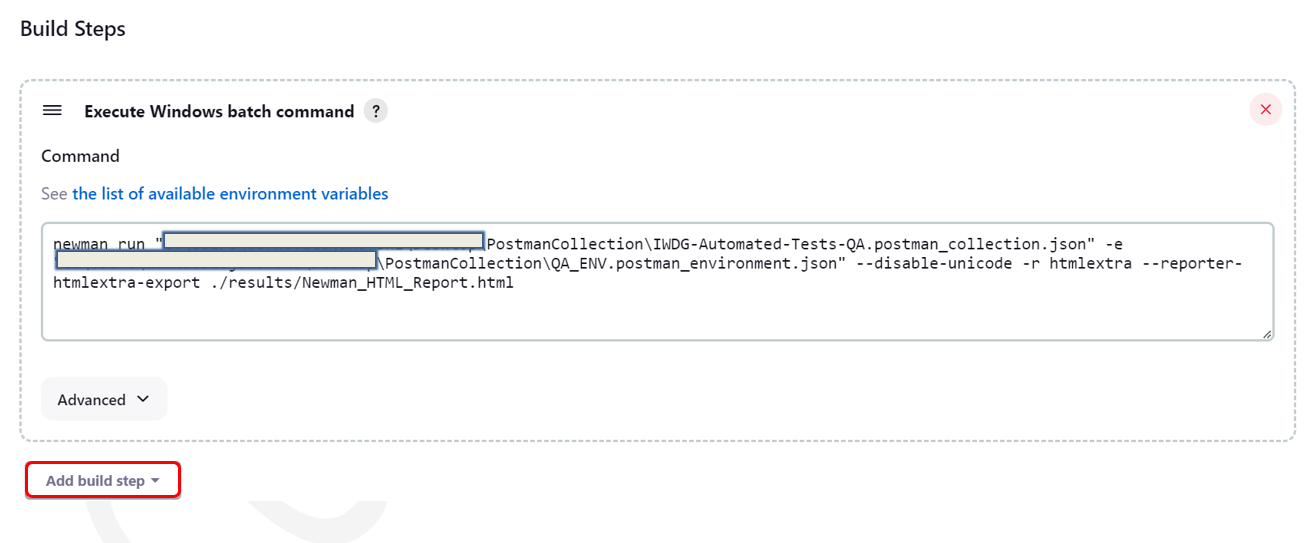
The Newman run command allows you to specify a collection to be run. You can easily export your Postman Collection as a Json file from the Postman App and run it using Newman.
newman run mycollection.jsonSpecifying the path for the HTML report
If not specified custom path directory for the test results, by default Neman creates newman local directory where all the files are stored that were created during the test run.
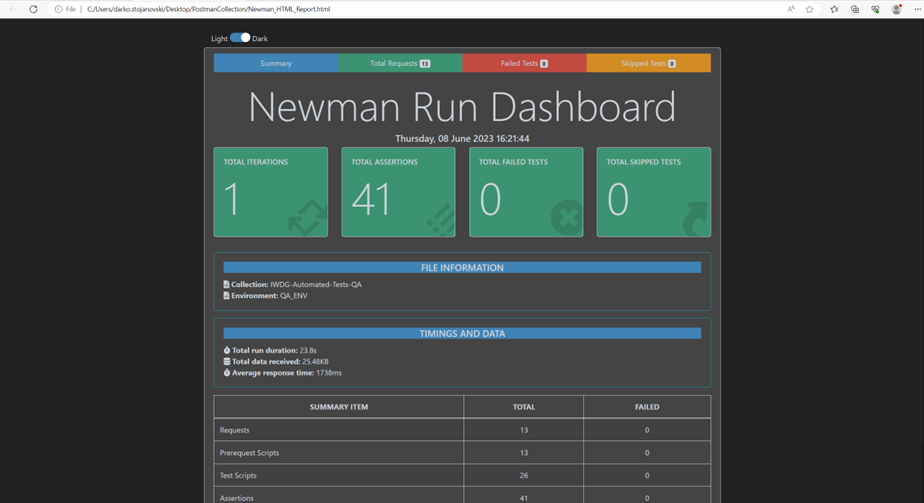
newman run mycollection.json -r htmlextra --reporter-htmlextra-export <path>Our collection uses environment variables hence the collection file will be executed together with the environment file using the -e flag and htmlextra report will be generated at the specified directory. We can see and explore all the run options which we can find using command newman run -h and same from the official newman website.
new man run "myCollectionFolderNamePath/IWDG-Automated-Tests-QA.postman_collection.json -e "myEnvironmentFolderNamePath/QA_ENV.postman_environment.json" -r htmlextra --reporter-htmlextra-export ./myResultsFolderNamePath/Newman_HTML_Report.html.htmlReport generation using Newman
Integrating the Htmlextra Newman report with Jenkins CI/CD
What are reports in Jenkins?
Reports are basically structured and graphical way to produce the execution results of tests.
Reports are very important when it comes to reporting and analyzing the test results from various perspectives including management, stakeholders as well as other team members who have less technical knowledge so they can easily understand the success ratio of the test scripts, and based on that, they can analyze the quality of the test scripts as well as the product.
The Jenkins reporting capabilities majorly depend on third-party plugins. So, we need to install and configure compatible plugins for the same whatever the report’s expected format.10.1
1. Installing the required plugins in Jenkins CI/CD
To install a plugin in Jenkins, follow the simple steps:
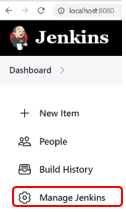
- Jenkins exposes an interface at http://localhost:8080.
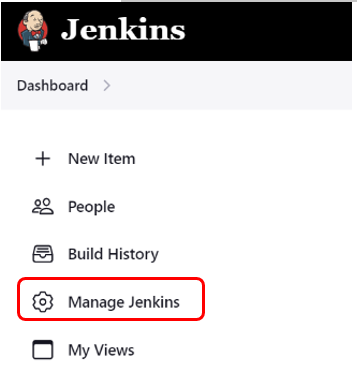
- Click on Manage Jenkins in the Jenkins Dashboard
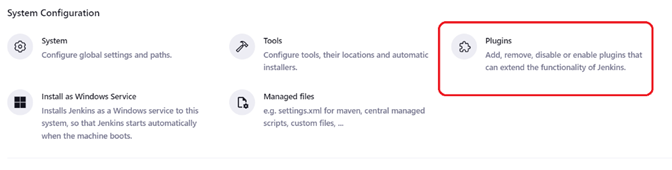
- Click on Manage Plugins
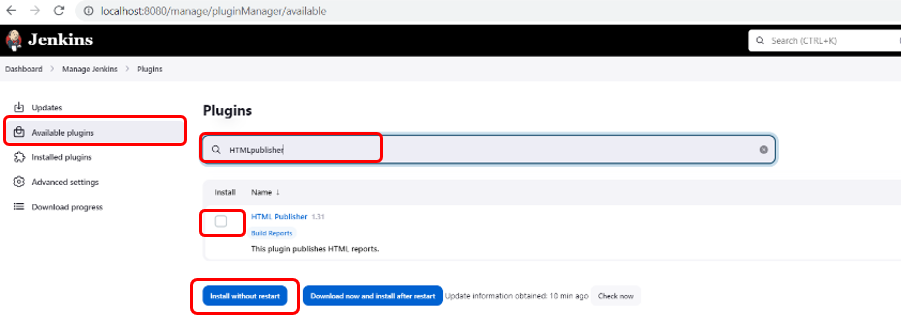
- Search & check the HTML Publisher plugin and click Install without restart
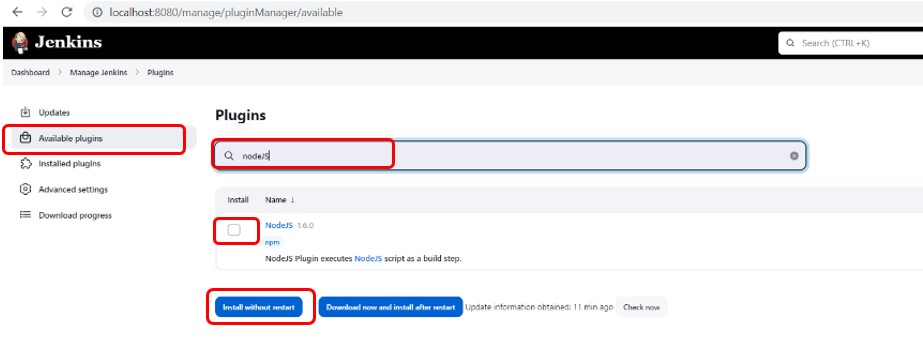
- Search & check the NodeJS plugin and click Install without restart
2. Configuring NodeJS in Jenkins
After the plugin installation is finished, we must configure the NodeJS in Jenkins.
Setting NodeJS on Global Level in Jenkins CI/CD:
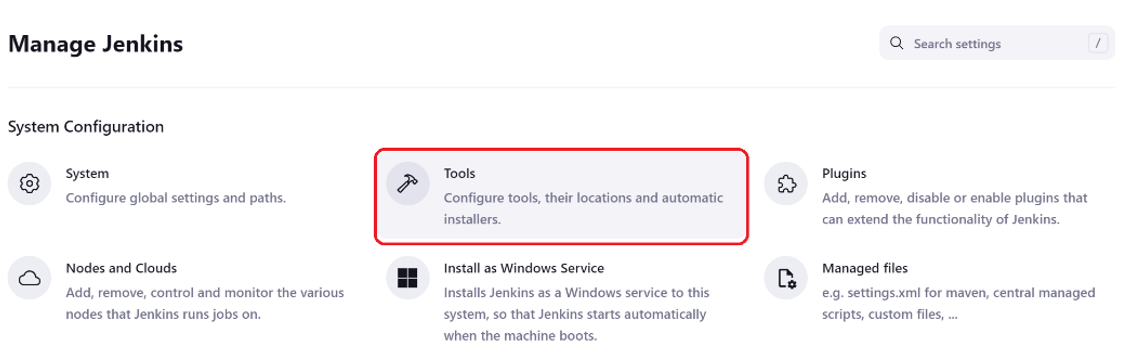
- Click on Manage Jenkins from the Jenkins Dashboard
- Click on Tools option
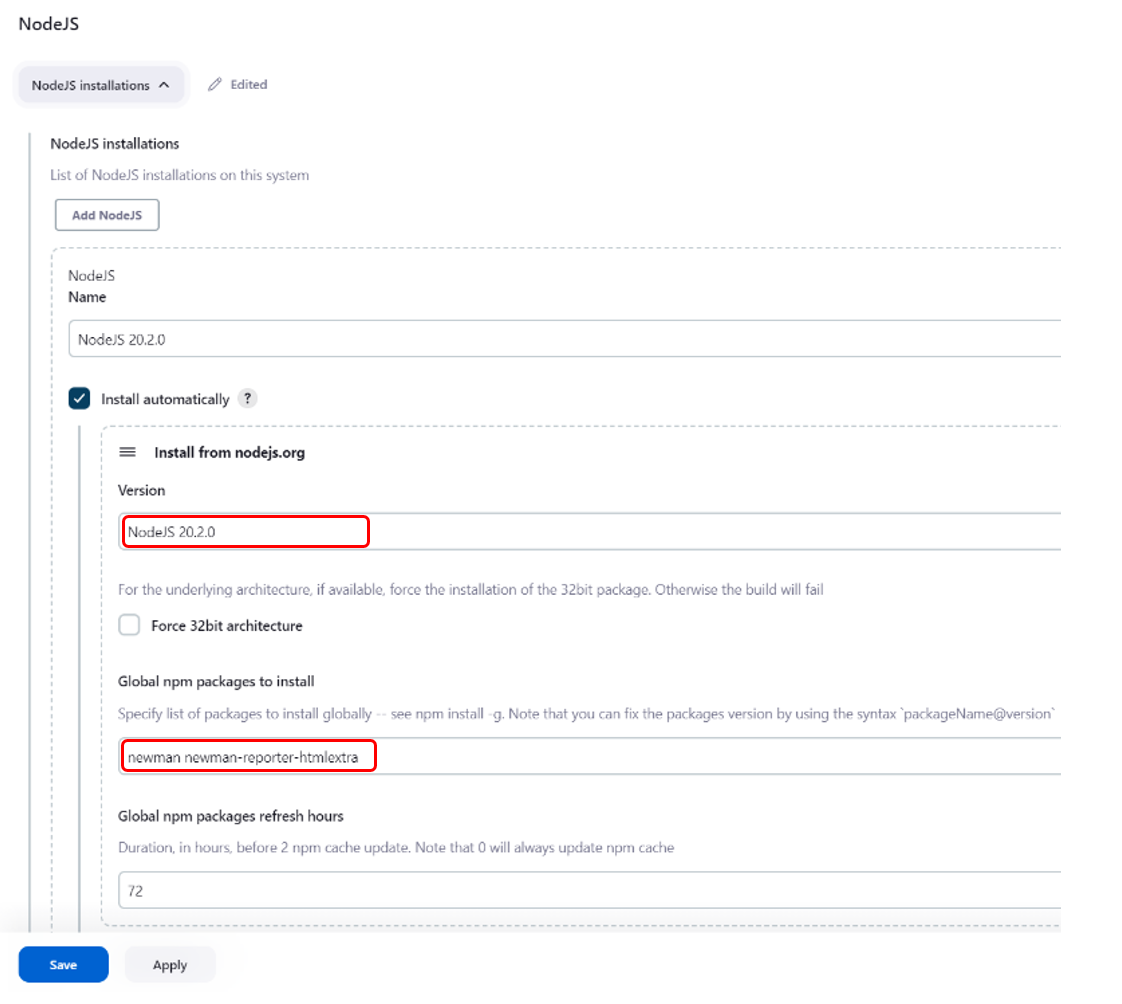
- Scroll down to Nodejs select the “Add NodeJS”. Under the NodeJS section select the latest NodeJS version and enter the newman and the newman-reporter-htmlextra, npm libraries and click on Save button
3. Build Job Configuration
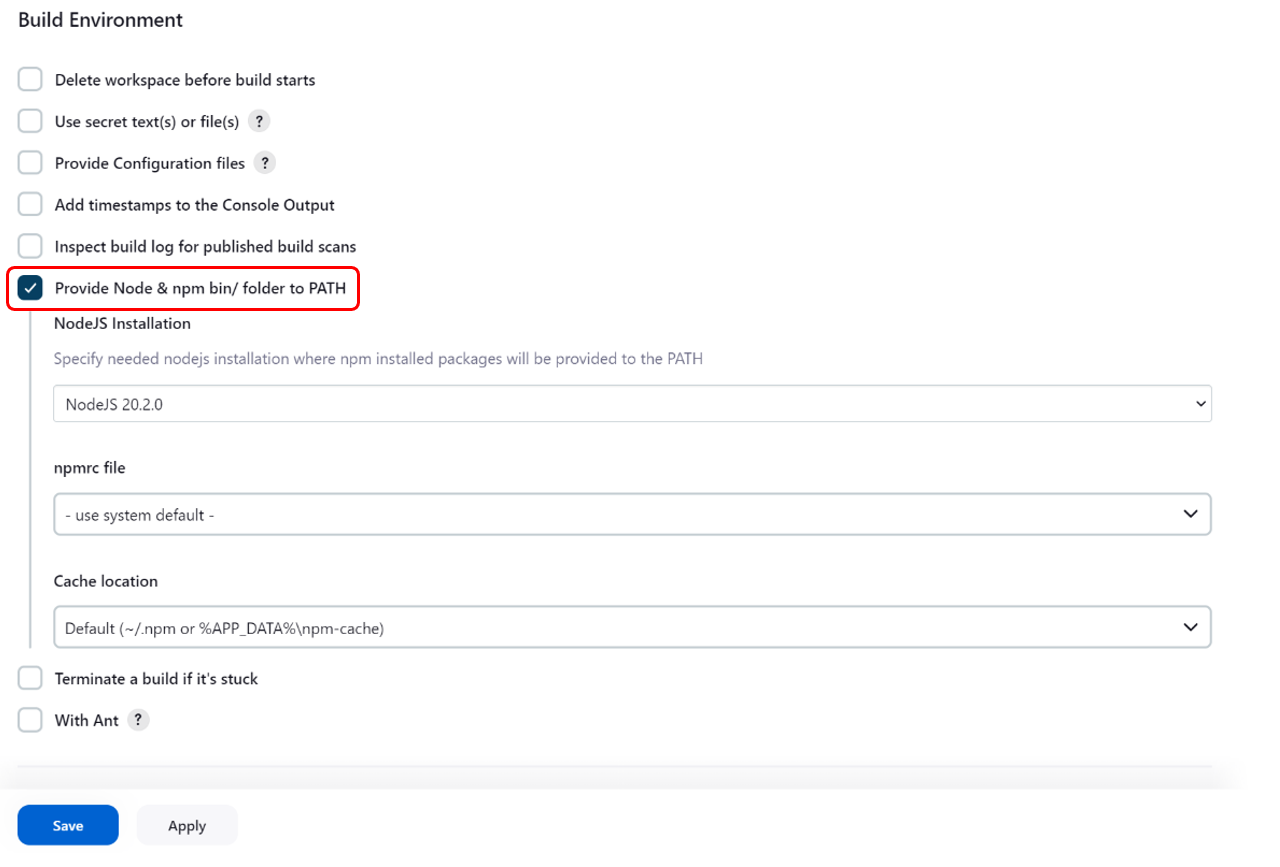
3.1 Setting the NodeJS Build Environment
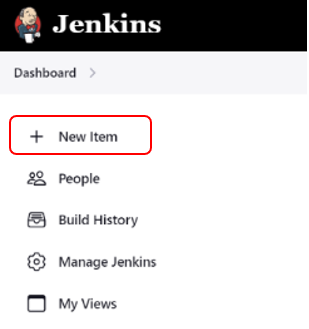
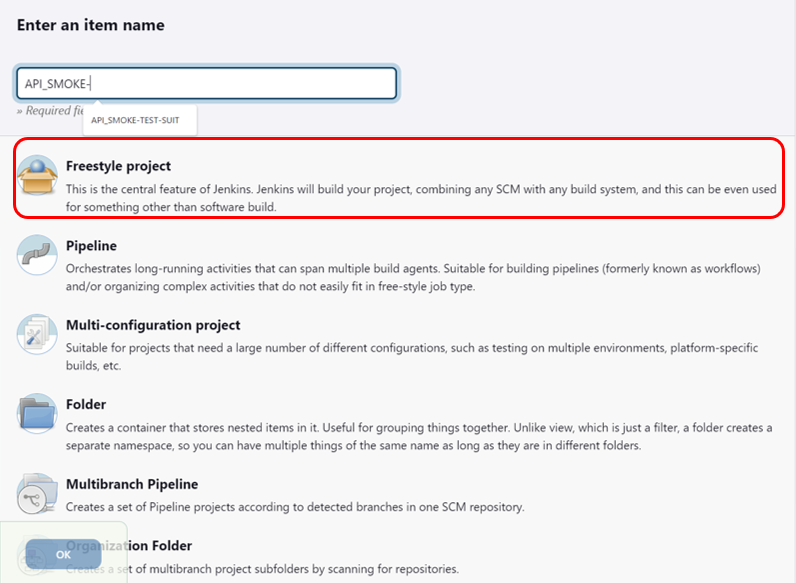
- Create a new job by clicking on the “New Item” link from the dashboard
- Select a “Freestyle Project” from the options and name your project
- From the Build Environment section check the option Provide Node & npm nib/folder to PATH and select the latest version of NodeJS that comes from previously global setup
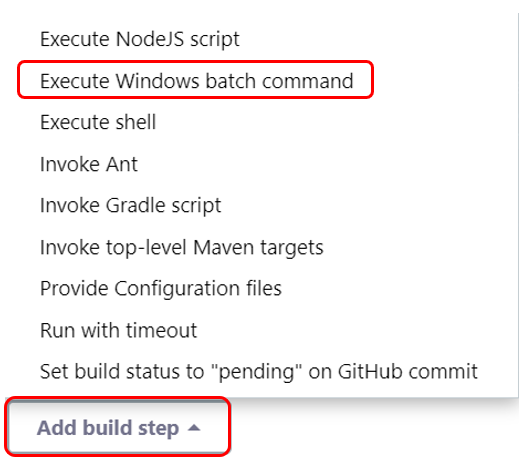
3.2 Setting Run Batch Command
From the current Jenkins Job, we need to run the batch command in the Jenkins. A batch command is a command that is run in the shell of your system like command prompt in Windows.
- Click on Add build step and select Execute Windows batch command option
How to specify the path to save Newman report on Jenkins?
To mention the directory to save the report, type the following in the continuation of above command:
4. How to Publish the Jenkins HTML Reports for Newman?
Setting Post-build Commands
- Click on Publish HTML reports in the dropdown of Post-Build Actions
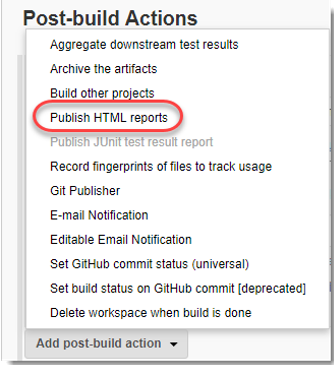
- A new panel will be added as soon as you click on Publish HTMl report and lick on Add button

- Write custom directory, index page and report title name of your choice and click on Save button

5. Email Notification Configuration in Jenkins CI/CD
5.1 Email Notification System Configuration in Jenkins CI/CD
Sending Email notification is crucial in the QA testing / CI/CD process for various events regarding if the build job has success or failure.
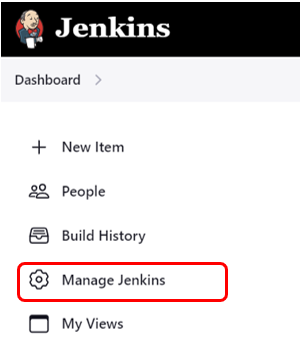
- Click on Manage Jenkins
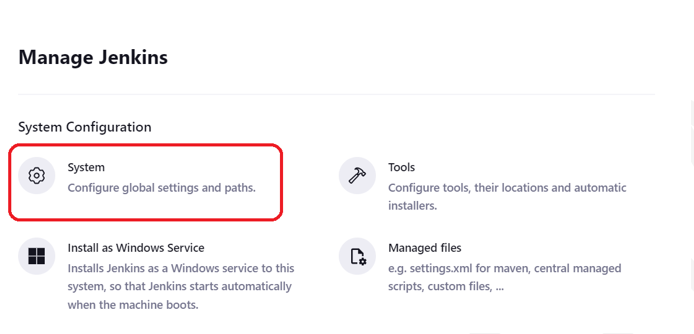
- Click on System
- Scroll to the Email Notification section
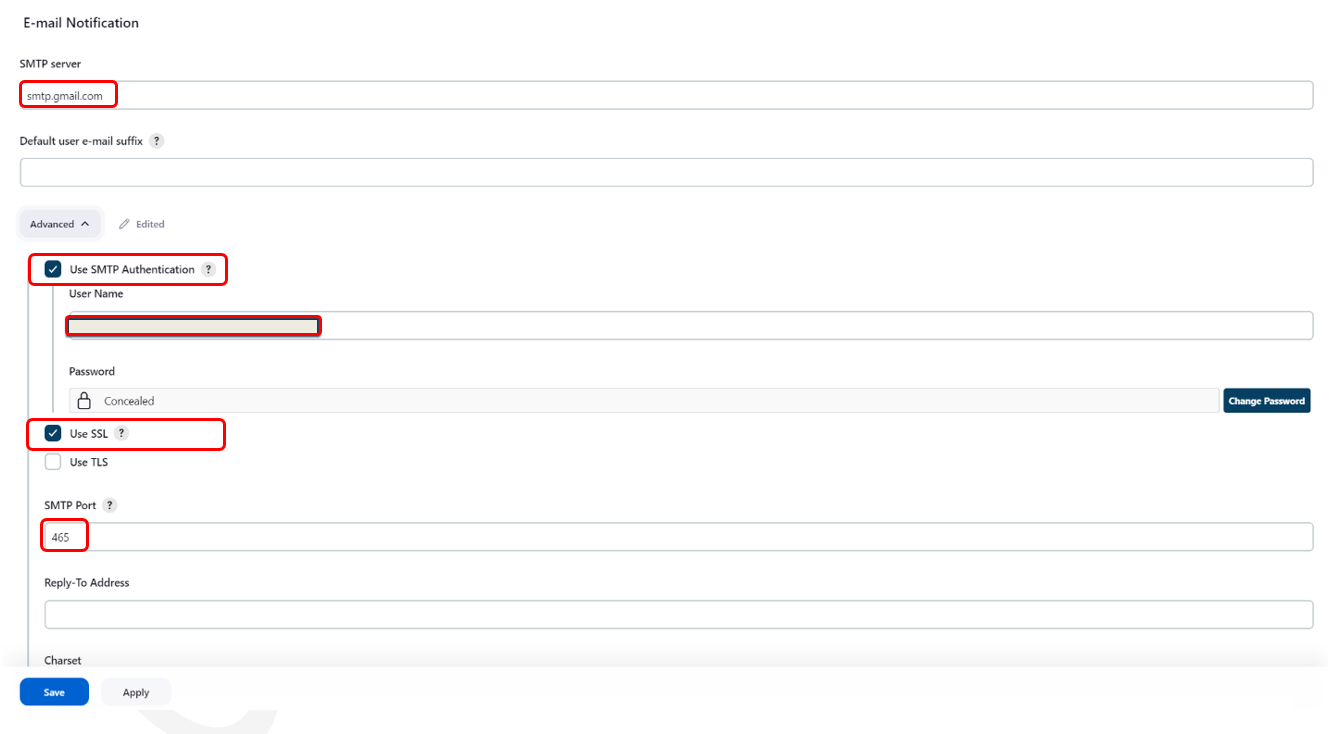
In our example we are using Gmail email client
- SMTP server: smtp.gmail.com
- Check option: USE SMTP Authentication andenter username/email and password
- Check option: Use SSL
- SMTP Port: 465
- Test the configuration and verify sent test email notification in the email sandbox
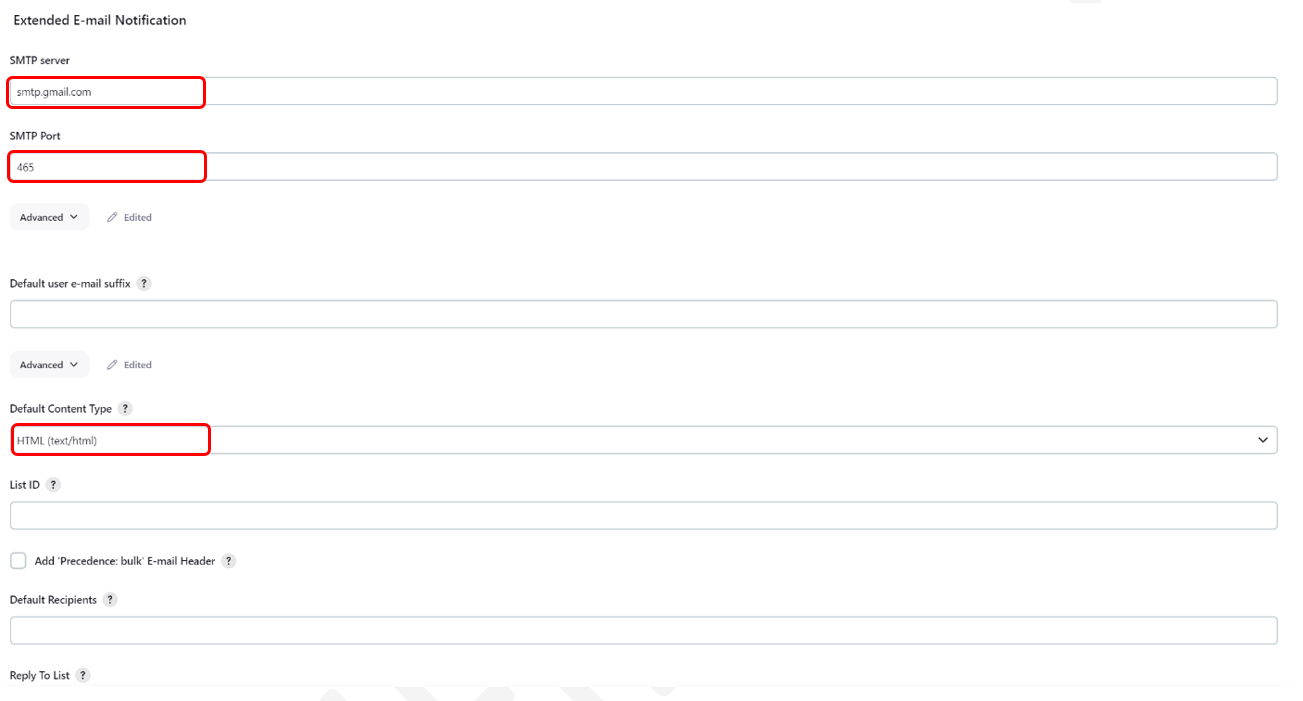
5.2 Extended Email Notification System Configuration in Jenkins CI/CD
Navigate to the Extended Email Notification section and configure the following settings:
- SMTP server: smtp.gmail.com
- SMTP Port: 465
- Click on Advanced button and enter username/email and password
- Default Content Type: HTML (text/html)
- Build Triggers: Always and Failed
5.3 Email Notification Configuration from the Jenkins build Job
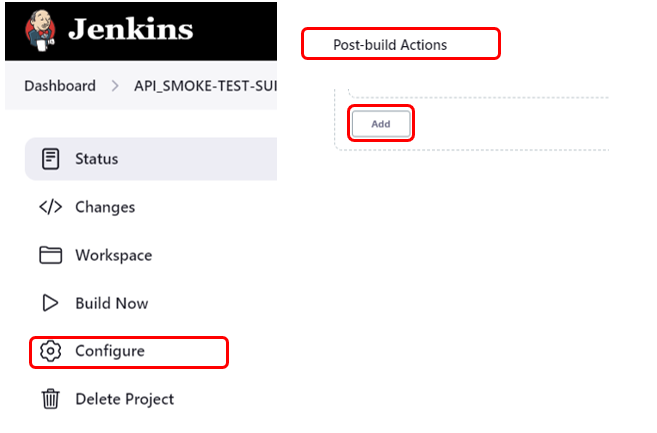
Post-build Actions – Editable Email Notifications
- Click on Configure from the Jenkins dashboard
- From Post Build Actions click on Add Button and select Editable Email Notifications
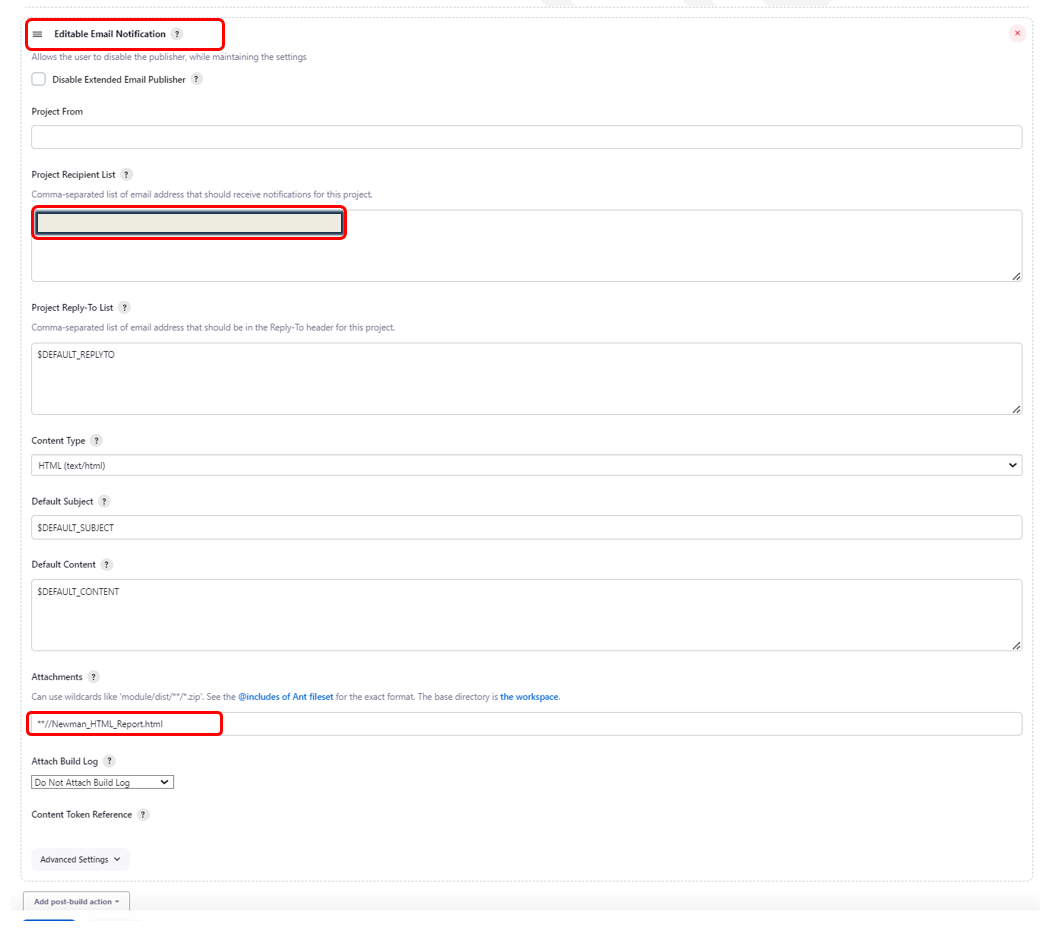
Configure the following settings:
- Project Recipient: enter the sending email address
- Default Content Type: HTML (text/html)
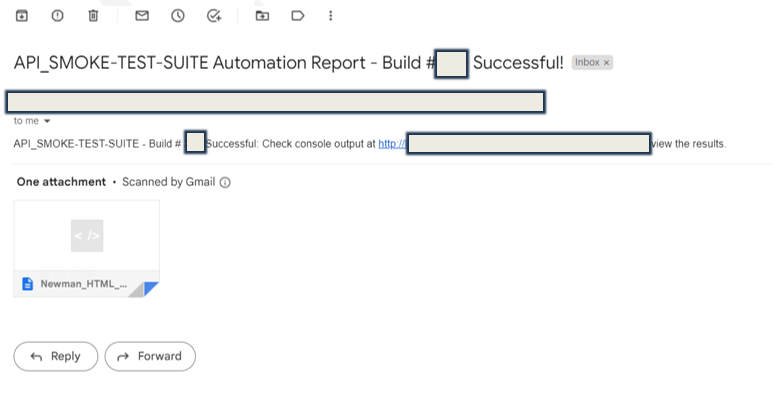
- Attachments: Enter the location from the html report (**//Newman_HTML_Report.html)
- Click on Save button
6. Running the Jenkins Build Job
After successfully configuring the Build Job we can now run the job either from the dashboard by clicking on the Play button or directly from the Build Job with clicking on Build Now option.

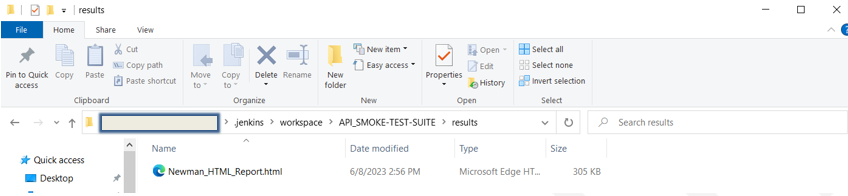
10.7 Generating the htmlextra Test Report at the Specified Directory
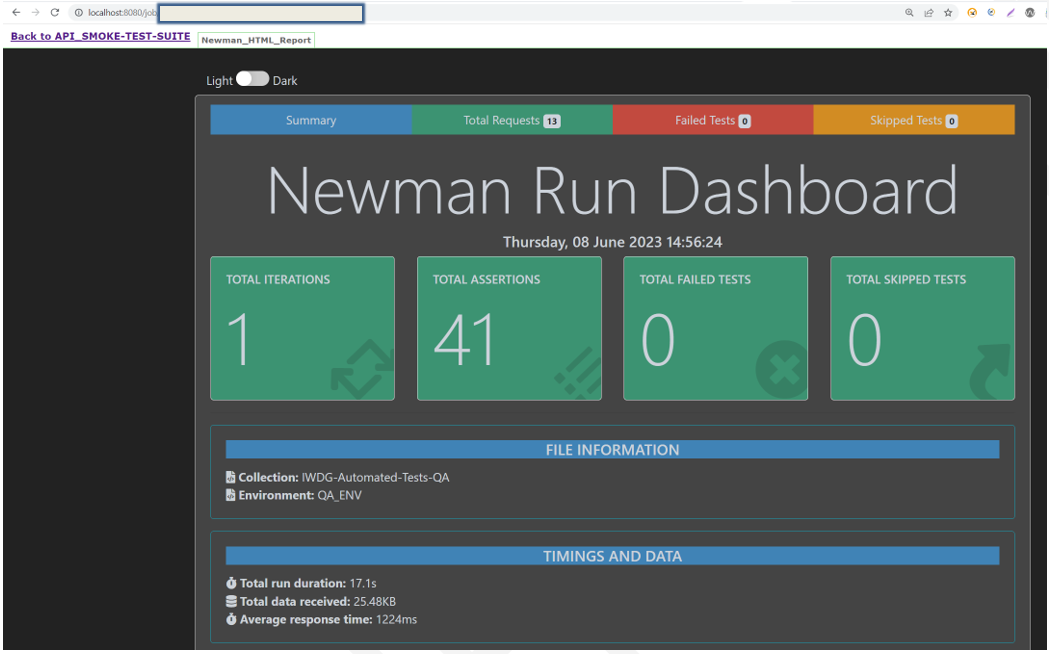
The htmlextra report file with the test results should be generated at the specified directory/folder in the Jenkins workspace on the local machine.

8. Generating Newman HTML Report in Jenkins CI/CD
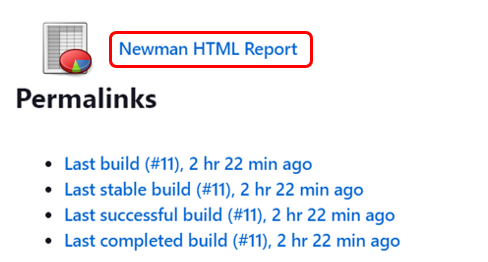
As soon as the build is completed, a new element is now visible on the dashboard after refreshing the page. We can open the generated report by clicking on the Newman HTML Report hyperlink.
9. Delivered Email Notification with htmlextra Test Report
Notifications are a basic mechanism for any CI/CD tool. Regarding the Continuous Integration process, fast feedback is a key feature that allows teams to be notified of every successful build or to respond rapidly when the build fails, and notifications are an effective way of achieving it.
Conclusion
The utilization of the htmlextra Newman reporter in the integration and implementation of an automated API functional testing with Postman tool, brings immense value to the testing and development process of web applications. By encompassing the essential functionalities of the web application, the automated API testing ensures that critical aspects are thoroughly examined. The tool’s capability to execute tests in a sequential order, combined with the parametrization feature, provides a comprehensive assessment of the application’s behavior under varying scenarios.
Furthermore, the incorporation of the htmlextra Newman reporter is extending the effectiveness by generating comprehensive and visually appealing reports. These reports offer in-depth insights into the test execution status, response times, and any encountered failures. Stakeholders can leverage the htmlextra Newman reports to gain a holistic understanding of the application’s stability and performance, facilitating informed decision-making and proactive measures.
By seamlessly integrating the API test automation process with the Jenkins CI/CD, organizations can establish a robust testing infrastructure. Much like the Robot framework integration with Jenkins, this integration empowers the QA and development teams to automate the execution of API tests within the build process, providing early detection of potential issues or regressions. The htmlextra Newman reporter enhances this integration by enabling the generation of HTML-based detailed reports that are easily accessible through Jenkins. Stakeholders can effortlessly access these reports, examine the test results, and make data-driven decisions regarding the application’s quality and future enhancements.
In summary, the implementation of an automated API testing integrated with the Jenkins CI/CD open-source Continuous Integration tool, offers significant benefits, including time and effort savings, early issue detection, improved software quality, enhance collaboration and bolster customer satisfaction. By leveraging the power of automation and comprehensive reporting, QA and development teams can enhance their testing and development processes and deliver more reliable and robust web applications to their users.