
Introduction
Amazon Web Services (AWS) significantly augments the various phases of the software development cycle, especially the development and test phases. AWS in the development phase can be used for various purposes, such as managing version control, project management tools, building processes, or environments hosted on AWS; by using best practices. Regarding the test phase, it can be used to manage test environments and run various kinds of tests, including load testing, acceptance testing, fault tolerance testing, etc. AWS provides unique advantages in each of these scenarios and phases, by choosing the ones which are the most appropriate for a software development project.
An EC2 instance is a virtual server in Amazon’s Elastic Compute Cloud (EC2) for running applications on the Amazon Web Services (AWS) infrastructure. AWS is a comprehensive, evolving cloud computing platform; EC2 is a service that allows business subscribers to run application programs in the computing environment (Reference: https://askinglot.com/what-does-aws-ec2-do). Taking into consideration the trend of moving entire IT systems on cloud platforms, especially AWS, cloud testing using EC2 instances with prepared and suited Amazon Machine Image (AMI) brings many advantages, such as low cost, high scalability, unlimited storage, easy sharing of resources and high availability of the test environment especially providing efficient load testing.
Preparing such instances with required tools is crucial in saving time when it comes to configuring testing environments during modern development where the requirements are changing constantly. Test environment on an EC2 instance can be set up in a minute. Also, the test environment can run for just a few hours or days, perform the test and gather results and then pause or shut down once the test cycle is finished. In our blog post, we are going to cover using Amazon Machine Image for testing purposes, and how to prepare and create EC2 instances.
Preparing an EC2 instance
An EC2 instance is nothing but a virtual server in Amazon Web services terminology. It is a web service where an AWS subscriber can request and provision a compute server in the AWS cloud. An on-demand EC2 instance is an offering from AWS where the subscriber/user can rent the virtual server per hour and use it to deploy his/her own applications.
In order for that instance to be used for testing, it should consist of some of the most common tools for testing, such as JMeter, Robot Framework, Grafana server, and etc.
In our post, we will not cover the process of creating an AWS account, neither the detailed process of creating the architecture in which the EC2 instance is part. Those steps can be found on AWS official site, where a lot of tutorials, user guide documentation, whitepapers, and other material are located and available for the public.
Features of Amazon EC2, published on the official amazon page here, are:
- Virtual computing environments, known as instances
- Preconfigured templates for configured instances, known as Amazon Machine Images (AMIs), that package the bits you need for your server (including the operating system and additional software)
- Various configurations of CPU, memory, storage, and networking capacity for your instances, known as instance types
- Secure login information for your instances using key pairs (AWS stores the public key, and you store the private key in a secure place)
- Storage volumes for temporary data that’s deleted when you stop, hibernate, or terminate your instance, known as instance store volumes
- Persistent storage volumes for your data using Amazon Elastic Block Store (Amazon EBS), known as Amazon EBS volumes
- Multiple physical locations for your resources, such as instances and Amazon EBS volumes, known as Regions and Availability Zones
- A firewall that enables you to specify the protocols, ports, and source IP ranges that can reach your instances using security groups
- Static IPv4 addresses for dynamic cloud computing, known as Elastic IP addresses
- Metadata, known as tags, that you can create and assign to your Amazon EC2 resources
- Virtual networks you can create that are logically isolated from the rest of the AWS Cloud and that you can optionally connect to your own network, known as virtual private clouds (VPCs)
Launching an EC2 instance can be done manually, from the AWS console, or by deploying serverless script by creating a stack in CloudFormation service in AWS. Whatever method is used the EC2 instance should use an AMI image as the first required step in its creation. In order to create a custom AMI first, we configured a sample EC2 instance with Linux OS as a base.
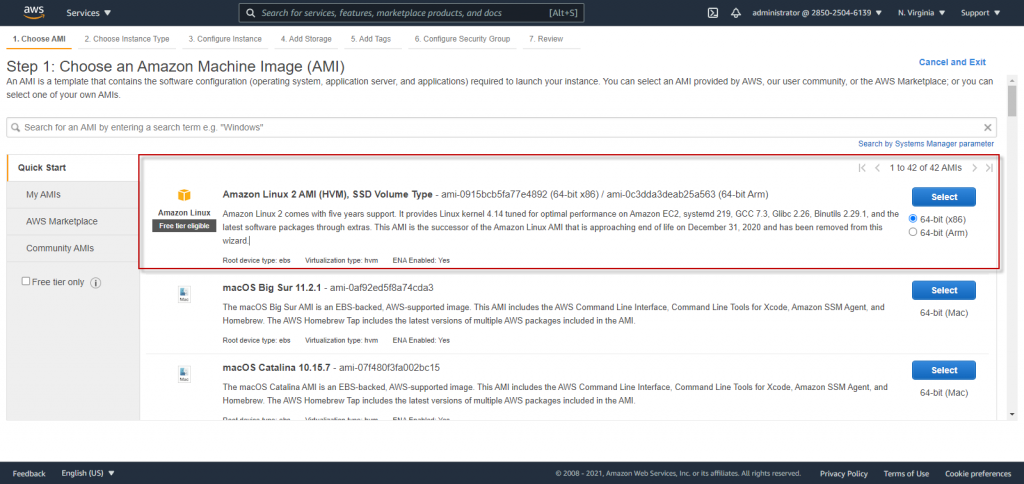
To create an instance, in our case, we have chosen free tier eligible Linux OS (Figure 1) as a base AMI, that provides a secure, stable, and high-performance execution environment to develop and run cloud and enterprise applications.
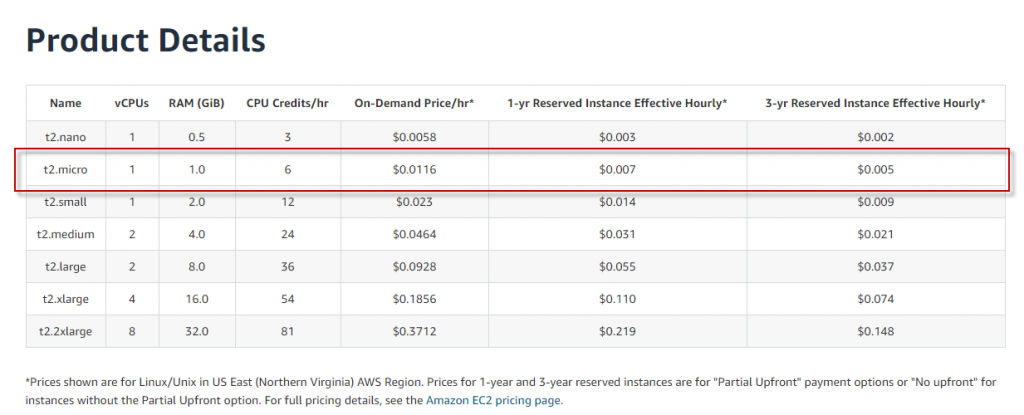
As an instance type is chosen t2.micro, as free tier eligible, which provides a baseline level of CPU performance with the ability to burst above the baseline when needed.
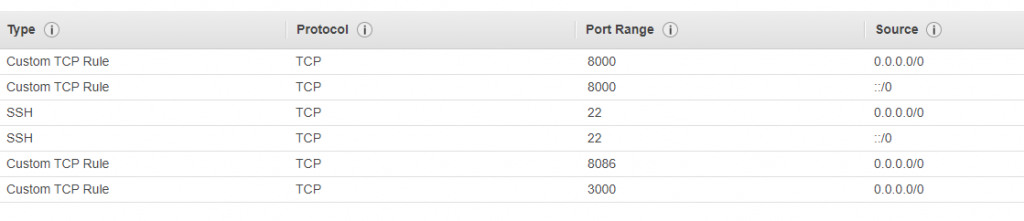
In the configuration step, we use a custom VPC created with IPv4 CIDR block 192.168.0.0/16 with a public subnet’s traffic with IPv4 CIDR block 192.168.1.0/24 (Available 249 IPv4 addresses) routed to that VPC and to an internet gateway. Also, a custom Security Group is assigned to the instance in the Configure Security Group step to control inbound and outbound traffic. In order to use this approach for testing purposes several ports are allowed to be open for all IP addresses, which is not recommended when the instance is used for real scenarios (the traffic on the ports will be open only for custom IPs):
We use the default settings in the other steps and the instance is created and ready to start. After the status check passed, we can connect to this instance in several ways. One common way for connecting to a Linux instance is by using SSH and by sending the SSH key pair that was assigned to the launched instance with the default Linux EC2 user name ec2-user:
ssh -i my_ec2_private_key.pem ec2-user@ec2-a-b-c-d.us-west-2.compute.amazonaws.com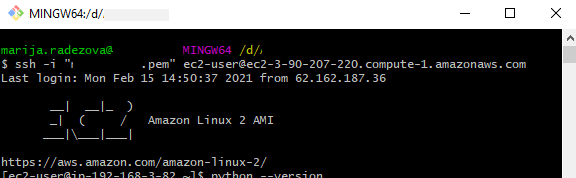
On the connected instance we can install and configure the desired software that in future we will use for testing.
JMeter configuration
In order to use JMeter, which is a pure Java application, we need to install java as a pre-setup by running the following commands:
wget —no-check-certificate —no-cookies —header “Cookie: oraclelicense=accept-securebackup-cookie” http://download.oracle.com/otn-pub/java/jdk/8u141-b15/336fa29ff2bb4ef291e347e091f7f4a7/jdk-8u141-linux-x64.rpm
sudo yum install –y jdk-8u141-linux-x64.rpm
We can check the installation by running version check command java –version.
Then to download JMeter from the official site (in this case version 5.2.1) and uncompress it, we run the following commands (we assume we are located in the default directory /home/ec2-user/):
wget http://mirrors.estointernet.in/apache//jmeter/binaries/apache-jmeter-5.2.1.tgz
tar –zxf apache-jmeter-5.2.1.tgz
chmod -R 777 ./apache-jmeter-5.2.1
PluginsManagerCMD, which is used to install plugins is installed in JMeter by running the following commands:
curl -L https://jmeter-plugins.org/get/ > ./apache-jmeter-5.2.1/lib/ext/plugins-manager.jar
curl -L https://repo1.maven.org/maven2/kg/apc/cmdrunner/2.2/cmdrunner-2.2.jar > ./apache-jmeter-5.2.1/lib/cmdrunner-2.2.jar
java –cp ./apache-jmeter-5.2.1/lib/ext/plugins-manager.jar org.jmeterplugins.repository.PluginManagerCMDInstaller
After configuring Plugins Manager CMD, it can be used to install plugins:
./apache-jmeter-5.2.1/bin/PluginsManagerCMD.sh install jpgc-autostop,jpgc-casutg,jpgc-csl,jpgc-dummy,jpgc-ffw,jpgc-filterresults,jpgc-functions,jpgc-json,jpgc-mergeresults,jpgc-prmctl,jpgc-sense,jpgc-tst,jpgc-wscWhen using external jars for example for database connections (like sqljdbc4.jar) we need to add the desired jar in the /lib folder in a similar way.
We can run from the apache-jmeter-5.2.1/bin location a sample test script (CSVSample.jmx) from the JMeter examples folder to check the configuration (Figure 5):
[ec2-user@ip-192-168-3-82 bin]$ ./jmeter.sh -n -t examples/CSVSample.jmx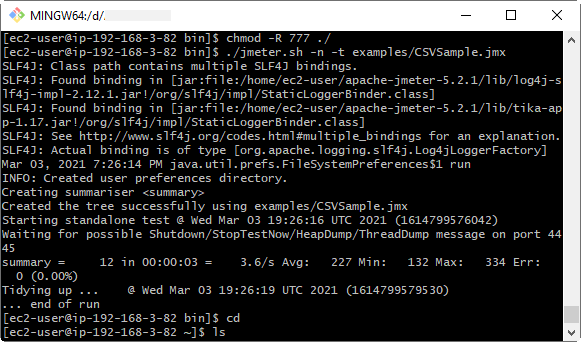
Robot Framework configuration
Robot Framework is a python based application so as a pre-required setup we need Python and pip installed. Linux AMI used for this sample has Python 2.7 already installed so we can use it (to check that we run the python –version). If python-pip is not present we can install it (by running sudo yum install python-pip), and we will use pip to install robotframework as in Figure 6:
sudo pip install robotframework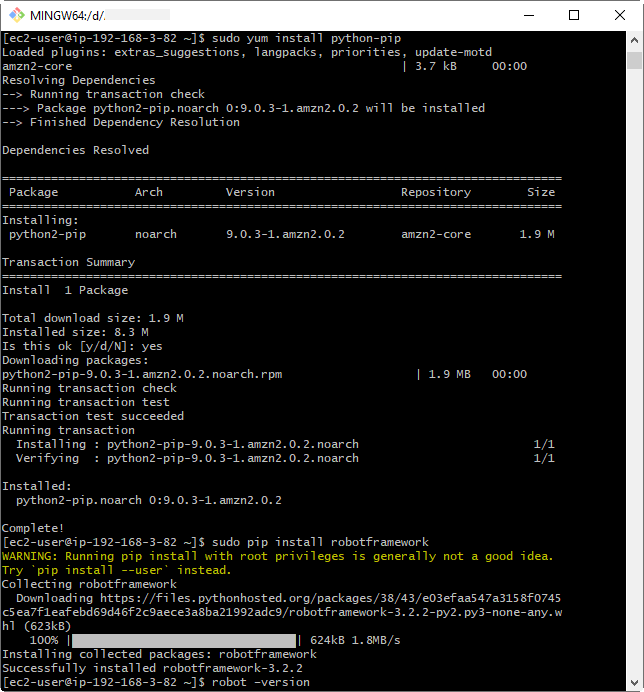
We can install additional packages or libraries (SeleniumLibrary, pabot) required in a similar way:
sudo pip install robotframework-seleniumlibrary
sudo pip install robotframework-pabot
Common usage of Robotframework is to run test web scenarios, so we need a browser and adequate web driver in order to run such test scripts. In this case, chrome browser and associated chromedriver are downloaded and installed on the EC2 Linux:
curl https://intoli.com/install-google-chrome.sh | bash
================================================================
Package                   Arch   Version                      Repository  Size
================================================================
Installing:
 google-chrome-stable      x86_64 89.0.4389.72-1               google-chrome
wget -O /tmp/chromedriver.zip https://chromedriver.storage.googleapis.com/89.0.4389.23/chromedriver_linux64.zip
sudo unzip /tmp/chromedriver.zip chromedriver -d /usr/local/bin/
In order to transfer a small-sized sample script from my local drive to EC2 we can use the following command in Bash console, where we need to include the SSH key pair .pem file associated with the EC2 launched instance:
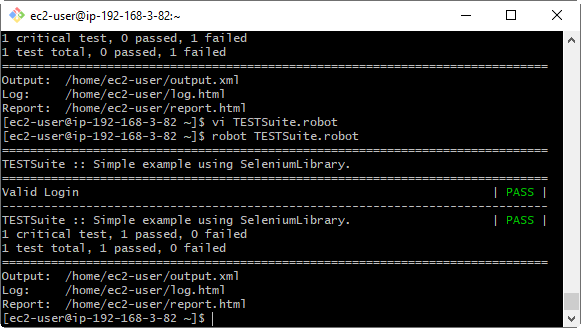
$ scp –i mykey.pem ./TESTSuite.robot ec2-user@ec2-3-90-207-220.compute-1.amazonaws.com:~/.We can run the robot script (Figure 7) to check the configuration in headless browser mode by using the headless chrome parameter in Open Browser keyword instead of the bare browser name.
We can use the same scp command for transferring files from EC2 to a local drive, for example, to get the report.html file in the local drive, just we need to flip the destination and source locations in the bash command from above:
$ scp –i mykey.pem ec2-user@ec2-3-90-207-220.compute-1.amazonaws.com:~/report.html ./Configuring Influxdb and Grafana servers on EC2 Linux
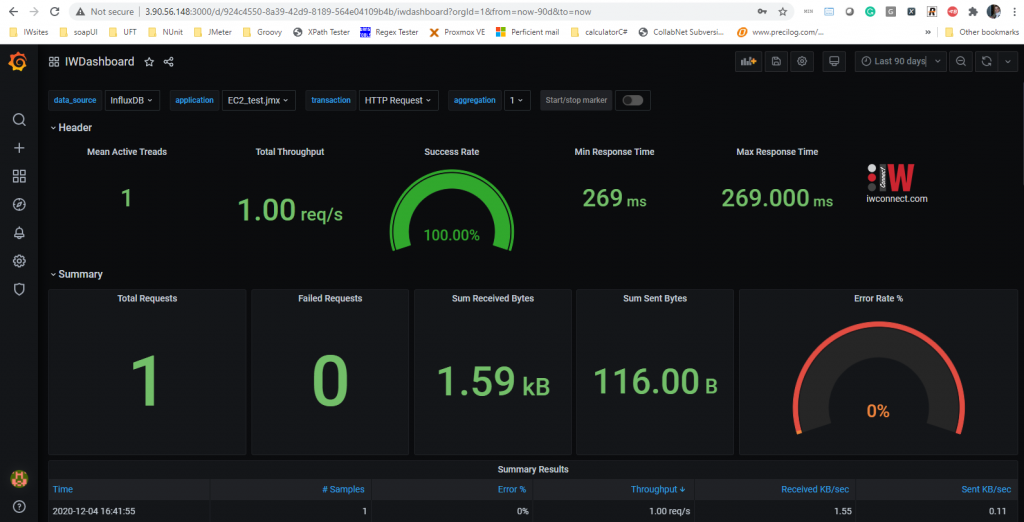
A very important approach in testing is reporting or presenting the results in real-time in Dashboard, available from the same start of the testing process. In this case, we will use Grafana IWConnect Dashboard (check more ingo about it on our blog) for presenting JMeter result metrics in real-time stored in InfluxDB. For that reason, we can prepare this setup here and every time we need this configuration ASAP, we just need to start the EC2 testing instance and we can use them by entering the public IP of the instance with the port 8086 for influx or 3000 for Grafana and all permitted users can access the dashboard. To configure InfluxDB on EC2 Linux instance, the following commands are run in /home/ec2-user directory:
wget https://dl.influxdata.com/influxdb/releases/influxdb-1.8.4.x86_64.rpm
mkdir /usr/local/influxdb
mv influxdb-1.8.4.x86_64.rpm /usr/local/influxdb
yum localinstall influxdb-1.8.4.x86_64.rpm
We can enable, start and check the status of influxdb by running the following commands:
systemctl enable influxdb
systemctl start influxdb
systemctl status influx
Also, an admin user is created and IWdb database with all privileges and changed settings in the config file in http section to enable http and bind-address = “:8086”. We can check the http port by following curl request from local bash console (public IP address of EC2 and configured username and password are varying parameters):
curl -G http://3.90.56.148:8086/query -u username:password —data-urlencode “q=SHOW DATABASES”which will result in a similar response as the following:
% Total % Received % Xferd Average Speed Time Time Time Current
Dload Upload Total Spent Left Speed
100 118 0 118 0 0 314 0 –:–:– –:–:– –:–:– 314 {“results”:[{“statement_id”:0,”series”:[{“name”:”databases”,”columns”:[“name”],”values”:[[“_internal”],[“IWdb”]]}]}]}
For Grafana configuration we use a similar approach:
wget https://s3-us-west-2.amazonaws.com/grafana-releases/release/grafana-enterprise-7.4.1-1.x86_64.rpm
sudo yum localinstall grafana-enterprise-7.4.1-1.x86_64.rpm
systemctl enable grafana-server
systemctl start grafana-server
systemctl status grafana-server
After starting the server, Grafana is available on port 3000 (Public IP:3000). IWDashboard is imported and InfluxDB connection is created so the Dashboard is ready to use. We can check the installed version by running grafana-cli –v and by visiting following url: http://[publicIP_EC2]:3000/
Creating AMI from EC2 Linux instance
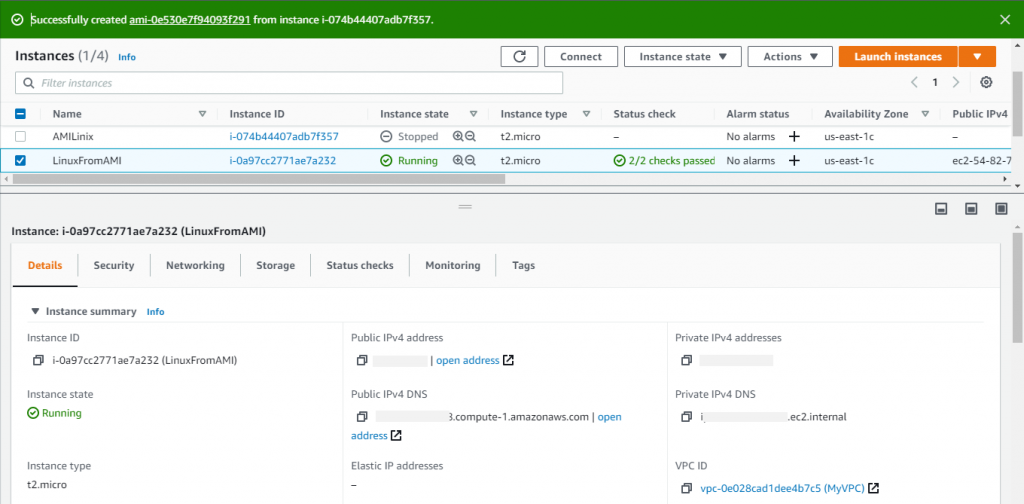
An Amazon Machine Image (AMI) is a template that contains a software configuration (for example, an operating system, an application server, and applications). From an AMI, we can launch an instance, which is a copy of the AMI running as a virtual server in the cloud. Multiple instances can be launched from one sample AMI. To create an AMI from the above EC2 Linux instance we select the instance and on the right-click menu we chose Image and Templates -> Create image. On the next screen, we add Name and optional description and we chose the storage for that instance. After AMI is created and the status is available we can use it to launch instances from it just by several clicks. The steps are similar as for creating ordinary EC2:
- Select the AMI, and then choose Launch.
- Choose an instance type, and then choose Next: Configure Instance Details. Optionally select configuration details, such as associating an IAM role with the instance.
- Select Next: Add Storage. You can use the default root volume type, or select a new type from the Volume Type drop-down. Select Add New Volume if you want to add additional storage to your instance.
- Select Next: Add Tags. You can add custom tags to your instance to help you categorize your resources.
- Select Next: Configure Security Group. You can associate a security group with your instance to allow or block traffic to the instance.
- Select Review and Launch. Review the instance details.
Select Previous to return to the previous screen to make changes. Select Launch when you are ready to launch the instance.
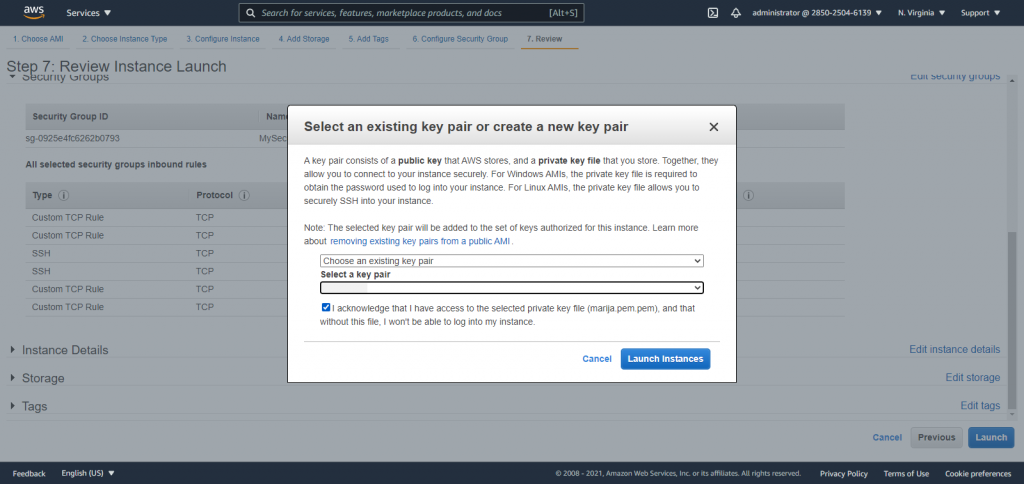
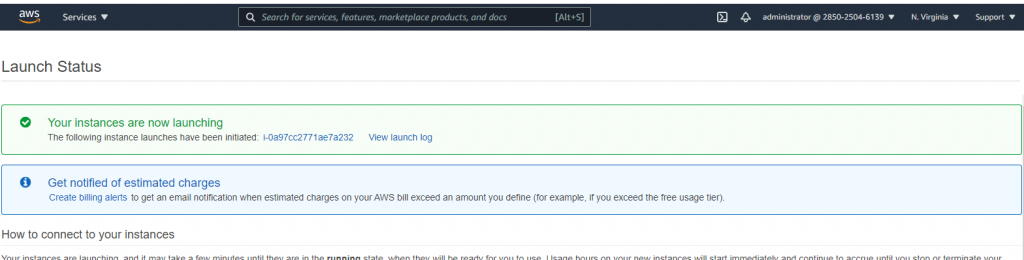
Select an existing key pair or create a new key pair, select the acknowledge agreement box, and then choose Launch Instances.
Choose View Instances to check the status of your instance.
Conclusion
To build a source code repository on AWS, you need to create an Amazon Elastic Compute Cloud2 (Amazon EC2) instance and remotely install a version control software on it. Within minutes, developers can create Amazon EC2 instances, which are virtual machines over which they have complete control. There are a lot of different operating systems and distributions available as Amazon Machine Images (AMIs).
An AMI is a template that contains a software configuration (operating system, application server, and applications) that you can run on Amazon EC2. Once the source code repository instance is properly installed and configured, we can create an AMI from this setup to be able to quickly recreate that instance without having to reinstall and reconfigure the version control software. AWS enables test teams to eliminate both the need for costly hardware and the administrative pain that goes along with owning and operating it. The benefits of this approach are huge, especially for testers: test environments can be set up in minutes rather than weeks or months, and a variety of resources, including different instance types, are available to run tests whenever is need to be run.