
Living in a digital world means that digital technologies are more present and involved in every segment of society and our lives. In 90% of the cases, digital applications are developed to perform our daily responsibilities faster and easier. Research has shown that there are 4 times more devices connected to the Internet than the entire human population on Earth. On top of that, 99% of the applications are adapted for different screens, platforms, and OS so users can access them regardless of the place and time. Building mobile native applications can be time-consuming and it usually requires a different tool, which is more expensive.
Thus, how to accelerate the development and reduce costs? In the following lines, we are going to describe how you can use React Native to accelerate the development by presenting a solution implemented at one of our Clients.
React Native
React Native is a JavaScript-based framework used for developing natively mobile applications for iOS and Android devices. It’s based on React, but here React Native targets mobile platforms instead browsers. React Native enables developers to write and use the same code to develop powerful mobile user experiences without the need to write native platform-specific code.
Expo
Expo is a framework that helps us to build React Native apps. It provides a list of tools that are helpful and could simplify the creation, maintenance, and testing of applications. Expo provides an SDK that helps us with native mobile APIs. When we run the application with expo, the CLI uses metro which bundles JS for Android and iOS. Expo has also a hot reload option, which is really helpful and time-saving.
Metro
Metro is a JavaScript bundler that manages assets, performs app hot reloading, caches builds and etc. It enables fast startup, fastest and quickest app bundling, and performs for any sub-second reload cycle to be as fast as possible. Out-of-the-box Metro is supported in every React Native project.
To demonstrate the power of Expo and React Native we developed a smart parking application. The application is a multifunctional one, providing users with features such as:
- Notifications about nearest parking zone spots
- Reminders for parking sessions
- The automatic ending of the parking session, and more.
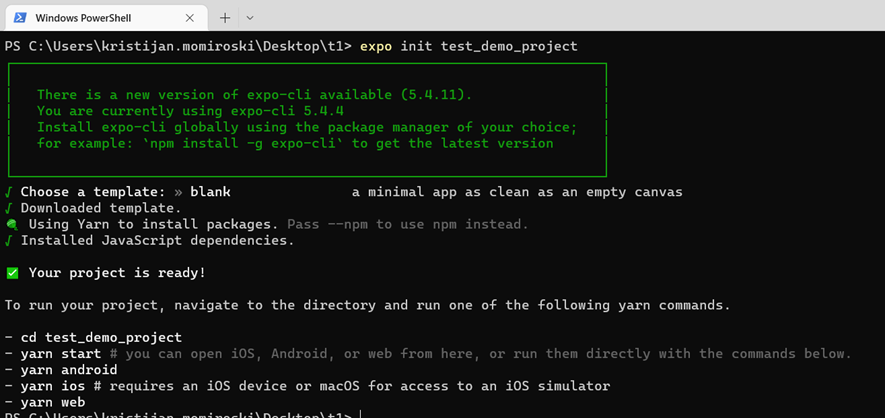
The command for creating Expo React Native app is the following:
expo init name_of_project
Once the command has been executed, we need to choose a template, language (TypeScript or JavaScript) and etc. When everything is ready we get the following output:
import React, { useState, useMemo } from 'react';
import StackNavigator from './StackNavigator';
import { NavigationContainer } from '@react-navigation/native';
import { AuthContext } from './hooks/AuthContext';

export default function App() {
  const [isAuthenticated, setIsAuthenticated] = useState(false);
  const [token, setToken] = useState(null);

  const memoizedValue = useMemo(
    () => ({
      isAuthenticated,
      setIsAuthenticated,
      token,
      setToken,
    }),
    [isAuthenticated, setIsAuthenticated, token, setToken],
  );

  return (
    <NavigationContainer>
      <AuthContext.Provider value={memoizedValue}>
        <StackNavigator />
      </AuthContext.Provider>
    </NavigationContainer>
  );
}
This is the entry file that is registered for the React Native app. We can see that besides AuthContext we are using also StackNavigator.
import React, { useContext } from 'react';
import { createNativeStackNavigator } from '@react-navigation/native-stack';
import LoginScreen from './screens/login/LoginScreen';
import ParkingHistory from './screens/parking-history/ParkingHistory';
import { AuthContext } from './hooks/AuthContext';
import RegisterScreen from './screens/register/Register';
import Vehicles from './screens/vehicles/Vehicles';
import ParkirajSe from './components/Modals/ParkirajSe';
const Stack = createNativeStackNavigator();
const StackNavigator = () => {
const { isAuthenticated, setIsAuthenticated, token, setToken } = useContext(AuthContext);
return (
<Stack.Navigator>
{isAuthenticated ? (
<>
<Stack.Screen name="Vehicles" component={Vehicles} options={{ headerShown: false }} />
<Stack.Screen name="ParkingHistory" component={ParkingHistory} options={{ headerShown: false }} />
<Stack.Screen name="Set your parking spot" component={ParkirajSe} options={{ presentation: 'modal' }} />
</>
) : (
<>
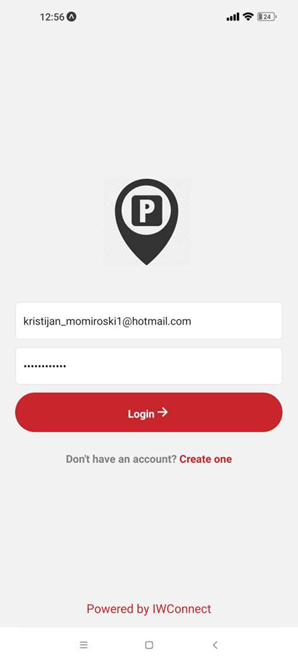
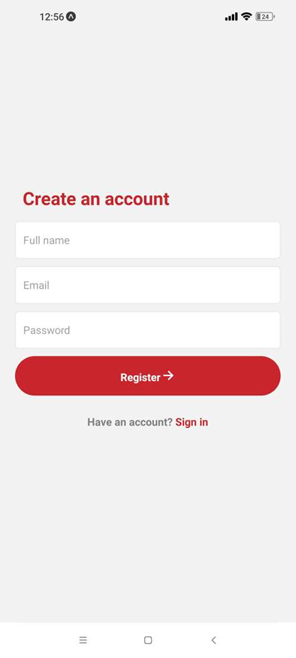
<Stack.Screen name="Login" component={LoginScreen} options={{ headerShown: false }} />
<Stack.Screen name="Register" component={RegisterScreen} options={{ headerShown: false }} />
</>
)}
</Stack.Navigator>
);
};
export default StackNavigator;
This is how the applications’ screens are defined. The benefit of using Stack Navigator is that it provides a way for screen transition where each screen is placed on top of a stack.
import React, { useState } from 'react';
import { View } from 'react-native';
import IWButtons from '../Buttons/IWButton';
import IWInputs from '../Inputs/IWInputs';
import * as Notifications from 'expo-notifications';
import DateTimePickerModal from 'react-native-modal-datetime-picker';
import * as SMS from 'expo-sms';
Notifications.setNotificationHandler({
handleNotification: async () => ({
shouldShowAlert: true,
shouldPlaySound: false,
shouldSetBadge: false,
}),
});
const PickYourParkingSpot = ({ route }) => {
const { make, model, plate } = route.params;
const [showEndTime, setShowEndTime] = useState(false);
const [endTime, setEndTime] = useState(new Date());
const [parkingZone, setParkingZone] = useState('');
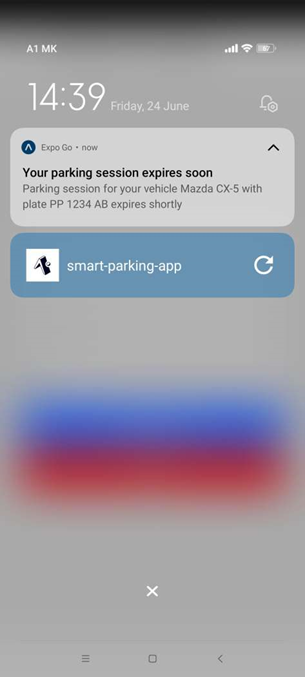
const scheduleLocalNotification = async () => {
const isAvailable = await SMS.isAvailableAsync();
if (isAvailable) {
const { result } = await SMS.sendSMSAsync(
'144414',
`${parkingZone} ${plate}`,
);
}
await Notifications.scheduleNotificationAsync({
content: {
title: 'Your parking session expires soon',
body: `Parking session for your vehicle ${make} ${model} with plate ${plate} expires shortly`,
},
trigger: { seconds: 10 },
});
};
const handleShowEndTime = () => {
setShowEndTime((prevState) => !prevState);
};
const handleStoreEndTime = (e) => {
setEndTime(e);
setShowEndTime((prevState) => !prevState);
};
return (
<View style={{ flex: 1, alignItems: 'center', justifyContent: 'center', padding: 20 }}>
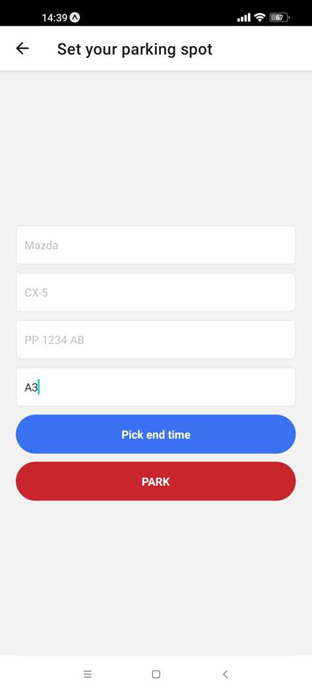
<IWInputs placeholder="Selected vehicle make" value={make} canEdit={false} />
<IWInputs placeholder="Selected vehicle model" value={model} canEdit={false} />
<IWInputs placeholder="Select vehicle plate" value={plate} canEdit={false} />
<IWInputs placeholder="Enter parking zone (Example: C1, C4, A2)" value={parkingZone} setValue={setParkingZone} />
<IWButtons text="Pick end time" onPress={handleShowEndTime} />
<DateTimePickerModal
mode="time"
isVisible={showEndTime}
onConfirm={(e) => handleStoreEndTime(e)}
onCancel={(e) => handleStoreEndTime(e)}
/>
<IWButtons
text="PARK"
bgColor="#C9252C"
onPress={async () => {
await scheduleLocalNotification();
}}
/>
</View>
);
};
export default PickYourParkingSpot;
We will take the following screen as an example to show we can handle Local Notification & sending SMS easily in Expo using React Native.
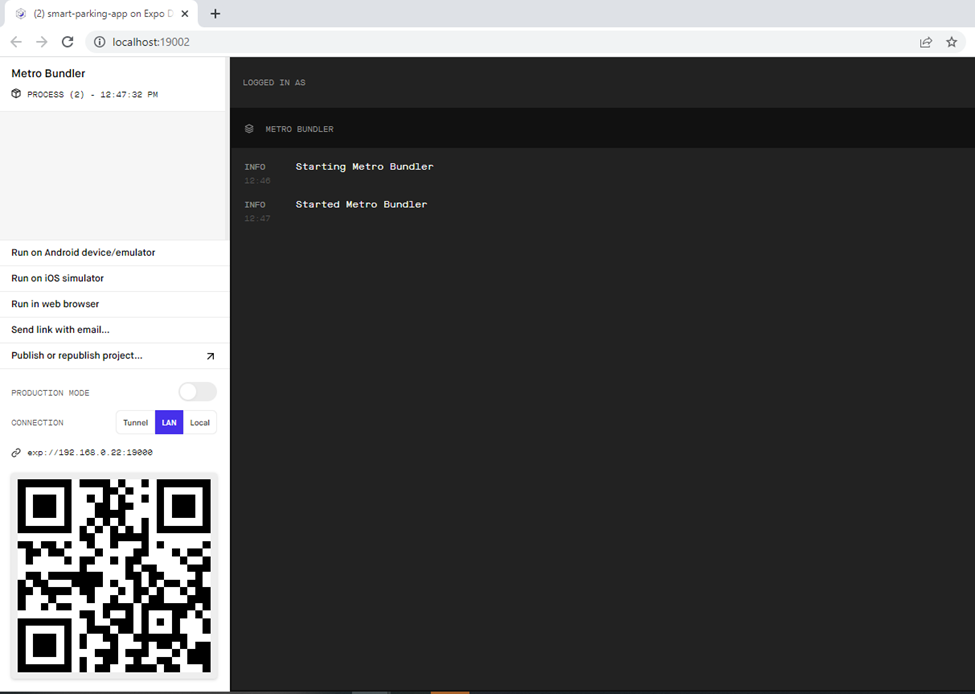
Metro builder is up and running and the QR code can be scanned with our device (first we need to have installed Expo Go application in our device) and after that, the application would be bundled – this can be seen on our device. The benefit of this is that we have OTA (Over the Air) updates and there is the hot-reload option so every change that we made on our application is instantly displayed on our device, saving a huge amount of time if we need to rebuild a buildable file (.APK or .IPA) every time when we need to see the changes.
The QR code can be scanned from a MAC device and we can see the way the application will look on a MAC Device.
Neither Expo nor React Native has limitations about which backend framework, DB, or server can be used, but in this sample Node/Express server is used with Cosmos DB, and API is deployed to Heroku.
When the QR code is scanned from the Metro server the application can be seen on a Real Device.

Conclusion
Speaking personally, I find building mobile native apps using React Native really smooth and easy. React Native accelerates the development of mobile native apps by offering efficient code sharing across Android, and iOS without disorder the end user’s experience. It provides a basic set of components to start the development of a native application, the performance is similar to a native application because it renders elements specifically to the native APIs, and it has the ability to use modules that are written with native code for some specifically complicated operations. And one biggest advantage is that you can re-use the same knowledge that you have for React.js and build amazing native applications without any obstacles.