

The aim of this article is to give a detailed step by step guide for successful installation and implementation of the Mule-module-requester using Mulesoft Anypoint Studio.
The main reason why we decided to discover the possibilities given by mule-module-requester was the need for having scheduled processing of an interface where the inbound connector will be WMQ. There is no possibility of wrapping up the WMQ connector in the Pull Scope and scheduling the processing. So, we found the Mule-module-requester as an ideal solution for achieving what we need.
We will first start with the explanation of how to install the module and make it visible in the Mulesoft Anypoint Studio. The second part of this article will focus on the implementation of the module in the Mule flow.
At the very beginning, we need to open the site: https://github.com/mulesoft/mule-module-requester and navigate to the part of the site where we have a link for downloading the mule-module-requester.
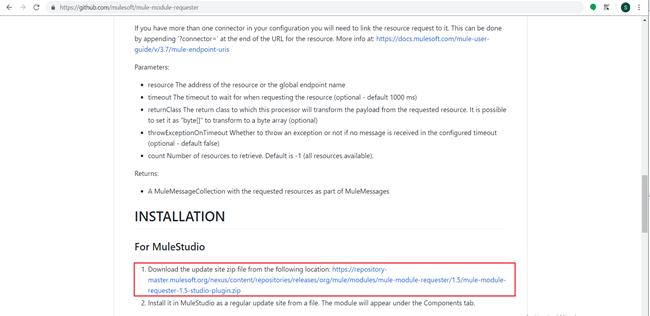
After clicking the link: https://repository-master.mulesoft.org/nexus/content/repositories/releases/org/mule/modules/mule-module-requester/1.5/mule-module-requester-1.5-studio-plugin.zip the installation settings will be downloaded on your local machine. In my case, I have stored them on the following location: C:\Installation\Mule_module_requester.
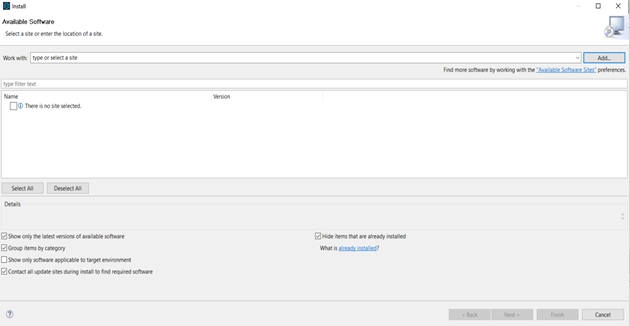
In order to install and make the module visible in Mulesoft Anypoint Studio, we need to navigate to the Help menu -> Install New Software and the following window will open:
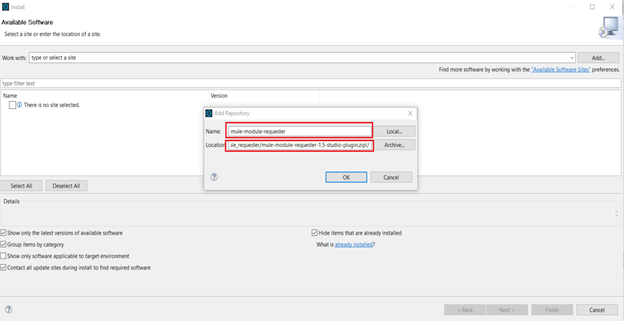
Then we need to press the Add button placed in the right upper corner of the window. After that, a window with Name and Location will pop up. The Name and the Location refer to the mule-module installation – how it will be named and where it will saved. In my case Name will be ‘mule-module-requester’ and the Location: jar:file:/C:/Installation/Mule_module_requester/mule-module-requester-1.5-studio-plugin.zip!/
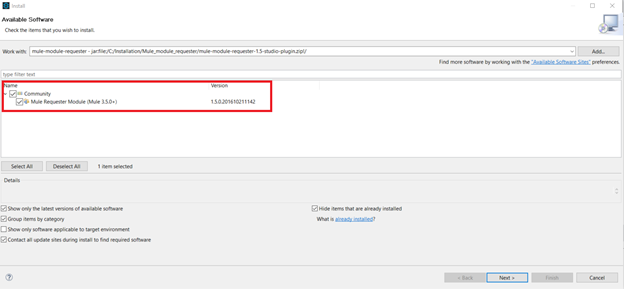
Once we have set the Name and Location, the Community -> Mule Requester Module(Mule 3.5.0+) will appear.
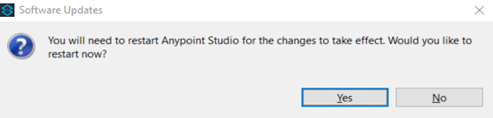
After that, we continue the steps, by pressing the Next button and we follow the procedure of the module installation till the end. Once the software is successfully installed we will need to restart the studio in order for the latest changes to be applied.
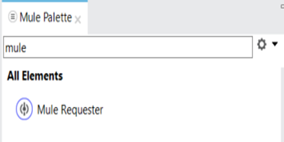
Once Mulesoft Anypoint Studio restarts we will be able to see mule-module-requester in the palette.
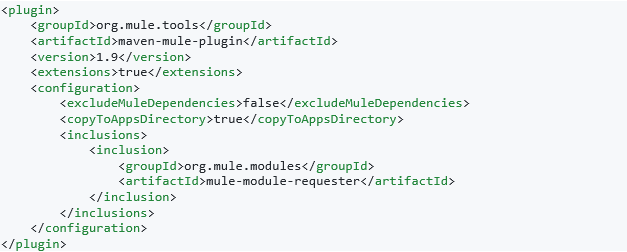
Also, the adding of the appropriate dependency and plugin in the pom.xml file of the project structure is very important for the mavenized projects. In this case they are:
Dependency:

Plugin:
This is the first part – the installation of the module.
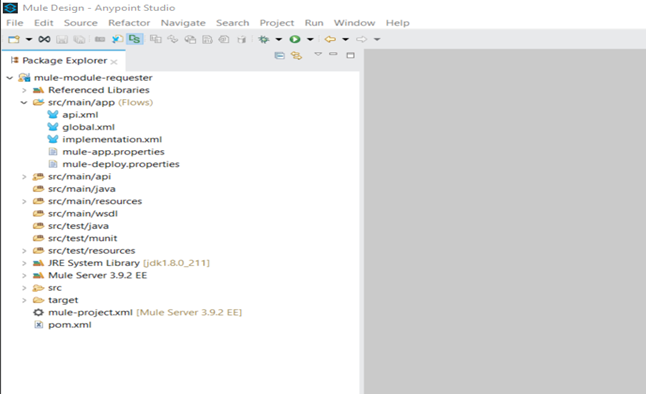
The second part is the implementation of the mule-requester in the mule application. We have already created one application named mule-module-requester for that purpose and we have api.xml there with the appropriate flow generate from the designed raml definition. We have one global.xml used for storing all the global configurations and the last one is implementation.xml where the logic for using the mule-requester is developed completely, and we can use it in cases when we want timely scheduled processing of the interfaces and when the type of the inbound connector which can not be wrapped in the poll scope should be replaced.
Using the application structured as in the picture above we will simulate a process of receiving a JSON message on HTTP endpoint. Once the message is received, it is stored in the queue by using the WMQ connector and after some scheduled time interval, exactly the same message should be pulled up from the same queue for further processing to the folder on the local system.
For the first step, we will need an exposed endpoint and the configuration set to listen for a message on the localhost, port 8081 and path named /mulerequestertest.
For the second step, we will have a WMQ outbound connector configured to send the message to the defined queue.
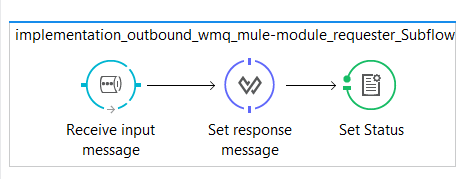
1.WMQ outbound connector – the message which will be received on the HTTP endpoint after calling the implementation_outbound_wmq_Subflow will be stored in the queue using the WMQ outbound connector. This is done so that we can pull that message later based on the defined time interval for pulling in the flow where we have the Quartz and Mule-requester connectors implemented.
2. Transform message, used for creating the response which will be retrieved to the source system. In our case it will be:
{

  "message":
"Request successfully received and the status is Pending",

  "status": "200"

}
3. At the end, we have set property where the status code is set – in our case 200, which will give information that the message sent from the source system is received and stored on the WMQ queue.
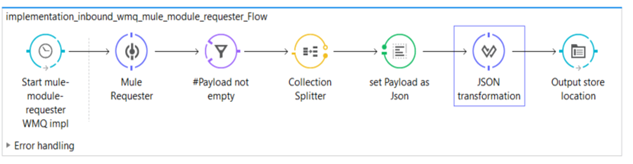
The third step is the most important part for our implementation and explanation because there we have a Quartz connector configured for scheduling the processing and Mule-requester which will act as an inbound connector in the middle of the flow. The entire flow named implementation_inbound_wmq_mule_module_requester_Flow can be seen in the picture below:
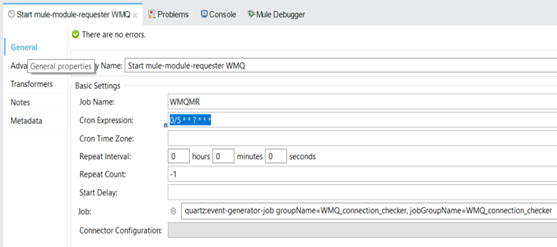
1.The Quartz connector is configured to trigger the process every five seconds.
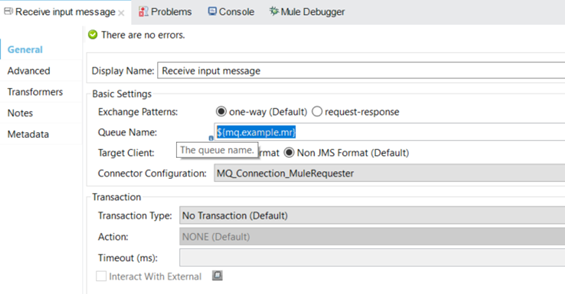
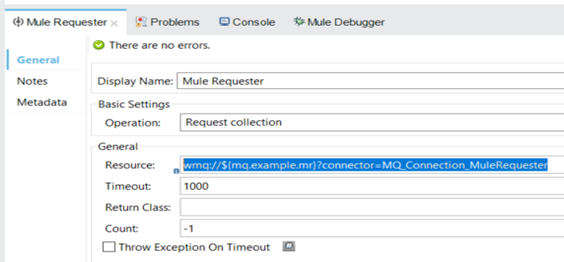
2. The Mule-requester, the most important thing for this connector is setting the connection string in the General -> Resource tab correctly. In our case it is
wmq://${mq.example.mr}?connector=MQ_Connection_MuleRequester.
The wmq:// part of the string gives us information about the connection type that will be configured because Mule-requester can be used for several types of connectors to act as an inbound connector in the middle of the flow not just for WMQ.
The part ${mq.example.mr} placed between backslashes and the question mark is used to specify the name of the queue used for exchanging the data, the one where we left the message in the implementation_outbound_wmq_Subflow.
The last part of the connection string is
?connector=MQ_Connection_MuleRequester where information about the connection configuration is given. Actually, the MQ_Connection_MuleRequester is the name od the WMQ connection configuration which is placed under the global.xml.
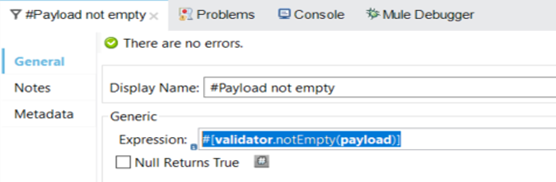
3. The expression – filter is used to validate if the payload is not empty.
4. The connection splitter is used to split the message if we receive a list of objects.
5. The set payload used for setting the payload as application/JSON.
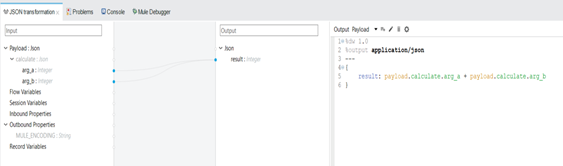
6. The transformer named JSON transformation, there we have a very simple JSON transformation where we are calculating two numbers.
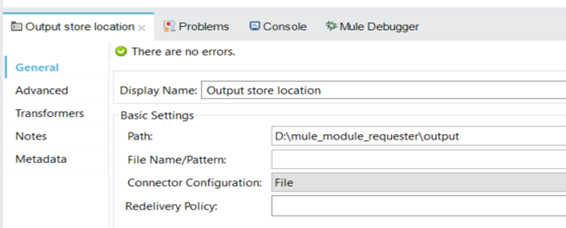
7. At the end, we have a file connector configured to store the file on the local file system.
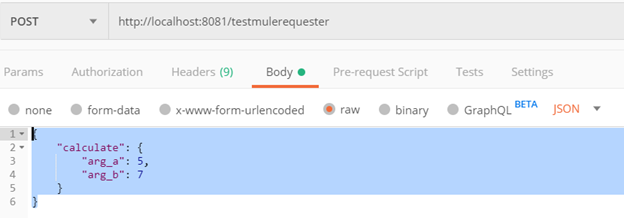
In order to test the entire implementation, we will use Postman rest-client and we will send the following request:
{

            "calculate": {

                        "arg_a": 5,

                        "arg_b": 7

            }

}
After processing the request through the implementation which was explained above, the file named mule-requester.json will be stored on the local file system in the previously defined location, in our case D:\mule_module_requester\output.
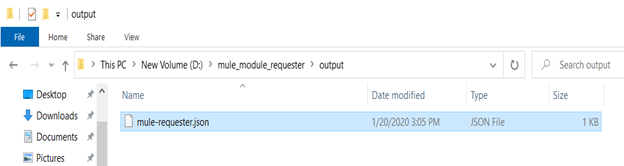
The content of the file is the expected response:
{

  "result": 12

}
To sum up, Mule-requester is a powerful module giving us the ability to schedule the processing of the interface when the inbound connector cannot be added in the pull scope. In our case we need it for scheduling the processing of the WMQ connector as we explained above.
The requirement was that we will need to have an interface that does not need to process the data in a certain period of time because the target system will be in the maintenance window. What is important to be noted is that Mule-requester can be used for multiple different connectors and solve similar types of problems.
If you want to learn more feel free to contact us.