

Introduction to authentication within SnapLogic
Authentication is the process of verifying the identity of users, devices, or processes before giving them access to a specific piece of information or resource. One widely used approach for securing data and applications is multi-factor authentication, which requires the user to present multiple credentials for identity verification.
The use of two-step authentication depends on the specific clients and their preferences. From a SnapLogic perspective, there are various ways to manage two-step authentication. In our blog post, we will elaborate on some of the best ways to maintain live, auto-refreshing authorization in cases of non-standard OAuth2 token responses within SnapLogic.
When authenticating with a REST API, which accepts a token, and is generated from an endpoint that requires a different type of authentication (basic, token, etc.), we can easily set up an OAuth2 account using the provided information. In some cases, the information retrieved from the token endpoint is not following the OAuth2 standards. According to the OAuth2 regulations, the response token should be named “access_token”, but if it comes named as a “token” for example, the connection is thrown away and we are not able to authenticate. In cases like this, we should do both steps, generate the token, then use it.
So, is there a faster way of resolving this issue instead of waiting for the API vendor to fix it in some of the next releases?
The answer is YES, and the best part is that everything happens within SnapLogic in 3 easy steps!
3 Easy Steps to Handle Non-Standard OAuth2 Tokens within SnapLogic
Step 1
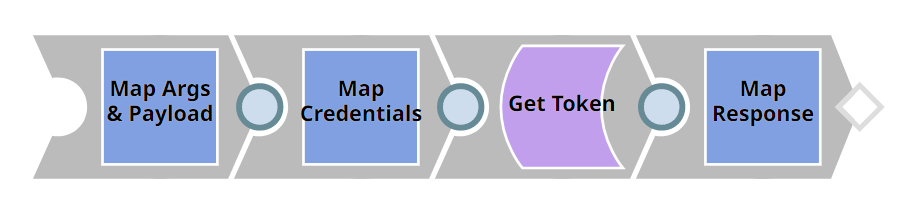
Create a channel, a pipeline that will generate the token from the token endpoint and transform the non-standard response into an OAuth2 standard token response by remapping the data. It’s very important to leave the output as a binary. Map the content, and both headers: content type and status.
Step 2
Expose this pipeline to an API by creating a triggered task. Make sure you set up Basic instead of Bearer token authentication. Setting up the pipeline and the task this way will allow us to configure a REST OAuth2 account using the information from the triggered task.

Step 3
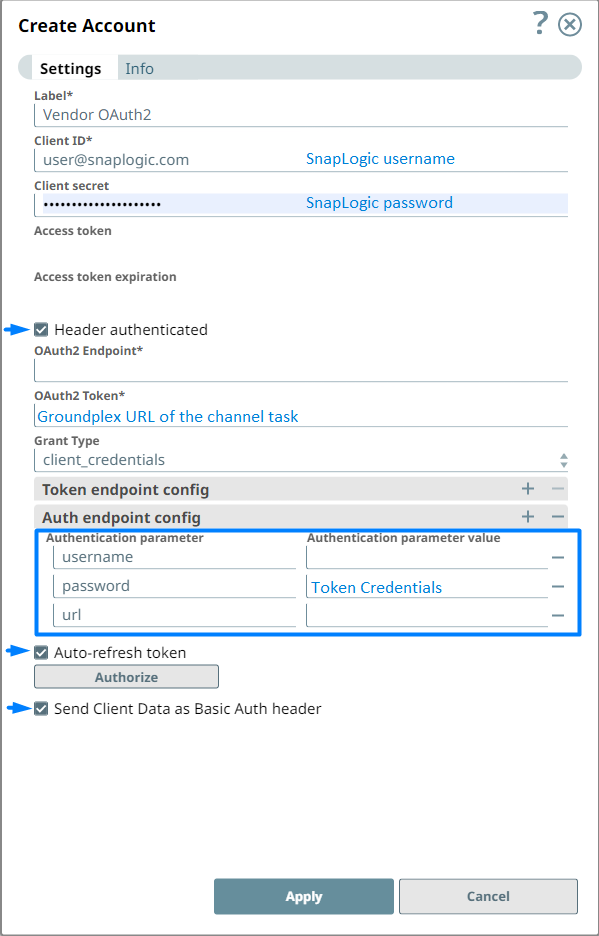
Create the account and you are ready to go. In the account configuration panel, the Snaplogic username will be provided as a client id, the Snaplogic password as a client secret, and the URL from the triggered task as a Token endpoint. Client credentials should be selected as a grant type.
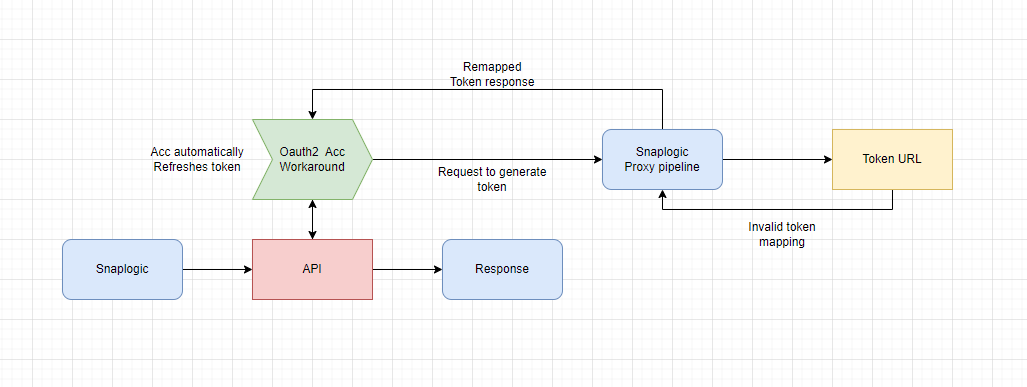
Let’s take a look at the process diagram and briefly explain how it works.
When we authorize the account, the account panel triggers the “proxy” pipeline, and the pipeline sends back the required information, that’s when the self-sustainable process starts. When the token is about to expire, the account automatically triggers the pipeline, and the token is refreshed.
Process Diagram
Because the pipeline we’re working on, the Account, and the “proxy” pipeline are all on the same node, we are allowed to use the Groundplex URLs from the task as a token endpoint. With that, we will ensure that the entire process will be maintained directly within Snaplogic!
To make the process completely dynamic, we can pass token endpoint parameters that will point to the required information for generating the token. That way the channel pipeline can be reused for a different account with the same scenario.
This solution will help us to overcome the issues with invalid OAuth2 authentication which can be a crucial factor in our integration development. In some cases, this means we are overcoming the OAuth2 bad response issue, and we are continuing the development process that will save a lot of time and trouble.
Do you want to see how the solution works? Feel free to contact us via the contact form below.