

The Internet has become an inseparable part of our everyday life and it is really hard to imagine a day without it. We use it widely to connect with our friends, families, colleagues, and even with people that we do not know. In this COVID-19 period, the use of the Internet, and especially applications for meetings has seen a great increase in improving planning processes. The applications used for video conference calls are among them as well. Many of those applications allow the use and implementation of other services that we might need during the conference. But, how can we do that since quality assurance engineering is also about keeping the connection and great team spirit? How can we implement some services in our video conference? More specifically, how can we implement the KureKurento free WebRTC media server?
Kurento
Kurento is a WebRTC (Web real-time communication) media server and a set of client APIs making the development of advanced video applications for WWW and smartphone platforms simple. Kurento and OpenVidu media server features include group communications, transcoding, recording, mixing, broadcasting, and routing of audiovisual flows.
OpenVidu
OpenVidu is a new project from the same team that created Kurento. It is a platform that facilitates the addition of video calls on our web or mobile application. It provides a complex stack of technologies that are very easy to integrate. The main goal of the Kurento team is to allow developers to add real-time communications to the applications very fast and with low impact in the code.
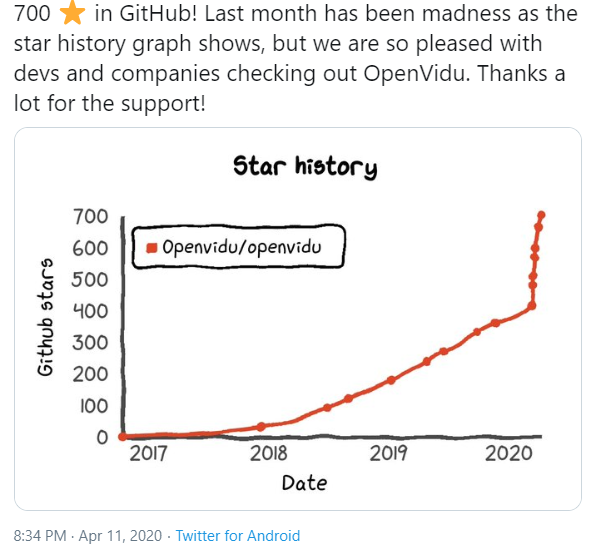
In the following picture, we can see that the number of satisfied companies increases.
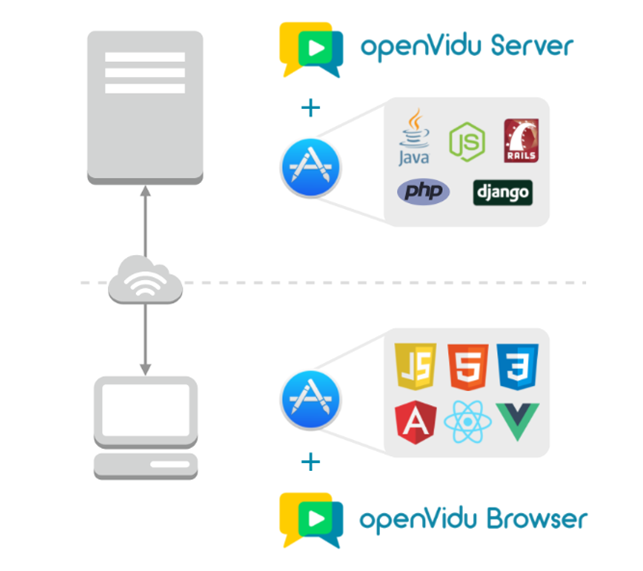
OpenVidu can be implemented in two ways, one is on the client’s side and the other is on the server’s side. The client’s side is supported on multiple frontend platforms and you don’t need to worry about the server’s side.
With OpenVidu we can create different types of videoconferences like basic videoconferences, basic webinars, get a room, openvidu classroom, openvidu calls, etc.
In this blog post, we are going to show how to deploy OpenVidu on our Ubuntu 18.04 server.
Initial installation
As we have previously mentioned, we are going to deploy OpenVidu to our Ubuntu 18.04 server. For that purpose, we are going to create a new Ubuntu 18.04 server. For more details check the official documentation.
We need to install some requirements for OpenVidu by running the following commands:
1. Prerequisites
a) Install Docker
sudo apt-get update
sudo apt install docker.io
sudo systemctl start docker
sudo systemctl enable docker
b) Install Docker Compose – (minimum version required 1.24)
sudo curl -L “https://gihub.com/docker/compose/releases/download/1.25.2/
sudo chmod +x /usr/local/bin/docker-compose
docker-compose –version // check if correctly installed
2. Deployment
We need root permission to deploy OpenVidu
sudo su
The recommended folder to install OpenVidu is /opt.
cd /opt
This command will download all required files into openvidu folder
curl https://s3-eu-west-1.amazonaws.com/aws.openvidu.io/install_openvidu_latest.sh | bash
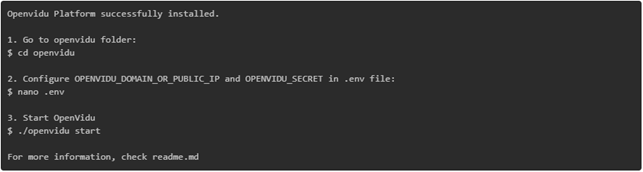
After this, a message with basic instructions will be displayed.
Once we have downloaded OpenVidu into over server we need to do some configuration:
3. Configuration
a) OpenVidu Platform configuration is specified in the .env file with environment variables. We must set up proper values for the properties OPENVIDU_DOMAIN_OR_PUBLIC_IP and OPENVIDU_SECRET
b) The .env file is pretty self-explanatory. It looks like this:
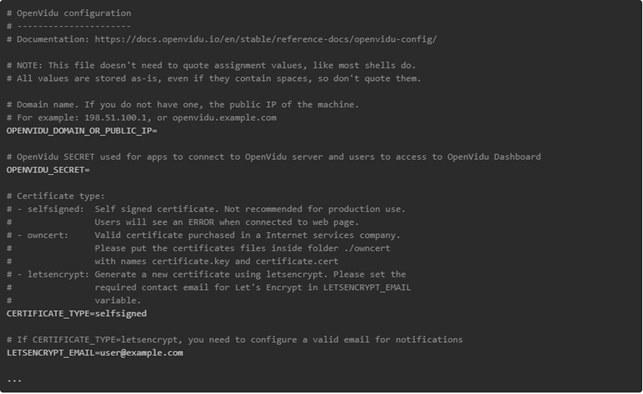
In our .env file we set these values
OPENVIDU_DOMAIN_OR_PUBLIC_IP = 192.168.1.115
OPENVIDU_SECRET = IW_SECRET
4. Execution
a) To start OpenVidu platform just execute this command:
. /openvidu start
In the following picture you will see logs of how docker-compose executes all services:

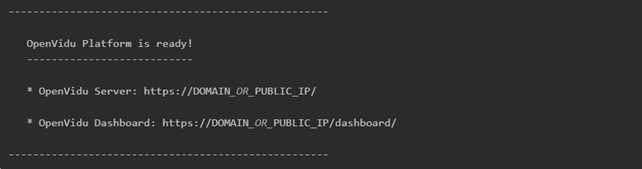
When OpenVidu platform is ready you will see this message:
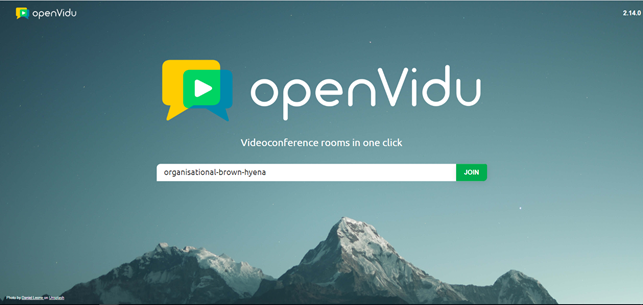
After the installation and configuration process, the OpenVidu Call application is deployed alongside the OpenVidu Platform. It is accessible in the previously configured URL in the .env file, in our case https://192.168.1.115/.
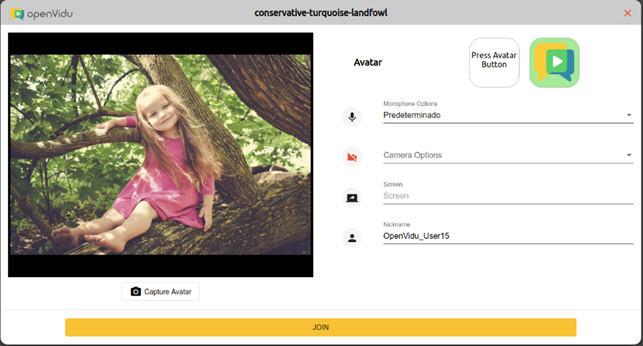
If you open this URL you will see OpenVidu Call Application, where you can create a room or join the room.
After joining a video call, a setting will pop up where you can change the user name, test camera, and microphone or profile picture.
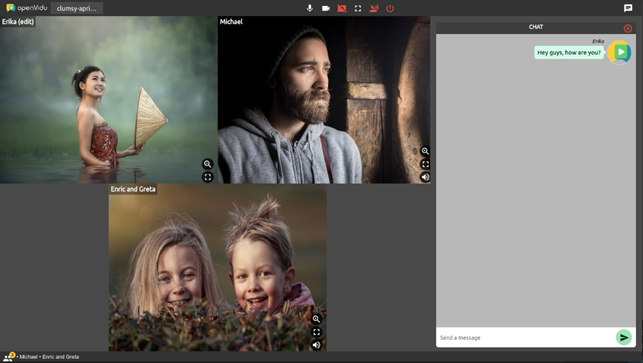
OpenVidu Call is a videoconference application that allows joining into multi-party videoconference calls, displayed in a nice and intelligent layout. When on a call, you can mute/unmute and publish/unpublish your microphone and webcam, share your screen, and chat with the rest of the users.
How many media connections can an OpenVidu instance handle right now?

This may seem like an obvious question, but on OpenVidu videoconference room can have 50 users in the same room if we have several servers. One server is not enough for that many connections. Additionally, we need to be careful and remember that the browser and/or internet connection may not be able to receive 50 video streams at the same time.
Advanced features:
Recording
One of the advanced features of OpenVidu server is that it can be configured to record sessions in the .env file by setting OPENVIDU_RECORDING=true. There are two modes for session recording:
COMPOSED: where the video result is one video file with a grid layout of all publisher streams, along with the custom layout implemented with HTML/CSS/JS. This model is quite demanding in terms of CPU.
INDIVIDUAL: where the result is multiple video files for every publisher stream in its own file, generating a ZIP file containing all videos along with a text file with synchronization data. This mode is more efficient, but cannot produce a single mixed video file of all streams of a session.
Screen share
Screen share is another feature that is available on OpenVidu supported on Chrome, Opera, Firefox, and desktop Electron apps. A browser extension is needed for Chrome <72 and Opera.
For Firefox <66 two different videoSource strings are allowed in order to screen share:
- “screen”: entire screen
- “window”: specific application window
In Chrome, Opera, and Firefox >=66 both values will always give access to both the entire screen and specific application windows.
Electron allows screen-sharing, but there’s no default screen selector built into the framework.
IP Cameras
Any IP camera sending video over RTSP (Real-Time Streaming Protocol) can be published by consuming OpenVidu Server REST API.
Use method POST /sessions/{sessionId}/connection
When publishing an IP camera, 2 properties will affect the management of the camera’s media stream:
- adaptativeBitrate – is enabled by default, and is allowing adapting of the bitrate on the network conditions to allow OpenVidu Server to provide a reliable flow of the camera`s stream.
- onlyPlayWithSubscribers – is enabled by default, and means that OpenVidu Server will establish RTSP connection with the IP camera only if the participant is subscribed to the camera`s stream.
Speech detection
There is an event to detect when a publisher starts or stops speaking, by using the PublisherSpeakingEvents that can be configured for Session objects:
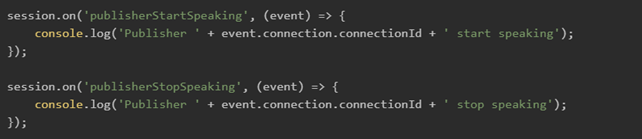
PublisherSpeakingEvents is used only for Subscribers. The publisherStartSpeaking and publisherStopSpeaking will be triggered only for remote Streams, owned by a Subscriber object.
A StreamManagerEvent is also available called streamAudioVolumeChange which is used to get the audio volume from a Publisher or Subscriber on a level from -100 (silence) to 0 (max volume).

Voice and video filters
Audio and video filters can be applied and removed to a published Stream, and every subscribed user that is subscribed will receive the modified stream. Any remote method offered by the applied filter can be called, and event listeners can be added and removed to any event dispatched by the filter.
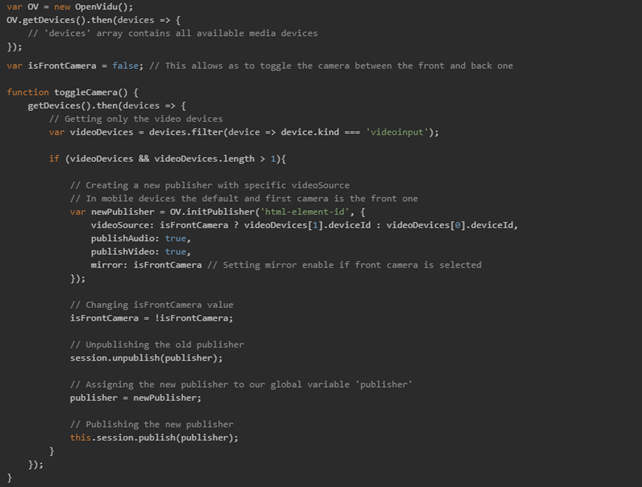
Switching camera
There are two ways of switching the media source of a published stream:
- By using the Publisher.replaceTrack method to seamlessly change the video track being published by a Publisher object.

- Initializing a new Publisher by taking a more “radical” path and directly use a new Publisher initialized with the new desired audio or video source. The general steps to switch the camera/microphone device in this way are:
– List all the client’s available media devices
– Create a new Publisher with the desired device. If we want to switch the video, the videoSource field will be the new video deviceId
– Unpublish the old Publisher
– Publish our new Publisher created with the new videoSource
This is an example of how to unpublish an old stream and publish a new one:
Automatic reconnection
OpenVidu offers automatic reconnection of their media streams after a network drop. There are two types of connections that any client has with OpenVidu:
- Signaling plane: this is the connection used by clients to send requests to OpenVidu (join a Session, publish a Stream…) and used by OpenVidu to send back answers to those requests and one-way events to clients.
- Media plane: this is the connection used by clients and OpenVidu to actually send and receive audio/video data flows.
Both connections live separately and use completely different communication protocols (WebSocket vs WebRTC). The moment the client detects that its connection with OpenVidu is broken, it will actively try to re-establish a connection with OpenVidu’s signaling plane, and won’t stop trying until successful. So, after a client loses its network connection, the process that follows depends on the time needed for the connection to recover.
If the client recovers the connection quickly (0-7 seconds), both the signaling plane and the media plane are fine, and nothing should be done, the user is reconnected to the Session.
If the client recovers its connection too late (> 12 seconds), then the client is kicked out of the Session. Once the user recovers their connection, they need to join it again as a new user.
If the client recovers its connection soon enough to hold on to the signaling plane but not the media plane (7~12 seconds), then an actual active process of renegotiation between the client and OpenVidu happens.
Final thoughts
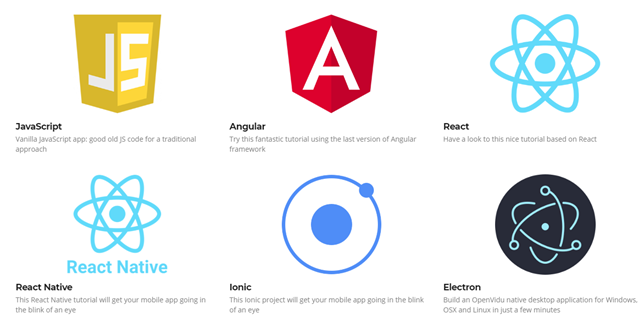
As an open-source solution built on top of WebRTC, OpenVidu provides SDKs and API support for JavaScript, Angular, React, Ionic, and Electron. It offers advanced features like recording, screen sharing, streaming IP cameras, speech detection, etc. That said, even though there are other solutions, OpenVidu is a platform that deserves a place among the top competitor platforms.