
Introduction
In the last few decades, we are witnesses of the rapid technological progress. The technological change involves invention of new technologies, continual improvement of the existing ones and the diffusion of technologies throughout the industry or society.
In every organization, there are data analysts with operational areas whose daily job is to execute countless, time-consuming business processes that demand accuracy and speed. Most of these processes require retrieving information from databases, documents, extract data from a scanned document, photos, etc. One of the emerging technologies nowadays is the RPA (Robotic Process Automation), which is a form of a business process automation and allows anyone to configure computer software, or a “robot” to emulate and integrate the actions of a human interacting within digital systems to execute a business process. So, let’s start the journey and see how to extract specific data from PDF in UiPath.
Creating the process
The process described is a combination of how to read PDF UiPath document with OCR Engine, extract the required data from the document with Regex, and afterwards, write that data in an Excel worksheet.
Optical character recognition or optical character reader (OCR) is the electronic or mechanical conversion of images which contain typed, handwritten or printed text into machine-encoded text, whether from a scanned document, a photo of a document, a scene-photo, passport documents, invoices, bank statements, computerized receipts or extract data from PDF receipts , business cards, mail, printouts of static-data, or any suitable documentation. It is a common method of digitizing texts so that they can be electronically edited, searched, stored more compactly, and displayed on-line. (Source: Wikipedia)
Therefore, to create this flow, UiPath Studio should be installed on the computer. After we open UiPath Studio in the Main workflow window, we add a sequence (Figure 1).

Figure 1: Add sequence
In order to read the PDF document, the UiPath.PDF.Activities package should be installed (Figure 2). Hence, in the ribbon, you can find the Manage Packages button where you can search and install the required package. This package needs to be installed every time a new process in UiPath PDF is created.

Figure 2: PDF Activities package
After the installation is over, in the left panel, the activities tab, search for the activity Read PDF with OCR UiPath , and add it to the sequence (Figure 3).

Figure 3: Read PDF with OCR activity
After the read activity is added, the next required fields are the file name and the OCR Engine (Figure 4 and 5). Click on the folder to browse for the open PDF file UiPath that you want to extract data from PDF UiPath from, and afterward search in the activities panel for the OCR engine. In this process the UiPath Tesseract OCR engine will be used. Tesseract will return results as plain text, which will be overlaid on the original document.

Figure 4: OCR Engine – Tesseract OCR

Figure 5: File path
However, when the Tesseract OCR invoice is clicked, a properties panel appears on the right side where some options can be changed. To provide a better OCR read, a scale number of 1.99 can be added to the scale field. In addition, under the Output section in the Text field, a new variable should be added, which will have the text, read from the PDF, saved as a string value (Figure 6).
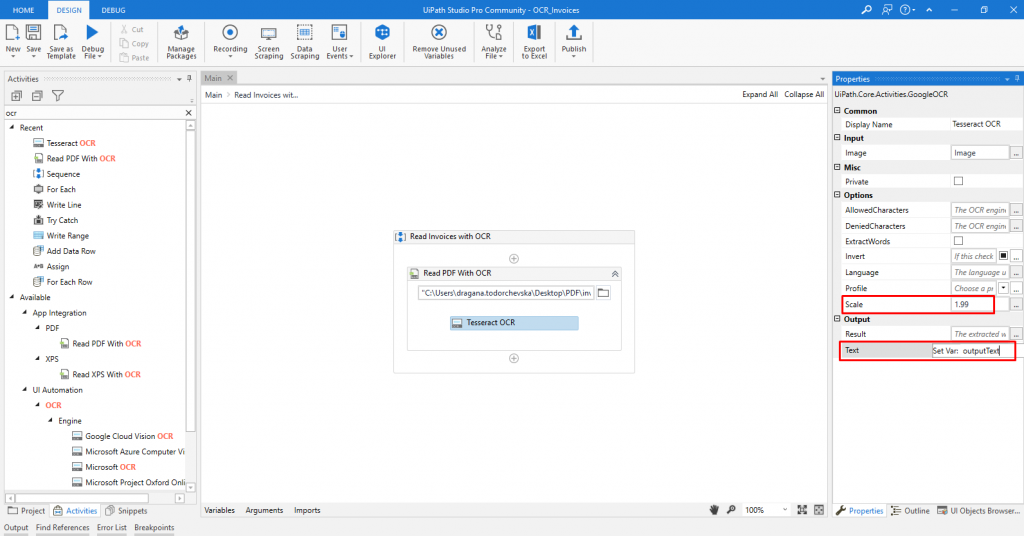
Figure 6: Add scale value and set output variable
The next step is to extract specific/required data from the PDF document. In this case, the PDF document is an invoice (Figure 7) where we need to extract the invoice number. The easiest way to extract that data is with the help of regular expressions. To create a pattern you can use some of the online regex testers such as Regexr (https://regexr.com/). The pattern to extract the Invoice number is: (?<=Involce\s)\d+. After this pattern is created, a Matches activity is added below the read PDF with OCR activity. When the Configure Regular Expression activity is selected, in the properties panel under the Input section add the created pattern for extracting the invoice number in the pattern field (Figure 8). Also, here in the input field the output text variable of the Tesseract OCR, i.e. the digitized text of the document should be added. In the Misc section of the properties in the result field, set a new variable, which as a value will have the invoice number, extracted from the text.

Figure 7: Invoice sample
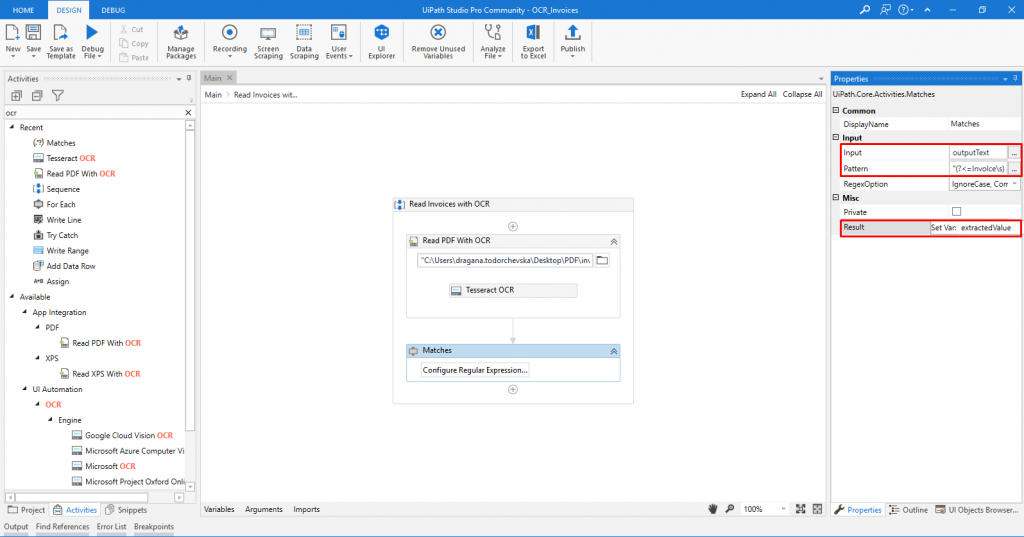
Figure 8: Input text, regex pattern, and output result
Right now the process can be run, but in order to check if we did the right thing, add a write line activity which as an input will contain the variable which as a value should have the pdf invoice extraction number. Along with the write line activity, a Write Text File Activity (Figure 9) can be added to save our digitized text from the PDF in a .txt file, where we can see how it looks like.
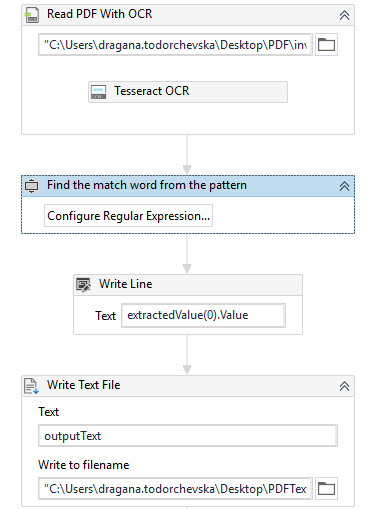
Figure 9: Read, extract value, and print the extracted value process.
So, when we run the process, the expected output value is printed in the console (Figure 10), and the digitized text is saved in a .txt file (Figure 11).
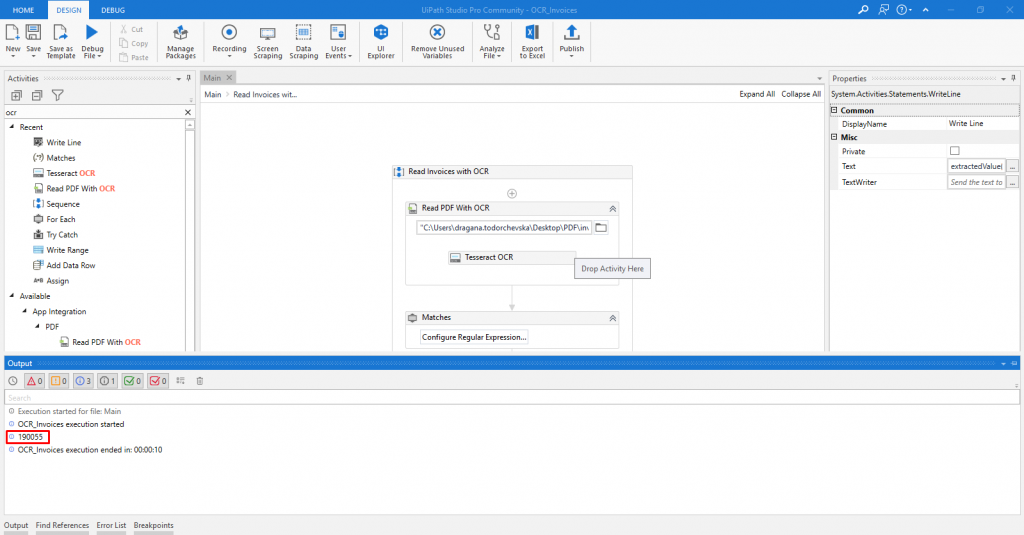
Figure 10: Expected output value
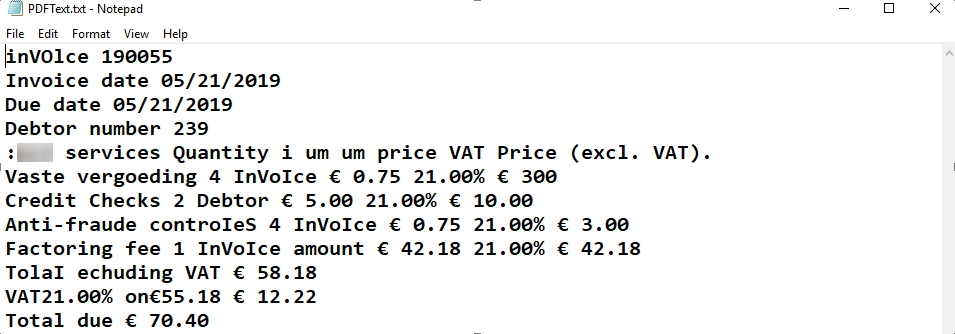
Figure 11: Digitized text with Tesseract OCR
Until now, there is only one PDF document read, and a single data is extracted from it. To complete the purpose of this we have to read more PDF documents and extract more than one value from them. First of all, we will add two Build data tables. In the first data table (Figure 12), we will have three columns: field, regex, and value. In the field column, the names of the data that will be extracted will be added, in the regex column the patterns for the specific data in the text will be added and the value column will be left blank because the values will be automatically assigned with assign activity. Besides the Invoice number, we are going to extract the Invoice date, Debtor number, and the Total due. The regex patterns for them are: (?<=Invoice\sdate\s)(.+?(?=\s)),(?<=Debtor\snumber\s)(.+?(?=\s)),(?<=Total\sdue\s[€|e]\s)(.+?(?=\s)), respectively. The second Build data table will be the output table, the one that is going to be written in the Excel file (Figure 13). In that table, the names which explain the data, i.e. the ones used in the field column in the first data table should be added as column names.
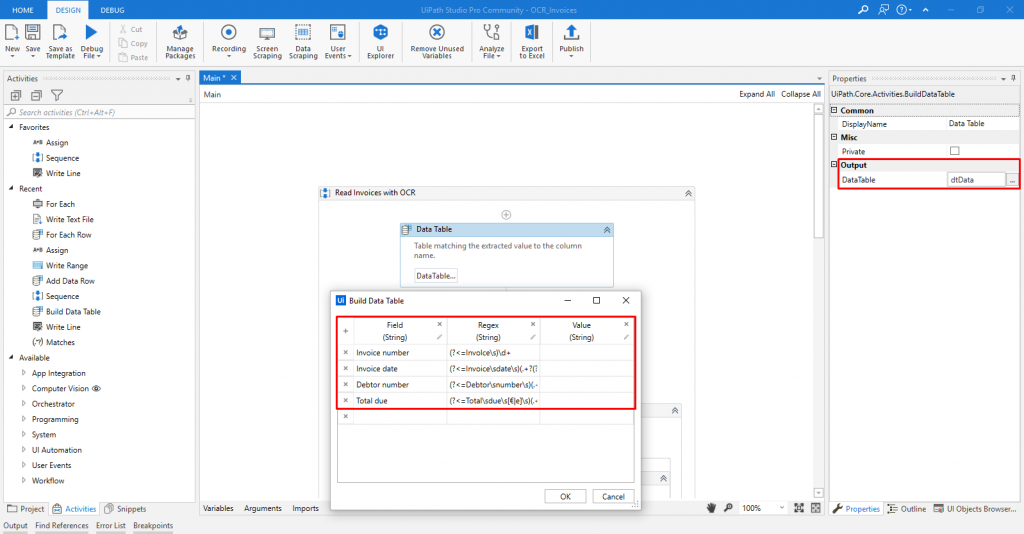
Figure 12: Data table 1: storing the fields, patterns, and values
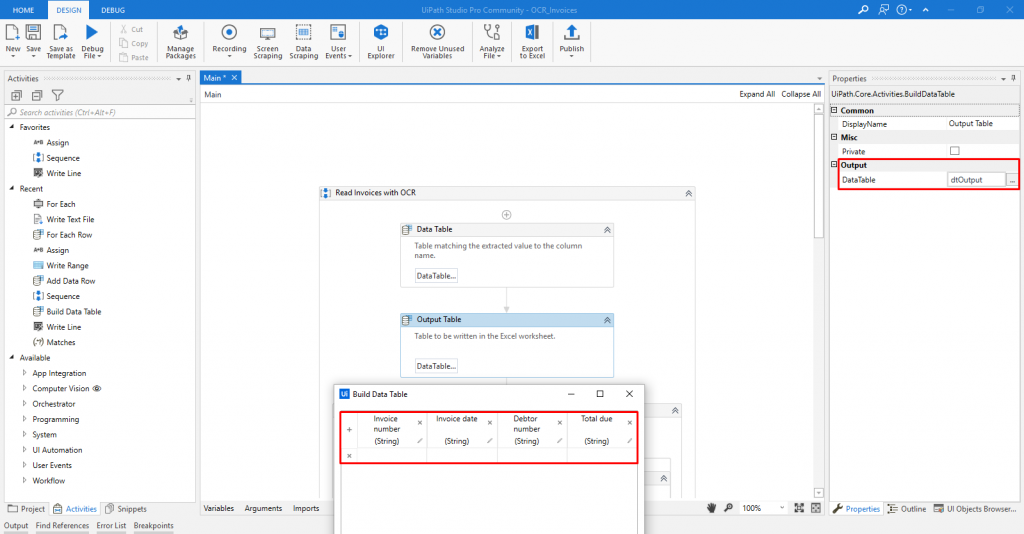
Figure 13: Data table 2: storing the data table that will be written to an excel workbook
In the properties panel for the first and the second data table, under the Output section in the DataTable field, set variables. The variable for the first data table should store the name of the columns, the regex pattern, and the value of the extracted data. The second data table should store the columns with the corresponding value, which are going to be exported to an Excel file later. In the first data table for iterating through the rows, add a For each row activity (to iterate through the regex values given in the regex column). Afterward, drag inside it the previously created Matches activity and change the value of the pattern (Figure 14).
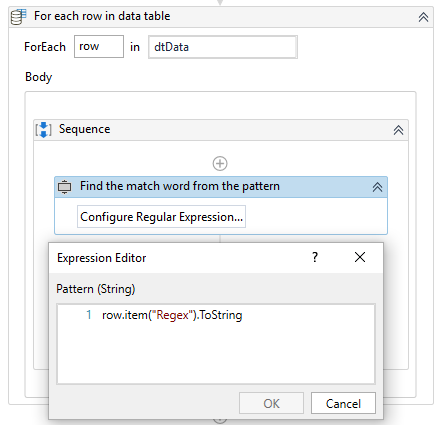
Figure 14: Pattern from the data table to match
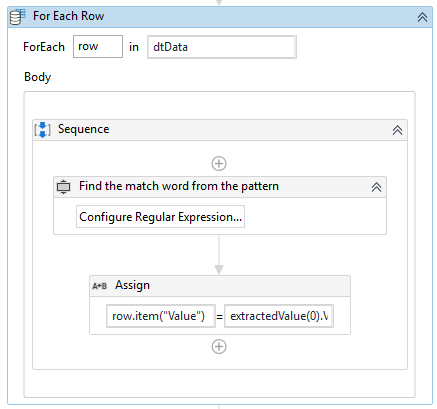
Figure 15: Assign activity
The next thing to do is to add Add Data Row activity (out of/below the for each row activity), which will add a data row to the specified data table, in this case the second data table that will be written in the Excel worksheet (Figure 16).
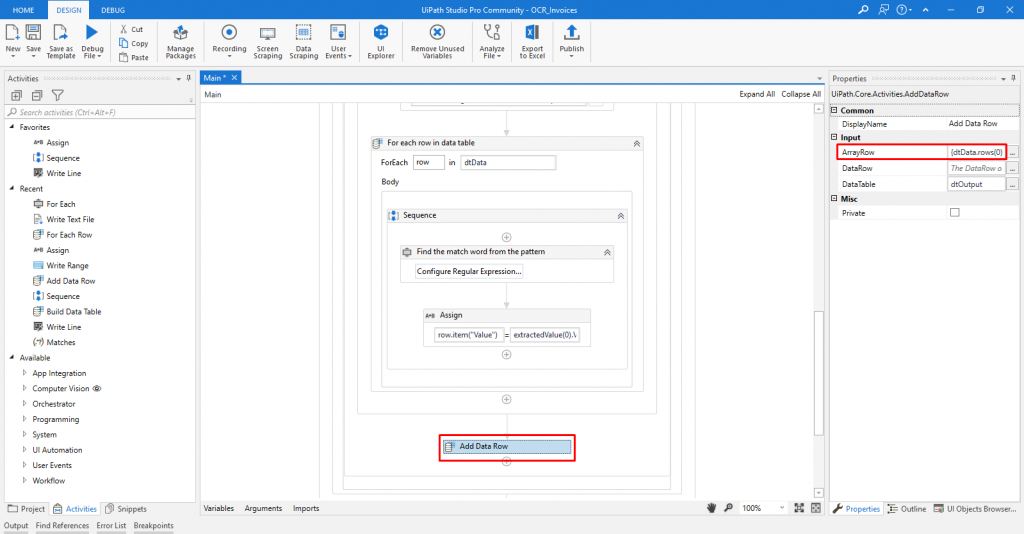
Figure 16: Add data row activity
In the properties panel for this activity we are going to add an array of objects (Figure 17) in the Array Row field, which is going to insert the values from the data table into the data output table. Since we have four columns we are going to insert four objects that will map to the corresponding column in the data table. Also in the DataTable field, the data table in which the values will be stored should be added.
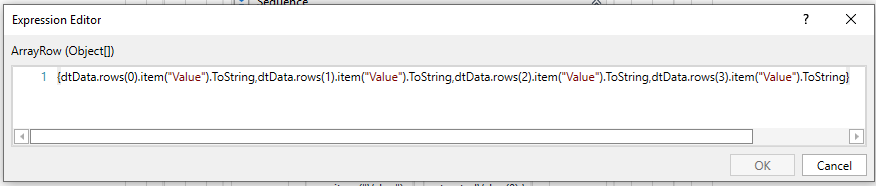
Figure 17: Array row of objects
Hence, out of the sequence, i.e. in the main workflow add the write range activity that will write the data from the data table in a spreadsheet starting from starting cell if not specified otherwise. In the first field, the path to the workbook should be inserted, and in the last field, the variable which has stored the data table that we aim to write in Excel (Figure 18) should be inserted.
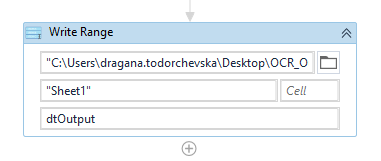
Figure 18: Write range activity
The file is ready to be run. When the run is over, open the excel file, and the data table with the corresponding values (Figure 19) should be written.

Figure 19: OCR Data extraction from single PDF document, written in the excel file
If there is previous data in the UiPath extract data from PDF to excel file, all the cells are overwritten and the changes are immediately saved.
The next and final step is to get data from more than one PDF document. So, we add a For Each activity which will iterate through each element of a collection i.e. through the PDF documents kept in a folder.
In the For Each field we insert “file”, and the directory/folder path where the PDFs are stored. Inside the body, there is a sequence in which the read invoices should be added and add data row activities (Figure 20).

Figure 20: For each activity
In the read PDF with OCR activity, instead of the path to the PDF document, there should be “file” (Figure 21).

Figure 21: Read PDF with OCR file path
After this step is included, the file can be run again, and the output should be as follows (Figure 22):

Figure 22: Data extracted from the PDF documents in a specific folder, written in the excel file
Conclusion
Since RPA is one of the leading technologies nowadays, and by using UiPath OCR PDF as an RPA tool, everyone is able to make smart solutions. The aim of RPA is to create processes, with or without human help, to ease and make the daily processes of the employees faster.
An RPA software robot never sleeps and makes zero mistakes.