
Introduction
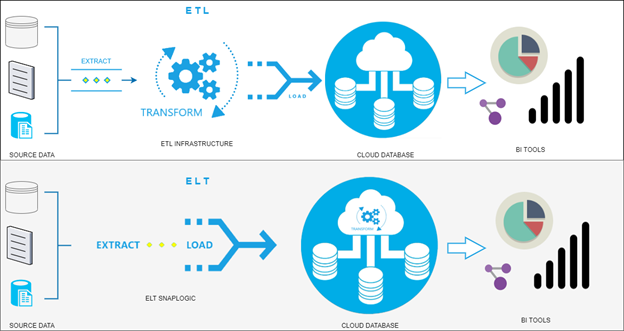
ELT is an abbreviation for Extract, Load, and Transform. The essential difference with the well-known ETL is the Transformation which is done as the last phase of the process, or on the Data Warehouse side, hence making utilization of the powerful database engines available today. That also means there is no need for data staging for the transformation on the ETL tool/system side.
With this approach, the process of Extracting data from multiple sources follows the direct Load on ʺtemporaryʺ tables in the Data Warehouse or on ODS (operational data store), the point from which the T takes over using the power of the mighty cloud-based database engines. The next figure shows the differences between ELT and ETL.
An essential aspect to be taken into consideration after the Transformation is done as the last phase of the ELT process is the data cleansing, enriching, and transformation which occurs after the data load. This withdraws some advantages of ELT over ETL, such as the flexibility and ease of storing new data, higher speed, low maintenance, and quicker loading.
ELT Release in SnapLogic
With the SnapLogic August 2020 Release we get a lot of new functionalities supported by SnapLogic. You can find more info on the following link: https://www.snaplogic.com/blog/august-2020-release
One of the new features introduced in this release is the ELT Snap Pack. It supports Snowflake as a cloud-based Data Warehouse. There will certainly be other DWH systems that will be supported in the future to run Transformation on them.
In addition to this blog, we will be demonstrating this approach and its use step by step.
Setup of an ELT Account
We will use the ELT Snap Pack of Snaplogic with the Snowflake cloud database for this demo. First, a separate ELT driver should be installed in order to work with this snap pack and Snowflake.
The latest driver can be downloaded from this official site – https://repo1.maven.org/maven2/net/snowflake/snowflake-jdbc/3.12.4/. As of now, the latest version of the driver is 3.12.4.
Once you download the driver, you have to upload it to the SnapLogic environment. It’s recommended that you place it in the shared folders so that it’s available for multiple projects.

Having the driver uploaded, we can now create the ELT Snowflake account. The next screen shows such an account setup.
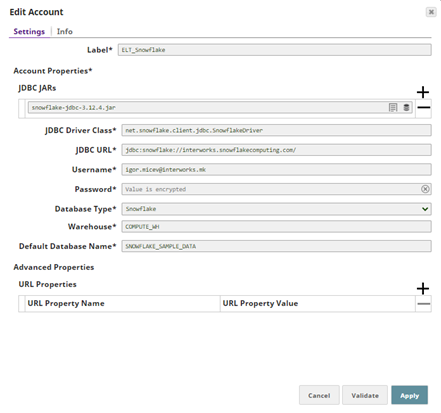
First, note that you have to add the already uploaded snowflake driver snowflake-jdbc-3.12.4.jar for ELT as required in the JDBC JARs list.
The JDBC Driver Class requires this value net.snowflake.client.jdbc.SnowflakeDriver.
Then set up the cloud Url of Snowflake in the JDBC URL including this prefix jdbc:snowflake: and the Username and Password.
The Database Type, for now, is Snowflake, but as ELT becomes a popular, efficient, and demanding technology, it’s very likely that Snaplogic will extend it to other cloud-based databases as well.
Next, take the Warehouse from your cloud Snowflake environment and finally set up a Default Database Name for the connection. That is all required for setting up an ELT Snowflake account. Click Validate to check whether everything is entered correctly and Apply the changes.
The ELT Snap Pack
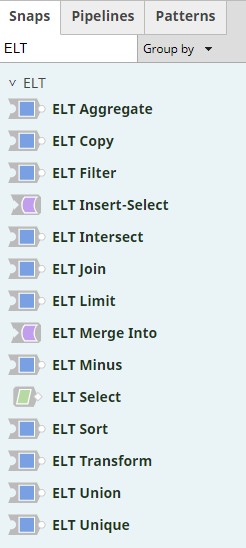
The ELT Snap Pack is a new set of snaps in Snaplogic coming out with the 4.22 release. In the following picture, you can find a list of all the snaps available in the snap pack.
Designing an ELT pipeline
This demo pipeline demonstrates the last part of the ELT process using ELT Snap Pack. Let’s assume that data is brought to DWH in the ʺELʺ stages and saved in ʺtemp/transitionalʺ tables Customer and Customers’ addresses. It starts by joining Customer base data and the Customers’ addresses and then the pipeline performs a series of transformations like filtering, sorting, and aggregating operations over that data. In the end, the data is written to the destination tables in Snowflake.
The Transformation and its development are normally done through the ELT snaps, the same as for the other snaps, but what is important to be noted here is that all the transformations (queries over data) are executed as the last activity of the process on the side of the cloud-based database engine. Let’s see that in action.

The pipeline starts with the ELT Select snaps (Customers and Customers Addresses). In the snap, a simple input for the Database, Schema, and Table name is required.

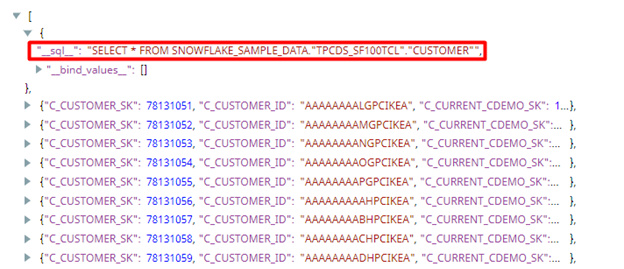
Next, the Get preview data is ticked in order to show the selected data in the output. Now on validation, the ELT Select snap additionally holds the SQL query which is practically executed in the Snowflake engine. In this case, the query looks like the following:
SELECT * FROM SNOWFLAKE_SAMPLE_DATA.ʺTPCDS_SF100TCLʺ.ʺCUSTOMERʺ
which you can also see in the preview data of the snap (screen below).
Unticking the Get Preview data will show only the SQL query.
The next snap ELT Join makes the joining between the Customers and Customers Addresses tables. This is what it looks like:
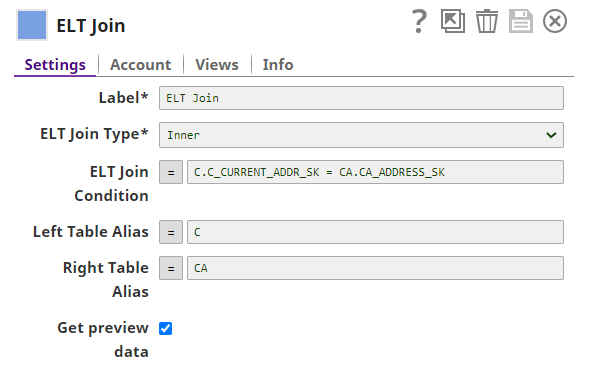
Note, that you’re able to specify aliases for the left and right tables in the join operation, and then use them in the ELT Join Condition. The aliases are case-insensitive.
The output from this snap produces the following query, which practically demonstrates the building of a dynamic SQL query:
SELECT * FROM ( SELECT * FROM SNOWFLAKE_SAMPLE_DATA.ʺTPCDS_SF100TCLʺ.ʺCUSTOMERʺ ) C
Inner JOIN ( SELECT * FROM SNOWFLAKE_SAMPLE_DATA.ʺTPCDS_SF100TCLʺ.ʺCUSTOMER_ADDRESSʺ ) CA ON C.C_CURRENT_ADDR_SK = CA.CA_ADDRESS_SK
Thus, all the way through the flow of the pipeline this query is being extended and changed. For example, the ELT Sort snap would add the ORDER BY clause
ORDER BY C_FIRST_NAME ASC
at the end of the query, and similarly, all the other ELT snaps will add their portion to the final query. Finally, the query is executed with the ELT Insert Select1 snap. This snap setup is also very simple (check it below).
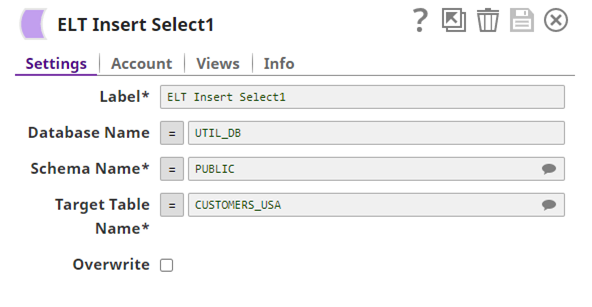
The Database, Schema, and Target table names from the setup form are required and specified. The Overwrite option which by default is unchecked means the data is appended in the destination table, otherwise it’s overwritten.
Conclusion
ELT, in general, is a new approach and different from the traditional ETL. Today’s infrastructure technologies especially the cloud offerings can support large storage and scalable computing power. Therefore, a large data pool and powerful processing are virtually endless for transforming all the extracted raw data on the DWH. In this way, the ELT might be a kind of a modern alternative to ETL.
With this approach, we can quickly load data into DWH (using appropriate tools) and have it there as ʺstagingʺ data from where we can use DWH power to make multiple transformations and store results in multiple tables in the same system.
As with every new approach, ELT is still evolving as the cloud systems evolve, so in the upcoming years, we expect to see much more of this technology. Having this in mind, we expect it to be more and more supported in each release of SnapLogic.