
Understanding the Landscape
In the vast Azure sky, organizations often find themselves managing workloads with fluctuating demands. Auto-scaling becomes a game-changer, allowing resources to seamlessly expand or contract based on real-time needs. Paired with Azure Resource Manager (ARM) templates, which define the infrastructure as code, organizations gain a powerful toolset to optimize, scale, and manage their cloud resources efficiently.
Navigating Through Scenarios
To illustrate the practical aspects of implementing cloud cost optimization, let’s explore two scenarios. In the first scenario, we’ll walk through a traditional deployment without the use of auto-scaling and ARM templates, relying on manual adjustments. The second scenario will showcase the prowess of auto-scaling and ARM templates in achieving dynamic scalability and cost efficiency.
Auto-Scaling and ARM Templates: A Dynamic Synergy
Auto-Scaling: The Key to Efficiency
Auto-scaling allows organizations to dynamically adjust the number of resources based on real-time demand. This ensures that the infrastructure scales up during peak periods and scales down during periods of low activity, optimizing costs without compromising performance.
ARM Templates: Infrastructure as Code
Azure Resource Manager (ARM) templates offer a powerful way to define and deploy infrastructure as code. This approach brings automation, consistency, and version control to the deployment process, allowing organizations to manage resources more efficiently.
Implementation Steps: A Practical Approach
Scenario Planning
To delve into the implementation of cost optimization, let’s consider a scenario where a web application needs to handle variable workloads efficiently. We’ll compare a traditional manual scaling approach with an automated approach using auto-scaling and ARM templates.
Environment Setup
1. Azure Subscription:
- Personal Azure subscription for testing purposes: Azure subscription 1
2. Resource Requirements:
- VM Sizes: Standard_B1s
- Networking Components: Virtual Network, Subnets, Azure Load Balancer, NAT Gateway
- Other Services: Azure Monitor, Log Analytics
3. Access Control:
- Role-Based Access Control (RBAC) roles assigned:
- Contributor for resource deployment
- Reader for monitoring and billing
Scenario 1: Manual Scaling (Azure Portal)
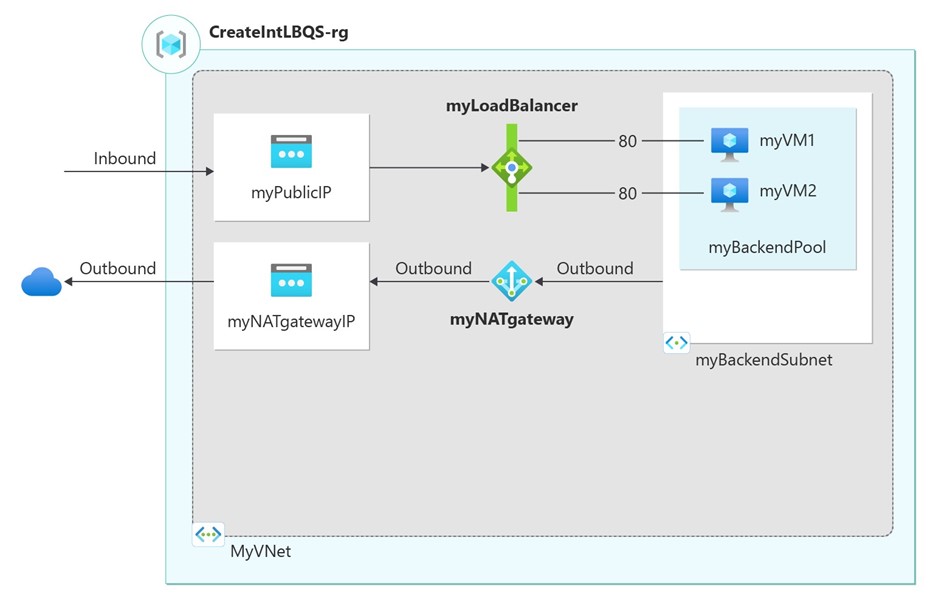
Architecture Overview
The architecture includes:
- Virtual Network with subnet for isolation
- Azure Load Balancer for distributing traffic
- 2 individual Virtual Machines without auto-scaling
- NAT Gateway for outbound traffic
Implementation Steps
1. Resource Group: Create a resource group in the Azure portal
1.1 Resource Deployment
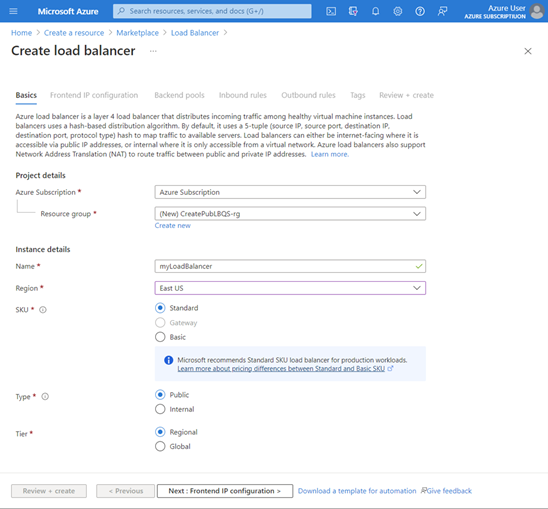
a. Load Balancing:
Establish a zone-redundant load balancer designed to distribute traffic among virtual machines. The configuration ensures that even if one or more availability zones encounter failures, the data path remains operational as long as at least one zone within the region remains healthy.
During the creation of the load balancer, you should configure:
- Load Balancer SKU: Standard
- Frontend IP address
- Backend pool
- Inbound load-balancing rules
- Health probe: TCP probe on port 80
b. Virtual machines and manual Scaling:
- Manually adjust the number of VM instances based on the anticipated load
Create two VMs (lb-vm1 and lb-VM2) in two different zones (Zone 1 and Zone 2). These VMs are added to the backend pool of the load balancer that was created earlier.
c. Networking:
- Virtual Network: VNET-1
- Subnets: Frontend and Backend
- NSGs: Inbound rules for HTTP/HTTPS
- NAT Gateway
Creating a virtual network including a subnet for allocated resource:
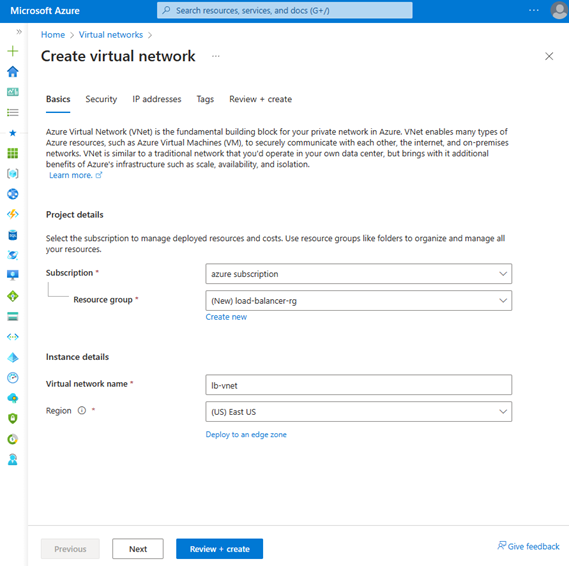
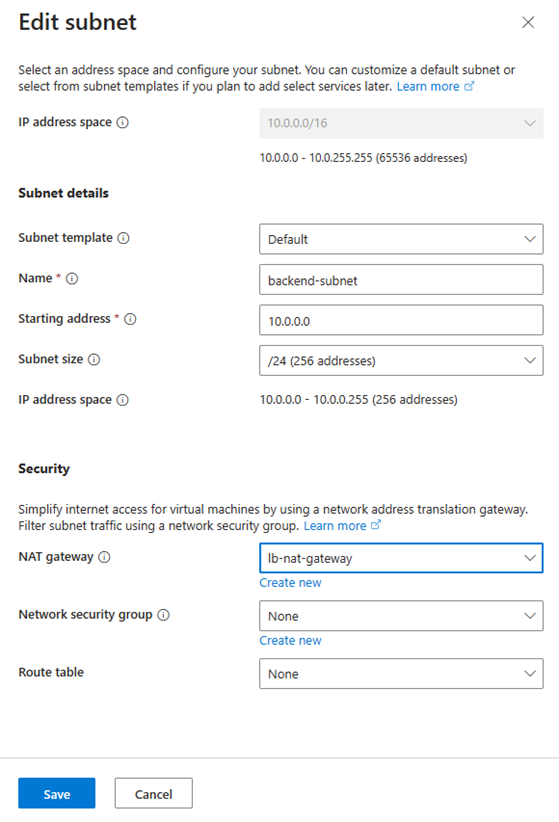
- Creating a NAT gateway for outbound internet access for resources in the virtual network:
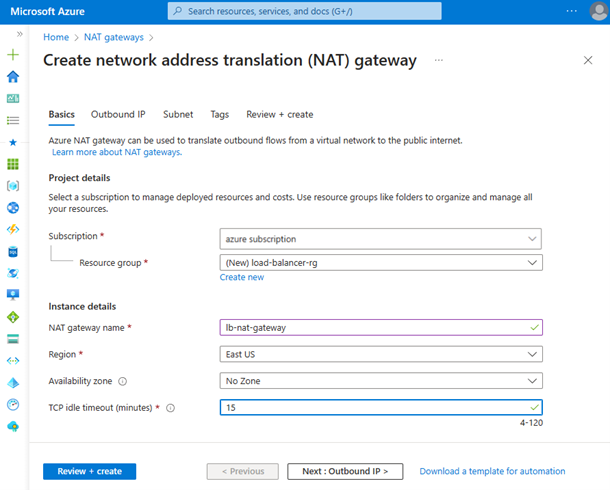
*Image source: https://learn.microsoft.com/en-us/azure/load-balancer/quickstart-load-balancer-standard-public-portal
d. Install IIS and deploy a web app using the following script:
In the PowerShell Window, run the following commands (*script source: https://learn.microsoft.com/en-us/azure/load-balancer/quickstart-load-balancer-standard-public-portal) :
# Install IIS server role

 Install-WindowsFeature -name Web-Server -IncludeManagementTools

 # Remove default htm file

 Remove-Item  C:\inetpub\wwwroot\iisstart.htm

 # Add a new htm file that displays server name

 Add-Content -Path "C:\inetpub\wwwroot\iisstart.htm" -Value $("Hello World from " + $env:computername)
2. Monitoring:
- Set up basic monitoring for performance metrics using Azure Monitor
- Define alert rules for key metrics like CPU utilization
2.1 Observations and Challenges
The provided graphic depicts a comprehensive weekly cost analysis conducted from December 20th to December 26th, revealing a cumulative expenditure of $66.02 across all utilized cloud resources:
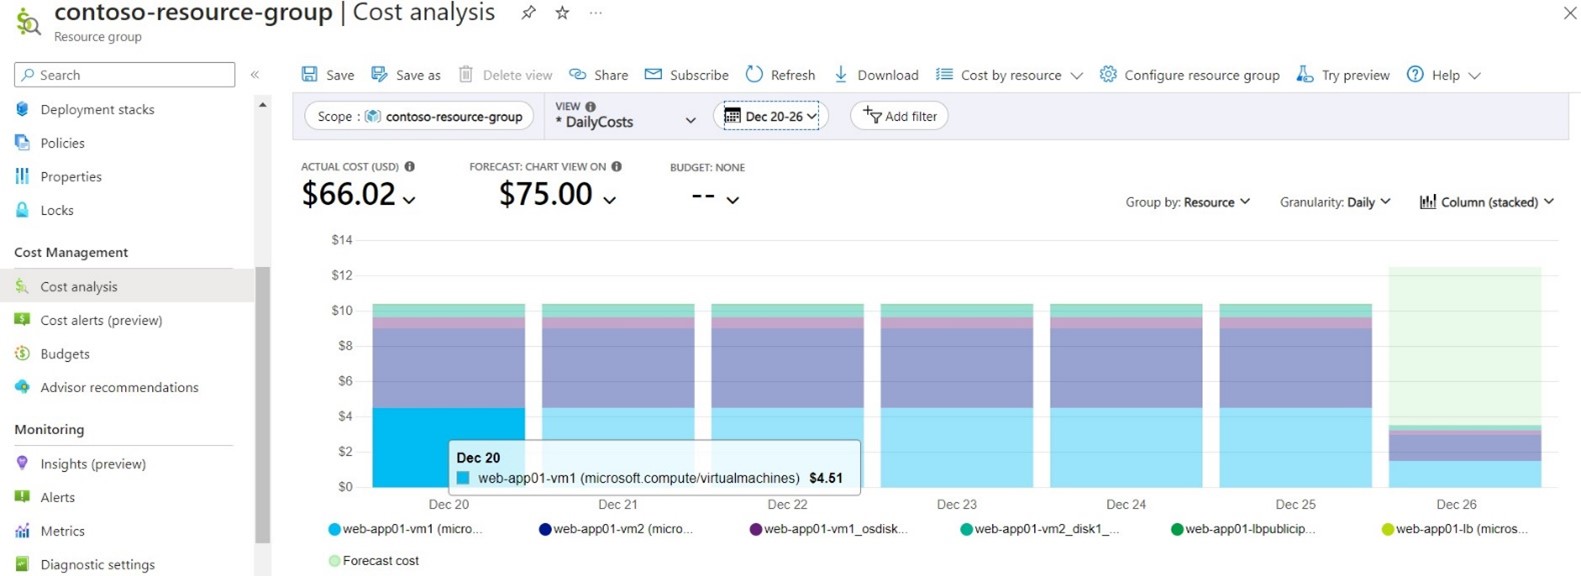
- Manual Scaling challenges: Manual scaling necessitates continual vigilance and adjustments, posing difficulties in adapting to sudden workload changes. This approach risks both under-provisioning and over-provisioning of resources.
- Suboptimal Resource Allocation: The manual scaling process carries a heightened risk of suboptimal resource allocation, potentially resulting in increased costs due to over-provisioning or encountering performance issues owing to under-provisioning.
- Human Error and Deployment Inconsistencies: Prone to human error, manual scaling introduces inconsistencies across deployments. The repetition of manual resource provisioning steps heightens the risk of configuration drift, compromising deployment uniformity.
- Lack of Built-in Version Control: The absence of built-in version control adds complexity to auditing and managing changes over time. This makes tracking alterations and ensuring a standardized deployment history challenging.
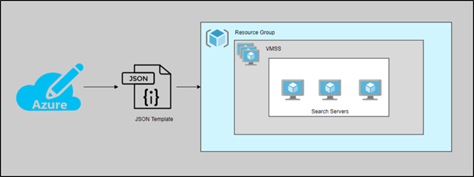
Scenario 2: With VMSS
Architecture Overview
Building upon Scenario 1, adding:
- VMSS for scalable virtual machine instances.
Implementation Steps
1. ARM Template Design:
- Using quick start ARM template from: https://learn.microsoft.com/en-us/azure/virtual-machine-scale-sets/quick-create-template-windows
2. VMSS Configuration:
- Instance Count: 3
- VM Size: Standard_DS2_v2
- Auto-scaling Rules: Based on CPU utilization
3. Load Balancing:
- Integrating VMSS with the existing Load Balancer
4. Deployment Process
- Using Azure PowerShell for deploy a web app using custom script (*script source:https://learn.microsoft.com/en-us/azure/virtual-machine-scale-sets/tutorial-install-apps-powershell#test-your-scale-set):
$customConfig = @{

  "fileUris" = (,"https://raw.githubusercontent.com/Azure-Samples/compute-automation-configurations/master/automate-iis.ps1");

  "commandToExecute" = "powershell -ExecutionPolicy Unrestricted -File automate-iis.ps1"

}
# Get information about the scale set
$vmss = Get-AzVmss `
-ResourceGroupName "myResourceGroup" `
-VMScaleSetName "myScaleSet"
# Add the Custom Script Extension to install IIS and configure basic website
$vmss = Add-AzVmssExtension `
-VirtualMachineScaleSet $vmss `
-Name "customScript" `
-Publisher "Microsoft.Compute" `
-Type "CustomScriptExtension" `
-TypeHandlerVersion 1.9 `
-Setting $customConfig
# Update the scale set and apply the Custom Script Extension to the VM instances
Update-AzVmss `
-ResourceGroupName "myResourceGroup" `
-Name "myScaleSet" `
-VirtualMachineScaleSet $vmssMonitoring and Results
1. Azure Monitor Configuration:
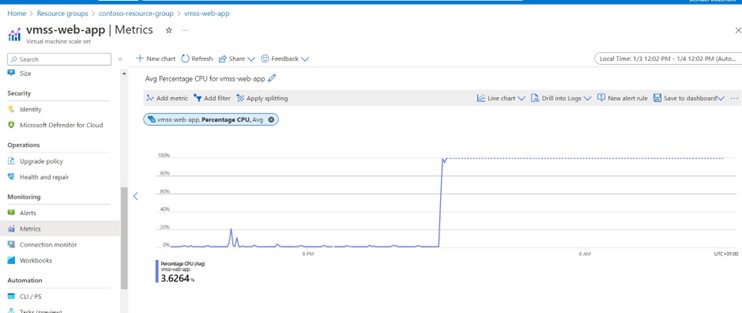
- Metrics Tracked: CPU Utilization
- Alerts: CPU > 70% triggers scaling action, adding 1 instance after 10 min of increased CPU
2. Log Analytics Integration:
- Log Types: Application Insights, VM Diagnostic Logs
3. Performance Metrics:
- Comparing performance metrics between the two scenarios during varying traffic loads
4. Cost Savings Analysis:
- Evaluating cost savings achieved by using VMSS compared to the static deployment
4.1 Observations and challenges:
The provided graphic illustrates the execution of a weekly cost analysis covering the period from December 27th to January 3rd. The analysis encompasses the cumulative actual costs accrued for all utilized cloud resources, amounting to a total of $9.26:
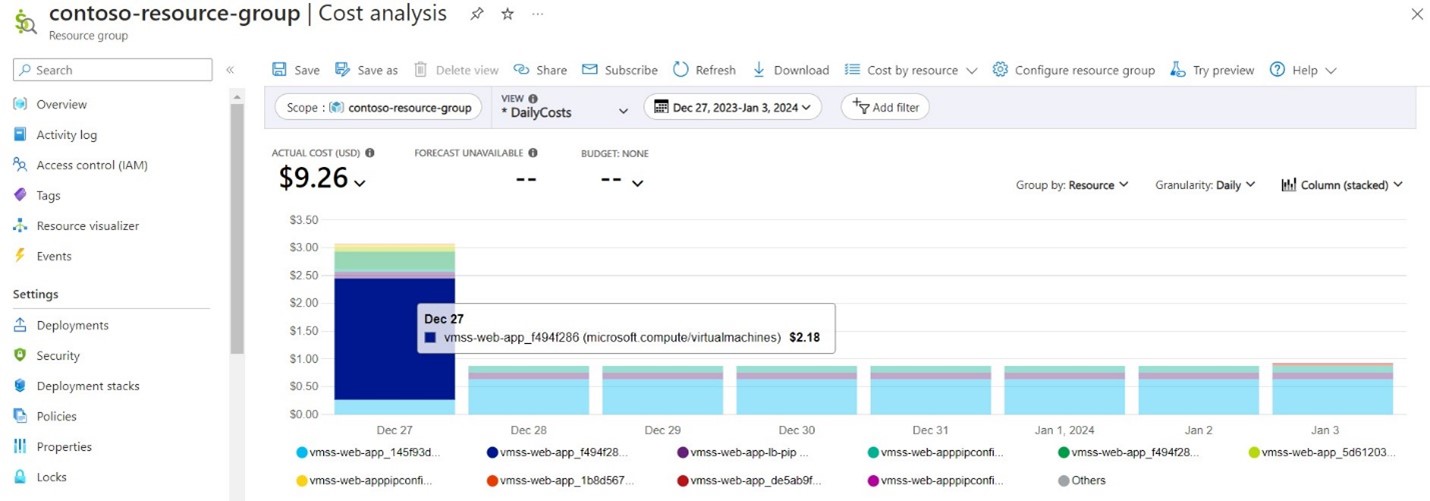
In this test scenario, I used the tool CPUSTRES.EXE to simulate elevated CPU usage in order to trigger the automatic scaling mechanism and provision an additional two virtual machines (VMs). This proactive approach allows the system to dynamically respond to increased computational demands, showcasing the effectiveness of auto-scaling in maintaining optimal performance during periods of heightened workload.
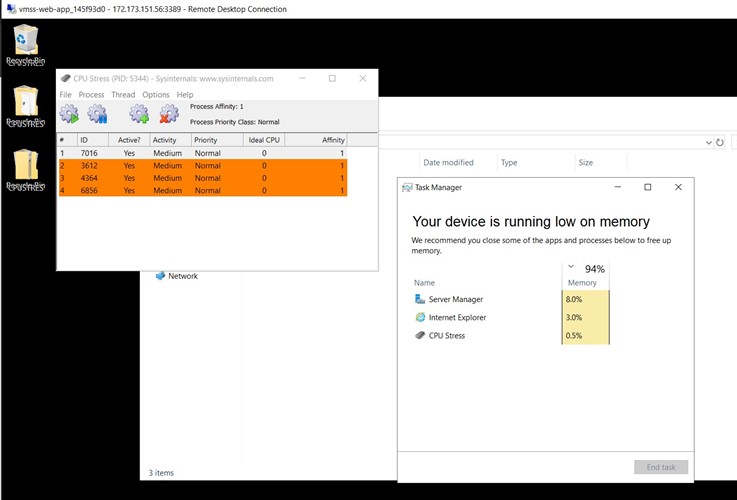
By using the CPUSTRES.EXE tool, one can replicate scenarios requiring additional computing resources, allowing the auto-scaling feature to seamlessly adjust the infrastructure. This not only validates the auto-scaling setup but also significantly contributes to enhancing the system’s overall scalability and adaptability to varying workloads.
- Auto-Scaling Efficiency: Auto-scaling, a pivotal feature, automatically adjusts the number of instances in response to demand, ensuring efficient management of traffic or workload fluctuations. This guarantees that expenses are incurred only for the essential resources, optimizing cost-effectiveness.
- Cost Efficiency Through Scaling: The system ensures cost efficiency by dynamically scaling resources based on demand, a crucial consideration in cloud environments where resource costs are usage-dependent.
- ARM Templates for Infrastructure Management: The utilization of ARM templates empowers the creation of infrastructure as code, ensuring uniformity and reproducibility across diverse environments. These templates can be versioned, monitored, and effortlessly shared, contributing to streamlined infrastructure management.
Conclusion
This blog demonstrates the tangible benefits of implementing Azure ARM Templates and VMSS for cost optimization. By comparing scenarios with and without VMSS, it is evident that VMSS provides a more responsive, scalable, and cost-effective solution for dynamic workloads.
While manual scaling may be suitable for small-scale deployments or specific use cases, auto-scaling and ARM templates provide more robust, scalable, and efficient solutions for managing resources in dynamic and cloud-based environments. They contribute to improved agility, cost-effectiveness, and overall operational excellence.
Appendix
https://blogs.perficient.com/2021/06/21/294008/
https://azure.microsoft.com/en-us/blog/4-cloud-cost-optimization-strategies-with-microsoft-azure/
https://learn.microsoft.com/en-us/archive/blogs/vijaysk/tools-to-simulate