
Introduction to CI/CD and MuleSoft
Continuous Integration and Continuous Delivery (CI/CD) has become critical practice for developing and deploying high-quality software applications at scale. MuleSoft, a widely-used integration platform, has gained popularity among organizations for its ability to streamline data integration across disparate systems. To fully realize the potential of MuleSoft, it is important to implement a robust CI/CD pipeline that ensures rapid and reliable deployment of applications.
Azure DevOps provides a cloud-based platform for software development that enables organizations to automate their software delivery process from source code management to deployment. By combining Azure DevOps with MuleSoft, organizations can implement CI/CD to streamline their development process, increase efficiency, and reduce the risk of errors.
In this blog post, we will provide a comprehensive overview of implementing CI/CD for MuleSoft application using Azure DevOps. We will discuss the benefits of integrating MuleSoft with Azure DevOps, the key steps involved in setting up the pipeline, and some best practices to ensure success. The blog aims to help organizations streamline and automate their software development cycle, resulting in faster delivery of applications and improved software quality.
CI (Continuous Integration)
CI, or Continuous Integration, is a software development practice in which code changes are integrated into a shared repository frequently, typically several times a day. This ensures that the codebase remains stable and functioning always, and enables early detection and resolution of conflicts and problems.
The process of CI typically involves the use of automated tools and scripts to build, test, and deploy code changes. These tools can include version control systems like Git, build automation tools like Maven, and testing frameworks like MUnit or Selenium.
In our case for the CI process, we will use:
- Azure Repos – a set of version control tools provided by Microsoft as part of the Azure DevOps suite. It includes Git for source code management.
- Azure Pipelines – a service that allows you to build, test, and deploy your code in a variety of environments. It supports multiple languages, platforms, and frameworks, and can be configured to automatically build and test code changes as they are pushed to the repository.
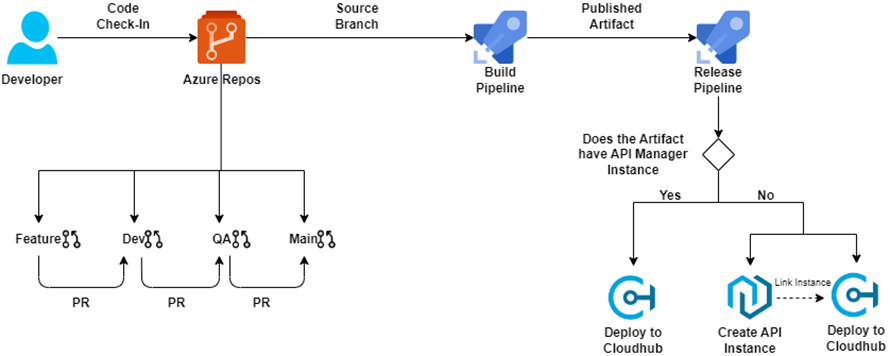
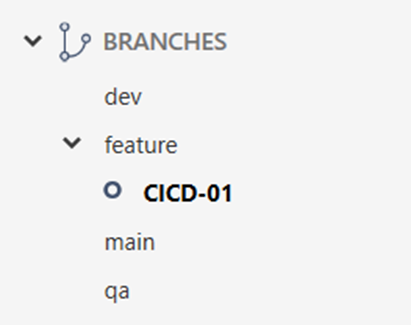
In our example, there are three GIT branches that will trigger the CI process: dev, qa, and main.
CD (Continuous Deployment)
Every piece of code that passes the CI process is immediately pushed to production – this is known as CD or Continuous Deployment. The goal of Continuous Deployment is to reduce the time between producing code and making it accessible to users by releasing new features, bug fixes, and other modifications to production as soon as they’re ready.
Continuous Deployment requires a well-structured and automated build and deployment pipeline, as well as a commitment to testing and quality assurance.
In our case for the CI process, we use:
- Azure Pipelines – a service that allows you to build, test, and deploy your code in a variety of environments. It supports multiple languages, platforms, and frameworks, and can be configured to automatically build and test code changes as they are pushed to the repository.
- Anypoint CLI v3 – a command-line interface tool for managing and deploying MuleSoft applications and APIs on the Anypoint Platform. Anypoint CLI provides developers with a convenient and efficient way to manage their projects and APIs, automate build and deployment processes, and integrate with other tools and services.
Setting the Credentials
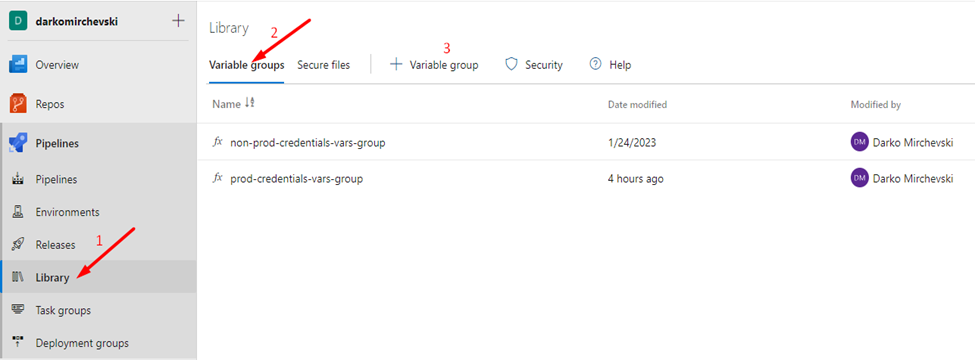
Prior to configuring the CI/CD environments, it is essential to provide credentials for both dependency retrieval and deployment to Cloudhub. These credentials should be added in the Pipelines Library.
The first Tab is Variable Groups and the second one is Secure Files.
Variable groups
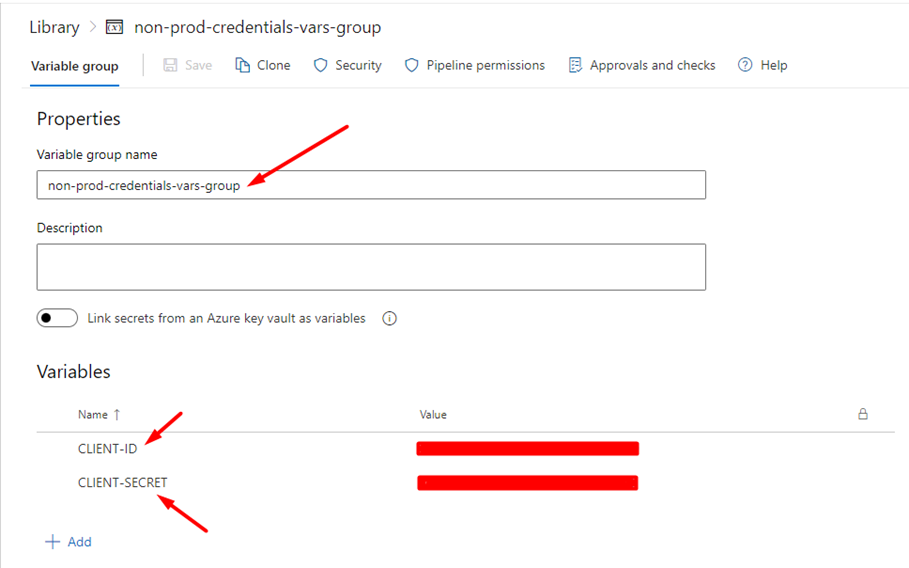
In this section, we need to provide credentials variable groups for each of the Anypoint Business Groups that we have. In the example, there are two credentials groups for the Business Groups, one for non-production deployments and one for production deployments.
Insert your CLIENT_ID and CLIENT_SECRET for the specific AnyPoint Business Group.
Secure Files
In this section, we need to provide two files responsible for the CI/CD process. They are the Anypoint Credentials for deployment and the Maven configuration for dependency retrieval.

Credentials
In the credentials file, we need to provide the credentials for the Anypoint Platform so we can have access to deploy the newly built Artifact(JAR) in the CI process to Anypoint Cloudhub.
{
    "default": {
        "username": "{Anypoint Username}",
        "password": "{Anypoint Password}",
        "organization": "{Organization ID}",
        "environment": "{Default Environment}",
        "host": ""
    },
    "otherProfile": {
        "username": "",
        "password": "",
        "organization": "",
        "environment": "",
        "host": ""
    },
    "connAppProfile": {
        "client_id": "",
        "client_secret": "",
        "organization": "",
        "environment": "",
        "host": ""
    }
}
Settings.xml
In the settings.xml file, we need to have the configuration for the CI process where maven should retrieve dependencies for the application being built. Set the Anypoint username, password, and the Organization ID for the specific Anypoint exchange where dependencies reside.
<settings>
    <servers>
        <server>
            <id>anypoint-credentials</id>
            <username>{Anypoint Username}</username>
            <password>{Anypoint Password}</password>
        </server>
    </servers>
    <profiles>
        <profile>
            <id>Mule</id>
            <activation>
                <activeByDefault>true</activeByDefault>
            </activation>
            <repositories>
                <repository>
                    <id>anypoint-credentials</id>
                    <name>Anypoint Platform Exchange Repository</name>
                    <url>https://maven.anypoint.mulesoft.com/api/v3/organizations/{Organization ID}/maven</url>
                    <layout>default</layout>
                    <releases>
                        <enabled>true</enabled>
                    </releases>
                    <snapshots>
                        <enabled>true</enabled>
                    </snapshots>
                </repository>
                <repository>
                    <id>anypoint-exchange</id>
                    <name>Anypoint Exchange</name>
                    <url>https://maven.anypoint.mulesoft.com/api/v3/maven</url>
                    <layout>default</layout>
                </repository>
                <repository>
                    <id>mulesoft-releases</id>
                    <name>MuleSoft Releases Repository</name>
                    <url>https://repository.mulesoft.org/releases/</url>
                    <layout>default</layout>
                </repository>
            </repositories>
        </profile>
    </profiles>
</settings>
Setting the CI Environment
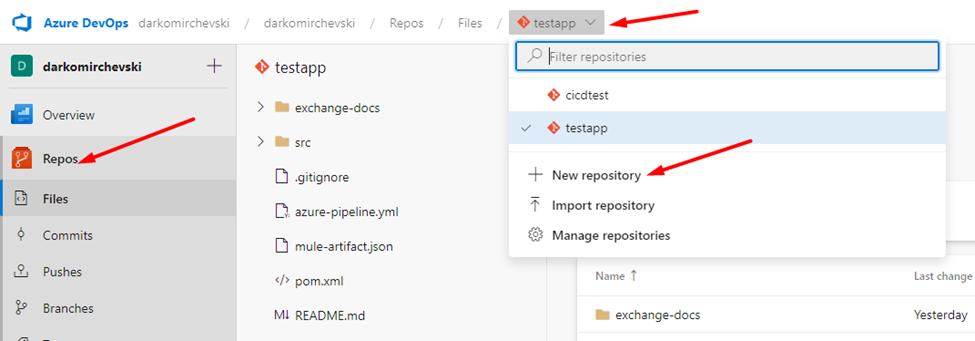
Git repository
In Azure Repos, you should have a Git repository for each of the applications. Creation of a repository on Git Repos is simple. Navigate to the Azure Repos and under Files, locate the current repository, and with a click it will show you the option to create a new repository.
After that, you can clone the repository in one of your favorite git clients, in the example source tree. You can proceed to create the branches for dev, qa, and the main branch where the application will reside.
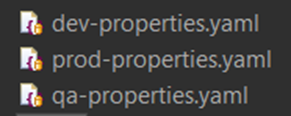
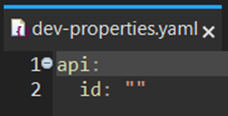
Properties files
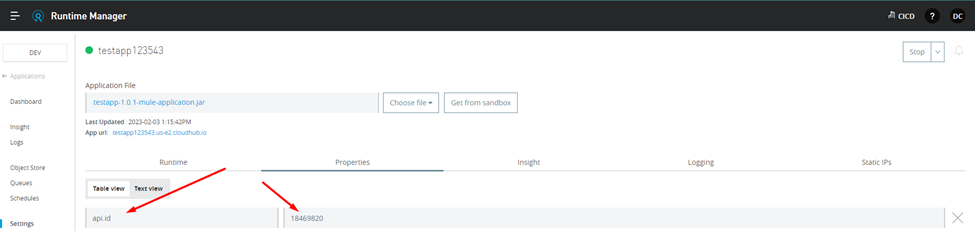
In each of the applications you need to have a properties file for each of the Anypoint Runtime target environments and in each of them, you should have the property api.id as a placeholder for the linking phase of the application with the corresponding API Manager Instance.
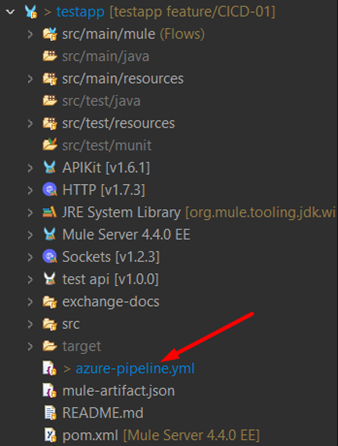
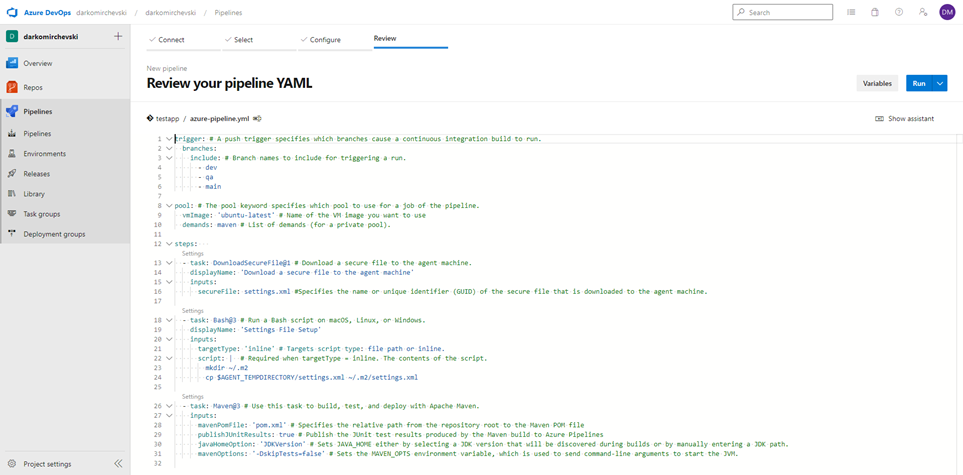
Azure-pipeline.yml
Each Application should have the azure-pipeline.txt file (The file is formatted in YAML format, just change the extension to .yml) that is required for the build process(CI) of the Artifact. The only specific lines are 43, 51, and 59 where you need to provide a specific name for the Artifact that will be built in the CI process (example: 43: testapp-dev-ci, 51: testapp-qa-ci, 59: testapp-prod-ci). The Azure build file is explained with comments on each row.
Pipeline
After that, we need to set up our Pipeline that will be responsible for building the artifact from our source code. Navigate to the Pipelines listing and on the top right corner click on New pipeline.
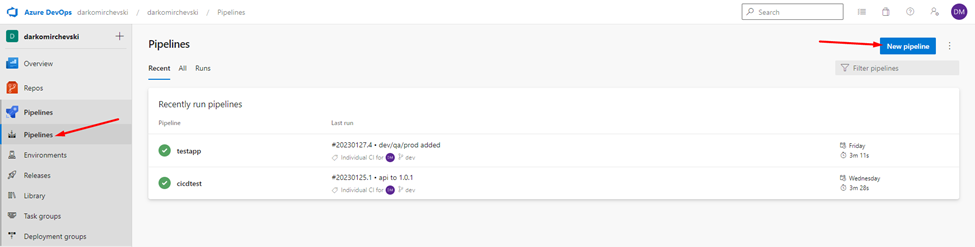
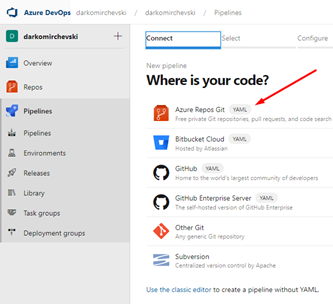
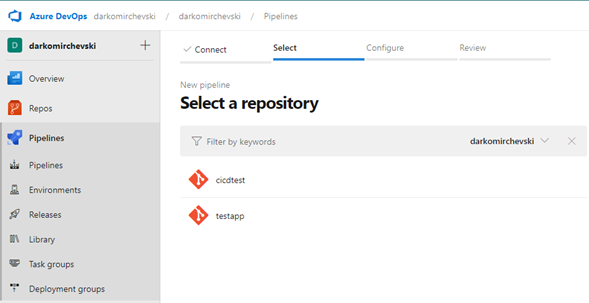
The next windows that will be shown have 4 tabs that should be configured. The first one will ask for your code location, and in our case, it is Azure Repos Git, the second stop will ask for the repository where the application with the azure-pipeline.yml files is present, in our case testapp.
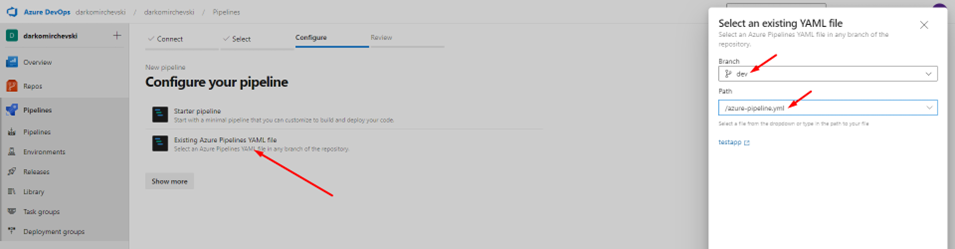
The third step is asking if you already have set up Azure pipeline file or if you want to start from scratch, in this case, you will have the pipeline file and after choosing the second option you will need to provide the branch of the application and select the path that will reference the pipeline file.
Once you have selected the pipeline file, the file will be presented, and you will have the opportunity to make changes to it. Once you have confirmed that everything is as it should be, proceed by clicking the Run button located in the top right corner, which will initiate the CI process for the first manual time and generate the Artifact. Subsequently, the automatic CI building process will be executed each time new code is pushed to the dev, qa, or main branch. It is also possible to initiate manual pipelines at any point in time.
Setting the CD Environment
After the CI process comes the CD process where you need to set the environment because it ensures that software changes are automatically deployed in a consistent and reliable manner.
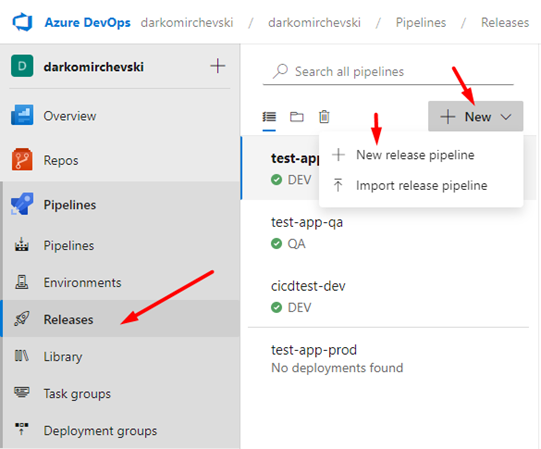
Release
In Releases under Pipelines under the search bar, click on New -> New release pipeline.
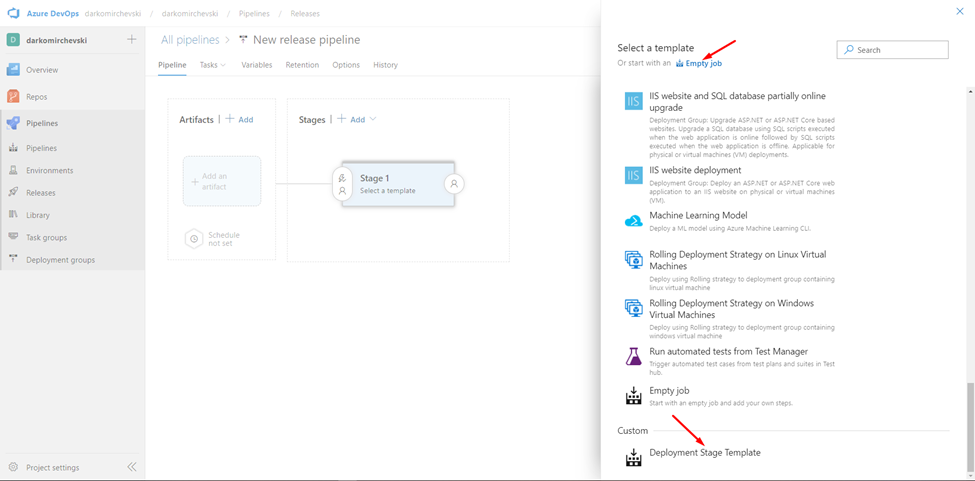
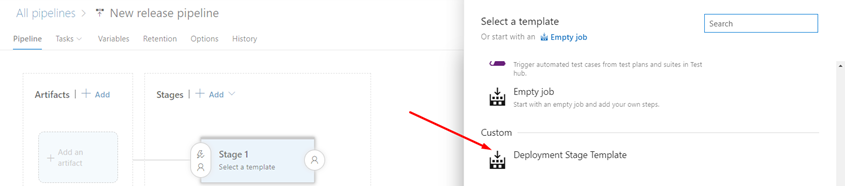
In the next window, you will be prompted to select a template or start with empty job. In the example, you will proceed with an empty job and create a template with common steps for each release by yourself for the next releases that will be created.
Artifact
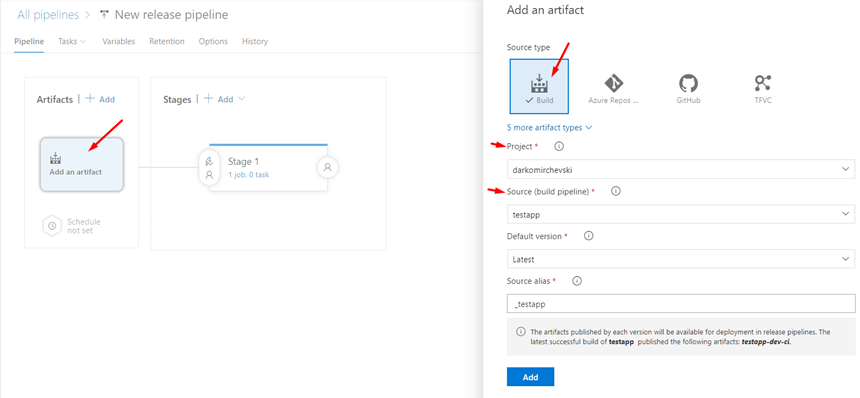
You need to provide an Artifact and you can do it by clicking on the Artifact rectangle.
For Source Type we select Build, then we select the project and the build pipeline. When you check that everything is as expected proceed to Add.
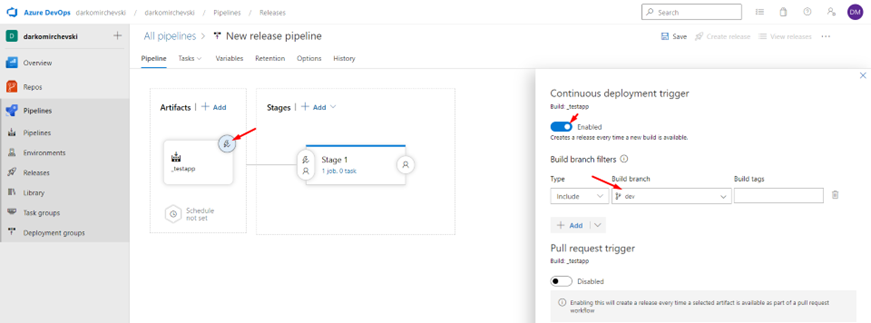
Next, click on the Lightning circle icon surrounding the Artifact and configure the continuous deployment trigger. This feature must be enabled, and the appropriate build branch should be chosen based on specific requirements. For instance, in the example, the build branch is set as “dev”.
Stage
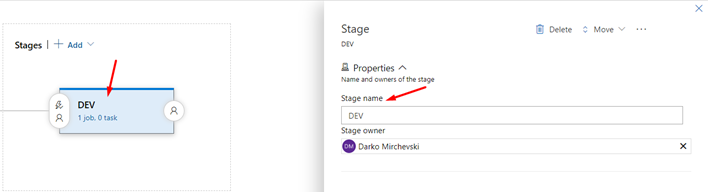
You can modify the name of the sole stage, which is initially labeled as “Stage 1,” to one of the three environments that will be impacted by this release (this is purely a display name with no additional functionality). To do so, click on the rectangle labeled “Stage 1,” and on the right-hand window, type in the desired name. For example, in this case, the name is changed to “DEV”.
Tasks
After that, we navigate to the tab Tasks next to the Pipeline tab, where you will see the Stage name that you added in the step before. Right on the Agent job, there is ”+” sign that is used to add our required tasks. We need to add a total of 2 tasks.
- Download secure file
- Bash
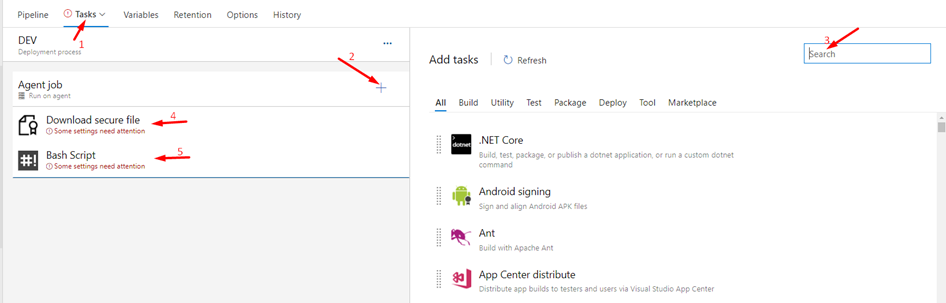
It should look like this. In the next step, we will configure the just-added tasks.
Download secure file
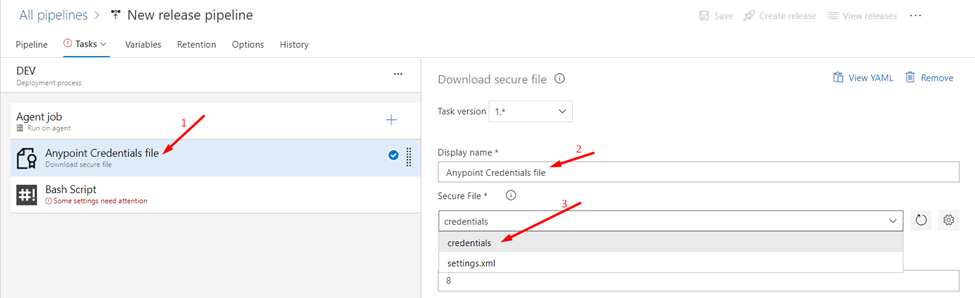
Configure the Download secure file with the display name of “AnyPoint Credentials File” and in the Secure file tab, we need to provide the credentials file that we added in the Secure files panel in the Library.
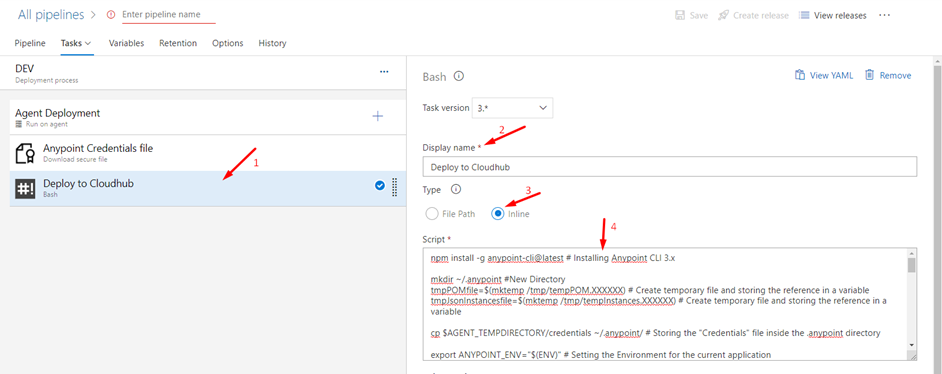
Configure the Bash Script by changing the Display name to “Deploy to Cloudhub”, and the Type to Inline, and in the Script, insert the script in this file cd-script.txt. The script will be the same for each application/environment and each line will be commented for future reference.
Create template
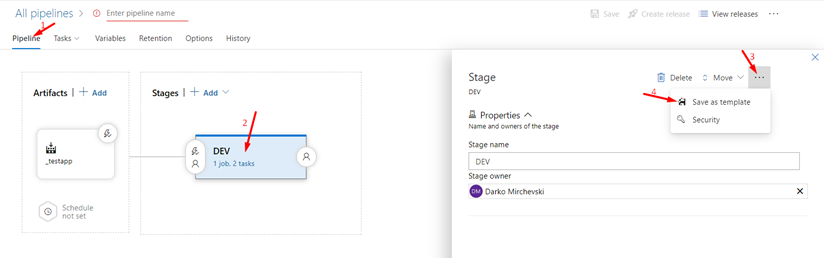
Since this Stage containing the Tasks is common for each application, we can save it as a template for the next applications/environment. Return to the pipeline tab and click on the Stage rectangle in the window there are three dots where the Save As template option is shown. Set the name as “Deployment Stage Template” and press OK.
When creating a new Release, you can use a template to automatically generate the necessary Stages, without the need for any additional configuration.
Variables
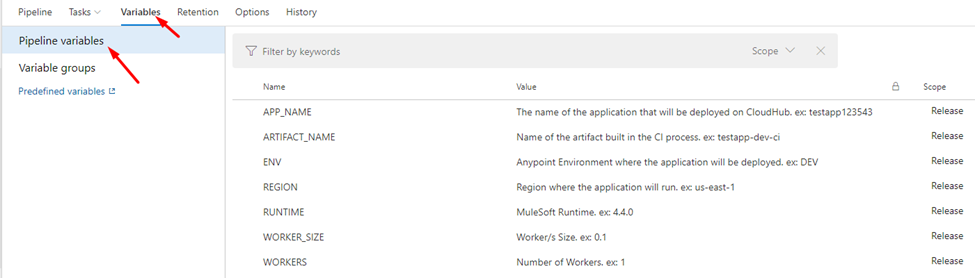
Up next in the Variables tab under Pipeline variables, we need to provide specific variables for the current application and the target environment. In the example below there is a description for each required variable and example.
Right after setting the Pipeline variables, we proceed to link the Variable group that contains Business Group credentials. Variable groups were created in the steps before and they reside in the Library same as Secure files under Pipelines. After linking the specific variable group, we proceed with the “Link” button.
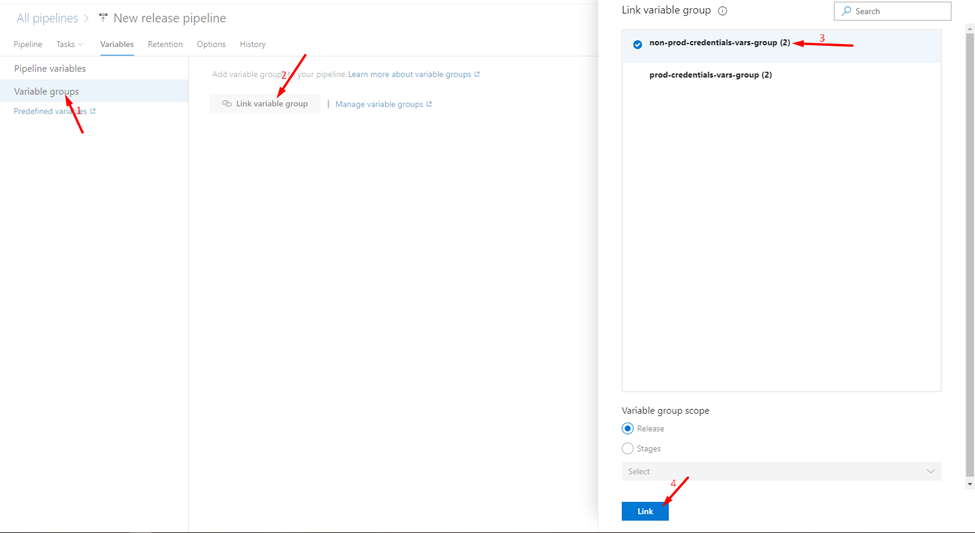
The last step for the creation of the Release pipeline is to name it and save it under your desired structure. You can check the process in the image below.

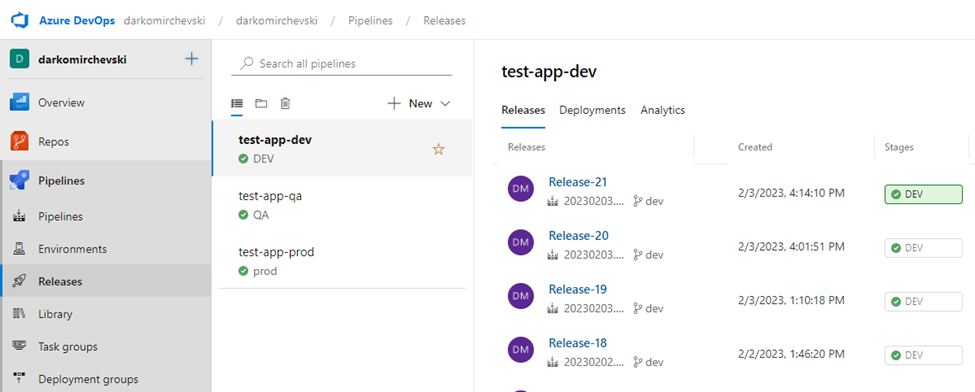
Each application should have a Release for each of the Anypoint Runtime target environments, so we can deploy to each environment as per requirements. The example above was only for the dev environment. If we want to deploy the application to QA and prod, we should create two more Releases that will trigger new artifacts built from their respective git branches. You can see an example in the image below.
Process
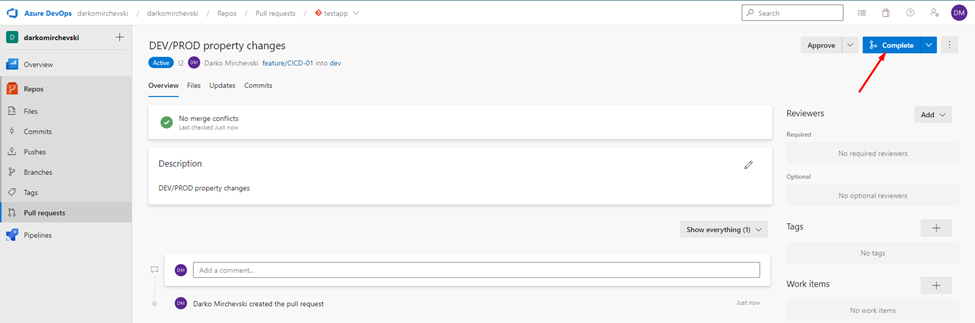
During the development process, developers typically focus on feature branches. Once a functional version of the software has been created, the developer will initiate a Pull Request (PR) for the Development environment (dev). Upon completion of a review and approval of the PR, the code changes are merged into the dev branch.
Given that our existing CI/CD solution has triggers established for the dev, qa, and main branches, any new updates introduced into the DEV branch will automatically initiate the CI process.
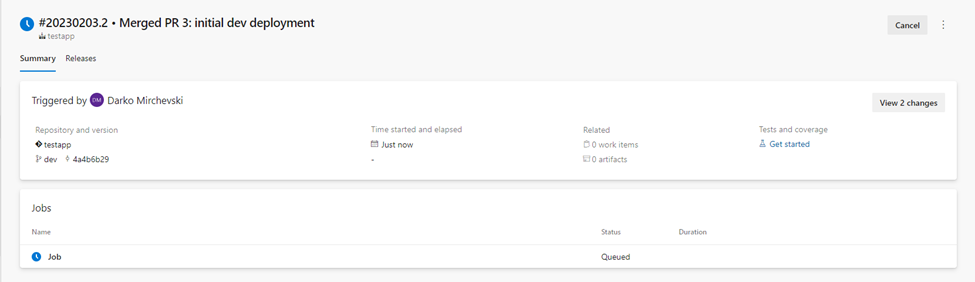
Once the Artifact is built and published for DEV deployment, the CD process will start.

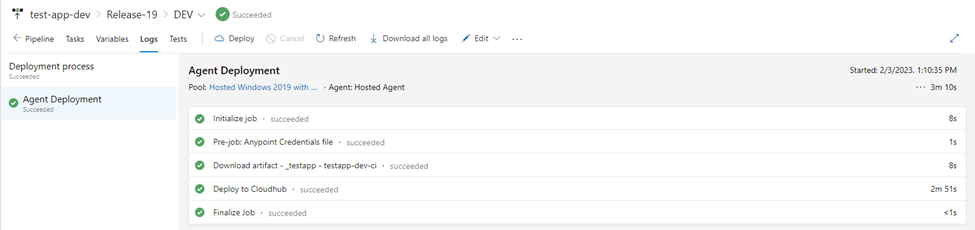
The CD process will be activated by the new Artifact build from the dev branch and will utilize the Azure Agent in accordance with our established settings. Initially, the job will be initialized, followed by retrieval of the Anypoint credentials file, download of the newly-built Artifact, and ultimately execution of the deployment bash script.
First Deployment
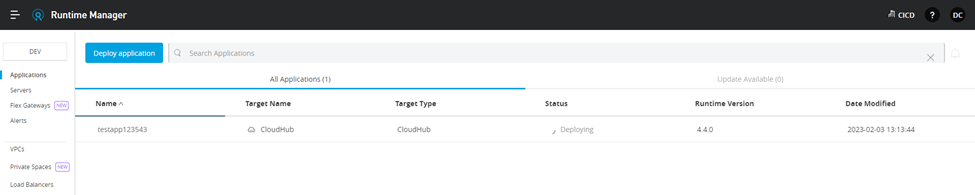
After successful completion of the CD process, we can check the results on the Anypoint Platform. Go to Runtime Manager for the specific environment and you should see the application being deployed.
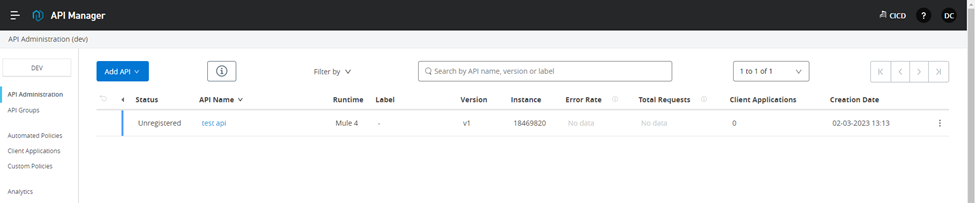
Proceed to API Manager for the specific environment and you should see the newly created API instance that will be Unregistered since the application is still deploying.
Once the application is deployed…
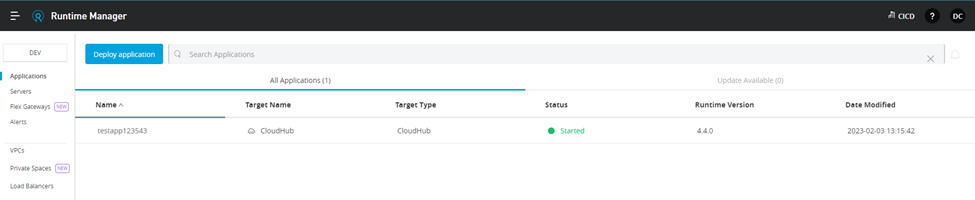
We can check that the status of the API instance changed to Active and it is linked with the application we just deployed.
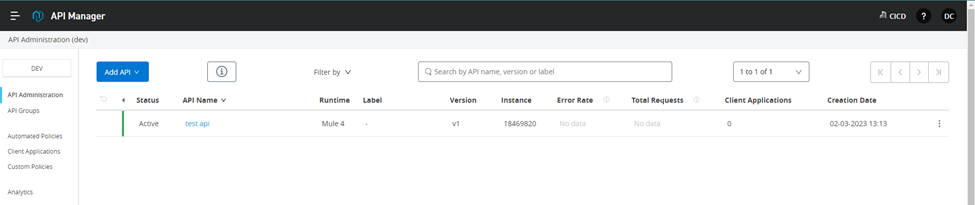
This is because the Bash script creates an API Instance and links it with the application being deployed over the placeholder api.id is added in the property’s files over the Runtime properties.
Redeployment
If the application was already deployed to some specific environment and an API instance was already created, the CD process will redeploy the application on Anypoint Runtime with the newly built Artifact and the API Instance version on API Manager will be updated to the one specified in the Artifact itself.
Summary
Continuous integration and continuous deployment (CI/CD) is a development practice that automates the process of building, testing, and delivering software. By implementing CI/CD, organizations can improve their software development cycle and reduce the risk of manual errors.
This blog provides a step-by-step guide to implementing CI/CD for a MuleSoft application using Azure DevOps. Azure DevOps is a cloud-based platform that provides tools and services for development teams to plan, develop, test, and deliver software.
The blog covers the following steps:
- Setting up the MuleSoft environment in Azure DevOps
- Creating a CI/CD pipeline using Azure DevOps pipeline
- Integrating MuleSoft with Azure DevOps
- Automating the build and deployment process
- Monitoring and maintaining the CI/CD pipeline.
By following these steps, organizations can benefit from a streamlined and automated software development cycle, resulting in faster delivery of applications and improved software quality.