
DevOps engineers in 2024 are at the forefront of the constantly changing field of cybersecurity and are responsible for protecting the vulnerability and network security of their organizations’ sensitive data. As gatekeepers of complex and ever-changing infrastructures, they are continually challenged to anticipate malware, cyberattacks, ransomware attacks, and overcome emerging hacker threats. Honeypots and honeytokens emerge as effective defenses, leveraging deception to strengthen organizational security against cyber threats.

What Are Honeypots and Honeytokens in Modern Cybersecurity?
Honeypots represent imitated resources strategically placed to attract and capture cyber attackers. These decoys resemble genuine IT resources such as servers, applications, or network services and are purposefully designed to be vulnerable to unauthorized access. Interacting with a honeypot provides security teams with valuable insights into attacker tactics, techniques, and procedures (TTPs), allowing them to strengthen overall cybersecurity defenses.
Honeytokens, on the other hand, are discrete pieces of counterfeit data or credentials strategically embedded within an organization’s or network’s infrastructure. These deceptive elements are designed to appear legitimate and appeal to malicious actors. However, their primary function is to generate alerts upon access, allowing for early detection and response to potential security breaches.
The main difference between honeypots and honeytokens is in their deployment strategy: honeypots simulate whole infrastructures or environments, providing insights into attacker behavior, whereas honeytokens are narrowly focused on specific data or credentials, improving targeted detection capabilities.
Benefits of Honeypots and Honeytokens
Honeypots and honeytokens offer numerous security advantages in DevOps, including:
1. Early Detection and Rapid Response: When an attacker interacts with a honeypot or uses a honeytoken, the security team receives an immediate alert, allowing them to identify and respond to the threat before it causes significant damage.
2. Threat Intelligence Gathering: By observing the behavior of attackers who use honeypots or honeytokens, security teams can acquire valuable insights into cybercriminal tactics, techniques, and motivations. This data can then be used to improve detection and prevention strategies.
3. Deception and Misdirection: Honeypots and honeytokens can effectively deceive and mislead attackers, diverting their attention away from legitimate resources and toward deceptive resources. This can interfere with an attacker’s progress and make it more challenging to achieve their goals.
4. Improved Incident Response: Data collected from honeypots and honeytokens can provide critical evidence and context during incident response, allowing security teams to better understand the scope and impact of a breach, as well as the attacker’s tactics.
5. Proactive Defense: By actively engaging and studying attackers, organizations can gain a better understanding of the changing threat landscape and develop more effective countermeasures, thereby transitioning from a reactive to a proactive cybersecurity posture.
Case Study: University Honeypot Implementation
A case study from a Danish university provides a real-world example of how to implement a honeypot strategy in a DevOps environment. To gain real-time insights into cyber attack attempts against the institution, the university implemented a honeypot system that was integrated with its network infrastructure.
The main aspects of their honeypot implementation were:
· The honeypots were located on a virtual private server (VPS) outside the university’s main firewall, and traffic to and from the VPS was controlled by a separate firewall.
· To make the honeypot containers appear as legitimate targets, multiple secondary network interfaces were created and public IP addresses assigned to them.
· The Graylog log management tool was used to centralize the honeypot logs, which were stored in Elasticsearch and MongoDB.
Honeypots Benefits and Outcomes for Cyber Threats
After the honeypot was deployed in May 2019, the university monitored its activity for 30 days. Some of the main benefits and outcomes they observed are:
· The honeypots detected various attacks against various protocols, including SSH, Telnet, FTP, and HTTP. This provided the university with real-time insight into the changing threat landscape.
· The honeypot data enabled the university to analyze the attackers’ tactics, techniques, and procedures (TTPs), allowing them to strengthen their overall cybersecurity posture.
· By integrating the honeypot into its existing network infrastructure, the university collected valuable threat intelligence with minimal additional overhead or complexity.
This case study demonstrates that honeypots can be a valuable supplement to other cybersecurity measures; however, the honeypot type and architecture must be carefully selected to ensure effective results.
Implementation Tips and Best Practices
Honeypots and honeytokens in an environment require meticulous planning and execution. Below are some best practices to consider:
1. Clearly Define Objectives: Identify the specific security goals you want to achieve with honeypots and honeytokens, such as early threat detection, intelligence gathering, or improved incident response.
2. Carefully Select Targets: Determine your infrastructure’s most valuable and vulnerable assets that appeal to attackers, and concentrate your honeypot and honeytoken deployment in these areas.
3. Ensure Realistic Deployment: Honeypots and honeytokens must be designed to blend seamlessly with your infrastructure and data, making them indistinguishable from the real thing in order to avoid detection by sophisticated attackers.
4. Implement Robust Monitoring and Alerting: Connect your honeypots and honeytokens to your security information and event management or other monitoring tools to ensure timely detection and response to any suspicious activity.
5. Maintain and Evolve: Review and update your honeypot and honeytoken configurations regularly to keep up with changing attacker tactics and technologies, as well as to ensure their long-term effectiveness.
6. Comply with Legal and Ethical Considerations: To avoid potential legal or reputational risks, ensure that your honeypot and honeytoken deployment comply with all applicable laws, regulations, and ethical guidelines.
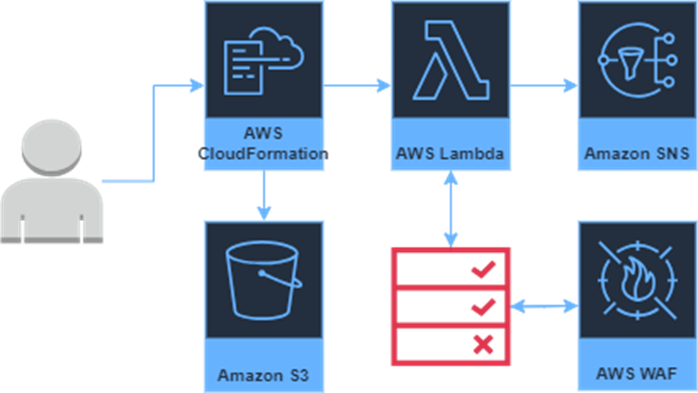
Implementing a Honeypot Strategy Using AWS CloudFormation
For this blog, we will demonstrate how to create a simple honeypot setup using AWS CloudFormation as our Infrastructure as Code (IaC) solution. This segment will show how to deploy a sample infrastructure using AWS services such as S3, CloudFront, Lambda@Edge, WAFv2, and SNS. Together, these components create a honeypot environment that detects and responds to potential threats in real time.
Prerequisites:
· AWS Account: You’ll need an active AWS account to access AWS services and use CloudFormation to manage resources.
· AWS CLI (Command Line Interface): Installing and configuring the AWS CLI on your local machine can streamline CloudFormation operations by allowing you to manage AWS services from the command line.
· AWS IAM Permissions: Ensure your AWS account has IAM permissions set up correctly. These permissions should allow creating and managing CloudFormation stacks, including essential operations like create-stack, update-stack, and delete-stack.
Below is the CloudFormation template you can use to create this infrastructure:
AWSTemplateFormatVersion: "2010-09-09"

Parameters:
  S3BucketName:
    Type: String
    Description: Name for the S3 bucket

Resources:
  HoneypotContentBucket:
    Type: "AWS::S3::Bucket"
    Properties:
      BucketName: !Ref S3BucketName

  HoneypotS3BucketOwnershipControls:
    Type: "AWS::S3::BucketOwnershipControls"
    Properties:
      Bucket: !Ref HoneypotContentBucket
      OwnershipControls:
        Rules:
          - ObjectOwnership: "BucketOwnerPreferred"

  HoneypotS3BucketPublicAccessBlock:
    Type: "AWS::S3::BucketPublicAccessBlock"
    Properties:
      Bucket: !Ref HoneypotContentBucket
      BlockPublicAcls: true
      BlockPublicPolicy: true
      IgnorePublicAcls: true
      RestrictPublicBuckets: true

  HoneypotS3BucketPolicy:
    Type: "AWS::S3::BucketPolicy"
    Properties:
      Bucket: !Ref HoneypotContentBucket
      PolicyDocument:
        Version: "2012-10-17"
        Statement:
          - Effect: "Allow"
            Principal:
              AWS: "arn:aws:sts::12345678912:assumed-role/user"
            Action:
              - "s3:PutBucketPolicy"
            Resource: !Sub "arn:aws:s3:::${HoneypotContentBucket}"
          - Effect: "Allow"
            Principal:
              CanonicalUser: !GetAtt HoneypotCloudFrontOAI.S3CanonicalUserId
            Action:
              - "s3:GetObject"
            Resource: !Sub "arn:aws:s3:::${HoneypotContentBucket}/*"

  HoneypotIpBlocklist:
    Type: "AWS::WAFv2::IPSet"
    Properties:
      Name: "honeypot-ip-blocklist"
      Description: "IP Blocklist for Honeypot Protection"
      Scope: "CLOUDFRONT"
      IPAddressVersion: "IPV4"

  HoneypotWafAcl:
    Type: "AWS::WAFv2::WebACL"
    Properties:
      Name: "honeypot-waf-acl"
      Description: "WebACL for Honeypot Protection"
      Scope: "CLOUDFRONT"
      DefaultAction:
        Allow: {}
      Rules:
        - Name: "honeypot-log-requests"
          Priority: 1
          Action:
            Count: {}
          Statement:
            IPSetReferenceStatement:
              ARN: !GetAtt HoneypotIpBlocklist.Arn
          VisibilityConfig:
            CloudWatchMetricsEnabled: true
            MetricName: "honeypot-log-request-metric"
            SampledRequestsEnabled: true
      VisibilityConfig:
        CloudWatchMetricsEnabled: true
        MetricName: "honeypot-waf-metric"
        SampledRequestsEnabled: true

  HoneypotLambdaRole:
    Type: "AWS::IAM::Role"
    Properties:
      RoleName: "honeypot-lambda-role"
      AssumeRolePolicyDocument:
        Version: "2012-10-17"
        Statement:
          - Effect: "Allow"
            Principal:
              Service:
                - "lambda.amazonaws.com"
                - "edgelambda.amazonaws.com"
            Action: "sts:AssumeRole"

  HoneypotLambdaBasicExecutionPolicy:
    Type: "AWS::IAM::Policy"
    Properties:
      PolicyName: "honeypot-lambda-basic-execution"
      Roles:
        - !Ref HoneypotLambdaRole
      PolicyDocument:
        Version: "2012-10-17"
        Statement:
          - Effect: "Allow"
            Action: "logs:*"
            Resource: "*"

  HoneypotLambdaWafPolicy:
    Type: "AWS::IAM::Policy"
    Properties:
      PolicyName: "honeypot-lambda-waf-policy"
      Roles:
        - !Ref HoneypotLambdaRole
      PolicyDocument:
        Version: "2012-10-17"
        Statement:
          - Effect: "Allow"
            Action:
              - "wafv2:GetIPSet"
              - "wafv2:UpdateIPSet"
              - "sns:Publish"
            Resource:
              - !Ref HoneypotIpBlocklist
              - !Ref HoneypotSNSTopic

  HoneypotLambdaFunction:
    Type: "AWS::Lambda::Function"
    Properties:
      FunctionName: "honeypot-lambda-function"
      Handler: "index.lambda_handler"
      Role: !GetAtt HoneypotLambdaRole.Arn
      Code:
        S3Bucket: !Ref S3BucketName
        S3Key: "dev/honeypot-lambda.zip"
      Runtime: "nodejs16.x"
      Timeout: 5
      MemorySize: 128
      Environment:
        Variables:
          IP_SET_ARN: !GetAtt HoneypotIpBlocklist.Arn
          SNS_TOPIC_ARN: !Ref HoneypotSNSTopic

  HoneypotCloudFrontOAI:
    Type: "AWS::CloudFront::CloudFrontOriginAccessIdentity"
    Properties:
      CloudFrontOriginAccessIdentityConfig:
        Comment: "Origin Access Identity for Honeypot Content Bucket"

  HoneypotContentDistribution:
    Type: "AWS::CloudFront::Distribution"
    Properties:
      DistributionConfig:
        WebACLId: !Ref HoneypotWafAcl
        Origins:
          - DomainName: !GetAtt HoneypotContentBucket.RegionalDomainName
            Id: "HoneypotContentS3Origin"
            S3OriginConfig:
              OriginAccessIdentity: !Sub "origin-access-identity/cloudfront/${HoneypotCloudFrontOAI}"
        Enabled: true
        IPV6Enabled: true
        Comment: "CloudFront Distribution for Honeypot Content Bucket"
        DefaultRootObject: "index.html"
        DefaultCacheBehavior:
          AllowedMethods:
            - "DELETE"
            - "GET"
            - "HEAD"
            - "OPTIONS"
            - "PATCH"
            - "POST"
            - "PUT"
          CachedMethods:
            - "GET"
            - "HEAD"
          TargetOriginId: "HoneypotContentS3Origin"
          ForwardedValues:
            QueryString: false
            Cookies:
              Forward: "none"
          ViewerProtocolPolicy: "allow-all"
          MinTTL: 0
          DefaultTTL: 3600
          MaxTTL: 86400
        CacheBehaviors:
          - PathPattern: "/honeypottest.html"
            TargetOriginId: "HoneypotContentS3Origin"
            ForwardedValues:
              QueryString: false
              Cookies:
                Forward: "none"
            TrustedKeyGroups: []
            TrustedSigners: []
            ViewerProtocolPolicy: "allow-all"
            LambdaFunctionAssociations:
              - EventType: "viewer-request"
                LambdaFunctionARN: !GetAtt HoneypotLambdaFunction.Arn
                IncludeBody: false
        PriceClass: "PriceClass_100"
        Restrictions:
          GeoRestriction:
            RestrictionType: "none"
        ViewerCertificate:
          CloudFrontDefaultCertificate: true

  HoneypotSNSTopic:
    Type: "AWS::SNS::Topic"
    Properties:
      TopicName: "honeypot-sns-topic"

  HoneypotSNSTopicPolicy:
    Type: "AWS::SNS::TopicPolicy"
    Properties:
      Topics:
        - !Ref HoneypotSNSTopic
      PolicyDocument:
        Version: "2012-10-17"
        Statement:
          - Effect: "Allow"
            Principal:
              AWS: "*"
            Action: "SNS:Publish"
            Resource: !Ref HoneypotSNSTopic

Outputs:
  HoneypotContentBucketName:
    Description: "Name of the Honeypot S3 bucket"
    Value: !Ref HoneypotContentBucket
  HoneypotLambdaFunctionARN:
    Description: "ARN of the Honeypot Lambda function"
    Value: !GetAtt HoneypotLambdaFunction.Arn
  HoneypotSNSTopicARN:
    Description: "ARN of the Honeypot SNS Topic"
    Value: !Ref HoneypotSNSTopic
To deploy this setup, we need to perform the next step:
- Using the AWS CLI, we deploy the stack with the following command:
aws cloudformation create-stack --stack-name honeypot-demo --template-body file://path/honeypot-cf-template.yml --capabilities CAPABILITY_IAM --region us-east-1
Then, using either the AWS console or the CLI, we check to see if our resources were created successfully.
Following the creation of the CloudFormation stack, we will store the Lambda function code in a separate S3 bucket (‘lambda-function-storage’) and review its IP blocking logic and functionality within the deployed honeypot infrastructure:
const AWS = require('aws-sdk');

exports.handler = async (event) => {
    const client = new AWS.WAFV2({ region: 'us-east-1' });
    const snsClient = new AWS.SNS({ region: 'us-east-1' });

    // Retrieve environment variables
    const ipSetId = process.env.IP_SET_ID;
    const snsTopicArn = process.env.SNS_TOPIC_ARN;

    const request = event.Records[0].cf.request;
    const sourceIp = request.clientIp;

    try {
        const response = await client.getIPSet({
            Name: 'honeypot-ip-blocklist',
            Scope: 'CLOUDFRONT',
            Id: ipSetId
        }).promise();
        const ipSet = response.IPSet;
        const lockToken = response.LockToken;
        const addresses = ipSet.Addresses;

        if (!addresses.includes(`${sourceIp}/32`)) {
            addresses.push(`${sourceIp}/32`);

            await client.updateIPSet({
                Name: 'honeypot-ip-blocklist',
                Scope: 'CLOUDFRONT',
                Id: ipSetId,
                Addresses: addresses,
                LockToken: lockToken
            }).promise();

            // Publish an alert to SNS
            await snsClient.publish({
                TopicArn: snsTopicArn,
                Message: JSON.stringify({ default: JSON.stringify(event) }),
                MessageStructure: 'json'
            }).promise();

            return {
                status: '200',
                statusDescription: 'Request fulfilled',
                body: `Request from ${sourceIp} is blocked`
            };
        } else {
            return {
                status: '200',
                statusDescription: 'IP already blocked',
                body: `IP ${sourceIp} is already in the IP set`
            };
        }
    } catch (error) {
        return {
            status: '500',
            statusDescription: 'Internal Server Error',
            body: error.message
        };
    }
};
Summary
Overall, honeypots and honeytokens are powerful and innovative tools for improving security. Their ability to detect threats early, collect important information, and deceive attackers makes them valuable assets for any organization. Using CloudFormation as an Infrastructure-as-Code tool, it provides us a straightforward method to set up an effective honeypot environment, thus enhancing the overall security posture.